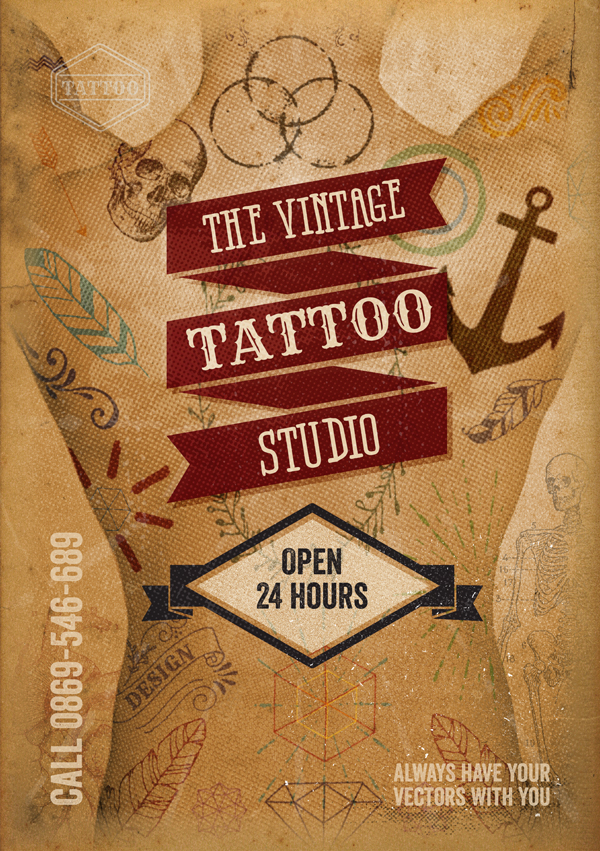
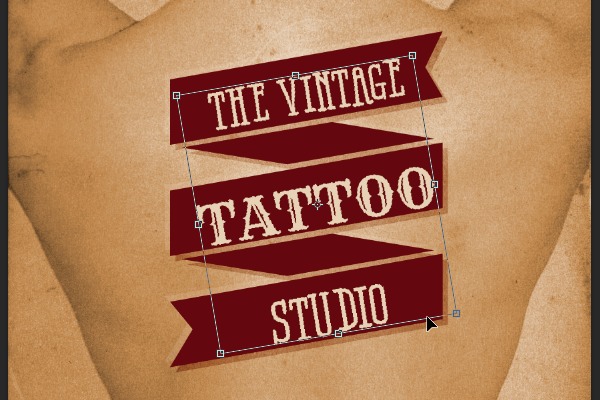
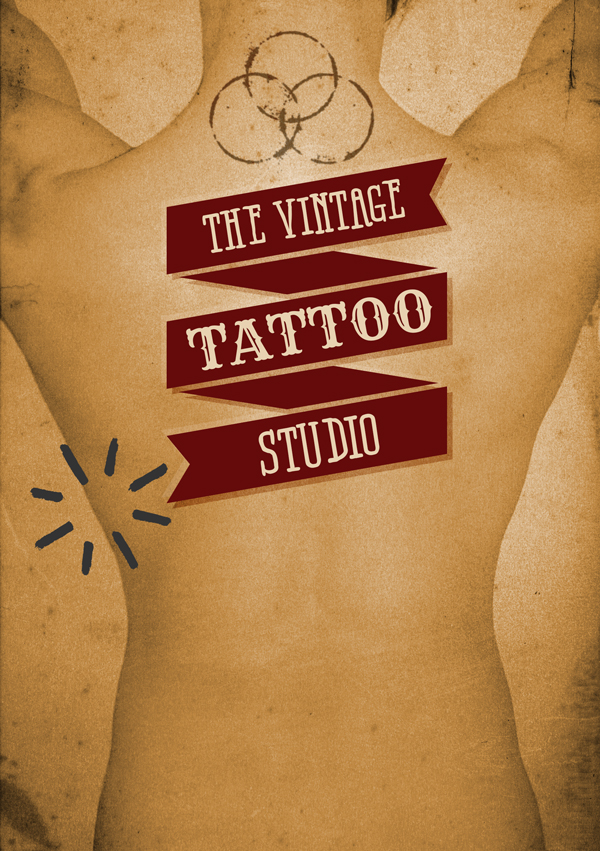
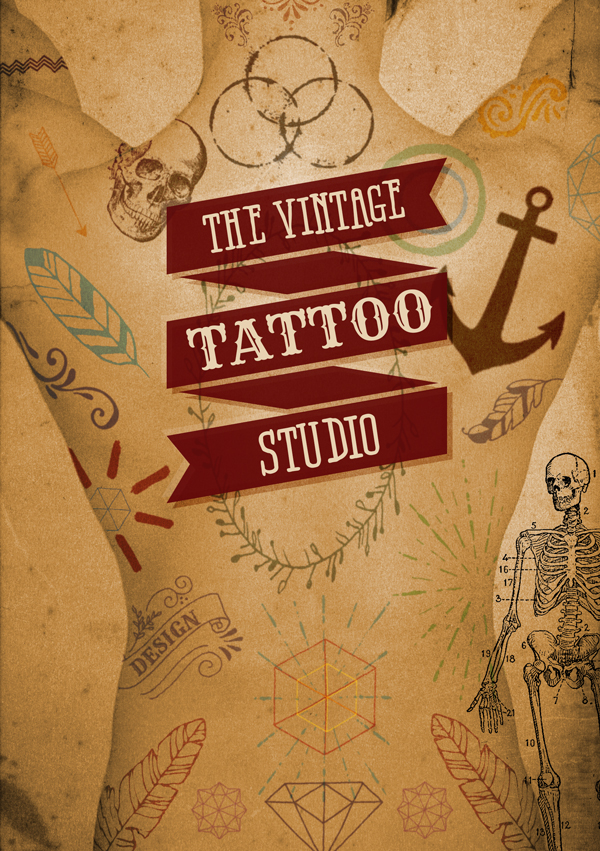
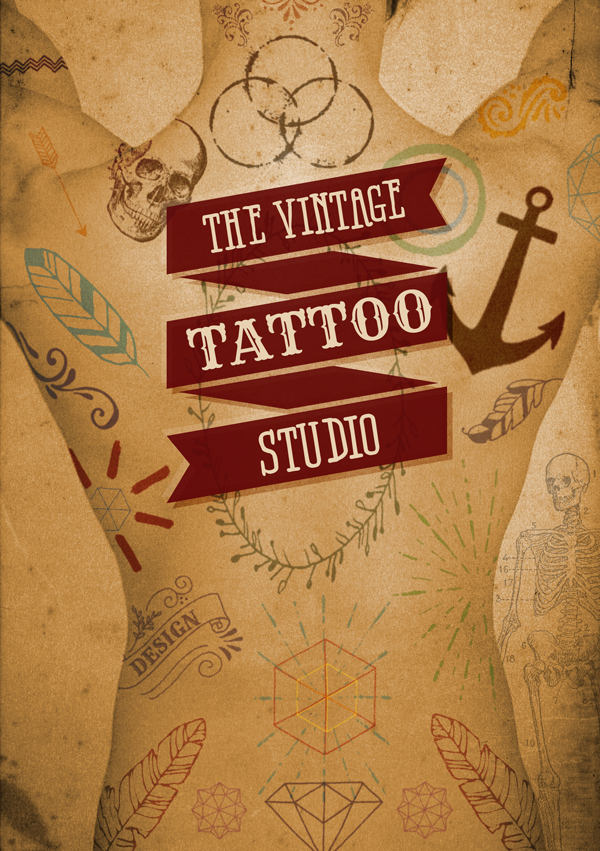
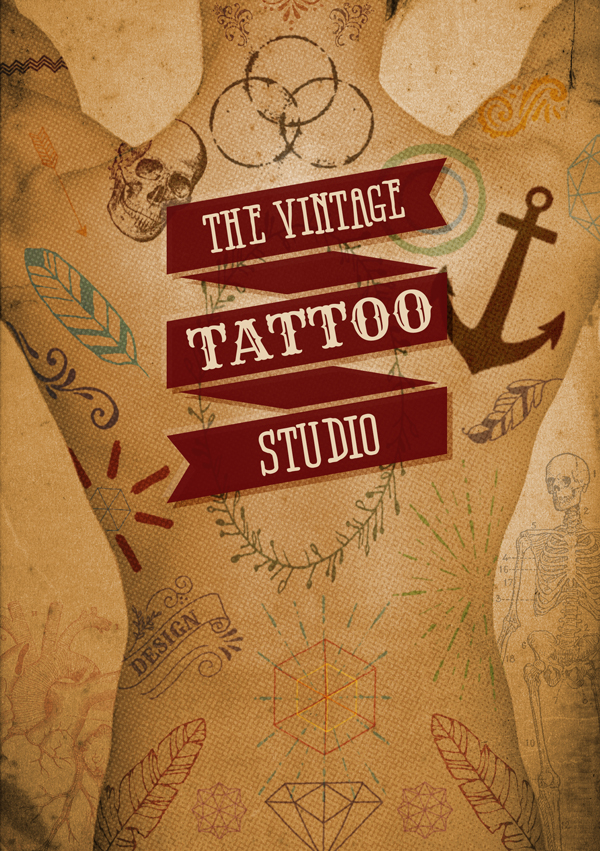
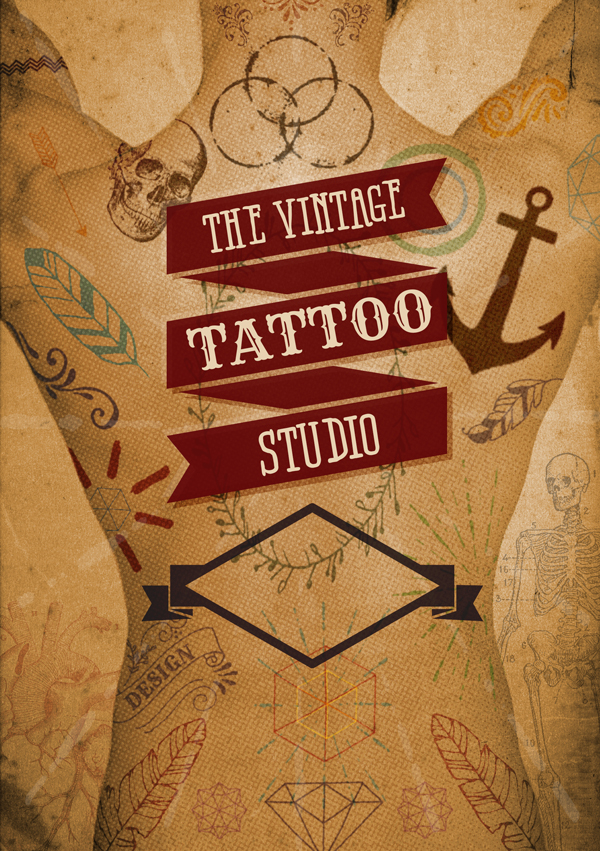
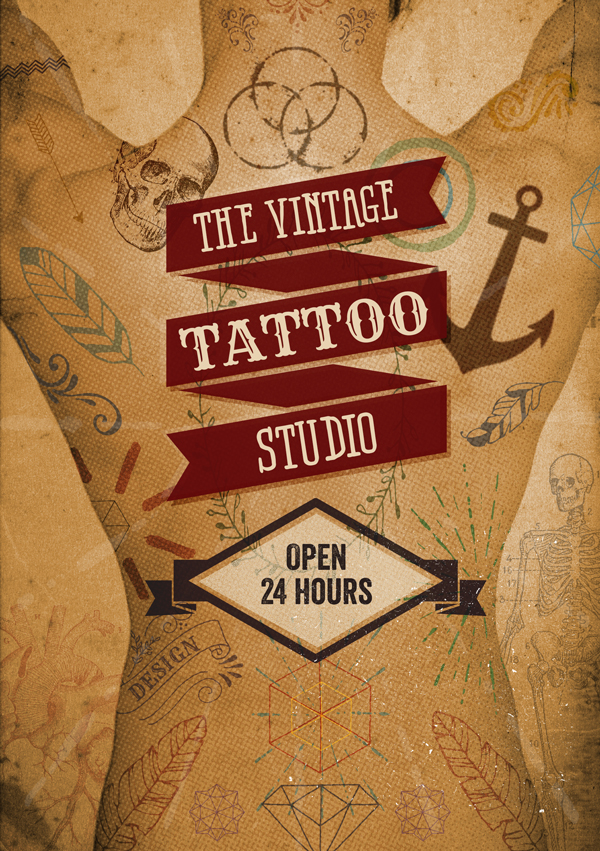
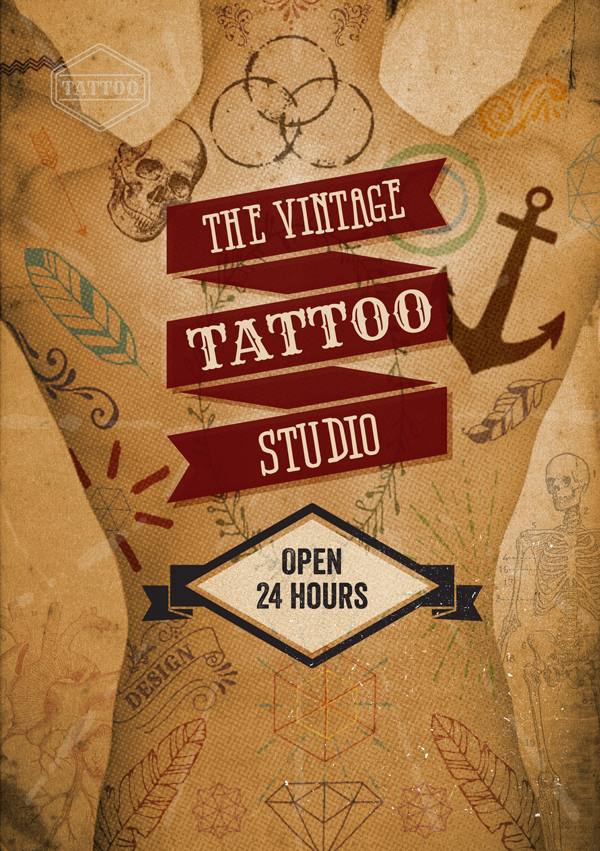
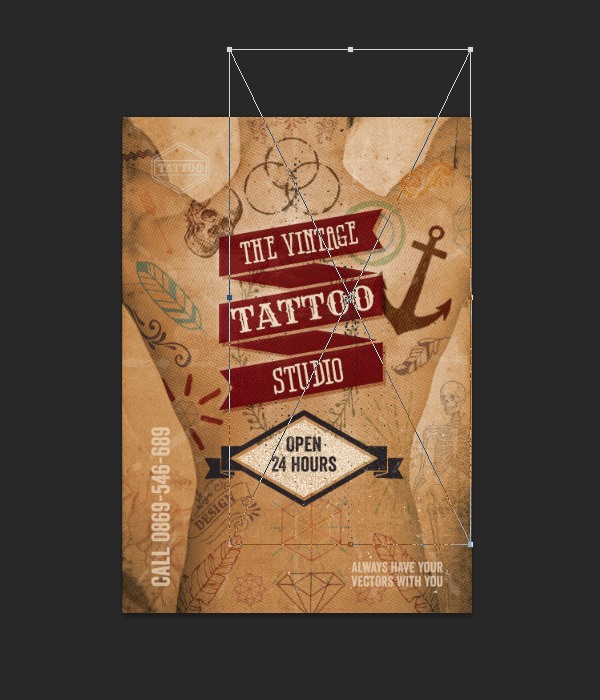
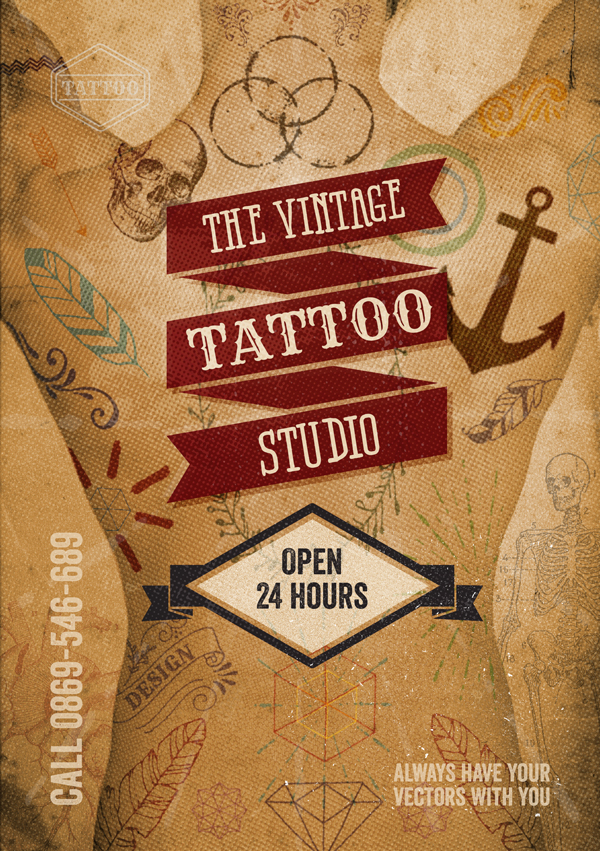
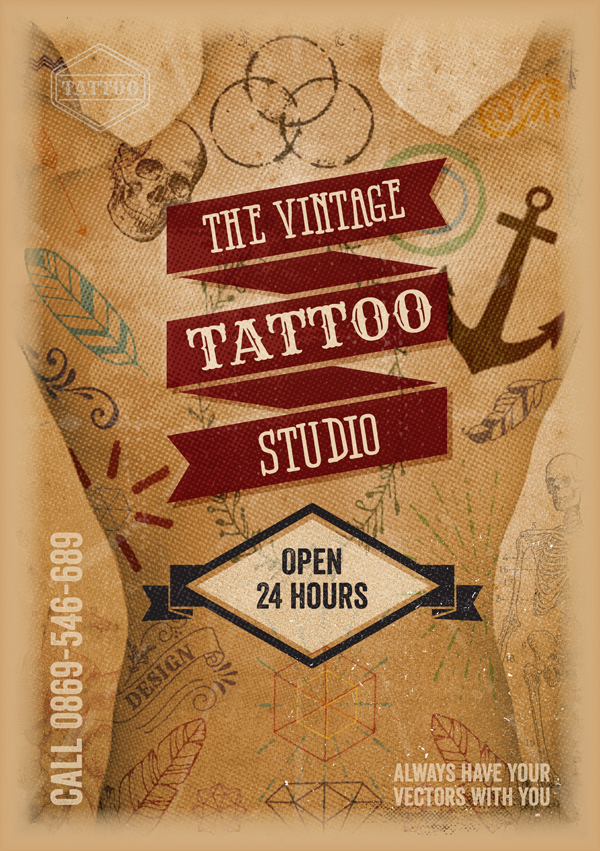
WHAT WE’RE CREATING:
Hello Design Cutters!
Jo here. Hopefully this tutorial will have you feeling a bit like a kid in a vector sweet-shop, as you’ll be able to get creative and pick-and-mix some of your favourite resources from the current vector bundle. :)
We’ll be using vectors from today’s freebie pack, plus plenty of others from the main bundle to create this vintage-inspired poster for a tattoo studio.
Hopefully, this will give you a chance to really explore the designs available, plus lean a few techniques to create realistic contouring effects and faded edges.
Ok then – let’s get stuck in!
Follow along with this tutorial: Download the freebies
Today we have another huge freebie for you design geeks to enjoy. Joseph from Ghostly Pixels has kindly put together some samples as a freebie for the Design Cuts community. These hand-drawn style vectors are perfect for your more creative projects!
Remember, this freebie is just a tiny sample taken from one of our biggest deals yet: The Ultimate Creative Vector Elements at just $29 (91% Off). We’ve partnered with 10 hugely talented design shops to bring you a vector collection that will give you infinite creative options, and a vast library of popular resources.
There are literally thousands of amazing vector items in this collection, ranging from banners, to frames, icons, textures, floral flourishes, hand-drawn doodles, clipart, shapes and much much more.
Enter your email below to download the Ghostly Pixels free sample pack, so you can follow along with this tutorial easily.
Step 1:
Open Open up a new 1748px x 2480px RGB (you’ll see why this is important in Step 3) document in Photoshop.
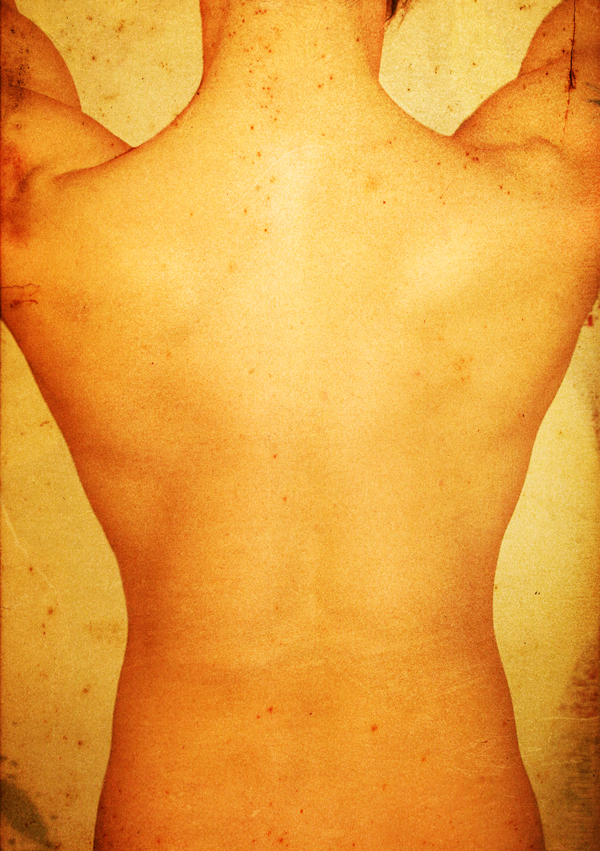
Now, we need to find a subject to decorate. As we want a fair bit of space to work with, using a fairly broad, male back makes sense.
For this tutorial, we’ll download this photograph of a back by David Shankbone from Wikipedia Commons. (Modesty filter applied to the screenshot below)! ;)

Scale the image so that it fills the canvas similar to below, and rotate slightly so that the spine is as vertically straight as possible. You can use a guide to help with the alignment:

Next, we want to get rid of the harsh shadow resulting from the camera flash. As we’ll be altering the image with the clone stamp, it’s worth creating a duplicate layer and hiding it, just in case we need to go back to the original.
Selecting the Clone Stamp Tool, choose a round brush and set the hardness to 75%. This gives us a soft, but not too soft edge. I’ve started with 100px as the size to get more coverage to start, and then reduce the size as necessary to get in to the tighter areas.

Select an area just outside of the shadow to clone and start covering the shadow. It’s a bit time-consuming, but worth it to create a much nicer finished image.

Once you’re done, select the Blur tool and using a fairly large brush at 100% strength, go over the background a few times to soften any jagged edges that using the Clone Stamp may have resulted in. A lot of these will be disguised as we add more texture, but it’s good to doing this extra step will help create a better base to work up from.

Step 2:
Next up, the trusty aged paper texture :)
We want to go for a strong, sepia tone to give the image a really vintage feel and there’s a great selection to download from The Digital Yard Sale.
I’ve gone with ‘Old Paper 1’ (second from the top) as it has a lovely rich colour, and the texture seemed quite skin-like with the speckles and blemishes, fitting with the theme.
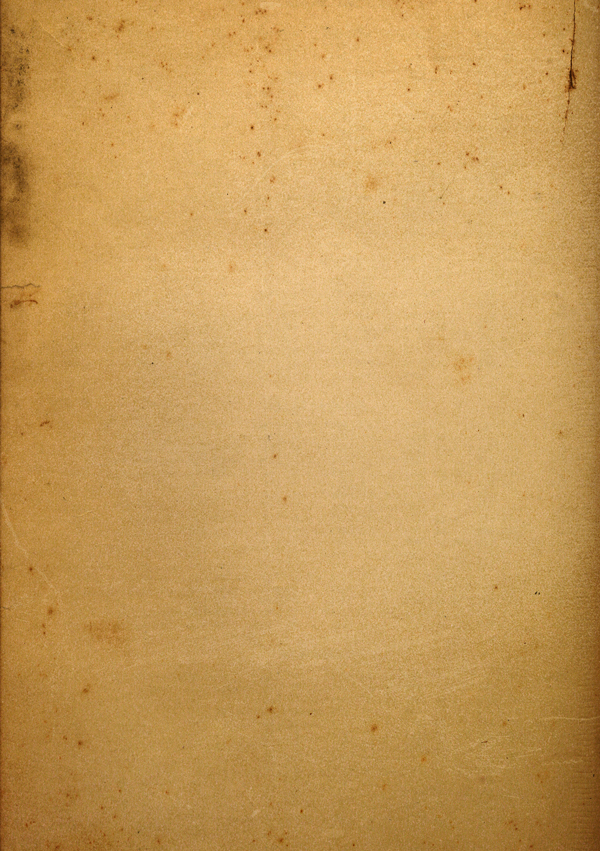
Paste it on to your Photoshop canvas and scale to fit. Once that’s done, change the blend mode to Soft Light:

Duplicate the layer, changing the blend mode to Overlay:
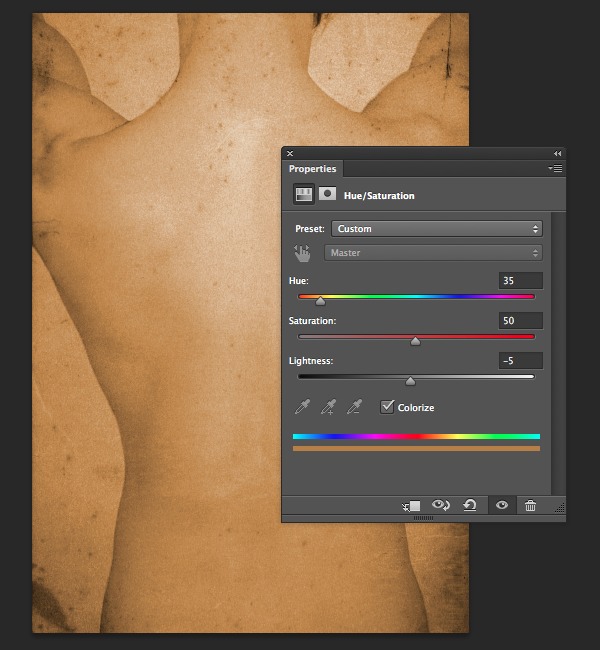
The effect is great, but could do with some toning-down. We’ll do this by adding an Hue/Saturation Adjustment Layer with the following settings:
Hue/Saturation Settings
Colorize: Selected
Hue: 35
Saturation: 50
Lightness: -5
We now have a much subtler base to make the vectors, which are going to be the stars of the show, stand out on.

As we’re going to be creating a lot of new layers, let’s keep things easy to find and place what we’ve done so far in a group called ‘Background’.
Step 3:
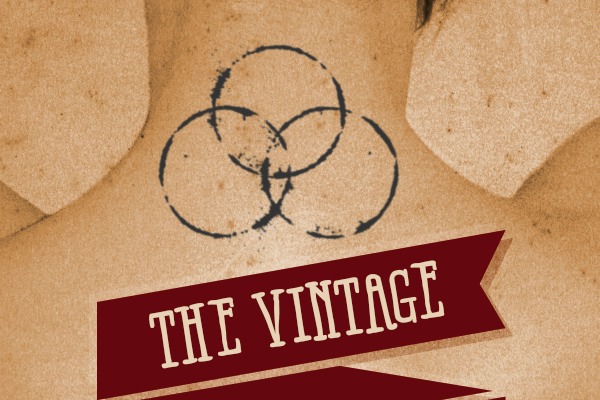
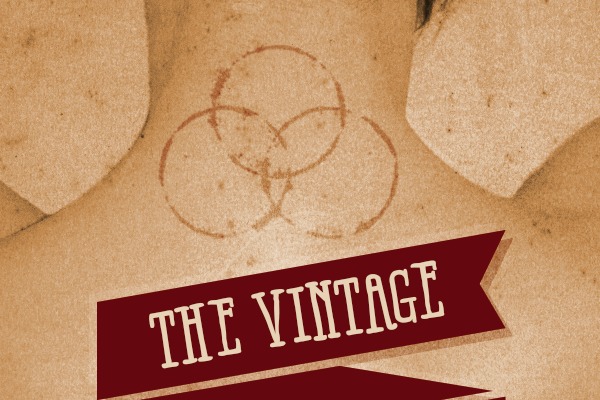
Before we go on to adding the tattoos, we’re going to create a Displacement Map. This is a technique that will allow you to wrap your images around objects, so that it matches the contours. This is a great tool to use for tattoo effects, as it will make the designs distort to match the contours of the part of the body, rather than looking like it’s jus been stuck separately on top.
You can see an example below:
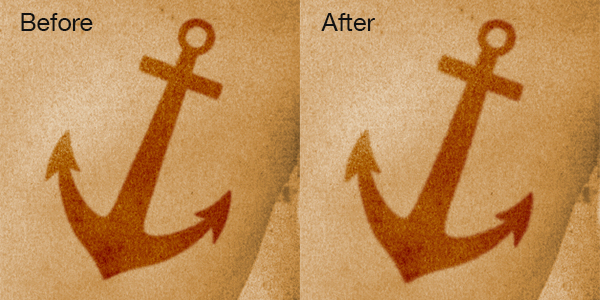
The effect will vary depending on how dramatic the contours are, but it’s a nice bit of attention to detail you can be proud of :)
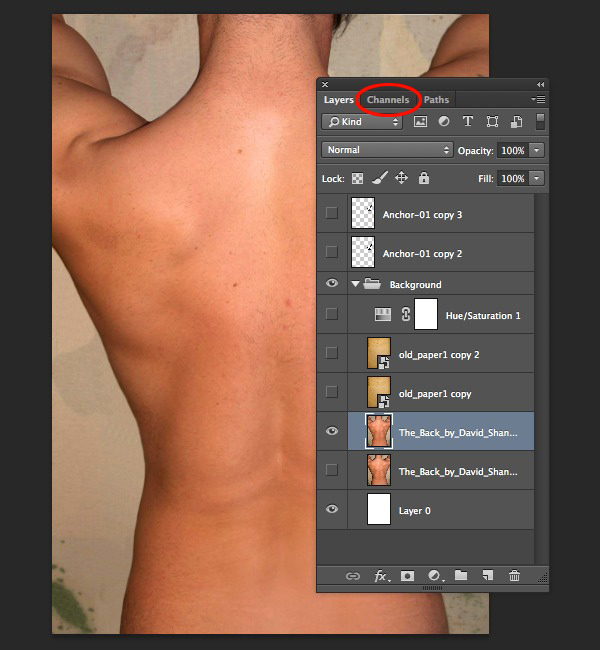
To create a Displacement map, first hide all the layers apart from the photo of the back we used the Clone Stamp on. With that layer selected, go to the ‘Channels’ tab in your layers panel:
Select the layer with highest contrast (in this case, Blue) and hide all the other layers.
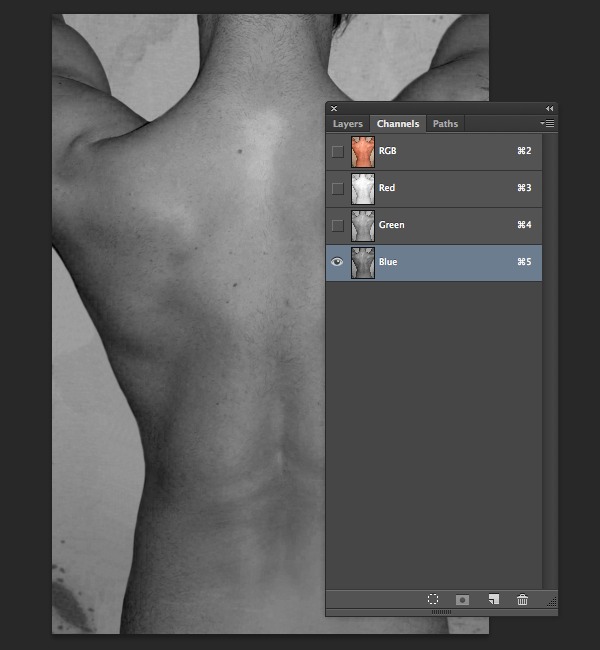
Right-click (or control + click) and select ‘Duplicate Channel’. This will open up a prompt where you can input the following details:
As: Tattoo Displacement Map
Document: New
Name: Tattoo Displacement Map
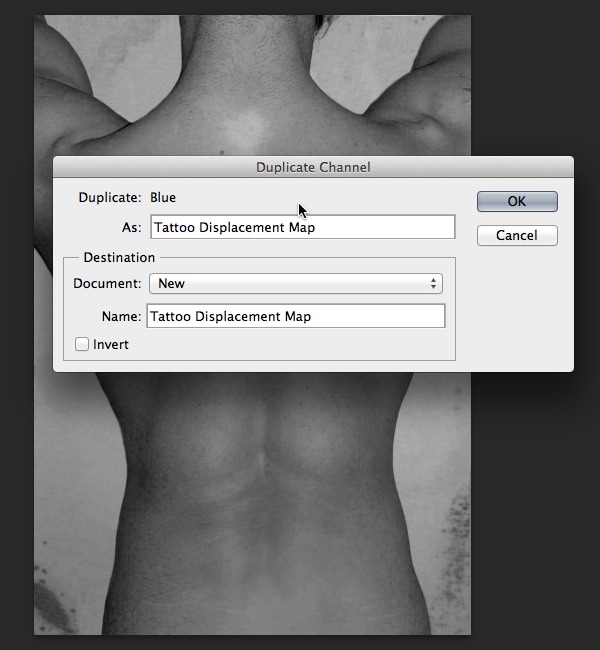
This will open up as a new document in Photoshop, which you’ll then need to save as a .PSD file. Save this somewhere easy to find for now, as we’ll be using it a lot later on in the tutorial, where we’ll be selecting this file as a ‘map’ for each of the tattoos to follow the contours of.
Go back to your original document and select the ‘RGB’ channel to return to normal, and then turn the visibility back on for your layers.
Now we’ve got our Displacement Map prepared, we can start adding some cool vector tattoos!
Step 4:
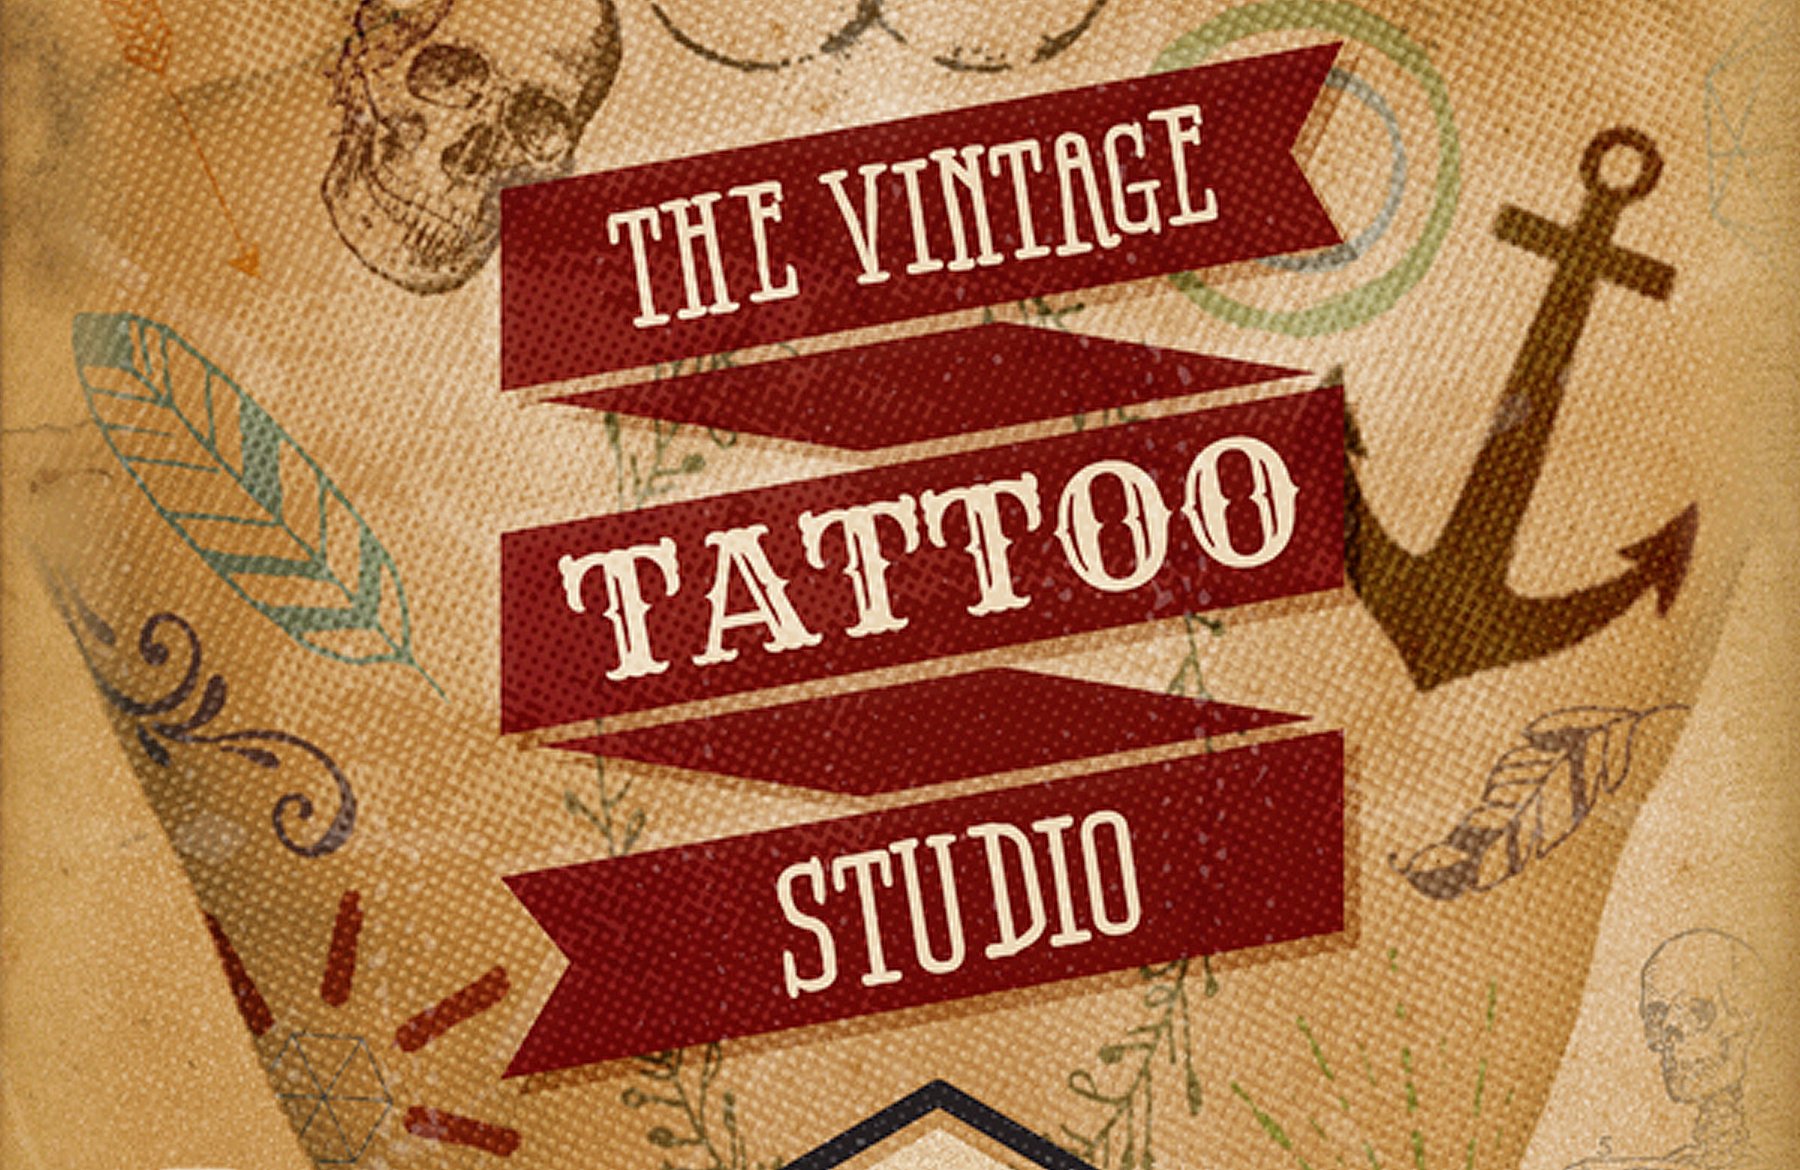
As there’s a prominent banner featured in this image, we’ll add this first so we can place our tattoos around it.
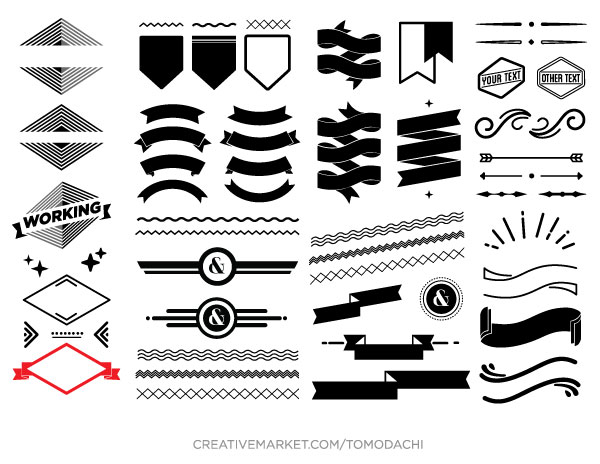
There’s an awesome selection of banner vectors in this deal to take your pick from. I’ve gone for a design by Tomodachi, which you can locate here:
The-Ultimate-Vector-Elements-Collection-1 > Tomodachi > labels and decorative
Open up one of the files in Illustrator and copy and paste the following in to your Photoshop document:
Scale and position so that it sits centrally in the upper part of the back, leaving room in the waist area.
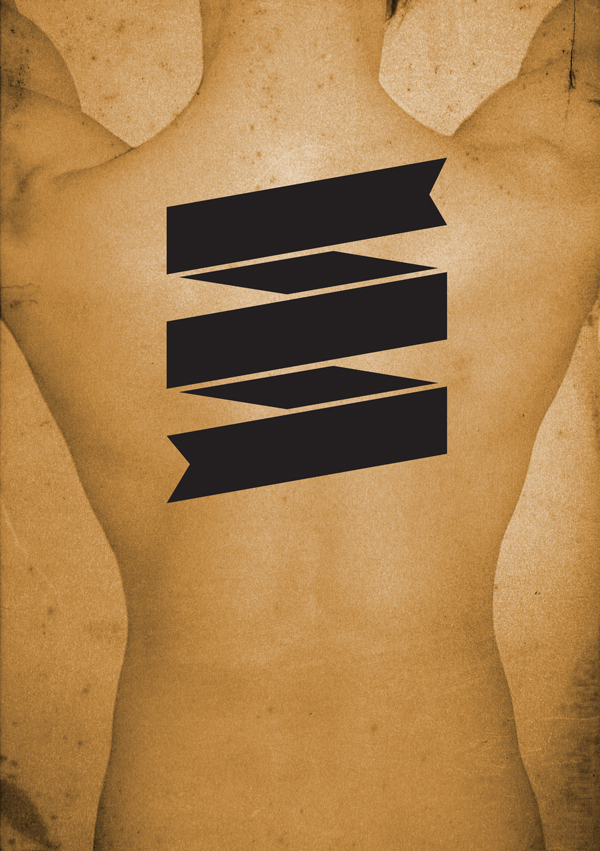
Change the blend mode to Overlay:

Duplicate the layer and change the blend mode to Soft Light. Nudge the layer down and right by hitting the arrow keys on your keyboard a few times.
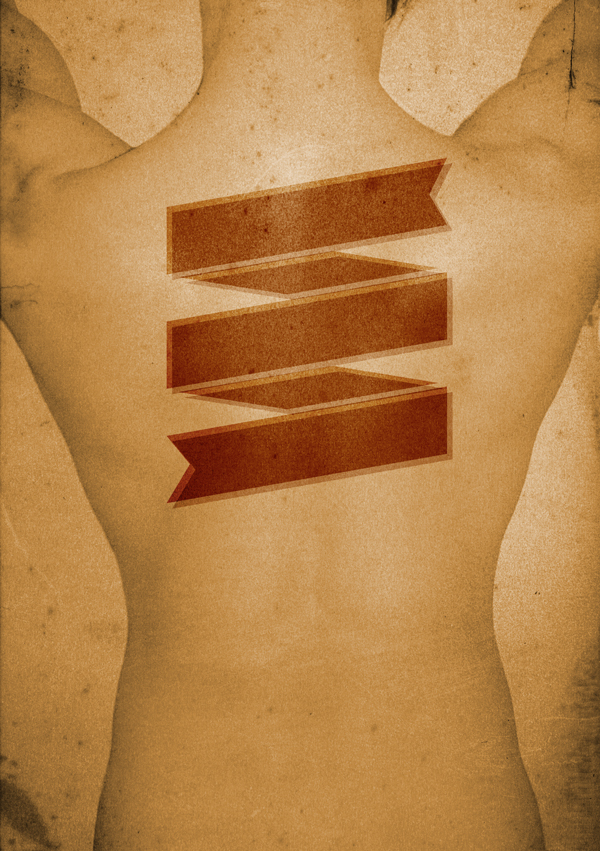
Duplicate the original banner layer again, this time setting the blend mode to Screen. Using the arrow keys again, move the layer up and left the same amount as you did for the shadow.

Duplicate the again (last time, I promise ;)) set the blend mode to Normal and reduce the opacity to 90%. Rasterize the layer so we can adjust the Hue/Saturation to the following settings:
Hue/Saturation
Colorize: Selected
Hue: 0
Saturation: 81
Lightness: +10


We now need to add some text! I’ve gone for a combination of a serif font with hand-written feel, similar to the text used in retro tattoo designs (feel free to do some googling for inspiration!) and a bolder, slightly ‘western saloon’ like font, which is a style you often see on tattoo studio signs.
For those curious, the fonts are:
Ride My Bike Serif (premium – unless you got it in an earlier bundle!)
Rye (free)
With #E8d2B0 selected as the colour, type each of the following on a separate layer so we can easily manipulate them:
THE VINTAGE (Size: 37pt)
TATTOO (Size: 39pt)
STUDIO (Size: 42pt)
Select all three type layers and use the transform tool to adjust the angle that they’re on. You can use the base of the banner as a guide:
Move the text as needed so they sit roughly in the centre of each strip of the banner:

Move all those layers in to a group called “Banner”, lock it as the top layer, and we’re ready to move on!
Step 5:
Time to add the tattoos – the part where you can really let your creativity loose :)
The process for creating each tattoo is essentially the same (bar the different hue/saturation settings), what we’ll do here is go through the steps for a couple of tattoos which we’ll create using resources from the Ghostly Pixels freebie pack. Remember, you can download this freebie pack at the top of this page.
Then, you can repeat the steps as necessary using your favourite designs.
First, we’ll use the following HeavySplatterCircle-05-byGhostlyPixels.png to create a tattoo on the neck:
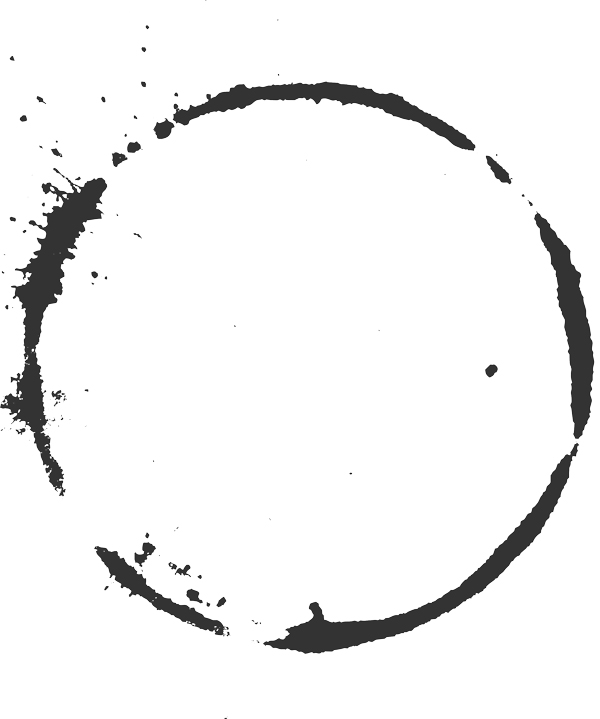
Paste that on to your canvas and resize so it’s about half the width of the neck:
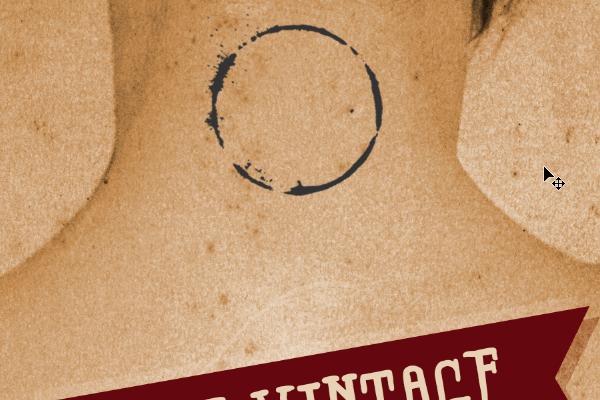
Duplicate the layer a couple of times to create three interlocking circles. You can rotate each one so it’s at a different angle and doesn’t look like an exact replica, and move them so they sit just above the banner. You can use some guides to help get the right alignment:

We’re now going to go through the steps to replicate for each tattoo:
1. We need to be working with a tattoo on a single layer, so as our design is currently on three layers, we’ll need to merge them into a single one. If you want change the position, do that now (for example, I’ve shifted the design left a bit so it’s more central on the neck).
2. Select the layer and go to Filter > Distort > Displace. You can leave the settings as default, and click ‘ok’.
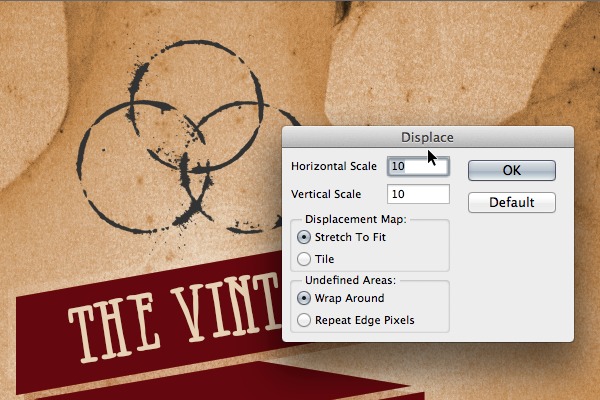
This will open up a window where you can select the .psd file you want to use as the displacement map, so that it follows the right shapes and contours.
We’re using the ‘Tattoo Displacement Map.psd’ file we created in step 3, which we saved to our Desktop:
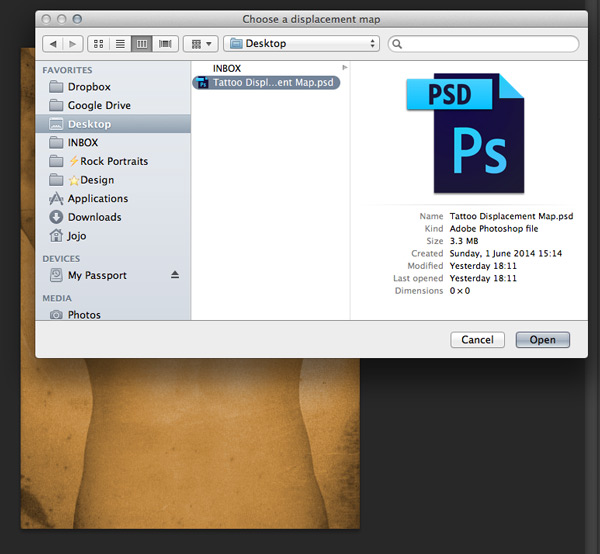
Select the file and click ‘Ok’ to apply the transformation.

3. Go to Filter > Blur > Gaussian Blur and set to 1px.
4. Change the blend mode to Overlay and set the opacity to 80%.
5. Duplicate the layer, then change the blend mode to Soft Light. Reduce the opacity to 20%.
6. Merge the layers, then change the mode back to overlay.
7. Duplicate the layer and set the blend mode to Normal and reduce the opacity to 50%.
We’ll now adjust the hue/saturation of the ‘Normal’ layer to get our desired colour. The levels will vary for each design, but as long as you select ‘Colorize’ you can adjust the rest of the settings till you’re heart’s content!
We want to make this quite dark, so let’s use the following settings:
Hue/Saturation Settings
Colorize: Selected
Hue: 37
Saturation: 25
Lightness: -100

It’s a lot of steps, but once you’ve done them a few times it should get a little easier and quicker.
We’ve covered a lot of ground already! This might be a good time to take a quick screen-break, have a little stretch and grab some water, so you come back refreshed and full of ideas :)
Step 6:
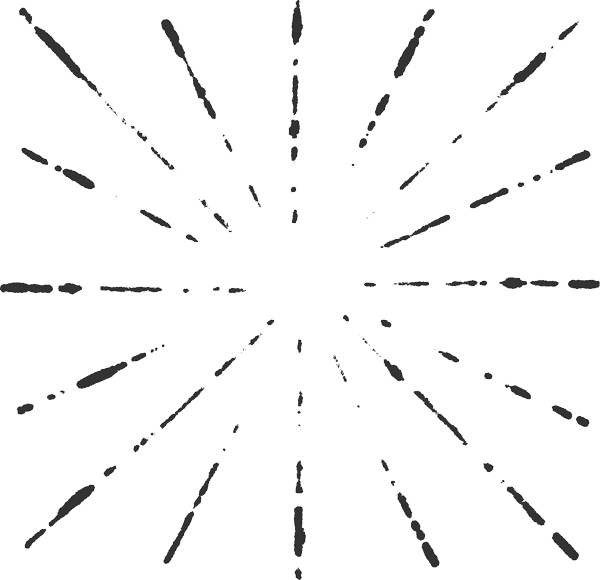
Next up, we’re using a couple more designs from the Ghostly Pixels freebie: Sunburst-13-byGhostlyPixels.png and Polygon-02-byGhostlyPixels.png, which you can see below:

Paste the Sunburst-13.png file on to your canvas, scaling and rotating so that it fits similar to below:
Use a layer a mask to hide any parts that go over the edge of the body. Do this as required for any of the other designs you use.

And repeat the following steps from Step 5:
1. As we’re already working on a single layer, we can go straight onto the next step here.
2. Select the layer and go to Filter > Distort > Displace. You can leave the settings as default, and click ‘ok’.
Then, navigate to the Tattoo Displacement Map.psd file we created in step 3. That will apply the transformation.
3. Go to Filter > Blur > Gaussian Blur and set to 1px.
4. Change the blend mode to Overlay and set the opacity to 80%.
5. Duplicate the layer, then change the blend mode to Soft Light. Reduce the opacity to 20%.
6. Merge the layers, then change the mode back to overlay.
7. Duplicate the layer and set the blend mode to Normal and reduce the opacity to 50%.
We’ll now adjust the hue/saturation of the ‘Normal’ layer to get our desired colour. In this case we’ll use the following Hue/Stauration settings:
Hue/Saturation Settings
Colorize: Selected
Hue: 5
Saturation: 100
Lightness: +5

Are you getting the hang of this now? :)
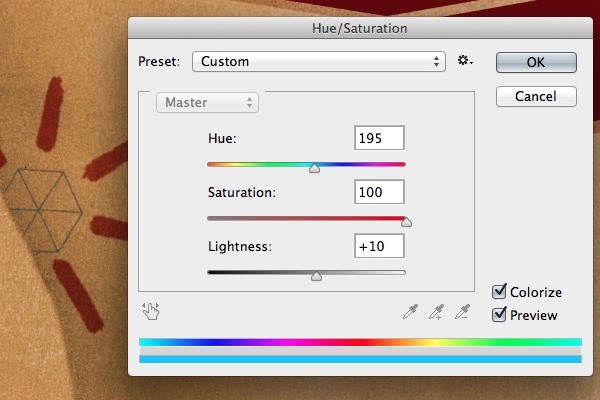
Paste the Polygon-02.png file on to your canvas. Scale and rotate so it sits within the sunburst design, and apply a layer mask to hide the edges that go over the body.
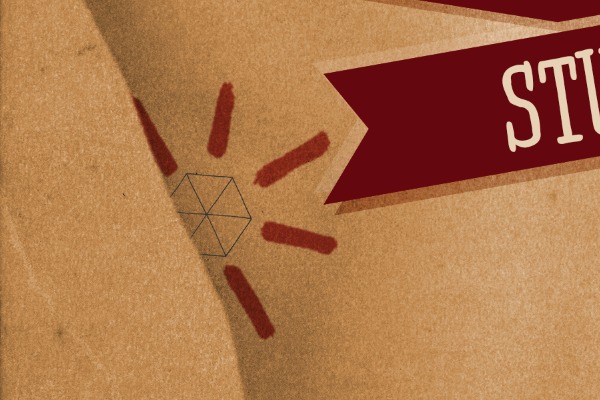
Repeat the steps as above until you get to the hue/saturation, where we’ll use the following:
Hue/Saturation Settings
Colorize: Selected
Hue: 195
Saturation: 100
Lightness: +10
And you should have the start of your tattoos:
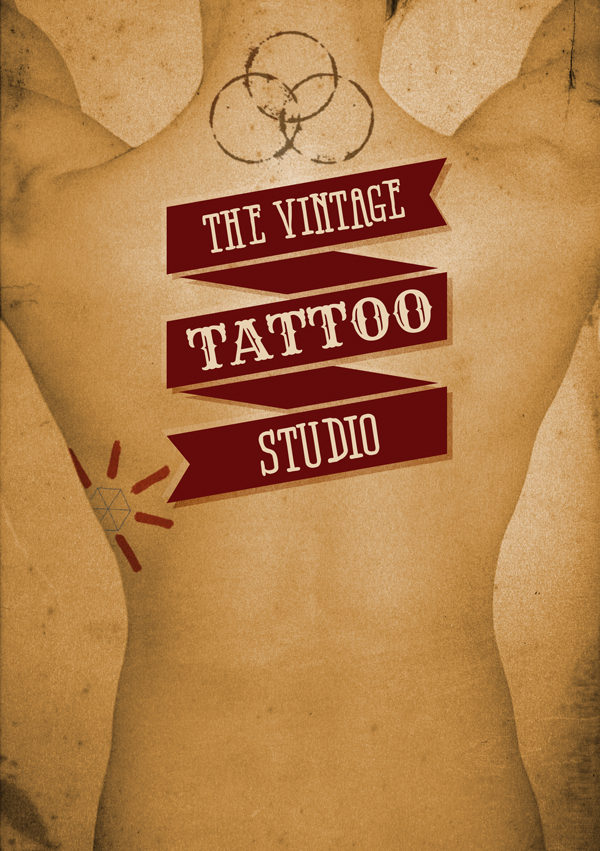
Remember, you can adjust the hue/saturation settings and even the opacity of the ‘Normal’ layer to get the colours you want. You can also transform, duplicate and flip the designs for even more versatility.
Now it’s over to you to explore the vectors and get creative!

Step 7:
Once you’re happy with your tattoo designs, put them in a group called “Tattoos” to your layers panel easier to navigate.
Adding to the rock ’n’ roll vintage feel, let’s use some of the old anatomy drawings to fill the space either side of the back.
First, navigate to The-Ultimate-Vector-Elements-Collection-1 > Offset > ANATOMY_COLLECTION > EPS FILES > SKELETON.eps
Paste this in to the lower right corner of your canvas:
Use a layer mask to hide the parts that go over the body. Then, change the blend mode to Color Burn and reduce the opacity to 30% for a subtler effect:
From the same folder, paste the HEART.eps file in to the lower left corner of you canvas:
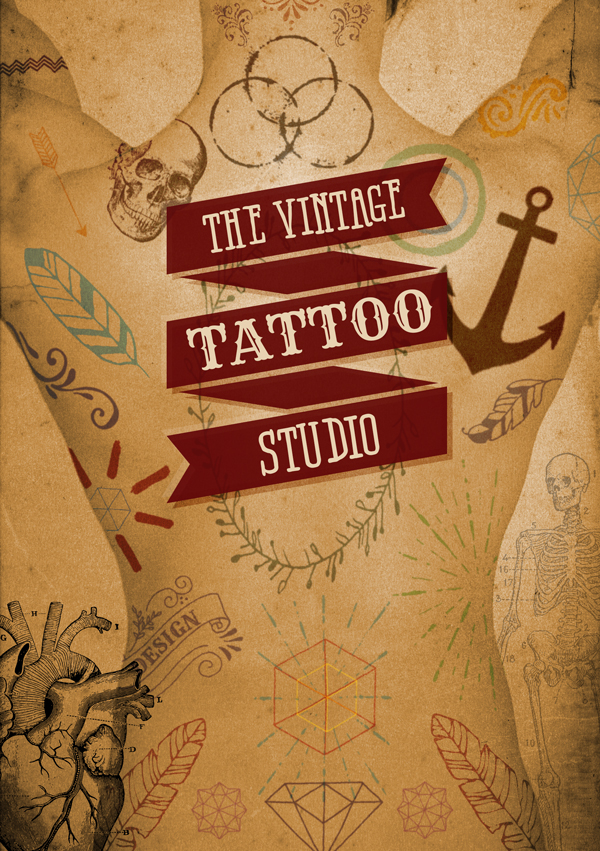
Again, use a layer mask to hide any areas that go over the body. Then change the blend mode to Overlay and opacity to 30% which gives us a nice reddish hue:

Step 8:
Next up, we’re going to start adding some texture.
Still in the Offset folder, go to VECTOR_TEXTURE_KIT > EPS_FILES > T13.eps

Paste this on to your canvas, between the “Banner” and “Tattoos” group:
What we want to do here, is add a bit more depth to the back and use this to create a shading effect.
First, use a layer mask to hide all the areas outside of the back:
We’re shooting for a slightly subtler effect, so let’s change the blend mode to Soft Light, and reduce the opacity to 35%:
Step 9:
Now we’ll use another great resource from the Ghostly Pixels freebie that accompanies this tutorial. Open up the folder and paste the following Sunburst-08-byGhostlyPixels.png file on to your canvas, scaling to fit:

This helps guide the eye in towards the centre of the design where the important details such as the venue name, and also reflects the shape of the body adding a sense of dynamism and movement.
It’s a bit distracting as it is though, so let’s change the blend mode to Screen and opacity to 55%:
Step 10:
We’ll now create the banner for the opening times. Navigate to The-Ultimate-Vector-Elements-Collection-1 > Tomodachi > Labels & Decorative and open the labels & decorative.ai file in Illustrator, and grab this banner that’ll fit the space nicely:
Note: keep this file open, as we’ll be using another design from here in the next step.
Copy and paste the design on to your canvas, scaling and positioning so it sits on the waist. The banner draws our eye in creates a more ‘pinched in’ illusion, which emphasises the sunburst shape of the body.

This is also a good time to tweak the position of any tattoos in relation to the banner, for better composition.
(You can see in the next image I’ve repositioned the “Design” tattoo on the left and Sunburst/Double polygon design directly underneath)
Change the blend mode to Overlay, then duplicate the layer. Change the duplicate blend mode back to Normal, and reduce the opacity to 85%
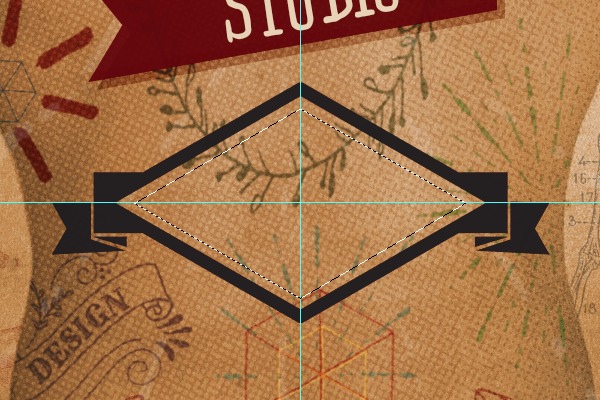
Create a new layer, then set the background colour to #ECDABE. Using the Polygonal Lasso tool and some guides, draw a diamond shape within that echoes the banner, leaving a slight gap in-between:
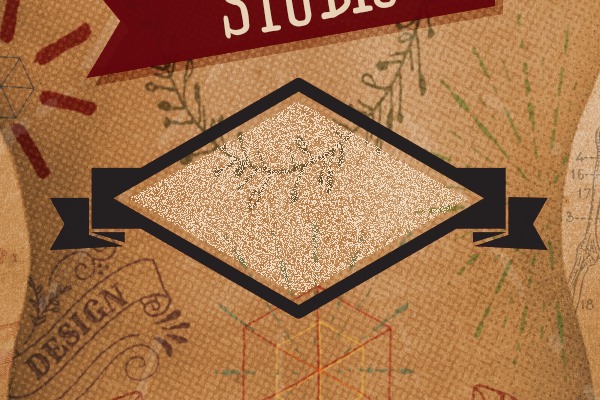
Then hit cmnd + delete (alt + delete for Windows) on your keyboard to fill the shape with your background colour:

We want to create a slightly grainy finish, so change the blend mode to Dissolve and reduce the opacity to 40%:
Duplicate the layer, changing the blend mode to Screen and Opacity to 45%, which gives us a nicely textured, but still clear base for our text, which we’ll add next.

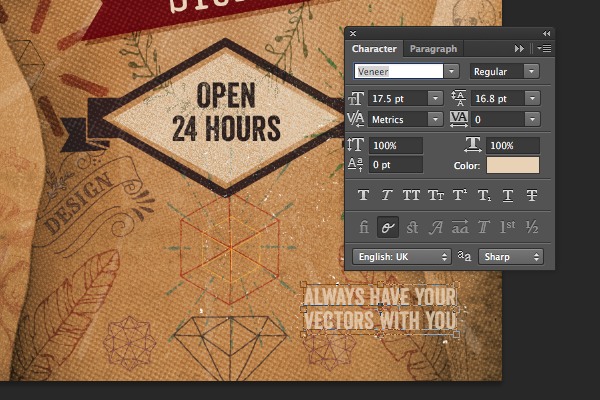
Use the Eyedropper tool to copy the colour of the banner, in this case #241F20. This will be the colour of our text.
For the font, a strong, narrow sans-serif would be a recommended choice. Even better if you have something with a stamped, grainy texture! In this example I’ve used one of my favourites – Veneer by Yellow Design Studio (premium)
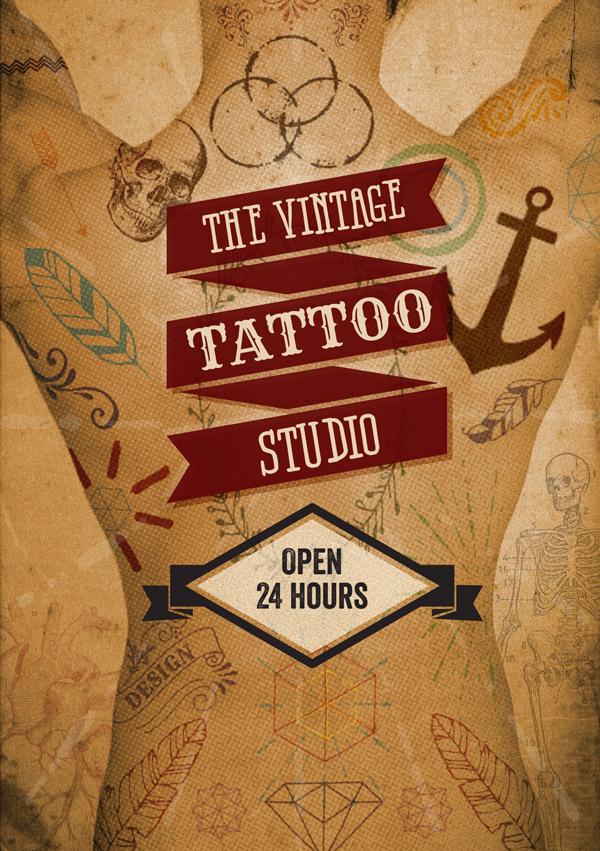
Set the type to centre justification and type “OPEN 24 HOURS”, resizing as needed to fit the space:
Step 11:
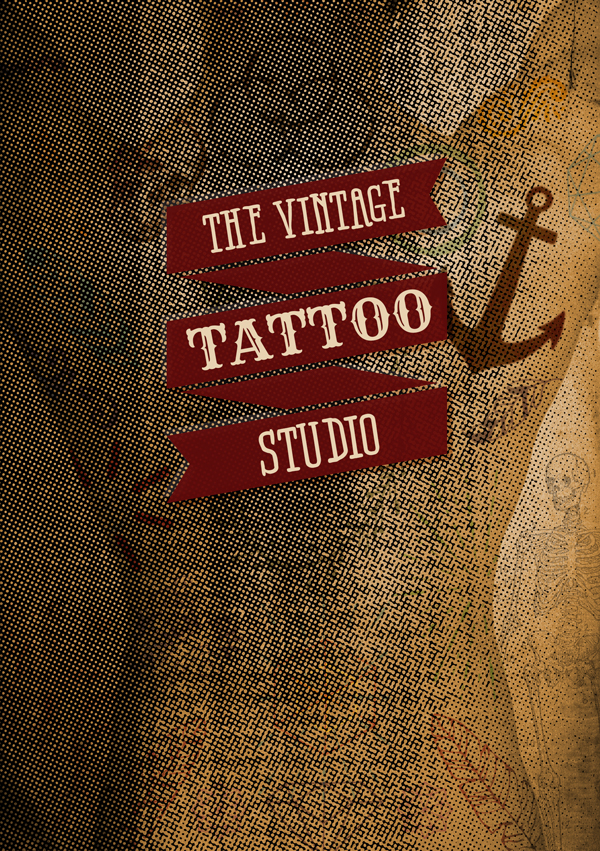
Now, back to building up those textures!
We’re going to use a not-so-obvious vector resource from the bundle here, which I only stumbled across by happy accident(!)
Navigate to The-Ultimate-Vector-Elements-Collection-2 > Nicky-Laatz > VeryVintageKit > CS5 > logo10-Amarillo.ai and open in Illustrator.

Go to the layers panel, and select layer 2:
Whoa! Wasn’t expecting that ;) Let’s copy and paste the selection on to our Photoshop canvas:
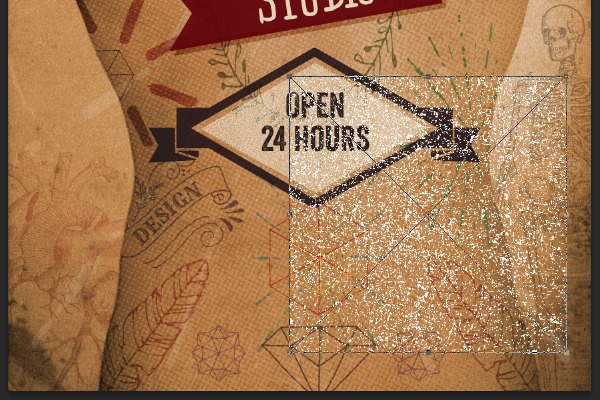
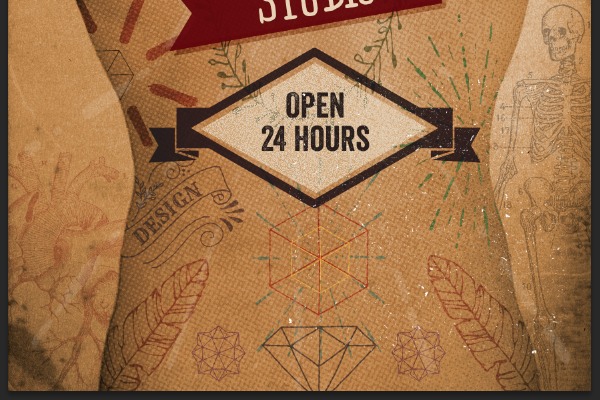
This gives us a really nice scratchy texture. If needed, use a layer mask to hide any parts that are too noticeable. For instance, there’s quite a large speckle that obscures the ‘P’ in “OPEN”:

With that dealt with, let’s move on to the next step….
Step 12:
Going back to the labels & decorative file in Illustrator, zoom in on the following design:

Replace the text with the word “TATTOO” using the same font as used on the main banner in your design (in this case, Rye):

Copy and paste this in to the upper left corner of your Photoshop canvas:

Invert the colour (cmd + I / alt + I) to turn it white, then reduce the opacity to 50%:
Step 13:
We’ll now add the final bits of text.
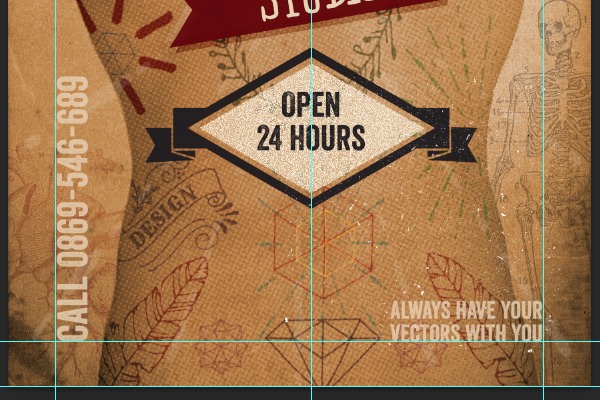
Using the same font as you did to write “24 Hours” (in this case, Veneer) write “CALL” followed by a fictional or real phone-number, depending on the poster’s purpose :)
Set the colour to #E8D2B0, which was sampled from a lighter area of the design.
Rotate and scale the type so it fits vertically in the space in the lower left corner (leave a bit of extra room around the edges, as we’ll be adding a slight border later to finish off the design). Reduce the opacity to 80% so the tone matches the overall design:

It’s coming together now, but the bottom right corner is looking a little empty. Let’s add a bit more text here to balance out the design.
Use the same settings as before and type “Always have your vectors with you” so that it sits on two lines, as a more compact shape fits the space better, rather than one long line.
Adjust the font size so the two lines are the same width (by sheer fluke, the Veneer font fits perfectly) and reduce the line height so the lines are fairly close together.
The font size should be smaller than the others, as this is secondary information compared to the rest of the text. Feel free to come up with your own slogan here!
Quickly use some guides to make sure the text is evenly positioned both horizontally and vertically:

Step 14:
Nearly there! We’re going to add some textures as a finishing touch.
Navigate to The-Ultimate-Vector-Elements-Collection-1 > Offset > VECTOR_TEXTURE_KIT > EPS_FILES > T02.eps and paste on on to your canvas, above the “Banner” group.
Scale to fit and invert the colour:
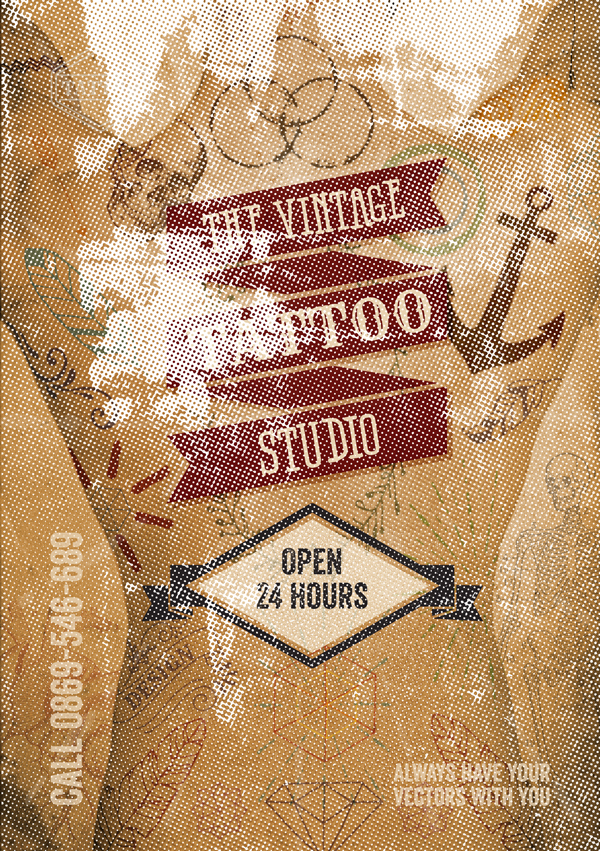
Change the blend mode to Soft Light and Opacity to 50%:

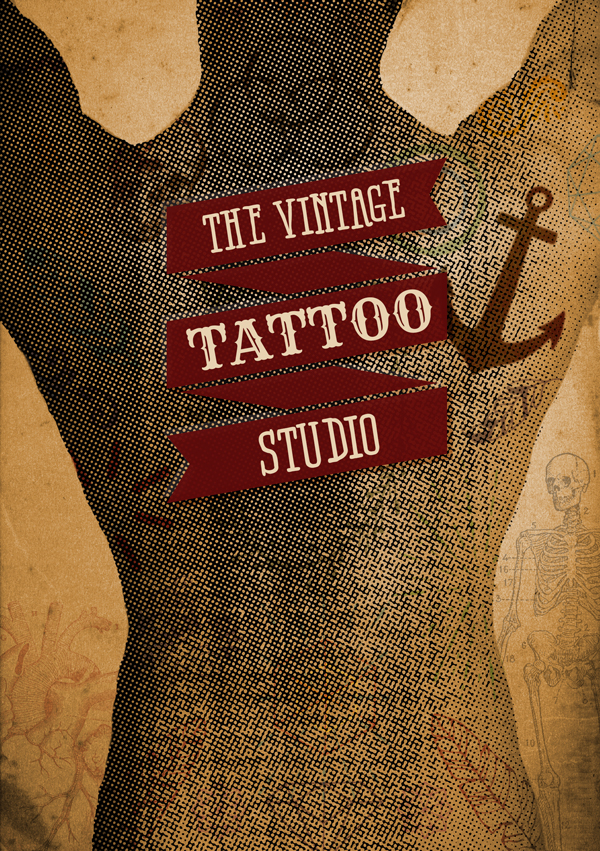
From the Ghostly Pixels freebie, select Scuff-08-byGhostlyPixels.png:

Paste on to your canvas, positioning it towards the right of the banner so the marks strongest marks are clearly visible:
Then, set the blend mode to Screen:
Duplicate the layer, then reposition so that the most prominent scuffs show up on the side of the back:
Let’s add a darker scuff towards the bottom of the poster. This will balance out the lighter areas, plus reflect the darker areas at the bottom corners of the design.
We’ll use one of the Ghostly Pixel scuffs from the main bundle. Navigate to The-Ultimate-Vector-Elements-Collection-2 > GhostlyPixels > HalftoneScuffs > PNG-Format > Scuff03_byGhostlyPixels.png
Paste this on to your canvas, moving the layer so it’s directly below the “Always have your…” text.
Scale and rotate so it sits similarly to the image below:

Notice how it brings the darker edges into the design a bit more?

Finally for this step, we’re going to add a bit more warmth to the image, and tone down the whiter areas.
Navigate to The-Ultimate-Vector-Elements-Collection-1 > Offset > VECTOR_TEXTURE_KIT > EPS_FILES > T21.eps
Paste this on to your canvas, scaling to fit:
Change the blend mode to Soft Light and bring the Opacity down to 10%

Step 15:
The final step!
If you’ve not done so already, save your document. Then, going back to the “Background” group, duplicate your ‘old paper’ texture. Here’s a reminder of what it looks like:
Move this outside of the group and place as the very bottom layer. Go to Save As… and give this document a slightly different name from the original.
Select all the layers apart from the paper texture we’ve just created, and merge them together. You can now see why we wanted to keep a separate, editable version!
What we’re going to do here is add a rough, faded border to frame the image.
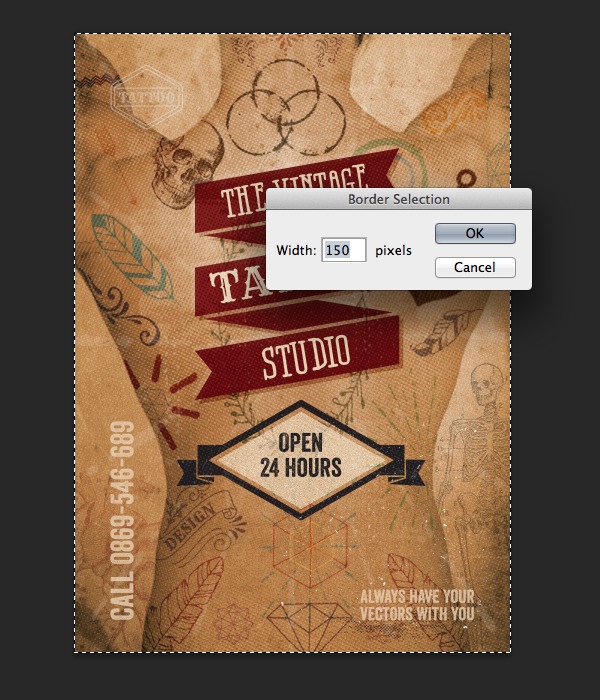
From the menu, go to Select > All (cmd + A), then Select > Modify > Border.
In the settings box, type 150 as the pixel width as we want a nice chunky border here:
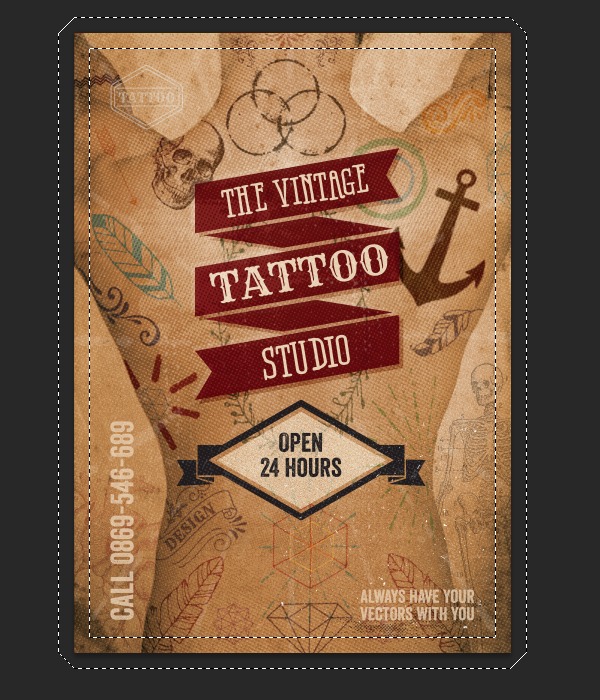
With the selection still active, go to Select > Refine Edges.
In the settings box that appears, change the radius to 25px.

This means the command will look 25 pixels on either side of the selection to make adjustments that adapt to the image. The different tones in the image will create different contours, which result in a rough edge:
Feel free to experiment with the other settings to get a result you’re happy with, but we can leave it at just the radius for the purpose of this tutorial.
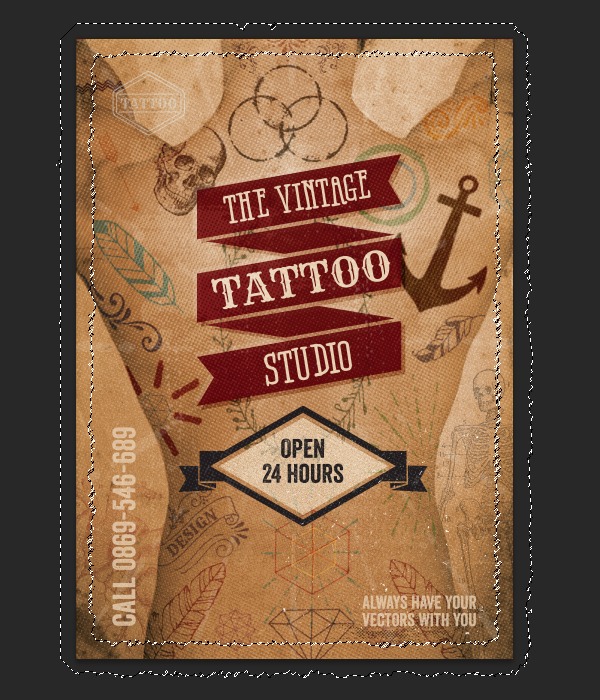
As you can see, the border becomes a lot rougher.
With the selection still active, activate the main image layer and hit delete:
As you can see, we’ve now got a subtle faded border.
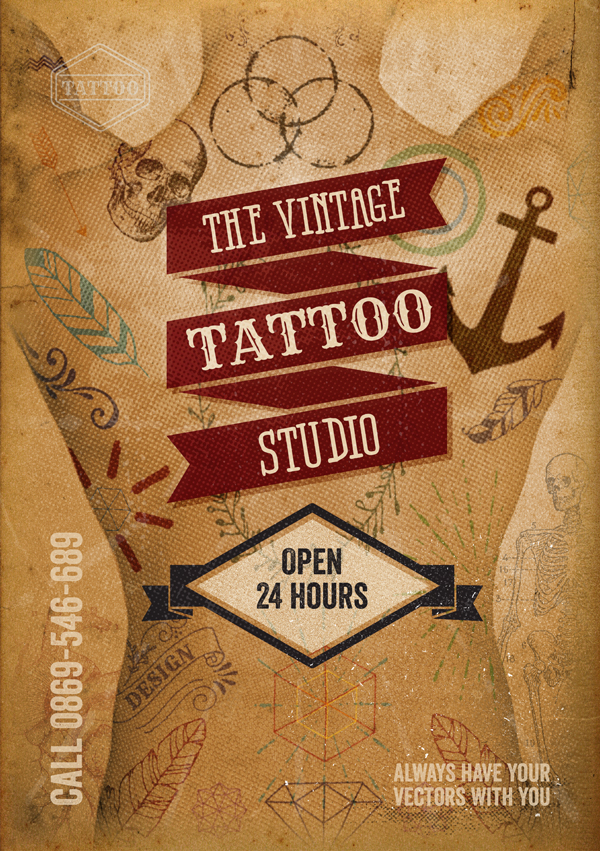
To give a feel of a bit more wear and tear, we’ll lighten this up a bit. With the selection still active, create a new layer.
Set the background colour to #CEA471 and with the new layer activated, hit (cmnd + delete / alt + delete) to fill:
Finish off by reducing the Opacity to 20%
And we’re done!
Phew! Thanks so much for sticking with this and I really hope you enjoyed getting creative with your new vectors and hopefully learning some useful tricks.
Is anyone considering getting some permanent vector work? I’m certainly tempted! ;)
If you’ve got any comments or questions, do leave them below and I’ll keep an eye out. Also, feel free to get in touch @rockportraits
Remember to share your designs on the Design Cuts Facebook page as we’d love to see what you do with this :)
Hopefully this tutorial showed you just some of the possibilities using our current vector bundle. The main bundle includes thousands of best-selling vector elements, and for this week only is available for 91% off! Grab it below, while you still can:
The Ultimate Creative Vector Elements Collection – 91% Off
A great tutorial. Just wanted to say that if anyone is interested this can be completed in Photoshop only. I don’t have Illustrator and was able to do every step.
Hey Cynthia, thanks so much for pointing that out. Indeed you can complete the tutorial in Photoshop just as well. It’s what I’ve been doing, since I don’t have Illustrator. It’d be great to see your outcome of this tutorial.