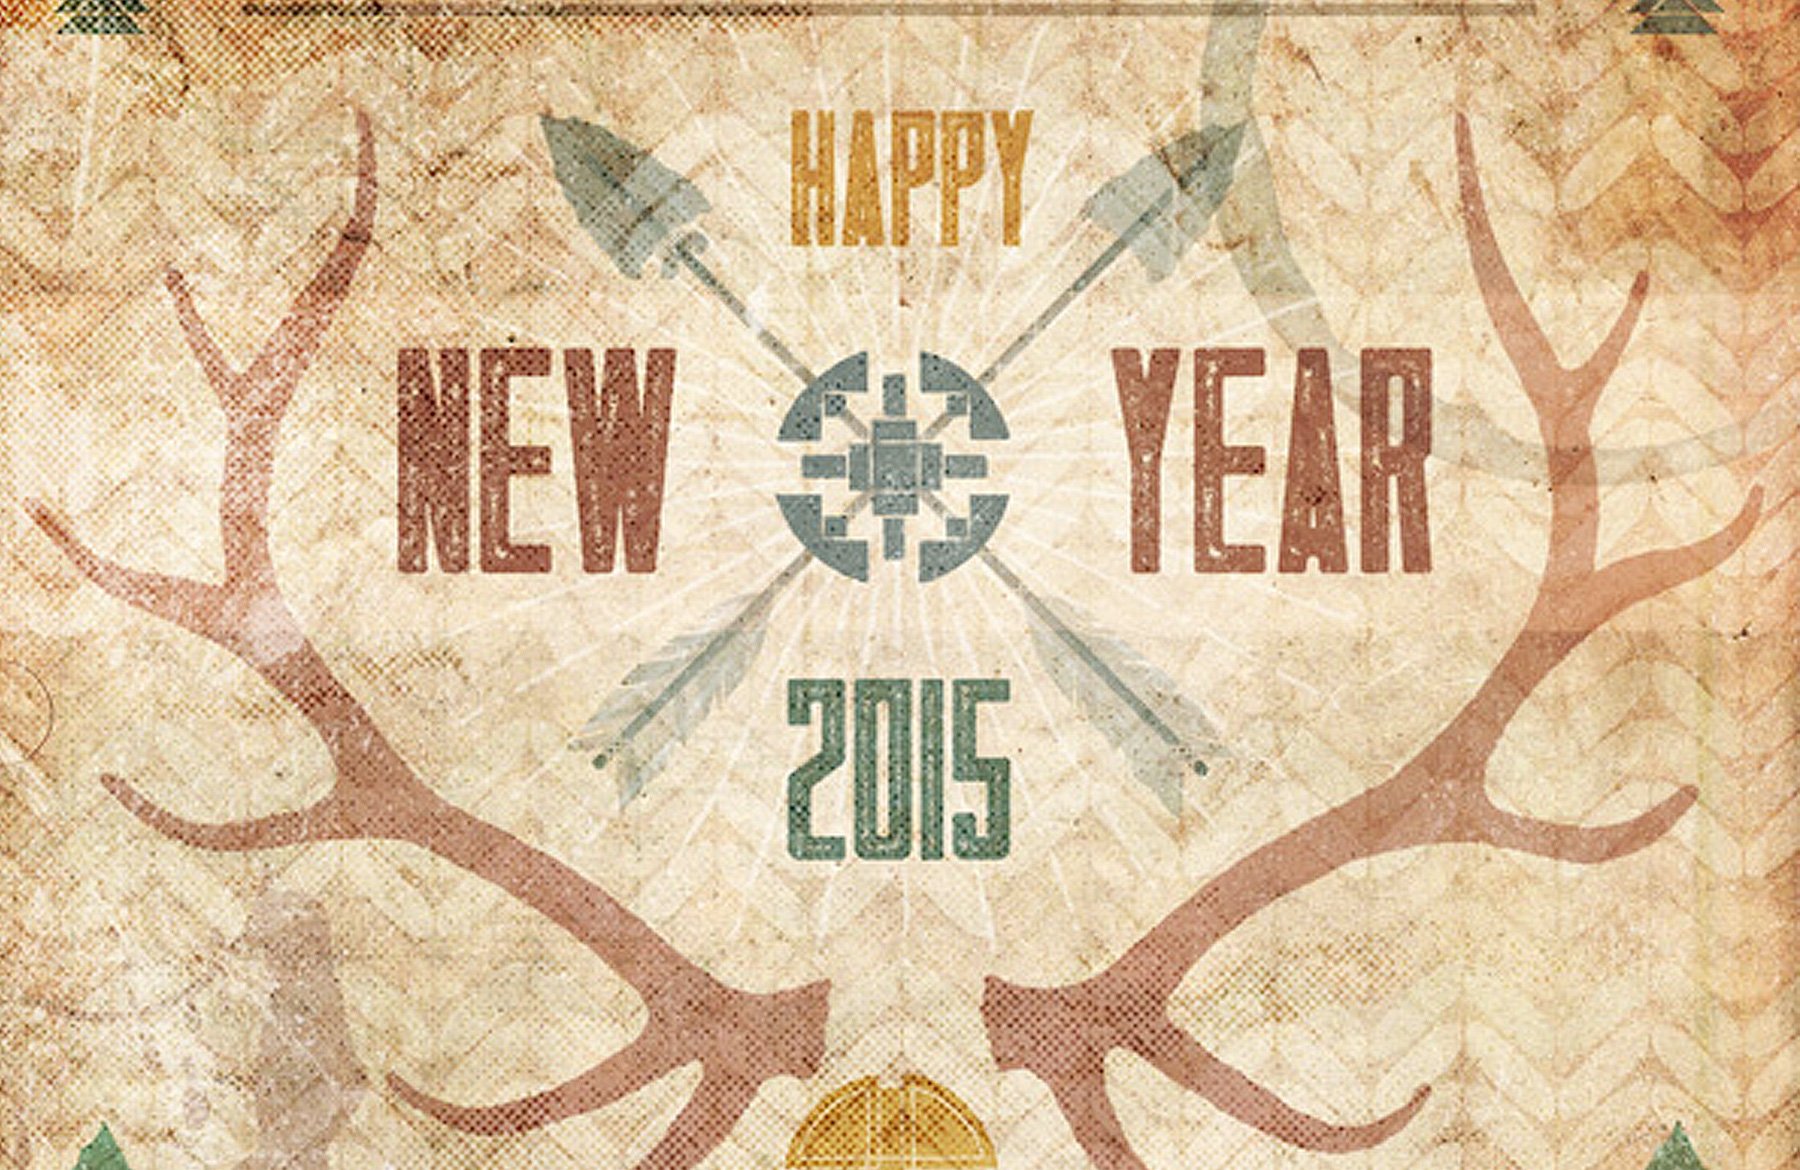
WHAT WE’RE CREATING:
Hello Design Cutters!
Jo here and I hope you all had a fantastic, creative Christmas. :)
We’re back and setting our sights on the next big celebration – New Year! In this tutorial we’ll be creating a muted, folksy party invite to counteract all the sparkliness from Christmas. It includes plenty of textures, vectors/pngs and fonts so you can get a good look around this fantastic free bundle: $456 Worth of Popular Design Resources Free for the Holidays!
Quick note: In this tutorial, the term “clipping” or “clipped layer” is used a few times. This means that the layer is only visible/applies to the layer directly below it. You can very quickly do this by holding ‘Alt’ down on your keyboard and clicking between the two layers. Here’s a quick demonstration.
Ok, let’s get started!

Step 1:
Open up a new (A5) 1748px x 2480px Photoshop document.
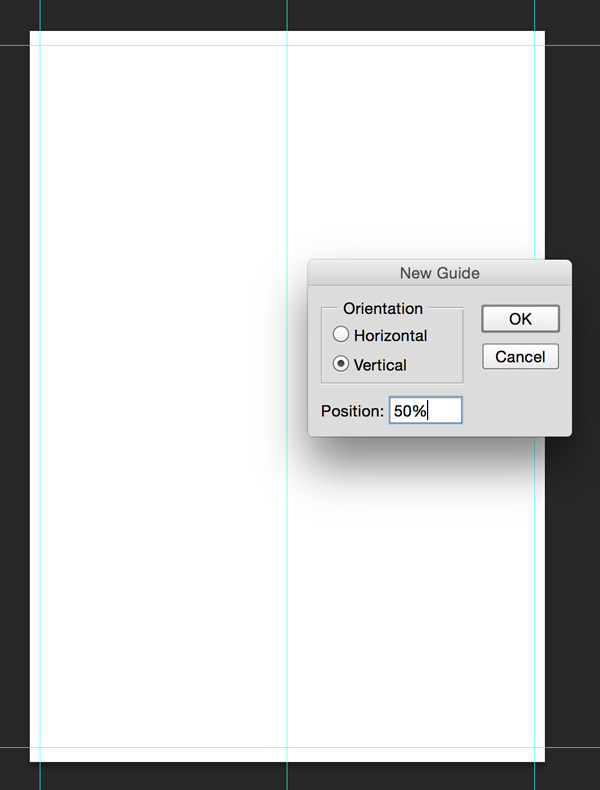
The first thing we’ll do is set up some guides to help us during the design process. To set specific guide positions, in the main menu go to View > New Guide and in the settings box enter separately:
Vertical: 2%, 50%, 98%
Horizontal: 2%. 98%
Step 2:
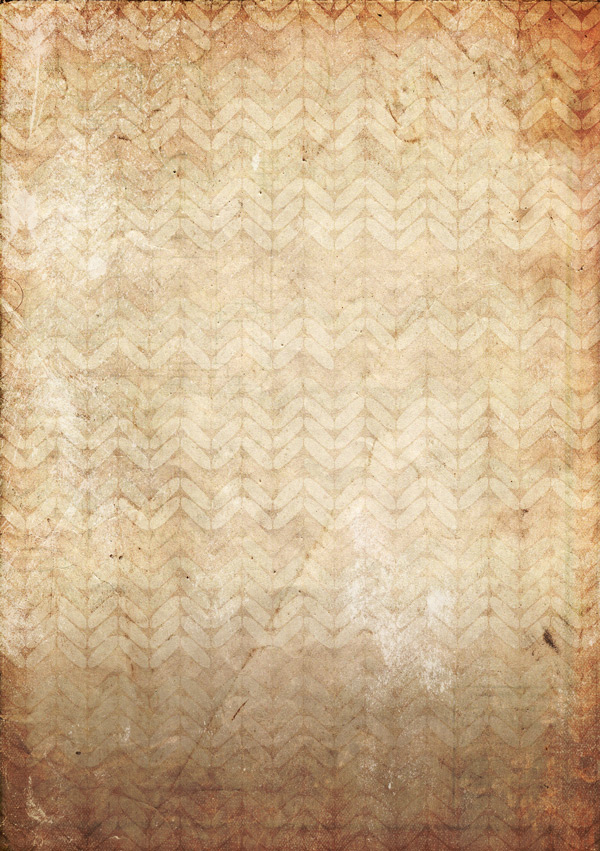
Now that our canvas is set up, we’ll start by downloading an extra paper texture to use for our base layer:
Paste on to your canvas, scaling to fit.

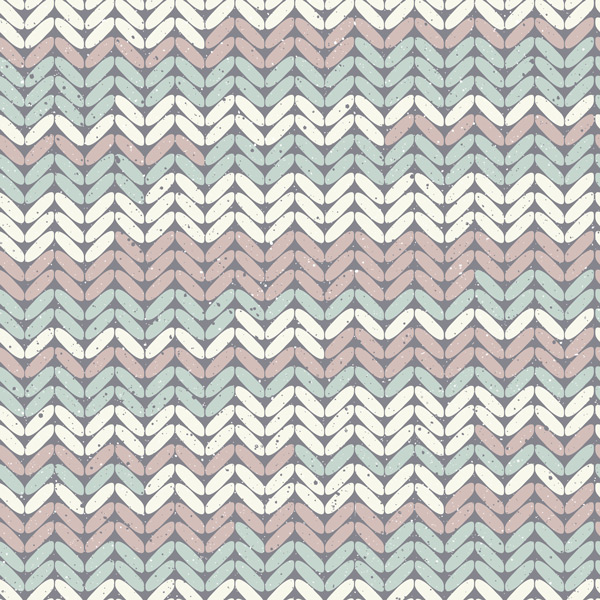
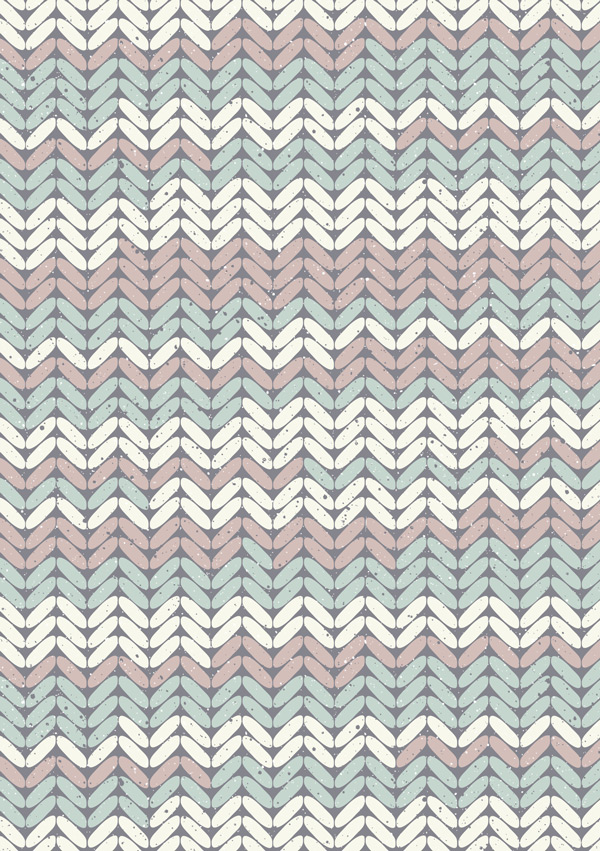
Next, we’ll set up a pattern fill using one of our bundle resources. Navigate to Holiday-Gift-Bundle-julia-baranova > Winter patterns > Winter patterns – JPG > Winter pattern23.jpg and open up in its own Photoshop document:
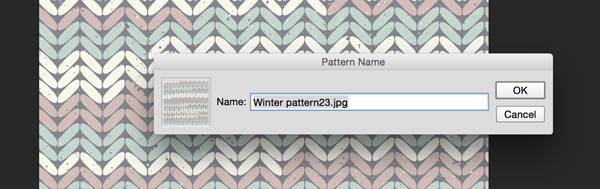
To add this to our patterns library, in the main menu go to Edit > Define Pattern. Leave the name as the default and hit ‘OK’:
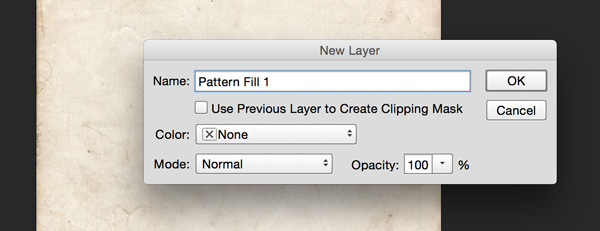
Going back to our main Photoshop document, from the main menu go to Layer > New Fill Layer > Pattern and leave the settings as default:
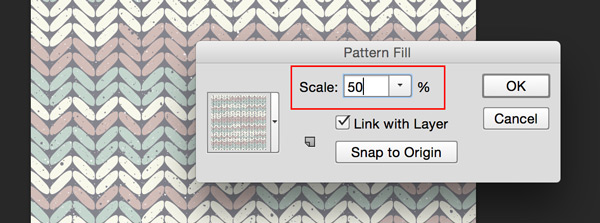
In the settings box that follows, reduce the scale of the pattern to 50% so that it fills our canvas size better and hit ‘OK’:
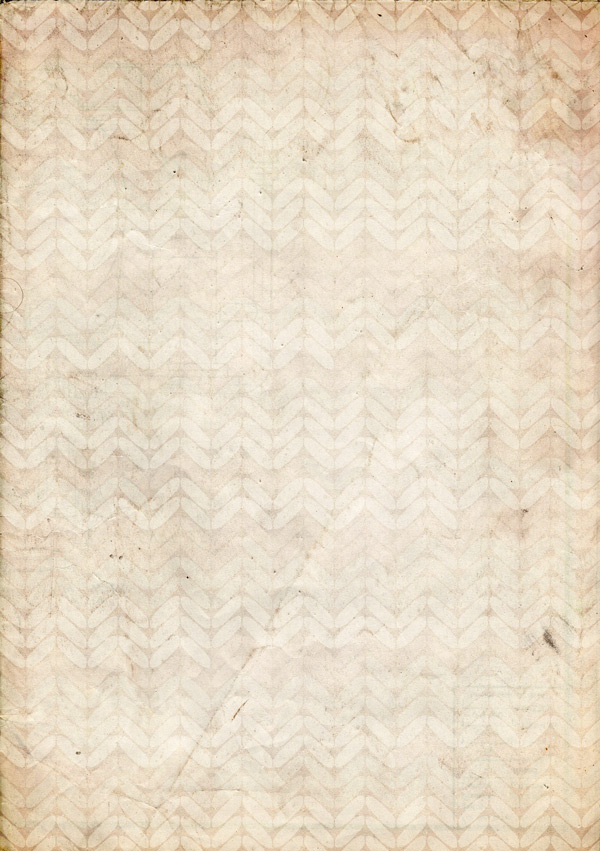
Change the blend mode to Overlay and reduce the Opacity to 50% for a much subtler effect:

To bring back some of the warmth and texture of the paper to the image, duplicate the background paper texture so that it sits above our overlay pattern. Change the blend mode to Multiply and reduce the Opacity to 75%:
Step 3:
To prepare our image for some text that we’ll be adding later, we’ll add a slight gradient.
Navigate to Holiday-Gift-Bundle-ornaments-of-grace > Welcome-Kit > Textures > WoodSet2-9-300dpi.jpg and paste on to your canvas so that it fits the width:
Create a Layer Mask, selecting black as the foreground colour. We’ll be using a gradient mask, so select the Gradient Tool so that the black (foreground colour) fades to transparent. Whilst holding down the ‘Shift’ key, draw a line starting from about one-third of the way down the canvas and finishing about three-quarters of the way down:
Set the blend mode to Multiply and reduce the Opacity to 35%:

Group the layers together in to a folder called “Background” for easy reference, and we’re ready to move on!
Step 4:
From the bundle, navigate to Holiday-Gift-Bundle-matt-borchert > Subtle-Distress > Soft-Grunge-Overlays > Textures > Subtle4.jpg:
Paste on to your canvas, scaling and rotating to fit as below:

Create a clipped Invert Adjustment Layer above:
Set the image layer blend mode to Overlay and reduce the Opacity to 45%. Lock this layer to the top so we can build up our design with this texture application in mind.

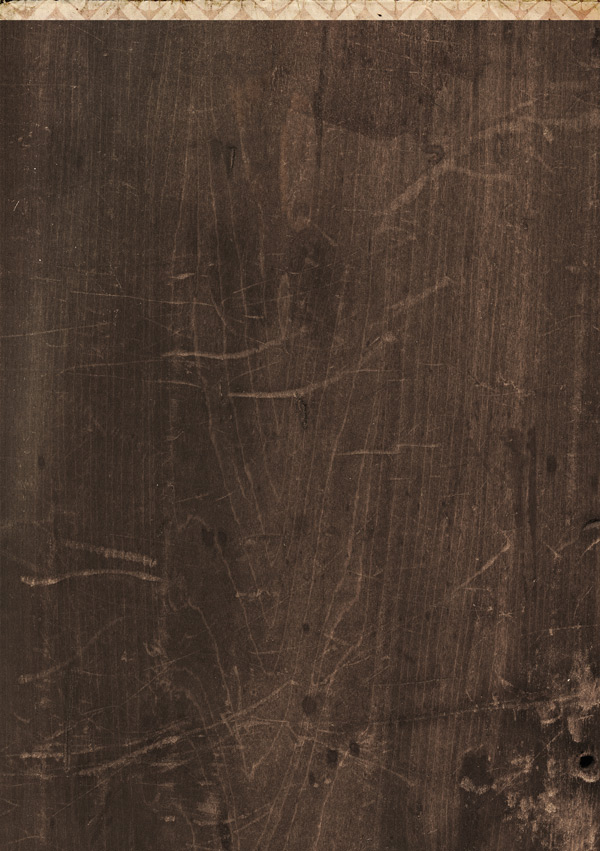
Locate the following resource Holiday-Gift-Bundle-ornaments-of-grace > Welcome-Kit > Textures > LEATHER LOVE Weathered Medium Brown-300dpi.jpg
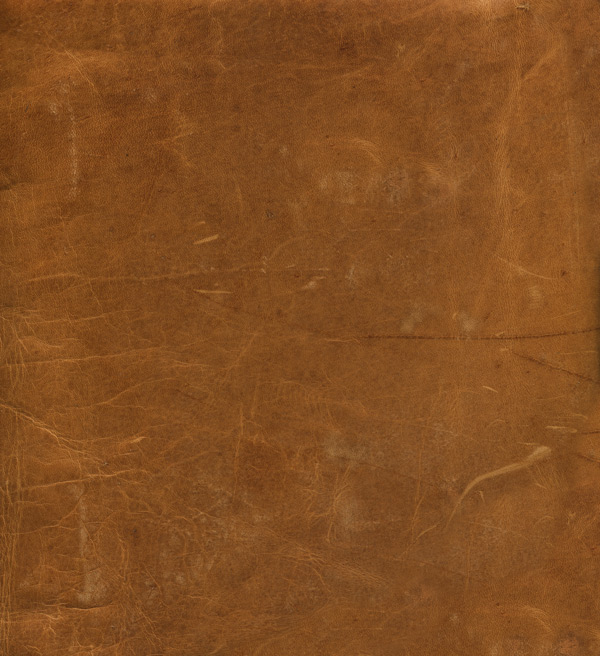
Paste on to your canvas directly below the overlay layer we just created and scale to fit:
This is to add a nice warm tone and texture to the overall design, and we want to be able to see how it’ll effect the colours as we’re designing, which is why we’re adding it towards the start.
Change the blend mode to Soft Light and reduce the Opacity to 40%:

Group the layers we’ve just created in to a new folder called “Top Textures” and lock to the top.
Step 5:
We’re going to work on our borders now, staring by creating a subtle vignette using Holiday-Gift-Bundle-clik-chic > RGough_ChristmasFreebies Soft-Grunge-Overlays > RGough_O_InkpadEraserGrungeOverlay.png:

Paste on to your canvas, scaling to fit:
Change the Blend Mode to Overlay and reduce the Opacity to 85%:
To add a subtle hint of colour, create a clipped hue/saturation Adjustment Layer with the following settings:

Hue/Saturation Settings:
Colourize: On
Hue: 345
Saturation: 20
Lightness: -30
Step 6:
Next, we’ll add some decorative borders and corners to help frame our image. Using the guides to help, paste Holiday-Gift-Bundle-ghostly-pixels > Western-Tribal_byGhostlyPixels > Solid > PNG > 06-Western-Tribal-byGhostlyPixels.png on to your canvas, scaling down to a similar size as below:
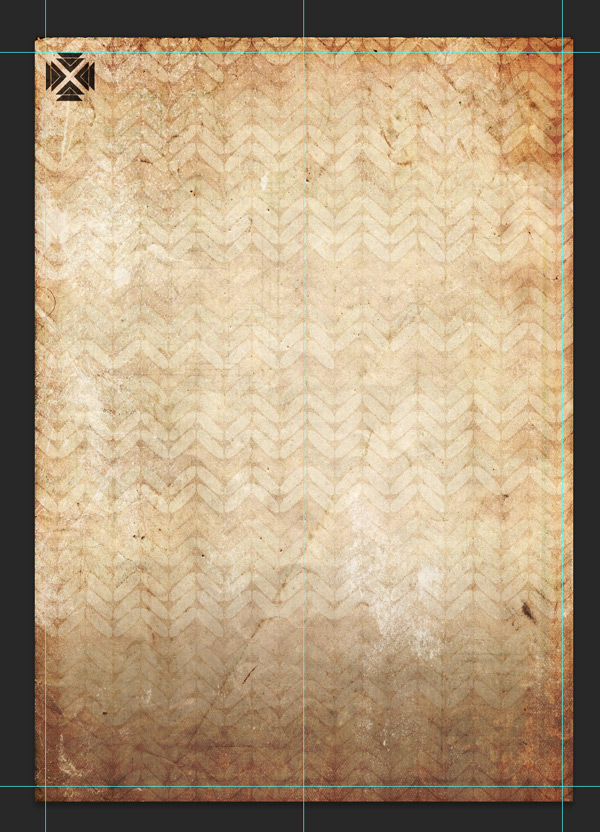
Duplicate the layer(s) to fill each corner:
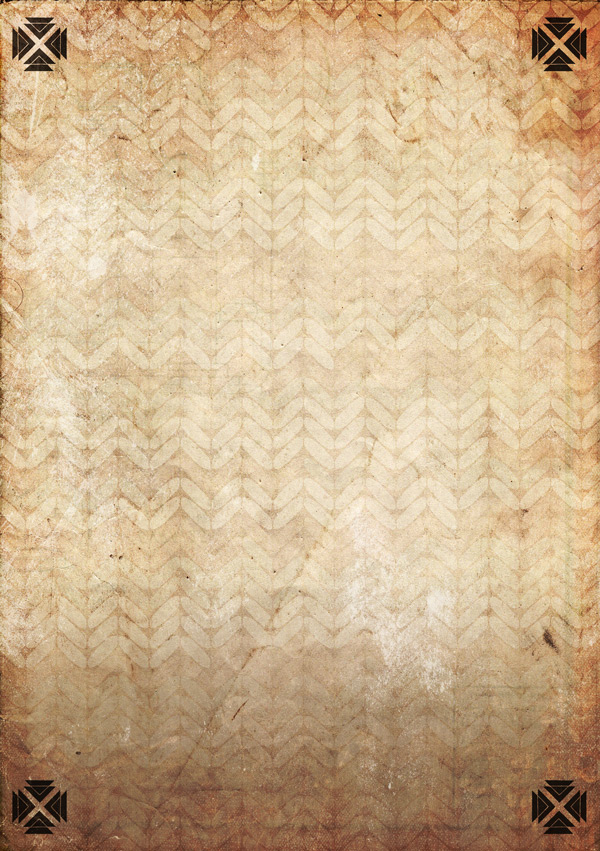
Place the layers in to a group called “Tribal Corners”. Create a clipped hue/saturation layer for the group (if you are using an earlier version of Photoshop, you may need to merge the layers, rather than group them). Apply the following settings:
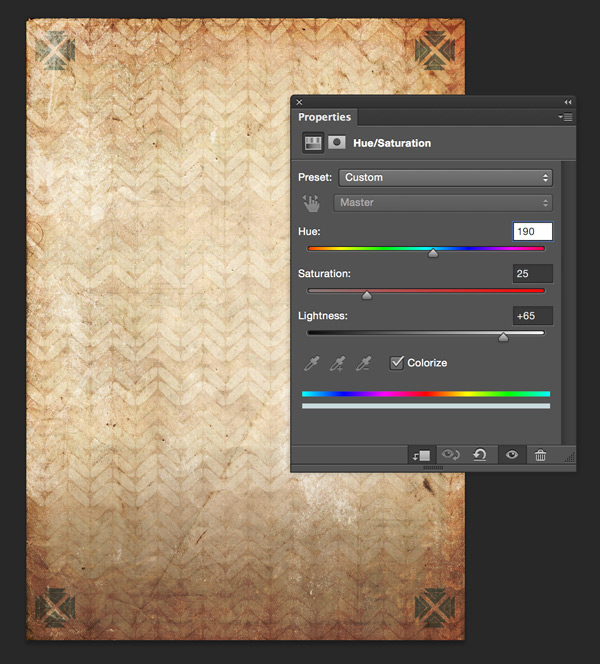
Hue/Saturation Settings:
Colourize: On
Hue: 190
Saturation: 25
Lightness: +65

Navigate to Holiday-Gift-Bundle-kelly-jane-creative > Design-Selection > KJC Arrows and Antlers.eps (if you can, open up the file in Illustrator to get the vector versions).
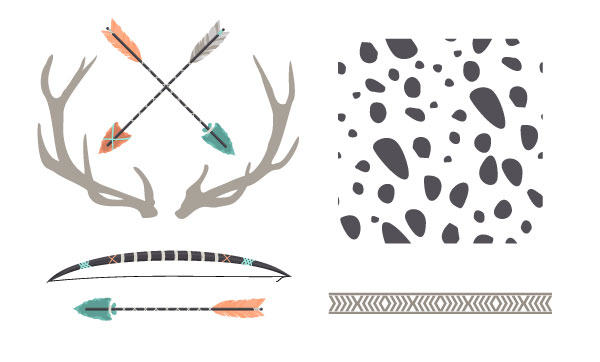
Copy and paste the border design in the bottom right and paste on to your Photoshop canvas, scaling and positioning so that it fits between the corner designs:
Change the blend mode to Multiply and reduce the Opacity to 40%:
Duplicate the layer and whilst holding down the ‘Shift’ key, drag the duplicate image down so that it sits between the bottom two corners:

Step 7:
We’re going to add some little extras using the following resources; Holiday-Gift-Bundle-clik-chic > RGough_ChristmasFreebies > Coffee-Stains > RGough_S_CoffeeStain2.png and RGough_S_CoffeeStain8.png:
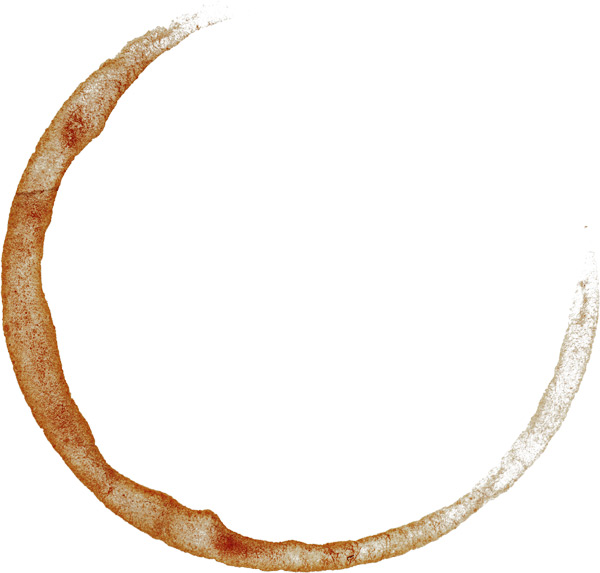
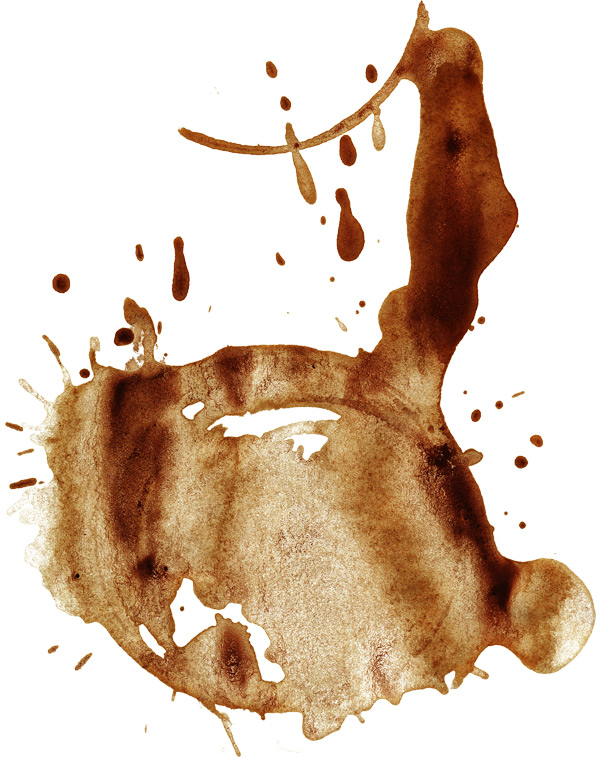
Paste the images on to your canvas, scaling and positioning so that they are similar to the image below:
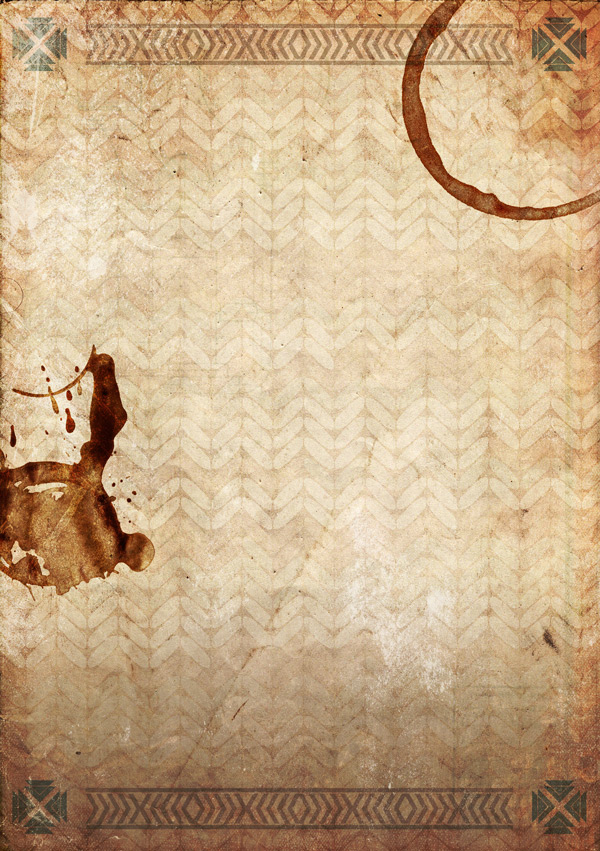
Change the blend mode to Multiply for both, then reduce the Opacity to 25% for CoffeeStain2 (top right) and to 20% for CoffeeStain8 (centre left):
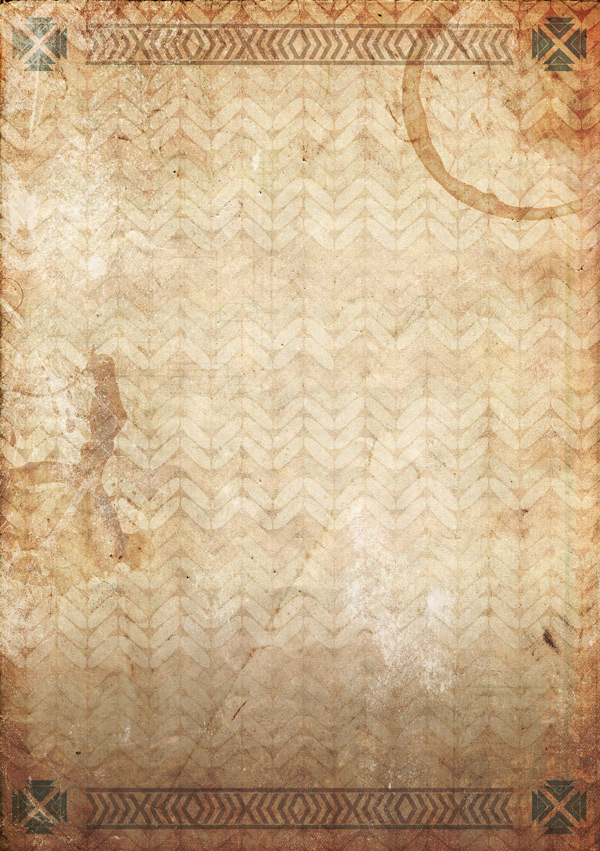
We’ll start to bring in a bit more of our colour palette using a clipped hue/saturation Adjustment Layer for each, using the following settings:
Coffee Stain 2 – Hue/Saturation Settings:
Colourize: On
Hue: 189
Saturation: 15
Lightness: +30
Coffee Stain 8 – Hue/Saturation Settings:
Colourize: On
Hue: 340
Saturation: 15
Lightness: +30

Group these together in to a folder called “Coffee Stains” for easy reference and good housekeeping. :)
Step 8:
Navigate to Holiday-Gift-Bundle-ghostly-pixels > Antlers-byGhostlyPixels > PNG-Format > Antlers-01_byGhostlyPixels.png and paste the image on to your canvas, using the guides to help you scale to the right size:
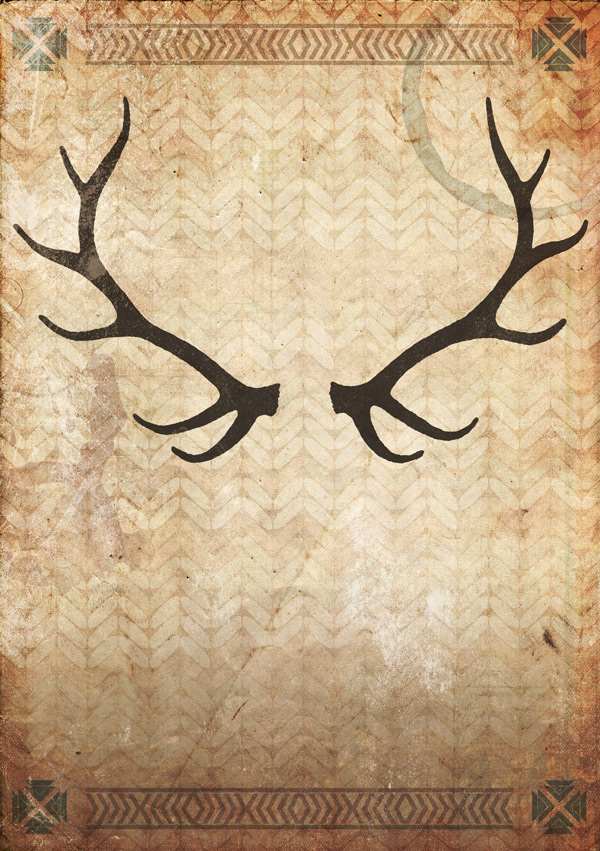
Set the blend mode to Multiply and reduce the Opacity to 75%. To soften the colour and make it fit with our overall design, create a clipped hue/saturation Adjustment Layer with the following settings:
Hue/Saturation Settings:
Colourize: On
Hue: 0
Saturation: 25
Lightness: +70

Next up, navigate to Holiday-Gift-Bundle-ghostly-pixels > Western-Tribal_byGhostlyPixels > Outline > PNG >11-Western-Tribal-byGhostlyPixels.png:
Paste on to your canvas, scaling and rotating so it looks similar to below:

We’ll add a drop shadow with the following settings to help the design stand out once we lighten the colour in the next step:

Drop Shadow Settings:
Blend Mode: Multiply
Color: #765b64
Opacity: 70%
Angle: 120
Distance: 0
Spread: 0
Size: 40
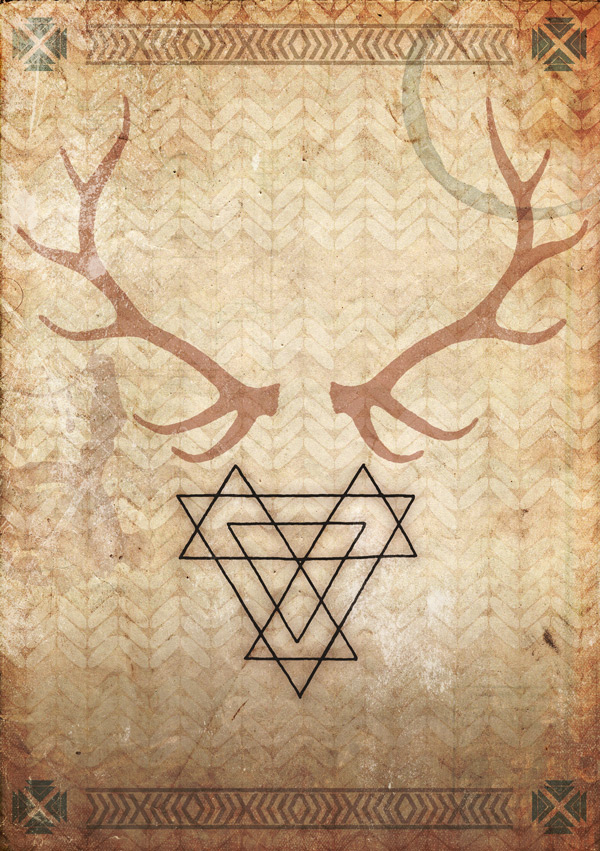
Create a clipped hue/saturation Adjustment Layer, and bring the Lightness up to +100 to change the colour to white:

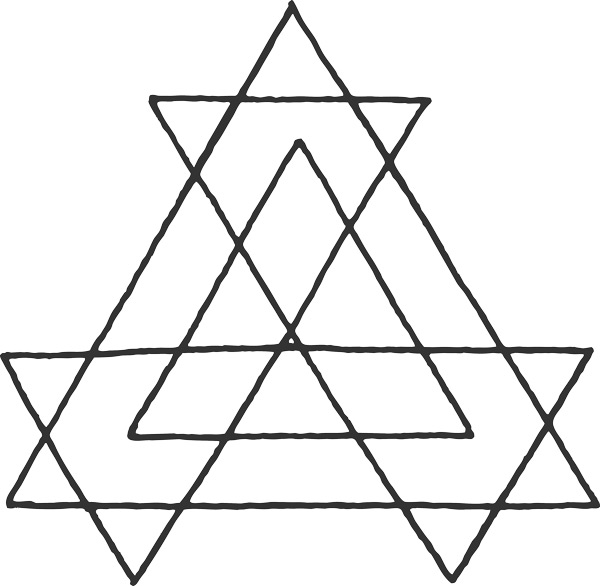
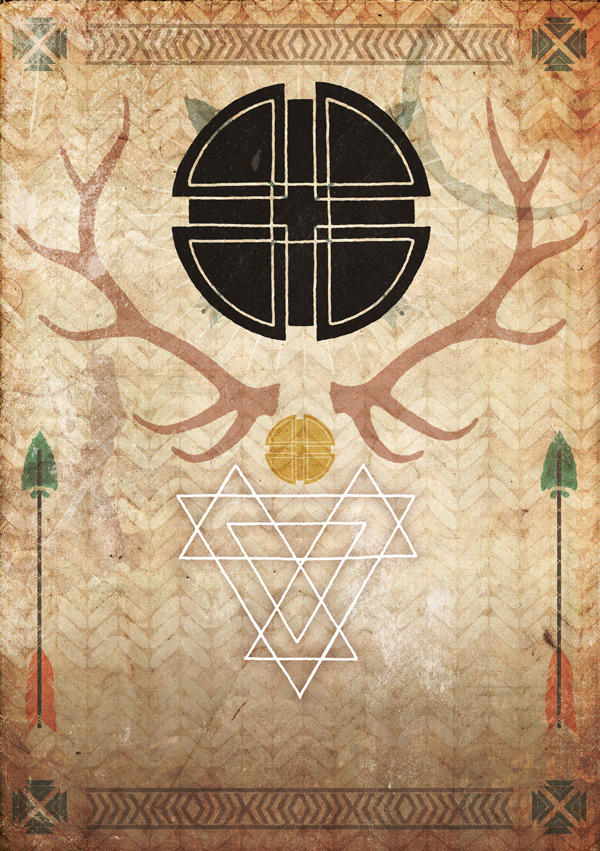
Navigate to Holiday-Gift-Bundle-ghostly-pixels > Western-Tribal_byGhostlyPixels > Solid > PNG >12-Western-Tribal-byGhostlyPixels.png
Paste on to your canvas, scaling and positioning so that it sits centrally between the antlers and triangle ‘skull’:
Change the blend mode to Colour Burn:

Create a clipped hue/saturation Adjustment Layer with the following settings:
Hue/Saturation Settings:
Colourize: On
Hue: 40
Saturation: 50
Lightness: +55
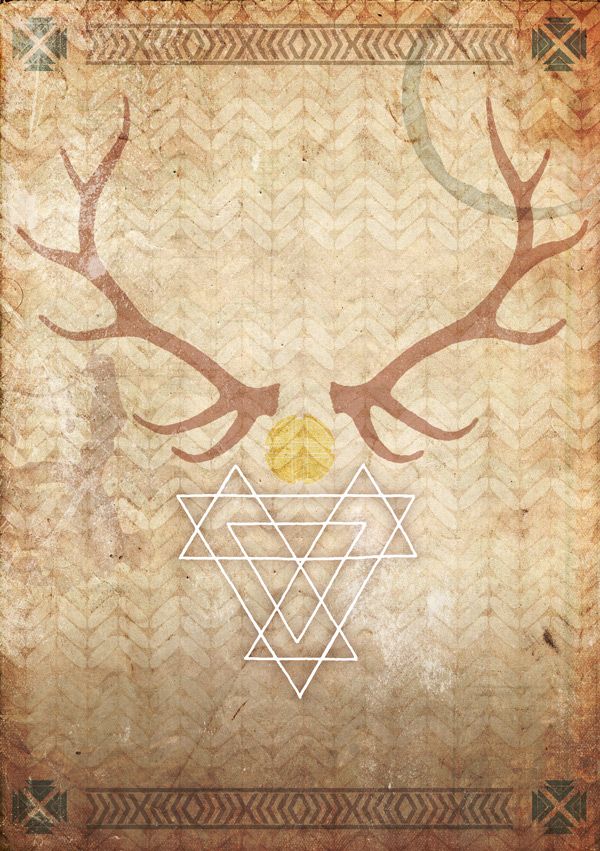
Duplicate both the image and hue/saturation Adjustment Layer, then change the blend mode of the duplicate image to Multiply and reduce the Opacity to 40%:
Group all the layers together in to a folder called “Head” for easy reference.
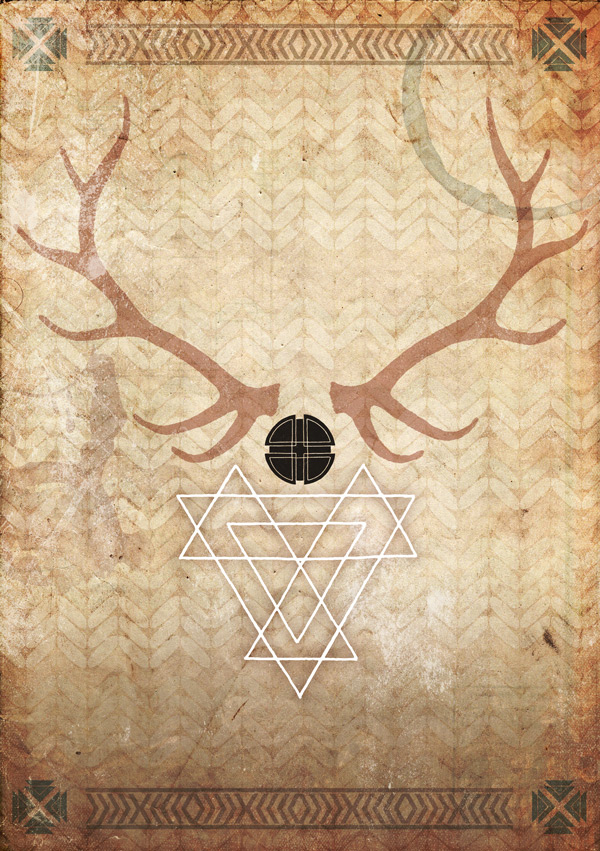
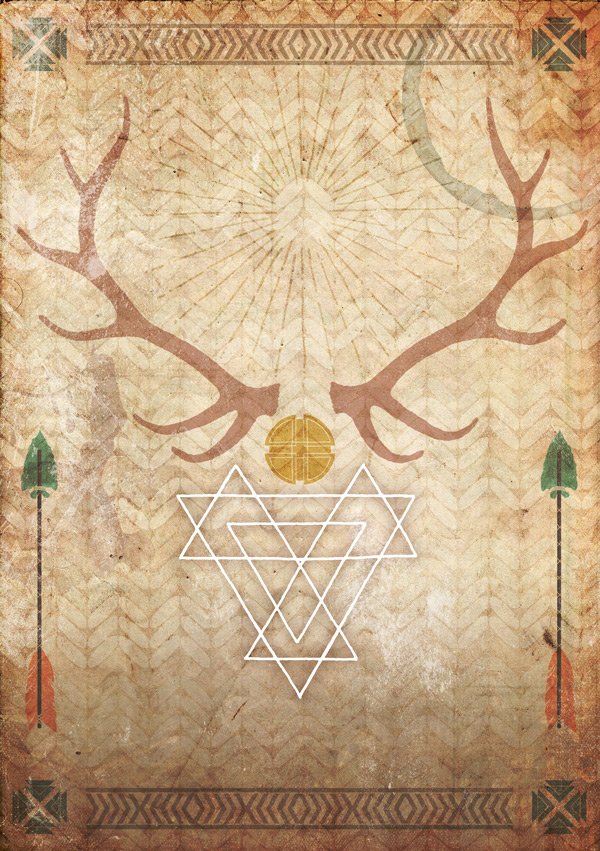
Step 9:
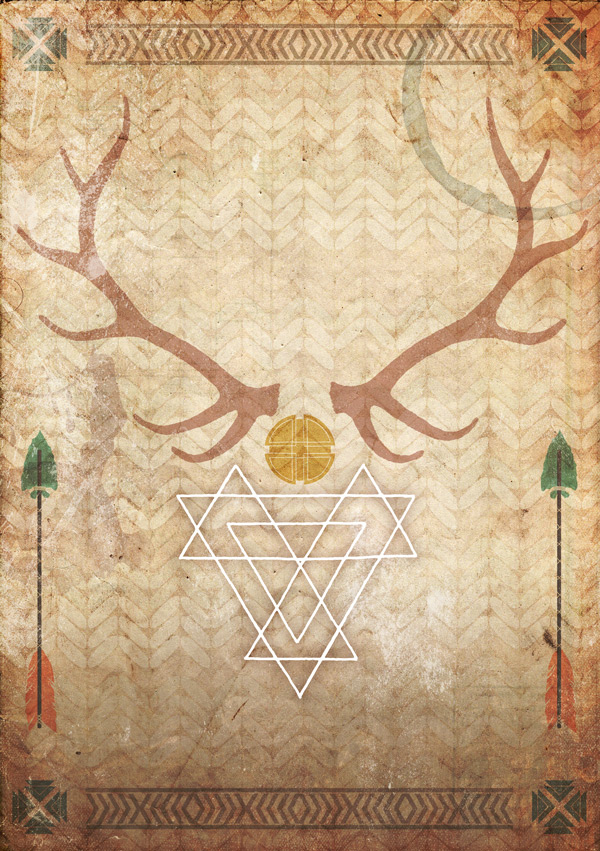
From the KJC Arrows and Antlers.eps we opened earlier, copy and paste the individual arrow on to your canvas, scaling and rotating as below:

The colour’s a little bold as is, so we’ll blend it in to our design a little more by changing the blend mode to Multiply and reducing the Opacity to 60%:

Duplicate the layer, then whilst holding down the ‘Shift’ key move across to the opposite side for balance:
Navigate to Holiday-Gift-Bundle-vintage-design-co > Hand-drawn-lettering-supply-kit > Starbursts > starbursts.psd:

Copy and paste Starburst 1 on to your working canvas, scaling and positioning as below:
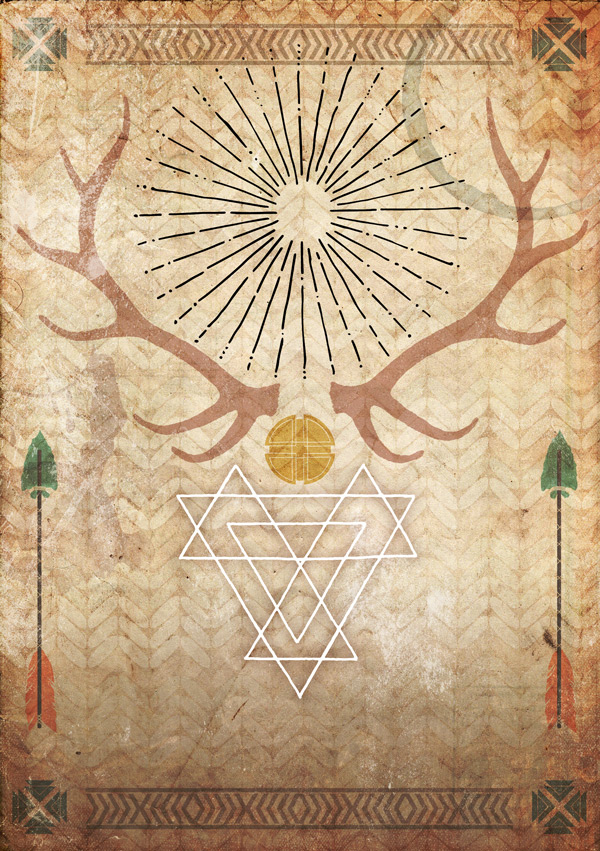
We want a slightly more subtle effect, so let’s change the blend mode to Soft Light and reduce the Opacity to 85%:
Create a clipped Invert Adjustment Layer to change it to a lighter, brighter glow:

Step 10:
Going back to the KJC Arrows and Antlers.eps file for the last time, copy and paste the crossed arrows on to your canvas, scaling, positioning and rotating as below. Set the blend mode to Multiply and reduce the Opacity to 80%:
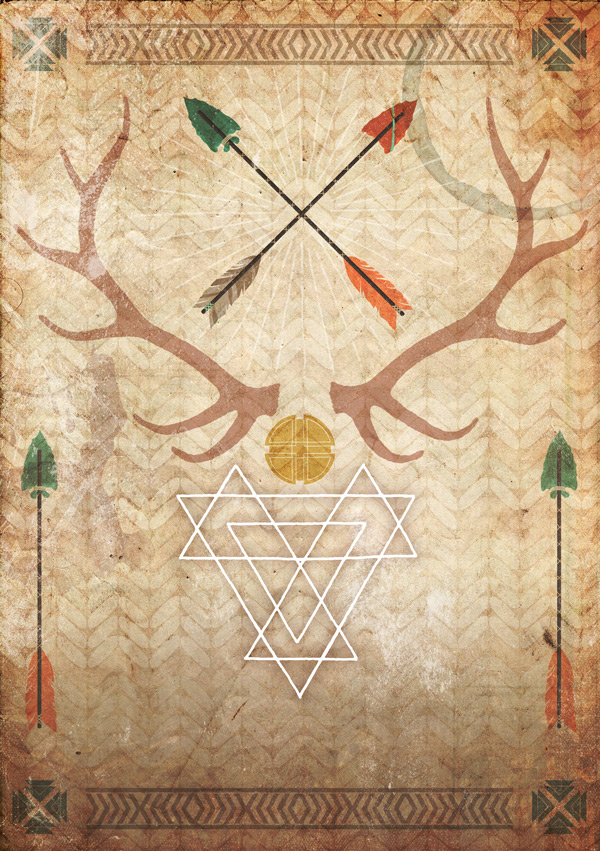
This is a bit bold for our needs, so we’ll create a clipped hue/saturation Adjustment Layer with the following settings to fix this:
Hue/Saturation Settings:
Colourize: On
Hue: 190
Saturation: 20
Lightness: +50
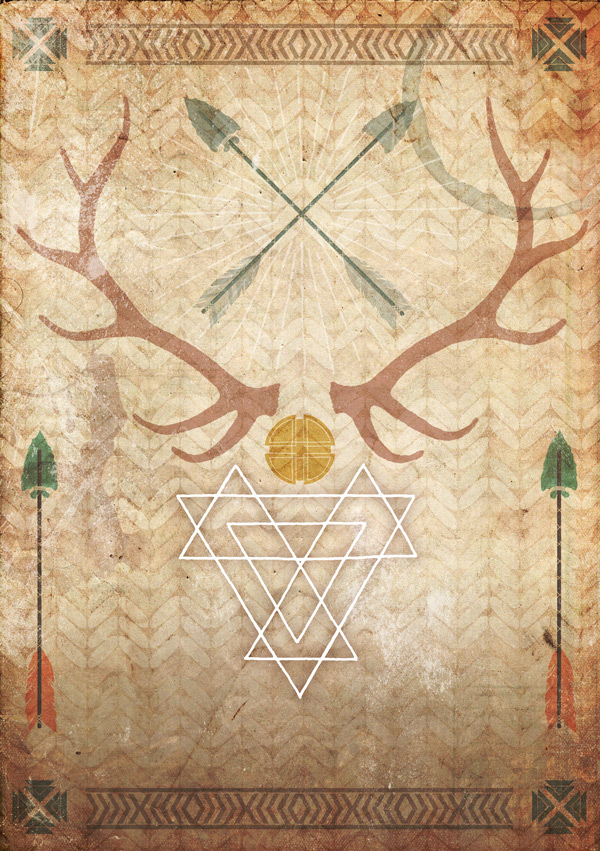
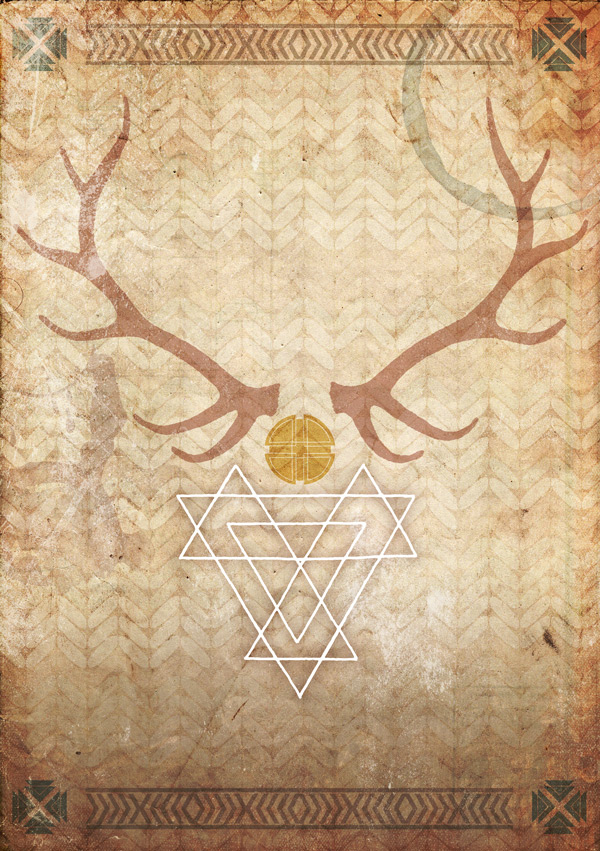
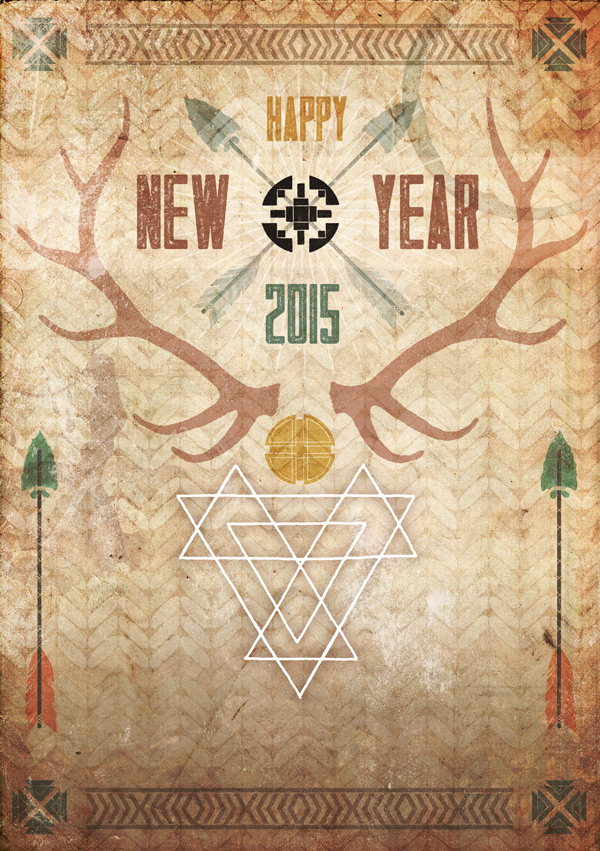
Navigate back to Holiday-Gift-Bundle-ghostly-pixels > Western-Tribal_byGhostlyPixels > Solid > PNG >12-Western-Tribal-byGhostlyPixels.png and paste on to our canvas so it’s positioned centrally on top of the crossed arrows, at about the same size.
Switch the blend mode to Screen for a subtle, illuminating effect.

Step 11:
On a new layer, use the Rectangular Marquee Tool to draw a rectangle that stretches the width of the canvas and covers the centre part of the arrows:
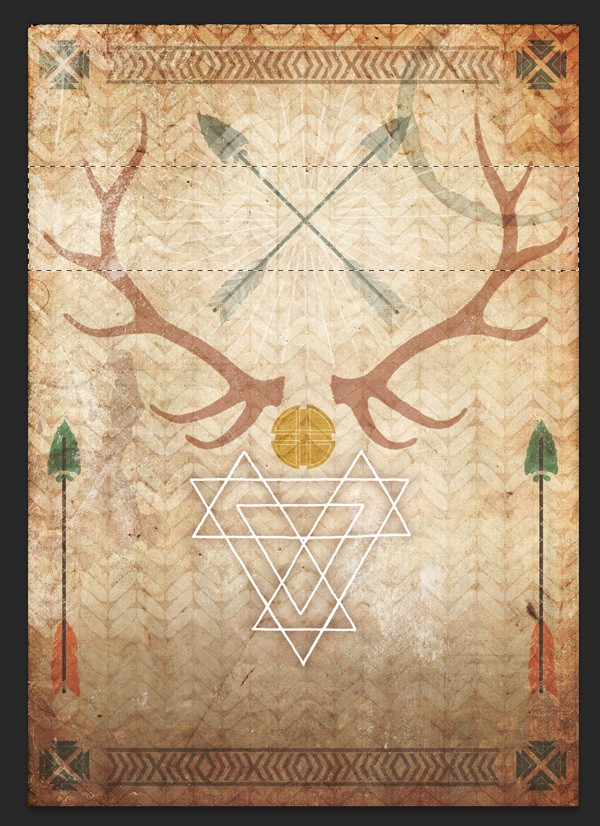
Set the foreground colour to #CEAFA1 and press ‘Alt + Delete’ on your keyboard to fill the selection with this colour.
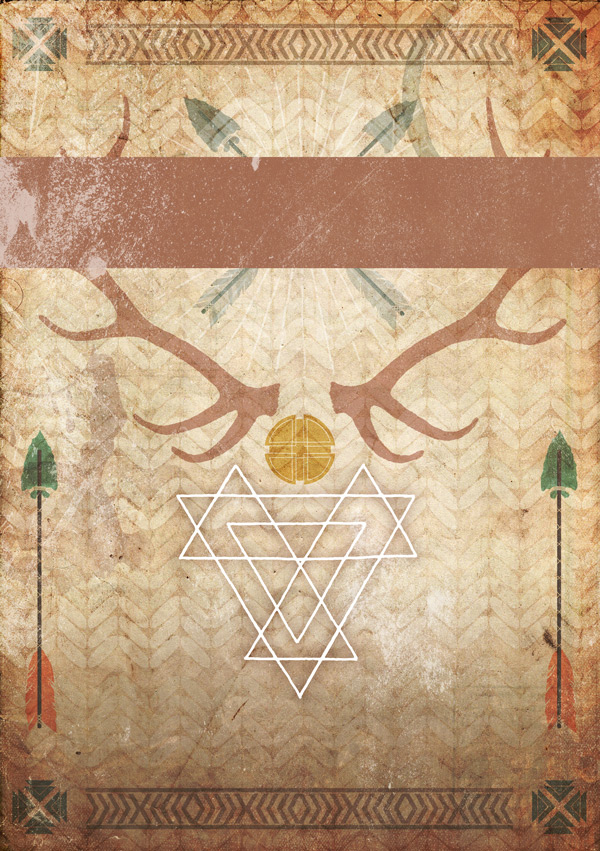
Change the blend mode to Overlay and reduce the Opacity to 60%:
This is to help make the text we’re about to apply stand out.
Now’s a good point to take a little screen-break, stretch the legs and maybe grab a hot drink so we can come back refreshed to complete the design. :)
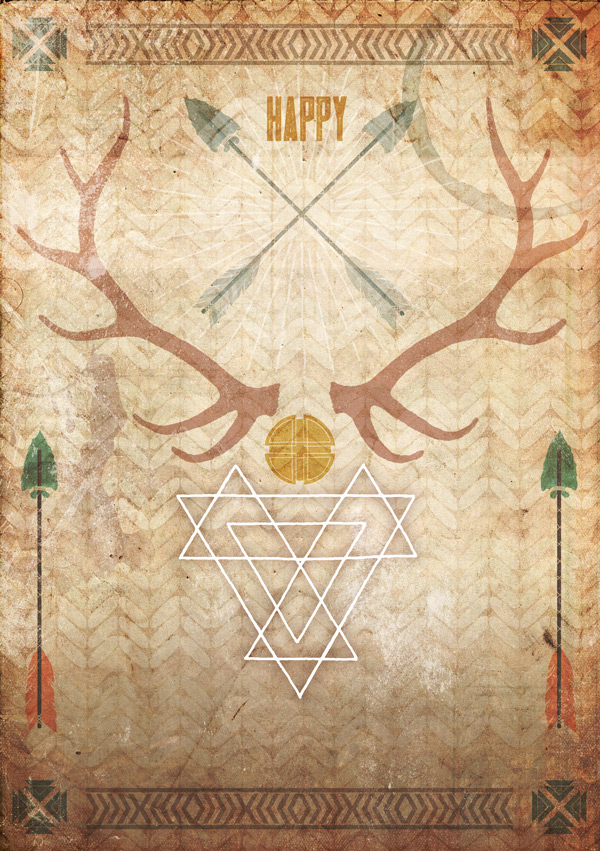
Step 12:
From the bundle, navigate to and install Holiday-Gift-Bundle-swist-blnk >Swistblnk Hobric Family Typeface > Hobric Vintage.ttf.
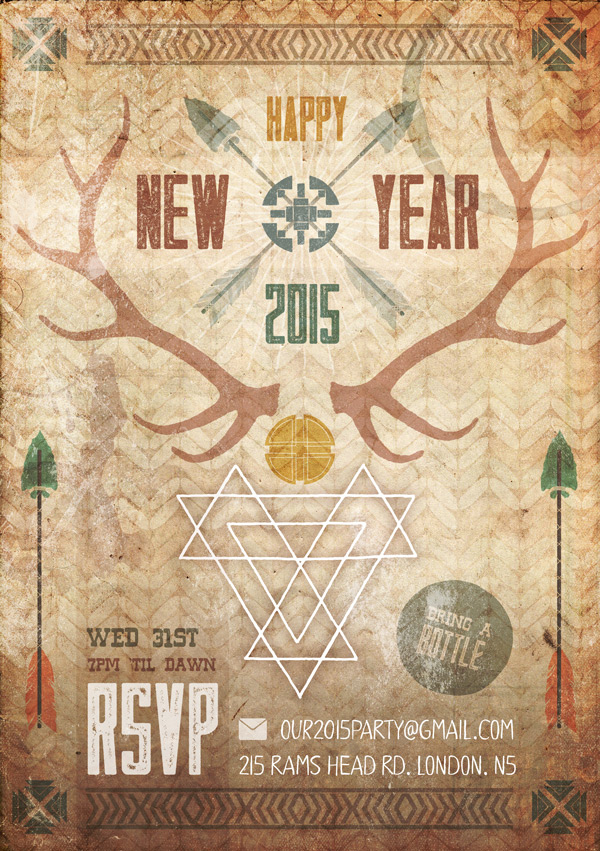
With Hobric Vintage as the font, on a new layer type “HAPPY” at 30pt and set the colour to #E2C588. Position so that it sits centrally in the top space between the crossed arrows, then change the blend mode to Multiply:
We’ll complete the header text using Hobric Vintage to type “NEW”, “YEAR” and “2015” with the following settings:
“NEW” Settings:
Font Size: 50pt
Colour: #BEA096
“YEAR” Settings:
Font Size: 50pt
Colour: #BEA096
“2015” Settings:
Font Size: 40pt
Colour: #95B5B5
Make sure all the text layers are set to Multiply for the blend mode, and that they’re positioned in the spaces as below for a nice balance:
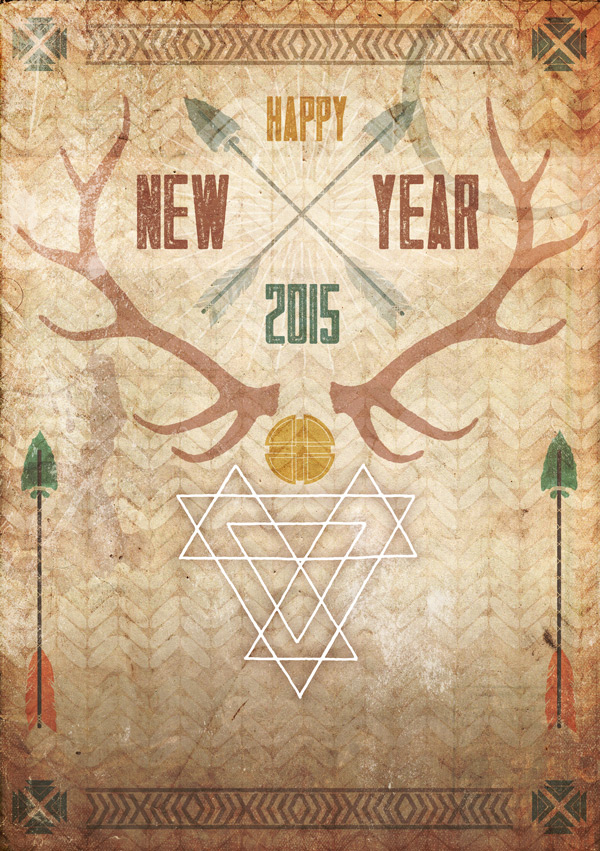
We’ll finish off the header by filling the space in the centre between the words, as it looks distractingly empty at the moment.
Navigate to Holiday-Gift-Bundle-ghostly-pixels > Western-Tribal_byGhostlyPixels > Solid > PNG >9-Western-Tribal-byGhostlyPixels.png, then copy and paste on to our canvas so that it sits neatly in the middle of our header:
Our space is filled, but now it’s distractingly dark! Let’s fix this by applying a clipped hue/saturation Adjustment Layer with the following settings:
Hue/Saturation Settings:
Colourize: On
Hue: 182
Saturation: 10
Lightness: +55
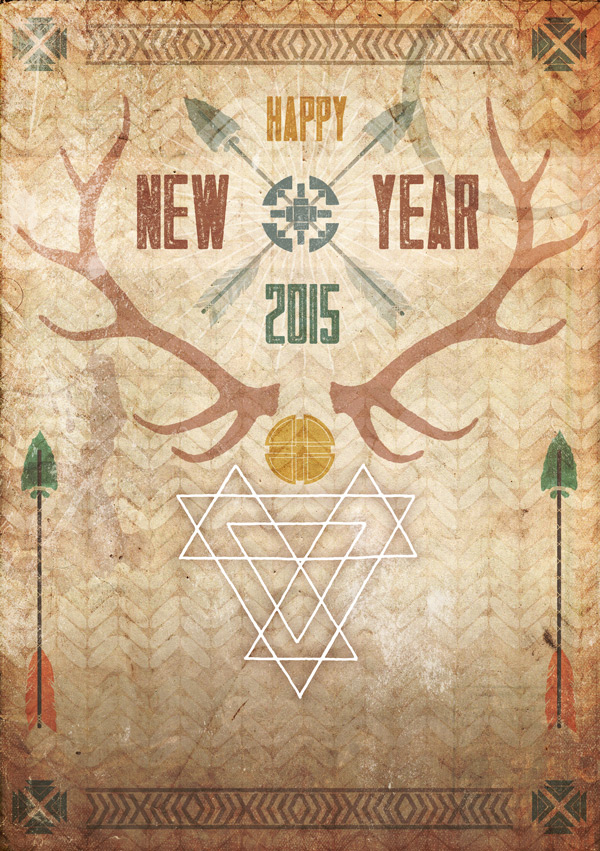
That fits in much more nicely now. :)
Step 13:
As with any invite, we now need to provide some details about the event.
For this, we’ll need to install a couple more fonts from the bundle so that they’re ready to use:
Holiday-Gift-Bundle-jackrabbit-creative > Hickory > Hobric Vintage.ttf
Holiday-Gift-Bundle-rodrigo-typo > LILIRUN > Hickory.ttf
First though, we’ll use Hobric Vintage as before to type “RSVP” in white at about 61.5pt. Drop the Opacity of the layer to 75% and position so that it sits in the lower left corner:

Now we’re ready to use Hickory as the font! Type “7pm ’til dawn” at 16pt with #BEA096 set as the colour. Position so that it sits above the “RSVP” text and aligns left with it, then change the blend mode to Multiply and reduce the Opacity to 80%:

With the font still as Hickory type “Wed 31st” at 24pt and with #A2AFA3 as the colour. Position so that it sits above “7pm ’til dawn” and is aligned left with all the text in that column. Once you’re happy with the position set the blend mode to Multiply and reduce the Opacity to 85%:

To help this text stand out a bit, we’re going to add some graduated colour behind it.
Create a new layer below all the text we’ve just added. Then, use the Rectangular Marquee Tool to draw a rectangle from the bottom of the canvas that goes slightly over the width of the text and up to about level with the top of the gold disk in the centre of our image:
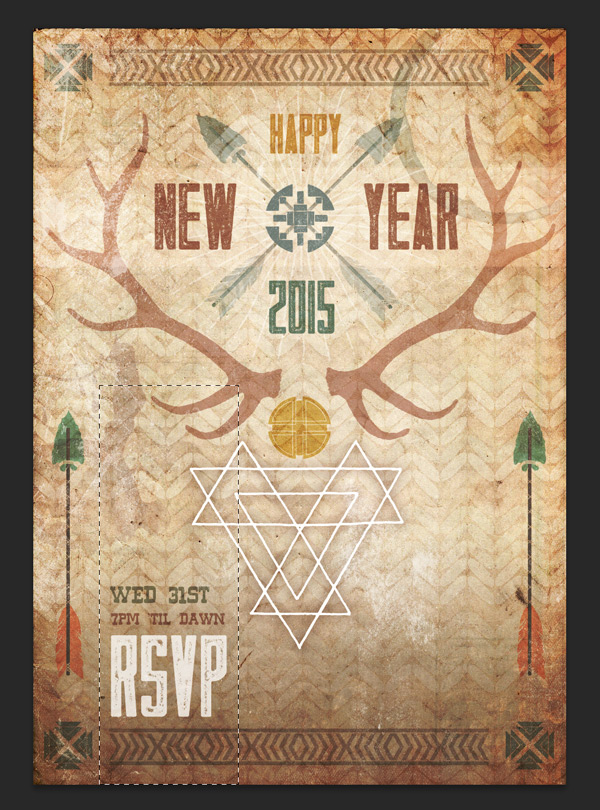
Set the foreground colour to #A26A51 and in the Gradient Tool setting make sure the foreground colour fades to transparent. With the marquee selection still active, hold down ‘Shift’ on the keyboard whilst drawing your gradient line – start about centre of the selection and stop a little before the top:
Once you’re happy with your gradient position, set the blend mode to Multiply and drop the Opacity way down to 20% for a subtler effect:

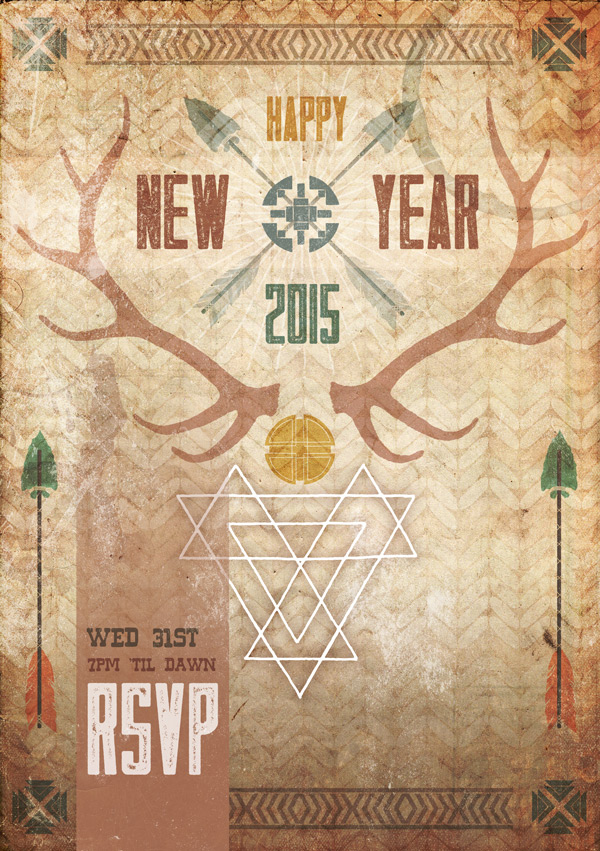
Step 14:
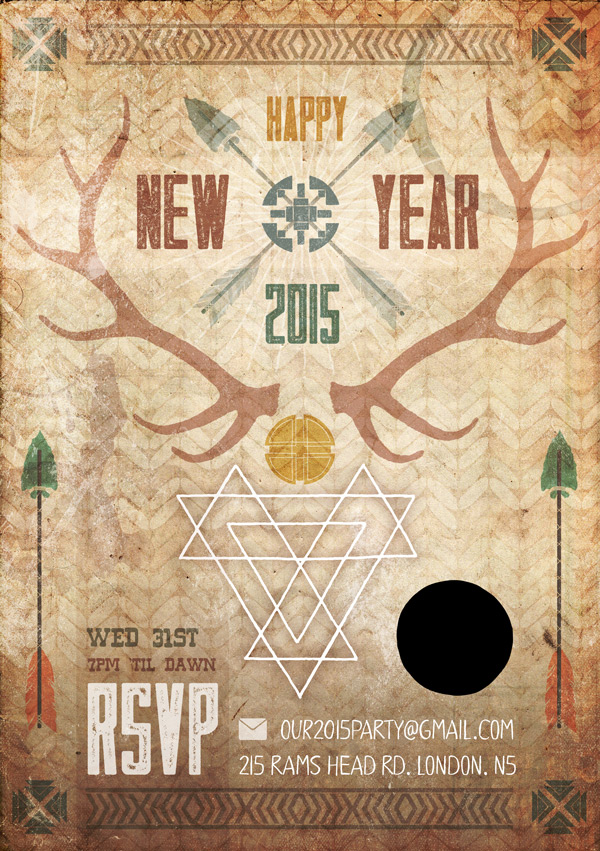
We’ll finish off the details by navigating to Holiday-Gift-Bundle-vintage-design-co > Flat-Icon-Set > flat_icons.ai and selecting the email/envelope icon:
Copy and paste on to our Photoshop document so that it sits next to the “RSVP” text, scaling to a similar size as in the image below and reducing the opacity to 70%:

Select Lilirun as the font and type an email address – we’ve used “our2015party@gmail.com” as a fictional example. Set the colour to white and the size to 19pt, as this most closely matches the text to the height of the icon. Position it so that the end of the text aligns with the edge of the border at the bottom of the image:
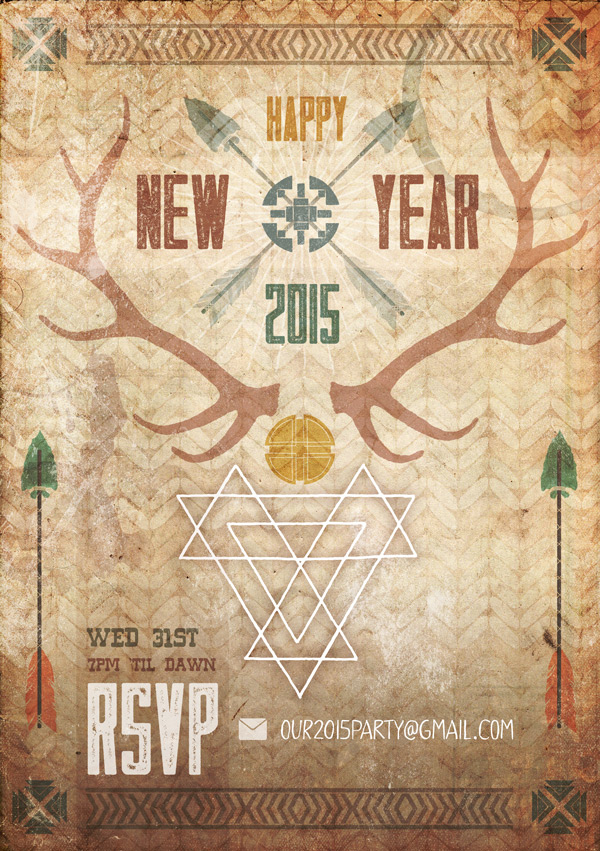
With the same text settings as the email address, type “215 Nags Head Rd. London. N5” to complete our fictional address:

Step 15:
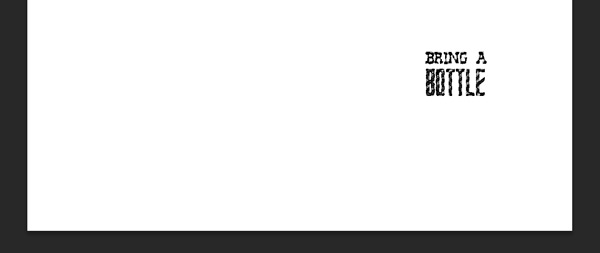
We’ve got a bit of a blank space to the right hand side of our design that needs filling, so we’ll use this to create a little badge that instructs our guests to ‘bring a bottle’.
Navigate to Holiday-Gift-Bundle-vintage-design-co > Hand-drawn-lettering-supply-kit > Shapes > shapes.psd:

Copy and paste the filled circle on to our working canvas, so that it sits nicely in the space on the right:
Once you’re happy with the position of the circle, create a Layer Mask. Whilst pressing ‘Alt’ on the keyboard, click on the mask in the layers panel to see it on its own, then type “Bring a Bottle” using the following settings:
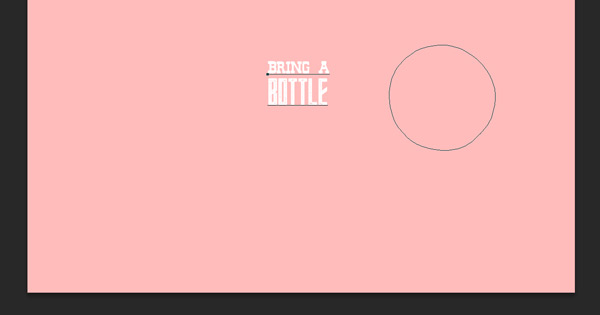
Note: Make sure the font colour is set to black for it to work as a mask. The text will change white temporarily on the red background whilst you type, then return to normal.
“Bring A” Settings:
Font Family: Hickory
Font Size: 16pt
“Bottle” Settings:
Font Family: Hobric Vintage
Font Size: 20pt
Once you’ve confirmed the typing, the text and background should return to normal and the text will automatically have its outline selected. Move this across closer to where the circle roughly is on our design:
Click anywhere on the layer panel to return to our main canvas, then click on the little chain between the mask and circle shape to unlink them. This is so we can easily reposition the text whilst its still selected. Move the text so that it sits centrally in the circle, then rotate slightly for a bit of interest:
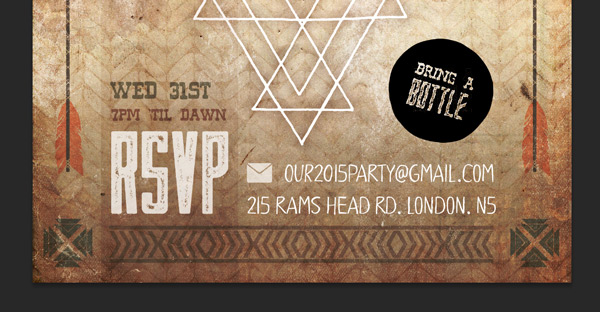
To finish off this step, we’ll change the colour of the circle using a clipped hue/saturation Adjustment Layer with the following settings:
Hue/Saturation Settings:
Colourize: On
Hue: 180
Saturation: 10
Lightness: +77
Step 16:
Finally, as we all love a bit of texture, we’ll add one last one to finish. :)
Navigate to Holiday-Gift-Bundle-ilham-herry > Paint Texture Pack > Paint Texture Pack.psd and select Texture 7:

Copy and paste this on to our working canvas, rotating and scaling to fit:
To finish, change the blend mode to Overlay:
And we’re done!
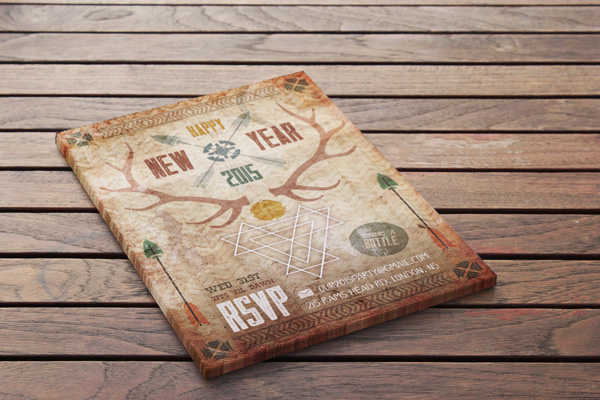
I hope you enjoyed following this tutorial and had fun with your new resources. We’d love to see your own take on this design, and can’t wait to see what you create in 2015! Do share your designs on the Facebook page as we’re always so inspired by the creativity within the community. :)
Hopefully this tutorial showed you just some of the ways you can use the great variety of resources available in this bundle, and sparked plenty of ideas of your own. Remember, you can get this bunch of design goodness completely free this week:
$456 Worth of Popular Design Resources Free for the Holidays!
PS: I just want to take a quick opportunity to say thank you for all your feedback on the tutorials this past year. It’s been a privilege seeing what you’ve created using them as a guideline, and extremely rewarding knowing that they’ve helped you develop and grow confident in your own skills and creativity. It really warms my heart when you share your own take on them! So I’d like to say a personal thank you, and wish you a happy, healthy, fun and of course, creative New Year! Jo x
This is very nice! It could be altered for any kind of poster, too! Thank you so much, Jo! I love the style of this, kind of ‘western’.
Su
Jo did an amazing job with this design and tutorial. I’m glad you like it Su. :)
Cool piece Jo! I love what you did with the pattern in the background.
Thank you so much for the kind words, Simon! Jo did an awesome job :)
Very coool!!!
Hehe Indeedy. :)