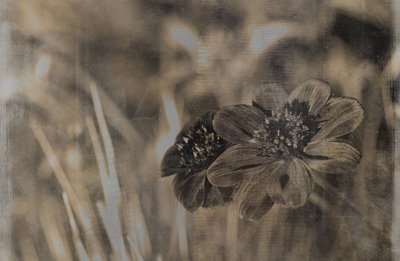
WHAT WE’RE CREATING:
In this tutorial I’ll show you how to use textures to build up an authentic vintage outcome. You’ll learn how to correctly manipulate and blend textures to achieve the best effect, as well as learning how effective it can be to layer up multiple textures and layers for a more unique outcome.
Let’s get started!

Follow along with this tutorial: Download the freebies
This tutorial is accompanied by a fantastic freebie pack, taken from this week’s deal, offering you 270 of 2 Lil Owls best textures for just $20.
To give you a sample of the 270 textures on offer, we’re giving away 5 beautiful masked textures.
Step 1:
Start by downloading this image of two elderly musicians playing together.
Open it up in Photoshop. Resize the image to 1000px width.
This will be our base photo.

Step 2:
Apply a black/white adjustment layer to desaturate your photo in a non-destructive way.

Create a photo filter adjustment layer, and apply Warming Filter 81. Use the following settings:
Photo Filter Adjustment Layer Settings:
Filter: Warming filter (81)
Density: 60%
Preserve Luminosity: Yes
Layer Opacity: 100%

Step 3:
Download the free texture pack available at the top of this page. This includes 5 beautiful 2 Lil Owls textures, not available for free anywhere else.
You will need these textures to follow along with the rest of this tutorial.
Download the free texture: Creative Masks 2 Set – Texture 3.
Paste it into your canvas and resize it to fit.
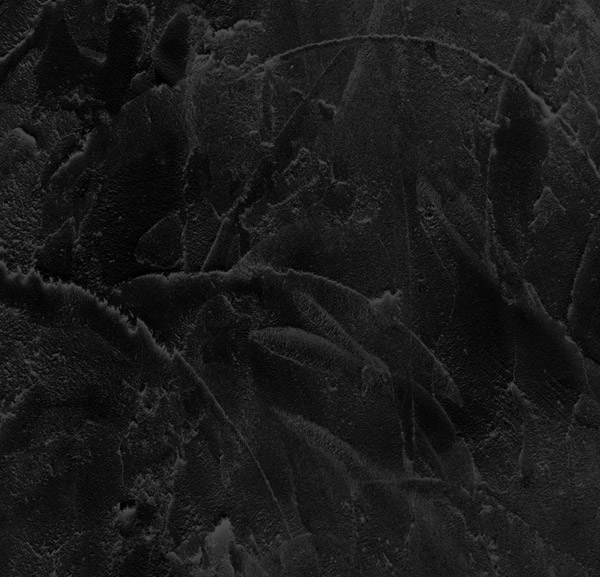
Now change this texture layer’s blend mode to ‘screen’. This will hide the black parts of this layer, just letting the lighter details show up. This will naturally lighten your image, but will give a lovely effect of the markings, scratches and creases enhancing your image, giving it a vintage appearance.

Step 4:
Return to your free texture pack (again, you can access this at the top of this page).
Select the beautiful texture Creative Masks 2 Set – Texture 8.
Paste it into your canvas, and resize it accordingly:

Again, set this texture layer’s blend mode to ‘screen’. This will hide the black parts of the logo, but still show the lovely vintage detailing.
TOP TIP: When working with 2 Lil Owls textures it’s really effective to layer up multiple textures to build up your desired outcome.

Step 5:
Repeat the same texture used in steps 3 and 4, to apply Creative Masks 2 Set – Texture 20 from your free texture pack:


Step 6:
By applying the screened textures the image is looking more vintage and damaged, but it’s also looking too light.
To fix this, apply an exposure adjustment layer, using the setting below:
Exposure Adjustment Layer Settings:
Exposure: -0.87
Offset: +0.0759
Gamma Correction: 0.66
You can see that these exposure settings taken a lot of the brighten out of the image, which is appropriate as we’re trying to achieve a more vintage effect.

Now apply a levels adjustment layer using the settings below:
Levels Adjustment Layer Settings:
11 / 0.85 / 255
This will help to darken your image and enhance the weathered, vintage look:

Step 7:
Time to add some more lovely textures to our image, to build up the vintage effect even further.
Access your free textures pack (taken from the top of this page).
Paste the Creative Masks Set 2 – Texture 29 into your canvas and resize accordingly:
Rather than setting this layer to ‘screen’ mode, we’re going to try a different effect.
Change the layer blend mode to ‘hard light’ and reduce it’s opacity to 13%.

Step 8:
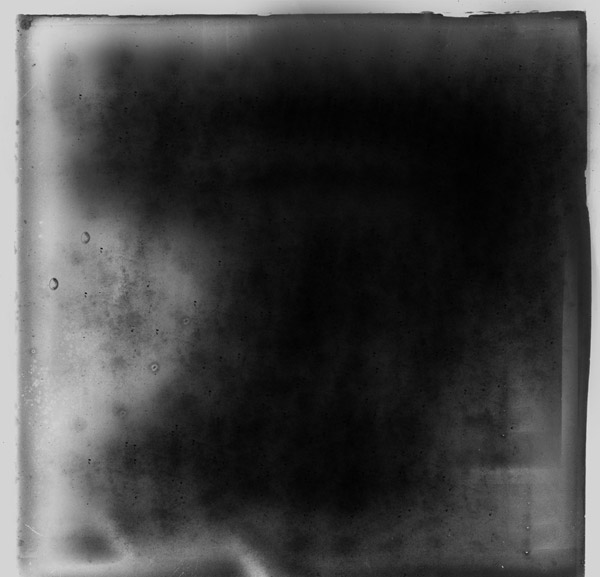
To apply a final vintage touch, we’re going open the final texture from today’s freebie pack.
This texture is taken from the awesome Transfers pack, available as part of our current 2 Lil Owls Texture deal.
Paste the Transfer Texture Collection – Texture 1 into your canvas:

Change this layer’s blend mode to ‘soft light’ and reduce it’s opacity to 50%:
Step 9:
Congratulations! You’ve just achieved a really authentic looking vintage effect.
Now…. what if you want to apply this vintage effect to more than one photo?
Well, because all of the techniques in this tutorial have been non-destructive, it’s actually incredibly easy.
In the image below you can see the layer arrangement. I really advise downloading the freebies from the top/bottom of this page, as we’ve included the Photoshop source file for this tutorial. This is a really easy way to follow along and edit some of the effects yourself.
In your layer order you can see ‘Photo 1’ selected. To apply the same vintage effect to alternate photos all you need to do is paste them into your canvas and ensure that the new layer is positioned beneath all of your adjustment/texture layers.
You can see in the image below where layers ‘Photo 2’ and ‘Photo 3’ are positioned:

Step 10:
I was apply to apply the same vintage effect to these additional photos in 5 seconds flat.


AND WE’RE DONE
I really hope that you enjoyed this short tutorial. This vintage effect can be applied to almost any photo, and is really versatile. Have fun with it, and enjoy your freebies pack.
Thank you this is a really good tutorial and I have just the photo I want to use for this technique and thanks to Denise for the wonderful textures at 2Li’ll owls. All works so well together.
Yay it is fantastic to hear that you already have just the photo that you would like to use this technique for Liz! If you would be happy sharing your work with us, we would love to see what you are working on!
Thanks so very much for this wonderful tutorial – so clearly described, with such great free textures and transfers. How generous of you to share all this – very deeply appreciated!
You’re so welcome Deborah, thank you so much for posting such an awesome comment!
We’re so glad that this tutorial is really useful, this is music to our ears!
We hope that you enjoyed picking up some new tips and get great use out of your new textures :)
This is an excellent tutorial. I have been looking for one like this for a long time
Hey Rajiv,
What perfect timing! We’re so glad you liked it and are so just happy we could help :D
Fabulous tutorial and freebie pack!! Thank you so much!
Hey Lisa,
You are very welcome and thank you for taking the time to comment on this one!
We are so pleased you are liking this one and happy designing :)
Oh my soul! It seems the older I become, the more I love the vintage looks. This is such a great tutorial. Can’t wait to try it out on a lot of my photos. Thank you for the clear instructions and generous freebie download.
Regards
Elsie van Rooyen