Are you looking to convert your brushes from Procreate to Affinity Designer? Well we have got you covered as this tutorial will talk you through the process, step by step. You can also use this tutorial if you want to make a brand new raster brush and/ or just want to know how to make a brush in Affinity Designer.
Step 1. Prepare your brush
- Open Procreate.
- Create a document with your brush stroke isolated on it. Make sure your brush is black and keep the background transparent.
- Save your brush swatch as a PNG and select the highest quality.
Step 2. Choose the right artboard
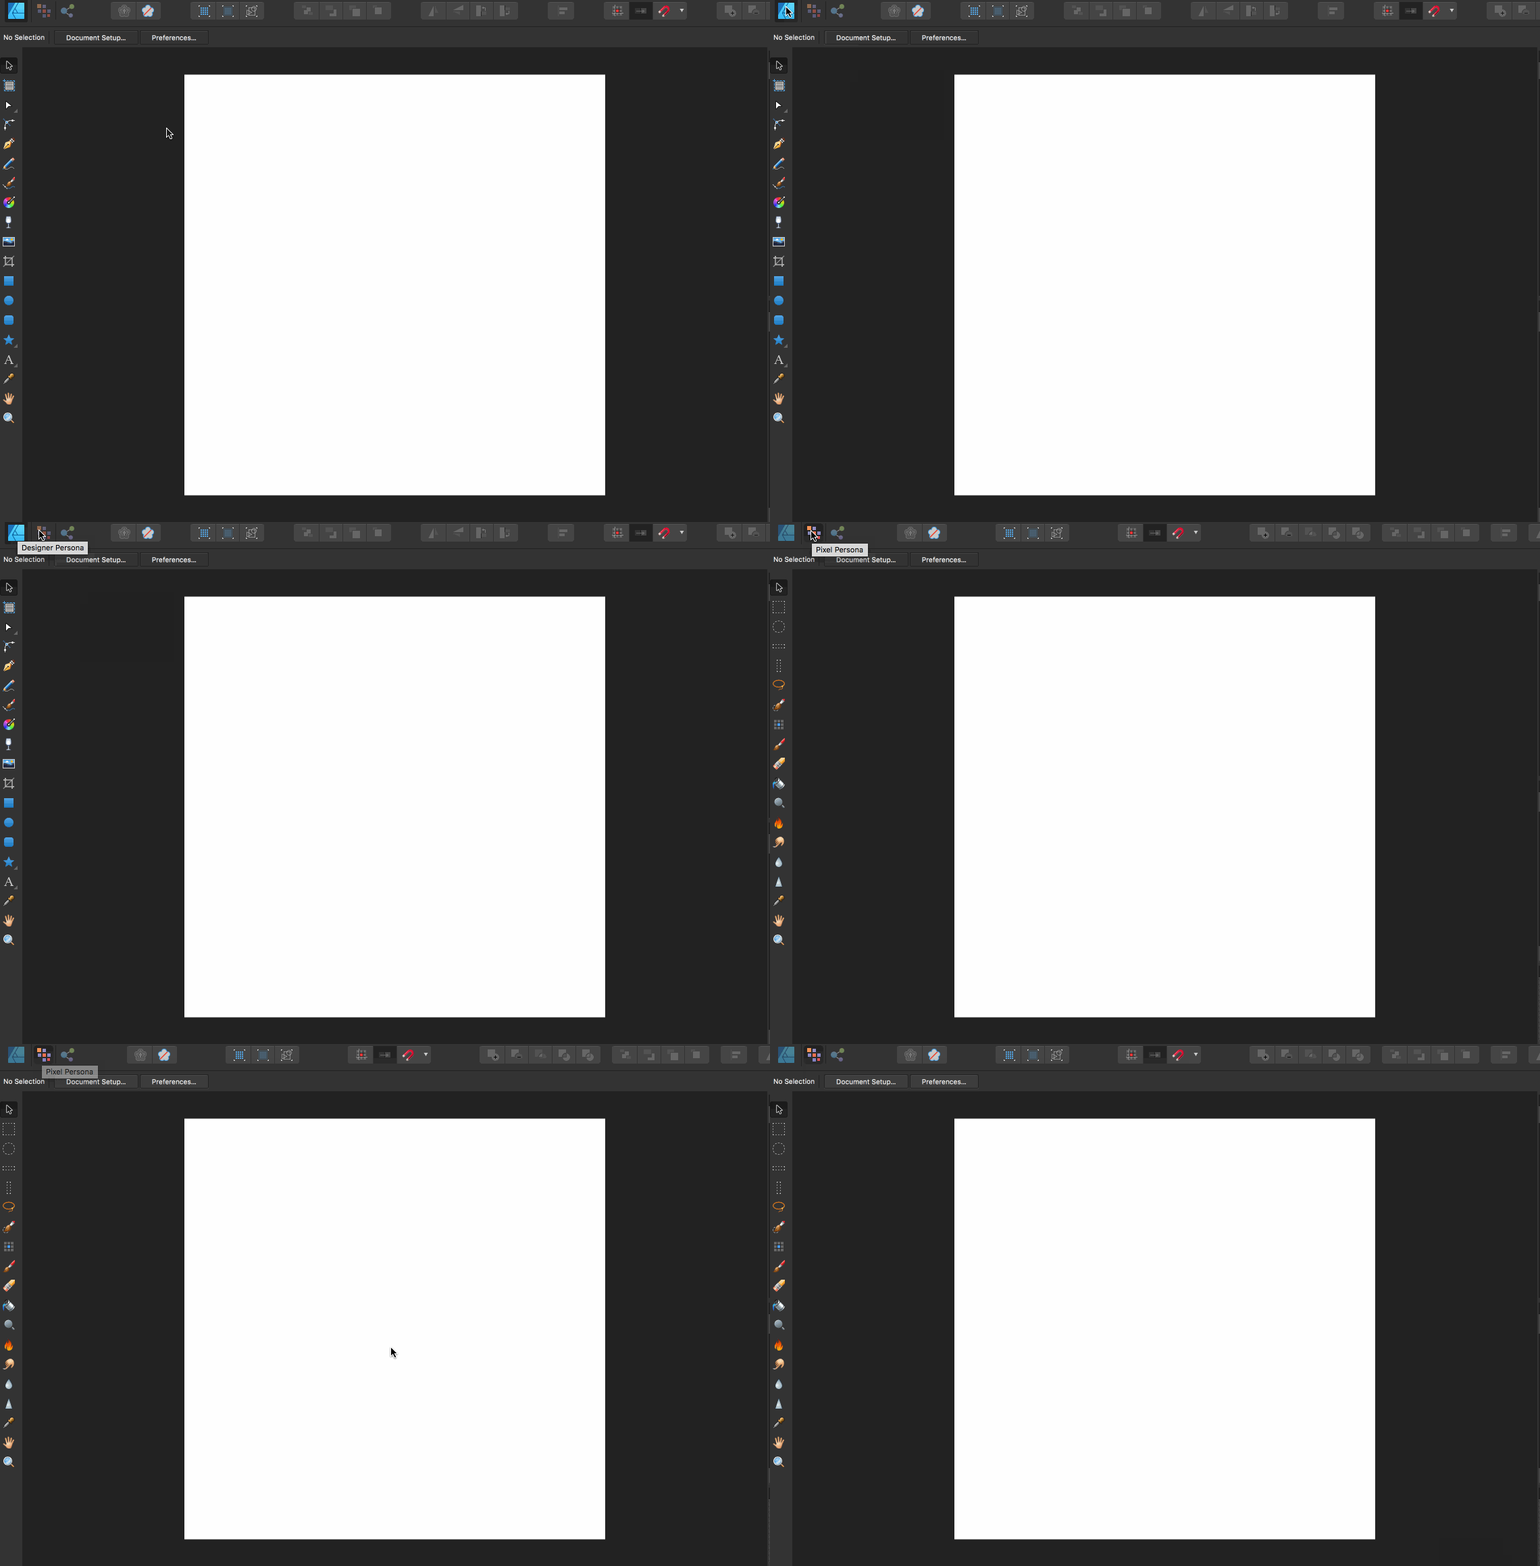
In Affinity Designer you have 3 different Personas- Vector, Pixel (aka Raster) and Export. These are located in your top panel and please note, Affinity Designer will always default open in the Vector Persona.
- Open Affinity Designer.
- Click on the icon next to the Affinity Designer logo (Looks like a series of squares) so that you are now working in Pixel Persona.
Step 3. Import your brush.
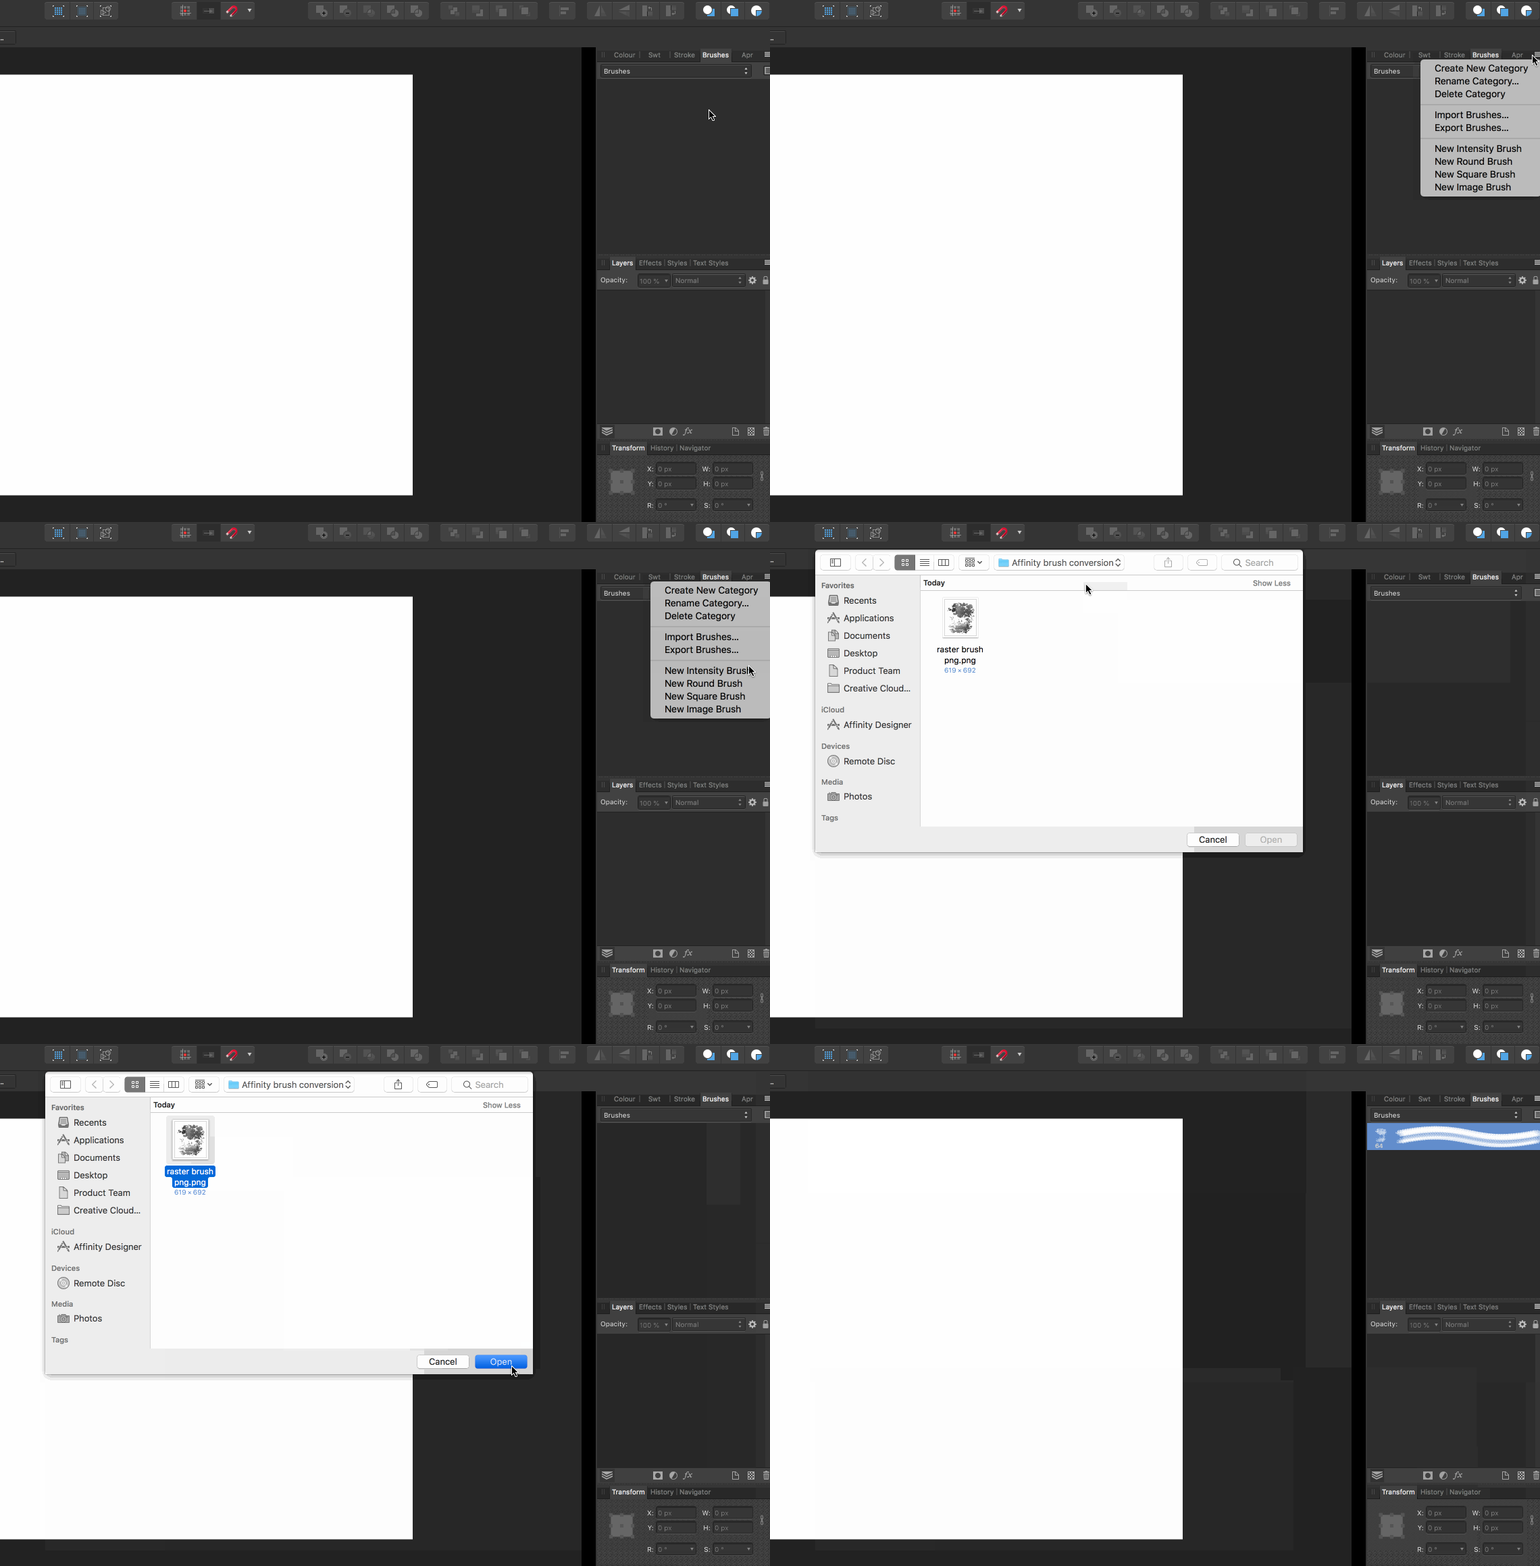
- Click the options icon in your right side panel that looks like a tower of 4 horizontal lines (this is called a ‘burger menu’), as seen below.
- Select New Intensity Brush. This will then open your computer files.
- Select your brush PNG you prepared in Step 1.
- Your brush will now appear in brushes panel.
Step 4. Side by side brush test.
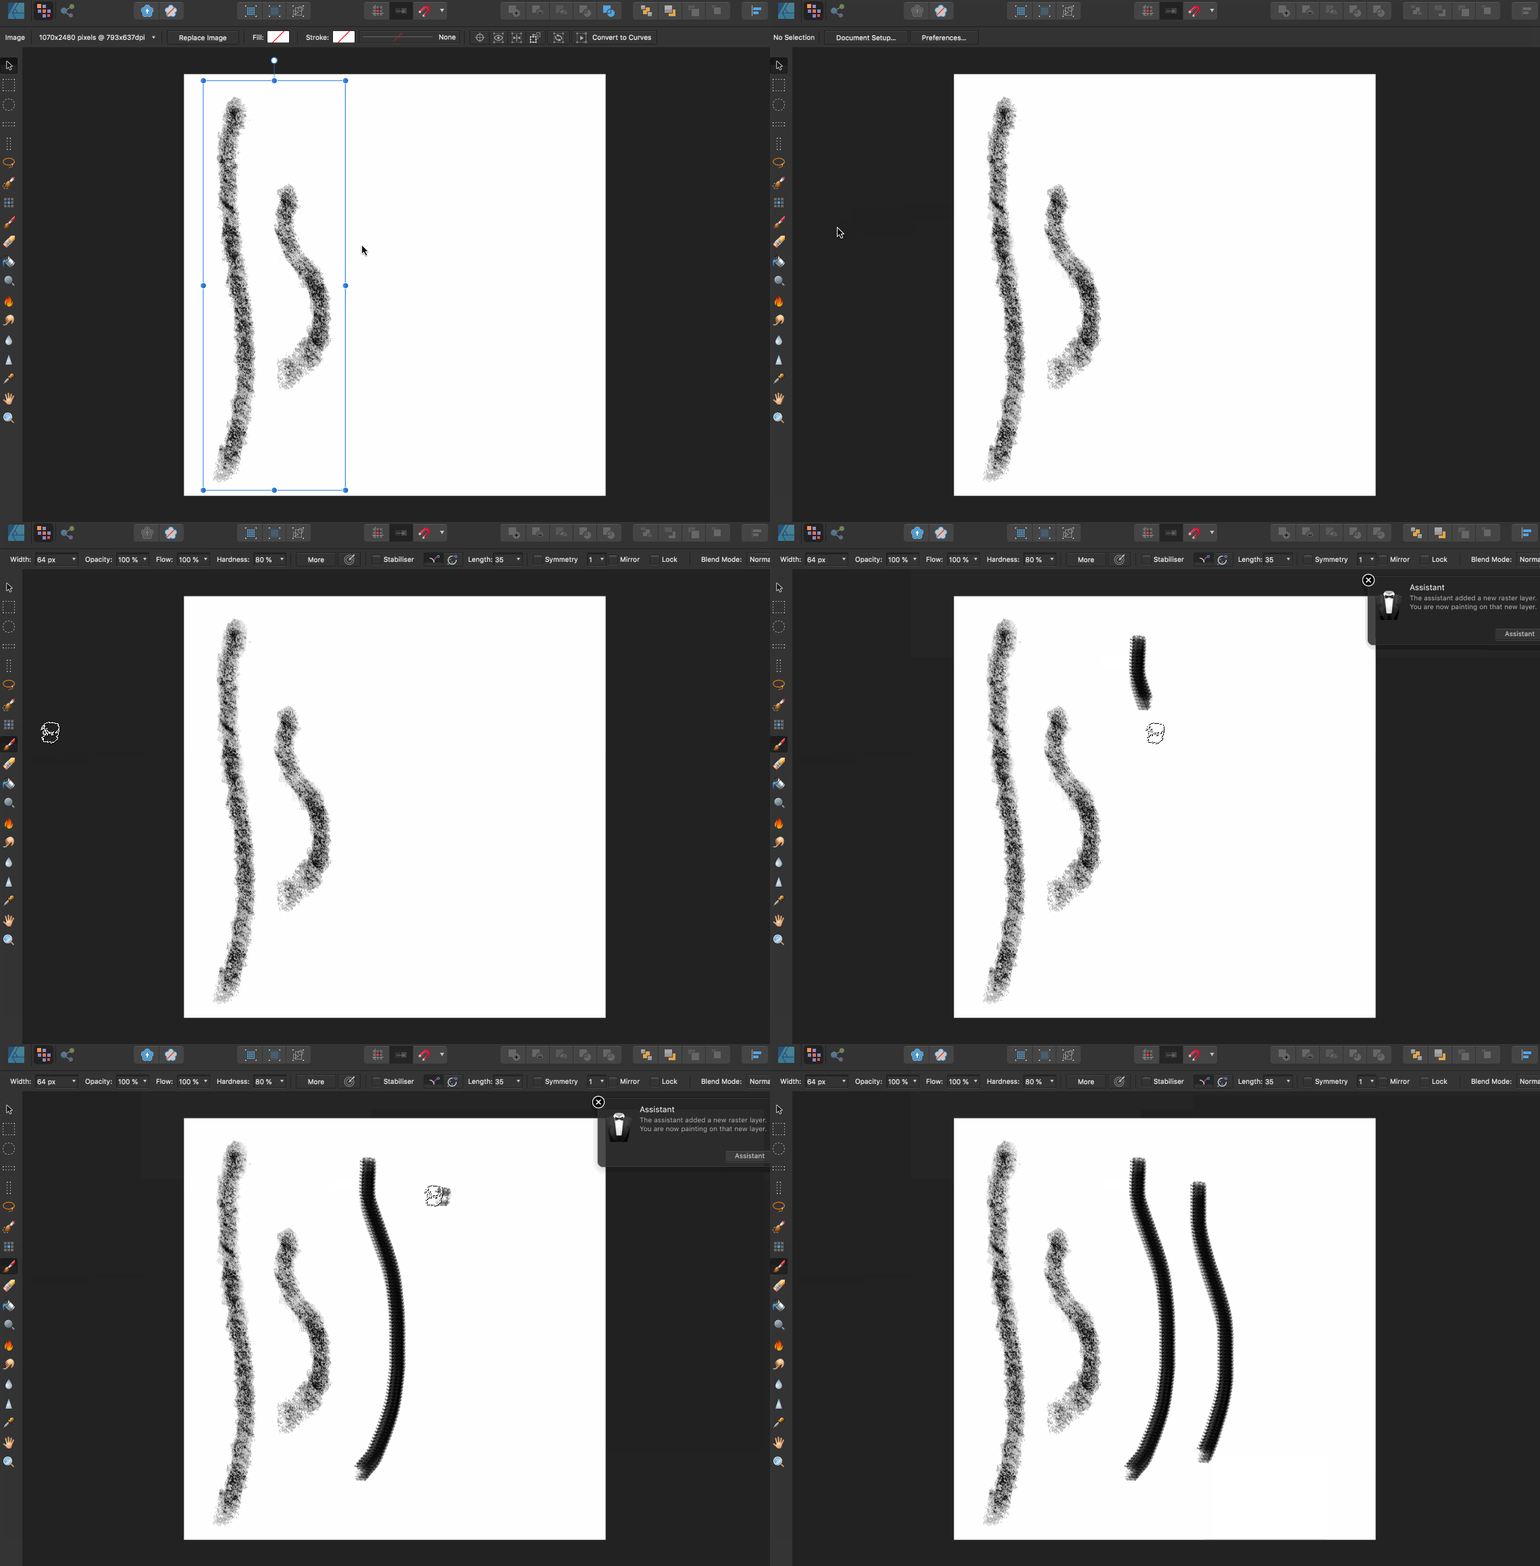
This is an optional step but it can be helpful to be able to match up your Affinity brush’s appearance to your original, by comparing them side by side.
- Open Procreate.
- Create a simple brush stroke with your Procreate brush and save as a PNG or JPG.
- Open Affinity.
- Place your saved brush stroke file in Affinity.
- Draw a brush stroke using your new Affinity brush next it so that you can compare their appearance, and see any differences.
Step 5. Edit your brush.
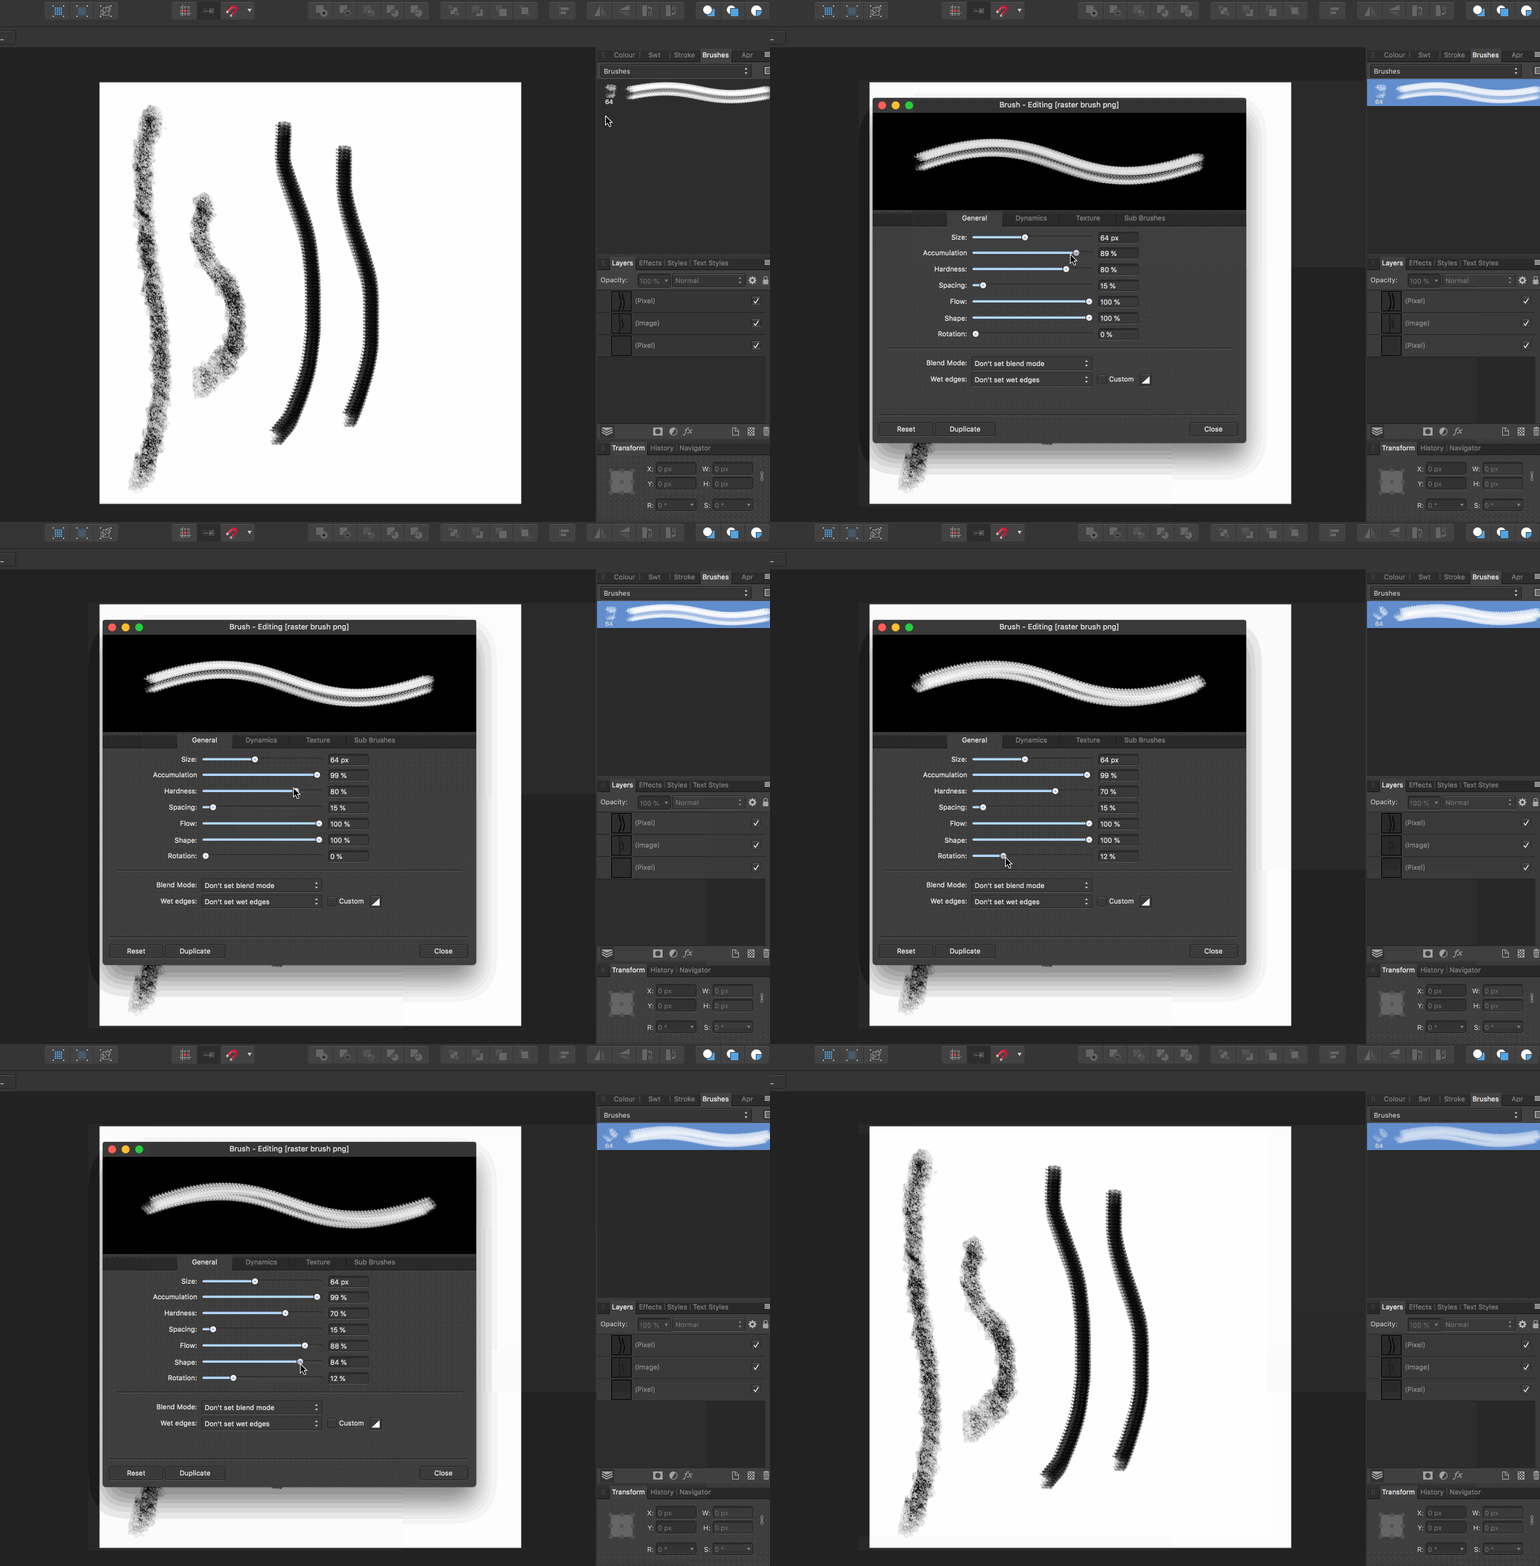
- Right click on your brush in your brush panel and select edit brush or double click to open the General editing options.
- Experiment with the sizing, spacing and any other options that you want to get your Affinity-created brush stroke looking as close to your original Photoshop brush as possible.
Tip: Adjusting the spacing is typically a good starting point to ensure your brush behaves as expected, as shown below.
Step 6. Edit your brush dynamics.
Now you are ready to play with the dynamics options of your brush.
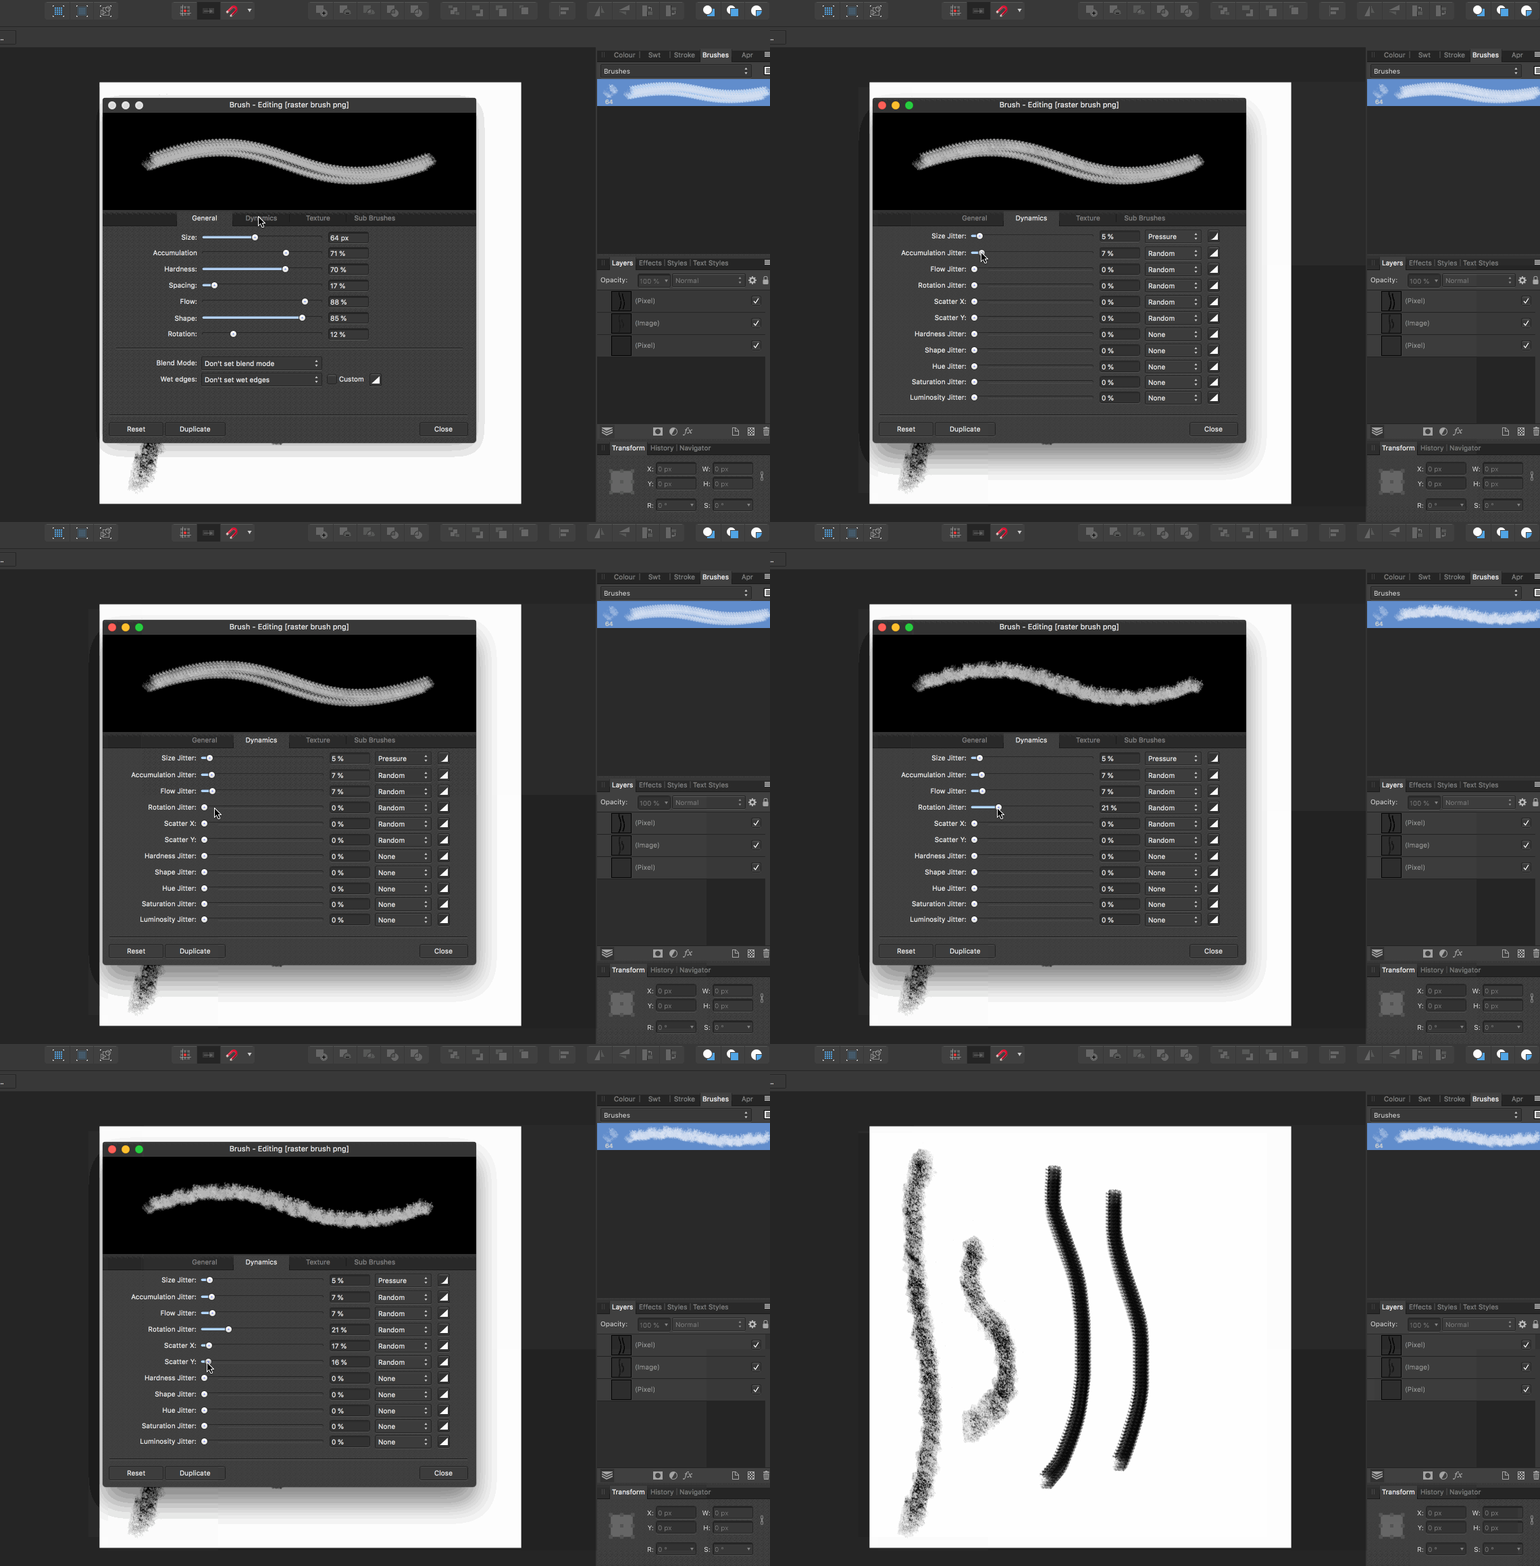
- Click on your ‘Dynamics’ editing tab.
- The dynamics settings allow you to adjust things like jitter, rotate, flow and luminosity via the sliders. There is a degree of trial and error required. In the example below, we’re adjusting settings to give a more authentic smokey, chalky appearance.
Step 7. Add Texture to your brush.
It’s time to add texture to your brush.
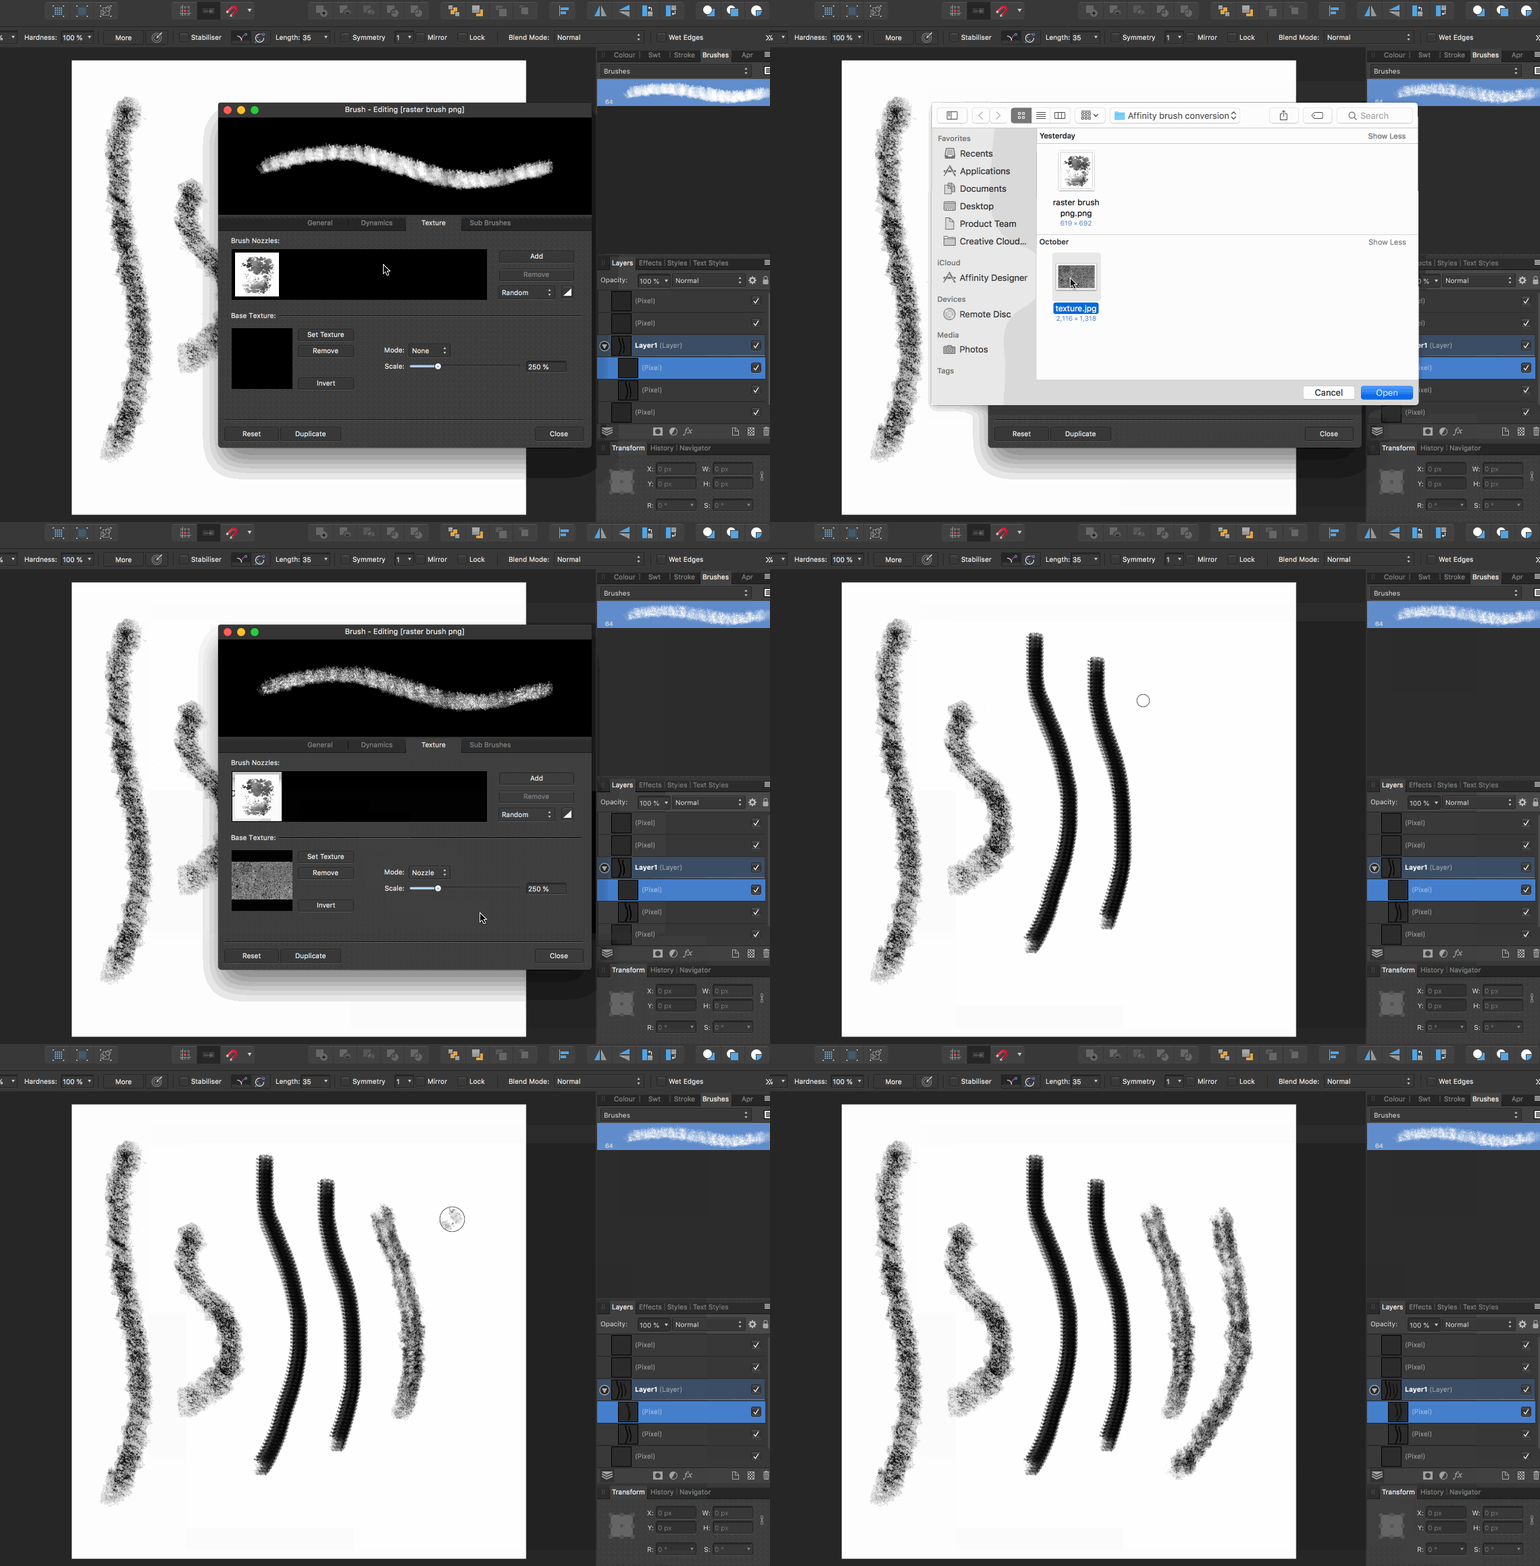
- Click on your ‘Texture’ editing tab.
- Click ‘Set Texture’.
- Choose the Texture you previously used in your original Procreate brush from your computer files.
- Change your texture Mode if required. For this brush example, we have selected the Nozzle Mode. It adds more of a noisy look throughout the brush.
- Draw a brush stroke next to the original brush you imported previously to compare the two. You can then play around with it further if needed.
Tip: The more you play around, the more comfortable you will get with the different options.
Step 8. Export your brush.
When you’re happy with your brush, you’re ready to export!
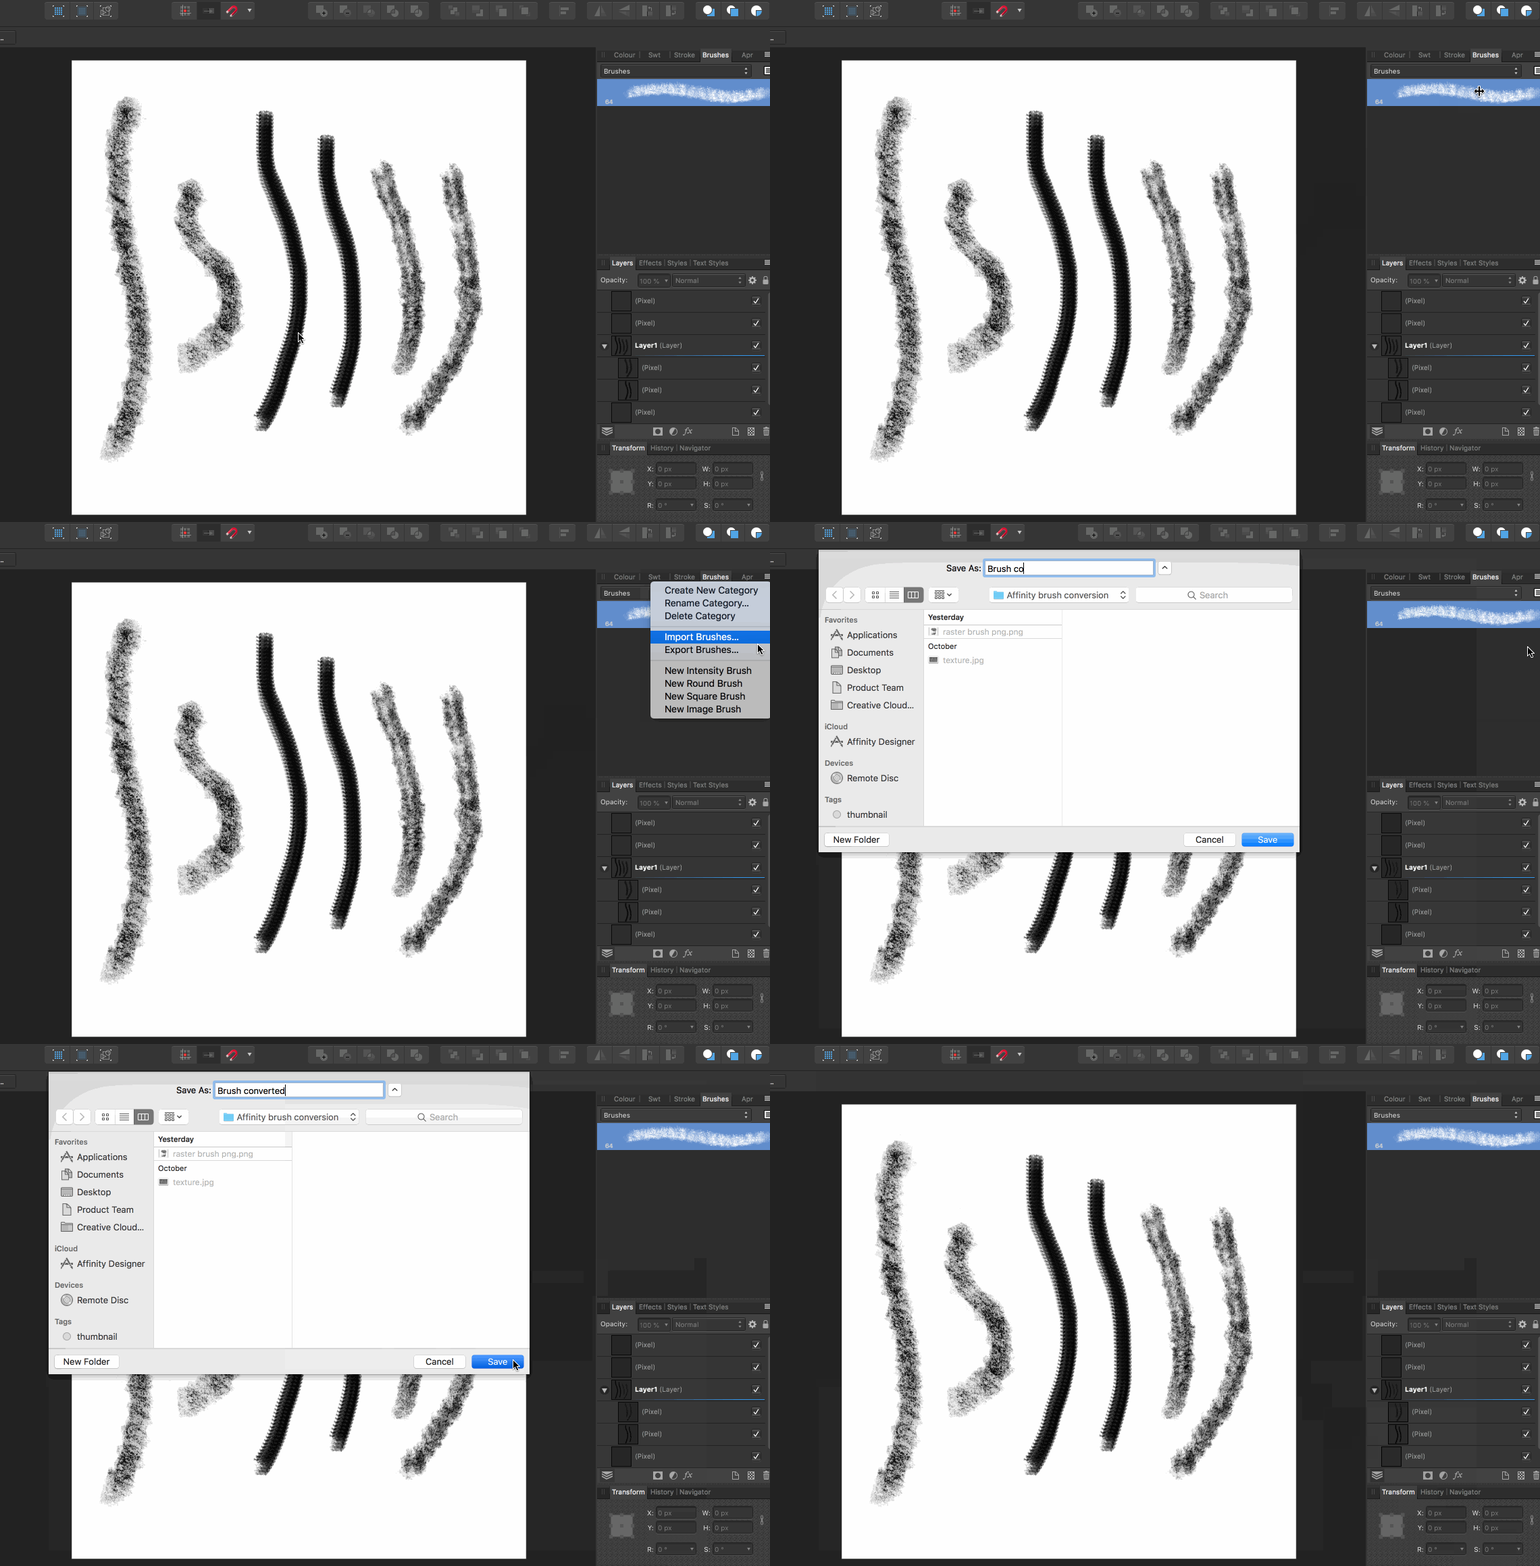
- Click the burger menu in your brush panel, as shown below.
- Select Export Brushes.
- You have now exported your brush as an Affinity .Brush file. Great job!
Tip: If you would like to export multiple brushes in one go, populate your Brush Category with all of your chosen brushes, and then export using the steps above.
Thank you and good luck with your brush ventures. If you enjoyed this tutorial and have other suggestions for future tutorials, please let us know in the comments below.

There’s this:
https://forum.affinity.serif.com/index.php?/topic/73884-import-procreate-brush-into-affinity-designer/
Specifically Frankdrawsnear’s comment on “unarchiving” (Mac has a free Unarchive Utility that works for this:
https://theunarchiver.com/
Not sure what would be the best tool on windows, or linux.
Once it’s unarchived, inside the folder is either a “Shape” or “Grain” or some other name “PNG”.
Open that in AFP. Using FNDN’s instructions what I’ve done is invert the layer, filter auto-contrast, and either delete the black background or (if I’m not sure if it’s the file entire or just pieces of it), crop out the specific piece I want to convert, select and delete the white background, and if there’s any white areas inside the brush delete them as well, then Export the PNG, give it an appropriate recognizable name in the location of your choice. In Affinity Designer, click on the Squares Persona in the upper left corner (Pixel – Persona), Click on the Brush tool, import an “Intensity Brush”, Edit the settings as recommended. I further set the colors: stroke and fill to black for good measure.
Then test it.
I used a free calligraphy font to test the process.
I find that if I create a colored square (black for instance) and paint using the Pixel Persona. That works.
I have created a brush set of the brushes I’ve created using this method. If the developers are interested, let me know, I’ll email them to you for testing.
Hey Mike,
Thank you so much for taking the time to comment and for sharing your findings. We hope that our community of designers find it useful for their needs and have fun giving these tips a test :).
We would love to see what you have been working on so if you are happy to share your creations with us, please feel free to pop us an email at hello@designcuts.com anytime!
It’s a bit sad that such awesome brushes are created for procreate but not for affinity. I have the same problem. I want to use procreate brushes to affinity designer but I don’t have procreate. Isn’t there another way, workaround? I’m a customer / member of designcuts. Thanks
Thanks so much for commenting Di and I am really sorry for any disappointment over the compatibility of some of the products that we sell. Expanding our Affinity section in our Marketplace is a big focus for us this year, so we will certainly be releasing more Affinity-compatible brush packs soon.
This particular tutorial was created to help the designers that we work with update their Procreate products to also be compatible with Affinity, so unfortunately this is not really intended for converting brushes that you have purchased from us.
If there are any brush packs in particular that you are interested in Di, please let me know and I can certainly help point you in the direction of some similar brush packs that are compatible with Affinity :).
Great tutorial to be able to use your procreate brushes in procreate and Affinity Designer, but my whole problem is that I have procreate brushes without procreate…or an ipad!
thanks
chris
Hey Chris,
Thanks so much for your comment. This particular tutorial has been created specifically to help designers expand their brushes software compatibility, and allow for these to work in Affinity. This article has not really been created to allow you to use Procreate brushes in Affinity, so I am really sorry for any disappointment caused!
We always want our community to get the most out of all of their purchases, so I have just popped you over an email to be able to get a little more information on this.
Hi Annabel,
Would it possible for you could help with the same thing? I have several Procreate brush sets that I have gotten in bundles I have purchased from DesignCuts. I just got Affinity this weekend and I would love to know if I could use them there. I also don’t have an iPad.
Thank you so much,
Charity
Thanks so much for commenting Charity!
I am really sorry for any confusion over our tutorial. This article has been created to guide designers through the process of converting their Procreate brushes to Affinity, to allow them to be able to share their work with a wider community. This tutorial will not help you convert any Procreate brushes that you have purchased to Affinity, without having Procreate, so my sincerest apologies for any disappointment caused!
Thank you for replying! I appreciate the clarification.
Hey Charity,
Thanks so much for coming back to Annabel.
I am delighted to see Annabel was able to help you with your query! If you have any other questions please do let us know :)
I have this problem as well. It would good to be able to use these brushes elsewhere.
Hey Liz,
Thanks for commenting and I am sorry for any inconvenience caused by this article. I have just popped you an email that should offer some more clarity.