- Filtering and Downloading Fonts on Design Cuts
After logging into your Design Cuts account, you will automatically be taken to Your Downloads. You can also get there from Account > Your Downloads.
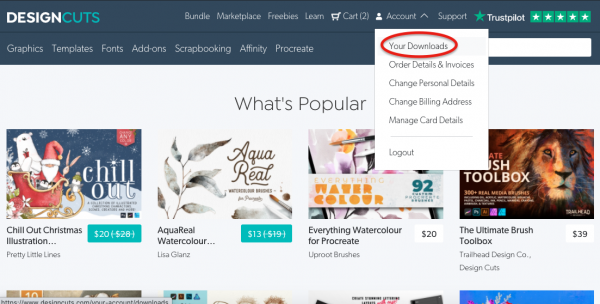
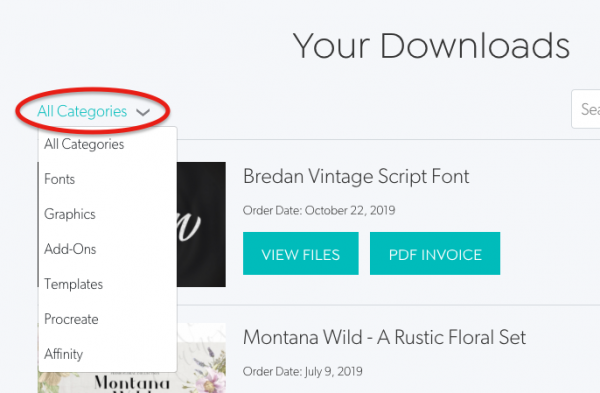
Under Your Downloads, you’ll see a filter on the left that’s set to All Downloads by default. You can use this to easily filter any font purchase you’ve ever made at Design Cuts.
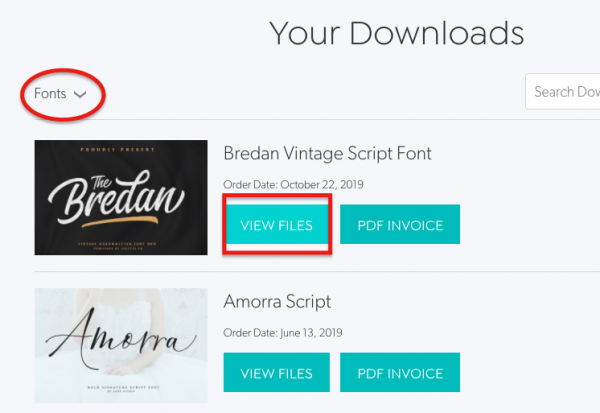
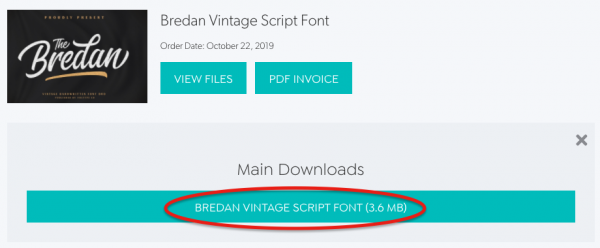
If you click on the thumbnail next to a purchased font, a new window will open with the full overview page. The View Files button will show you the downloadable file associated with that product without taking you to a different page. PDF Invoice will automatically download a pdf to your computer.
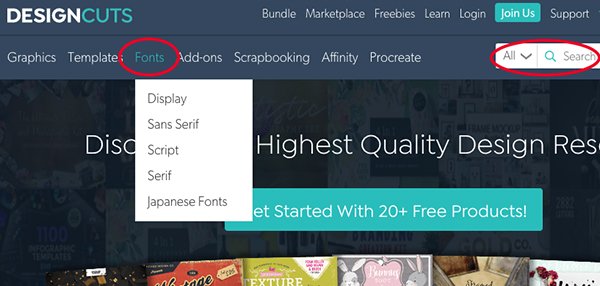
At the top left of the page, you’ll see categories to browse for new assets. You can click on Fonts to view all available fonts or hover over it to see a further breakdown of the category by style: Display, Sans Serif, Script, Serif and Japanese Fonts. You can also search using the search bar at the top right.
- Licensing
It’s not exactly the fun part of fonts, but it’s important to understand the licensing of the fonts you use. Many free fonts are for personal use only. Using these in a client project could result in additional costs, litigation and a loss of trust. Nobody wants that. On the plus side, any fonts purchased through Design Cuts come with an extended license to protect you, your company and your clients. Easy-to-understand details are available here.
Now that you have your font files, let’s look at how to organise them.
- Font File Organisation
You want to keep your folder structure as simple and broad as possible without hindering your ability to find specific files.
These tips do not apply to system fonts. It’s generally best to leave those alone. They’re basically integrated into the system and moving or renaming them could create havoc.
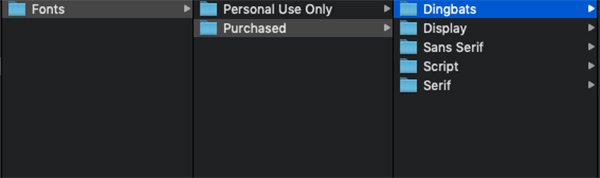
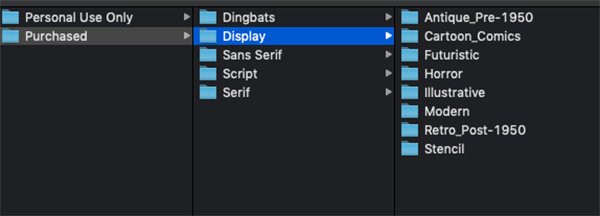
We'd suggest you start by dividing your fonts by basic license. This way, you're less likely to use a Personal Use Only font for a commercial project. From there, divide by basic style. We’ve divided into five main categories that mirror the categories on Design Cuts: Dingbats, Display, Sans Serif, Script and Serif.
If you have a large variety of fonts in a category like Display, further divide by theme. Let’s take a look at the breakdown.

Antique Pre-1950: This will include everything from Medieval to Art Nouveau and Art Deco, from blackletter to 1940’s advertising fonts. If you specialise in any of these areas and have, for example, a ton of Art Deco fonts, you may want to bypass this larger category and break it into more specific folders by decade.
Cartoon and Comics: Fairly self-explanatory, this category includes the types of fonts you’d see in comics and cartoons.
Futuristic: Fonts with techno, square, LCD-style letters.
Horror: Horror fonts tend to not fit easily into other categories, so we've given them their own. This would be the type of spiky font you might see for Dracula or the drippy font you’d use for a swamp creature.
Illustrative: This category is good to hold a variety of styles that are more art than text, like highly decorative initials or graffiti.
Modern: This could also be considered a Miscellaneous category. This is for fonts that don’t specifically fit into a theme or timeframe, but are still display fonts as opposed to standard sans serif or serif fonts.
Retro Post-1950: This category holds fonts from the 1950s, groovy 60s, disco 70s, rad 80s, grungy 90s and maybe even some rave-y 2000s. Oof, we feel old. Again, you can break these down by decade if that works better for you.
Stencil: This category can hold fonts that are specifically created for use as stencils or just fonts that are in the style of stencils such as military or sports themes.
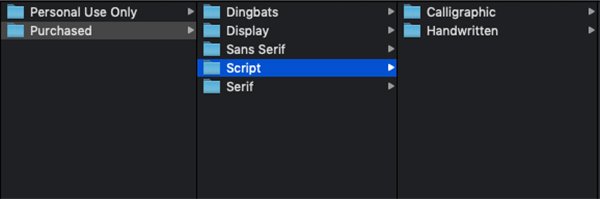
The only other category that we will break down further is Script. This will be divided between Calligraphic and Handwritten. Again, if you work with a lot of handwritten fonts, you may want to divide instead by more specific categories such as Whimsical, Kids, etc.
- Font Management Software
For the most control over your fonts, font management software is the way to go. In general, it helps your programs run more efficiently by easily allowing you to limit the number of active fonts and makes sorting and searching quick and painless.
Premium Solutions
There are many premium options when it comes to font management. Most premium solutions come with easy organisation and activation, auto-activation and integration with common design software, detection of conflicts, font preview and the ability to organise by style. Some have additional features such as font matching and cloud sync. The downside, of course, is that they do come with a cost, some being a one-time purchase and some using a subscription model.
A couple of robust, time-tested options that many of our creatives have worked with are Extensis Suitcase and Font Explorer. If you’re working with a larger group of designers, there are also font server solutions available.
Extensis Suitcase Fusion
Extensis Suitcase Fusion is provided as a subscription service at $84 USD per year and offers a 15-day free trial.
Pros
- Works with Mac or PC
- Easy organisation and activation
- Auto-activation and integration with Adobe Creative Cloud and Sketch plus drag-and-drop support for Affinity products
- Detects issues such as duplicates and other conflicts
- Font previews
- Create sets and organise by style, project or any other custom parameters
- Advanced features like font matching and cloud sync
- Access to software updates as they become available
- Unlimited customer service is available via email and chat and a response can usually be expected within one business day
Cons
- Many longtime users prefer the interface design of older versions of the software and find the newer versions to be less intuitive
- Auto-activation only works with Creative Cloud from 2018 or newer
- Subscription model requires on-going costs for continued access
- There’s not currently an official community forum on the Extensis website and customer support for Fusion is not available by phone
Overall: Suitcase Fusion is a powerhouse font management solution that’s time-tested and used by many professional designers and agencies. If you’re ready for a premium solution that integrates with a wide variety of newer design programs and offers cloud sync, this is definitely worth exploring.
FontExplorer X Pro
FontExplorer X Pro is another premium solution that’s been around for many years. It’s available for a one-time fee of $99 USD and offers a 30-day free trial.
Pros
- Works with Mac or PC
- Easy organisation and activation
- Auto-activation for Adobe programs all the way back to CS6 and QuarkXPress from 9.0 (with download of appropriate plug-in)
- Detects issues such as duplicates and other conflicts
- Font previews and printable type specimens
- Create sets and organise by style, project or any other custom parameters
- Advanced features like font matching and pairing suggestions
- Purchase includes 7 complete font families (38 fonts)
Cons
- Software updates generally require additional cost
- No integration with Procreate or Affinity products
- Although font back-up is included, there is no cloud sync functionality
- Customer service is only available via an online form that does not indicate an expected response time
Overall: FontExplorer X Pro is an incredibly robust premium solution that maintains an easy-to-use interface. The one-and-done cost is especially attractive for those using older Adobe software who don’t require font access across multiple devices.
These are both great solutions and the right choice will be determined by your specific needs. If you’re considering going premium, I suggest downloading the trials to discover which one will work best for your workflow.
Please note that these are presented as starting points for research and not intended as an endorsement from Design Cuts.
Free Solutions
For many designers, a free font management solution will be all that’s needed. There are third-party options like FontBase which can be especially useful for Windows users as Windows does not come with a native font management solution. FontBase’s functionality is very similar to Apple’s Font Book. Macs come with Font Book pre-installed. It’s a simple program, but more robust than it initially appears to be.
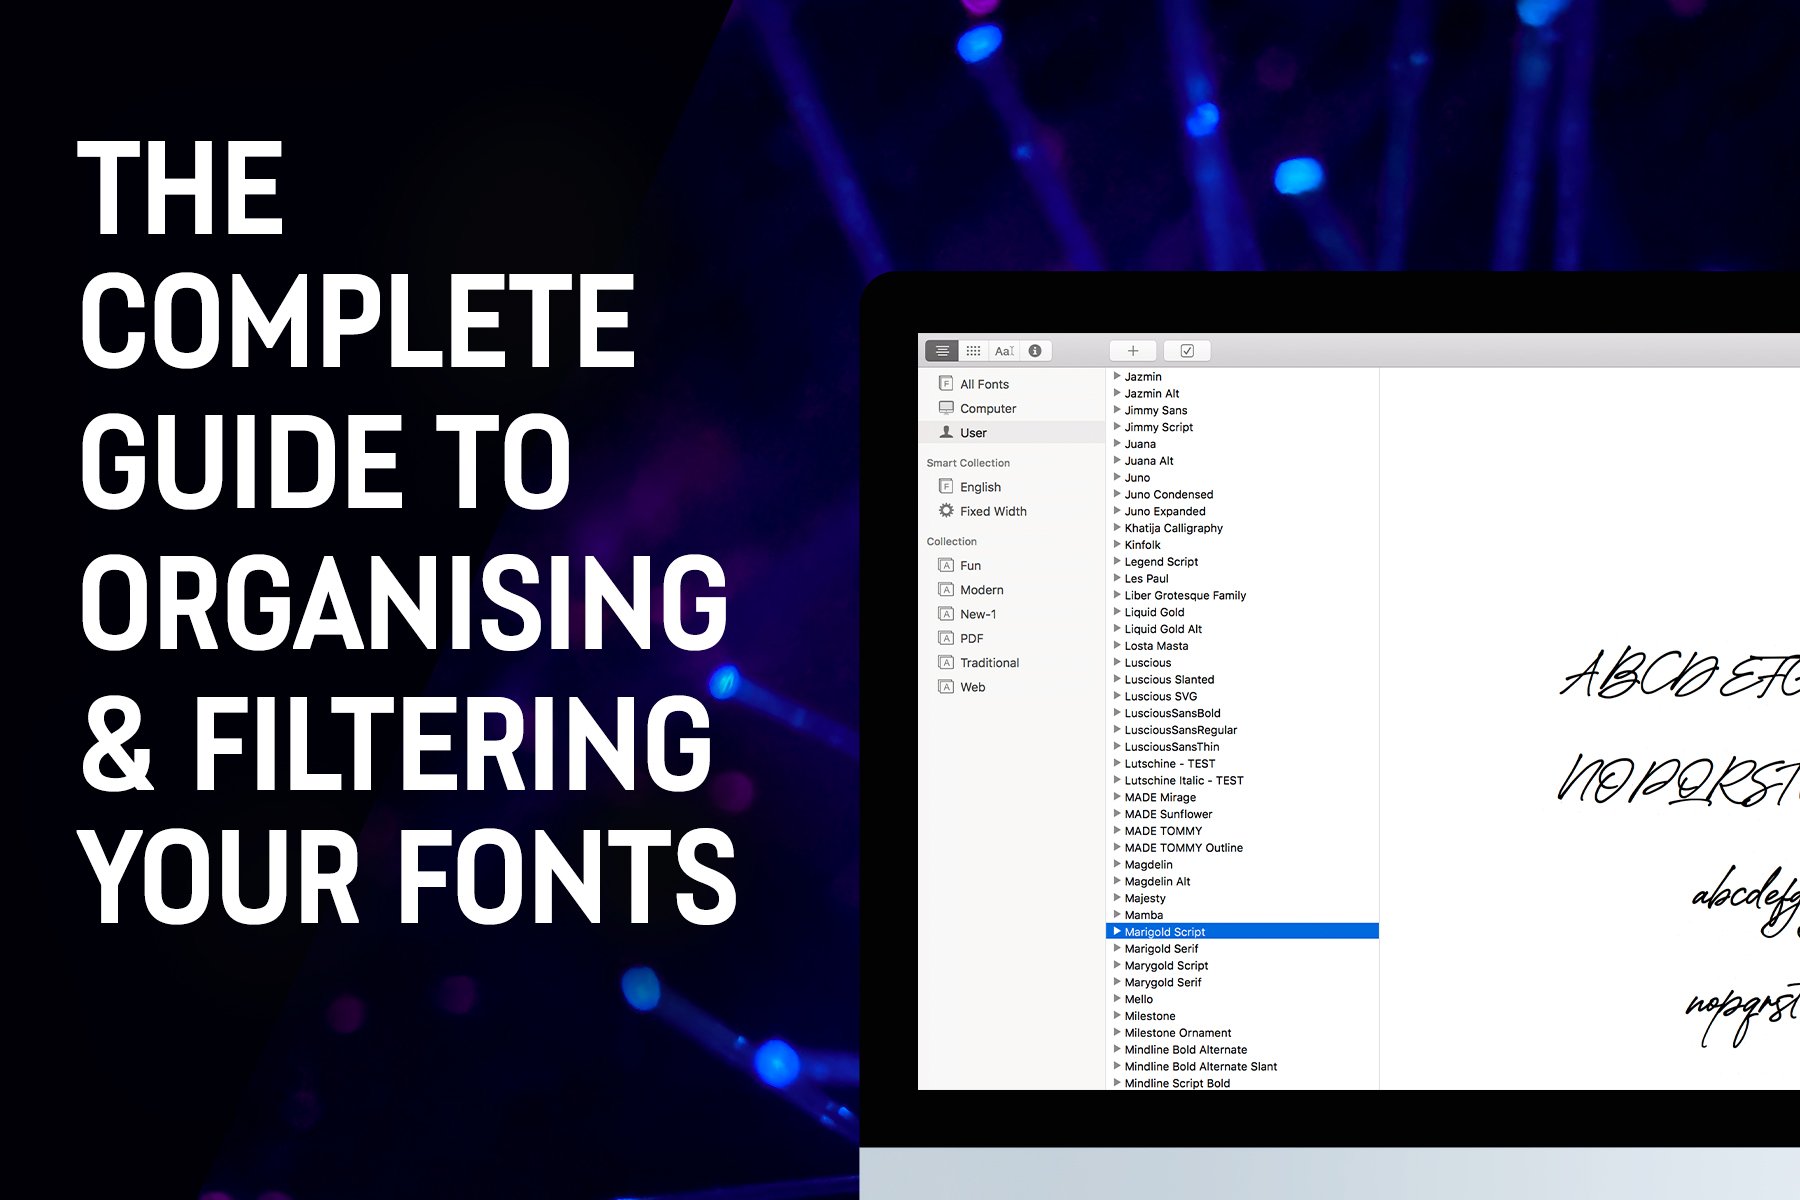
Font Book Basics
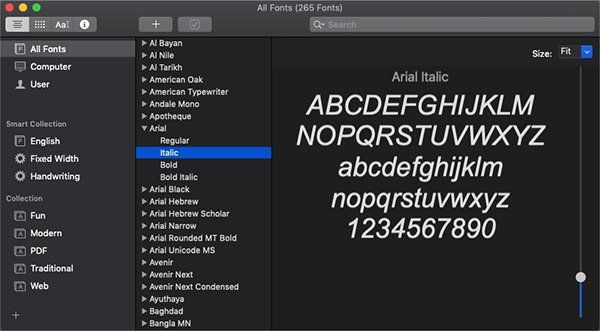
To the left of each font name is an arrow. Clicking on it will reveal any available styles within that font family. As you click on each name, you’ll see a font preview to the right. Please note: the styles will only pop down in this manner if the font foundries have organized the fonts as part of an overarching family; if not, they'll pop up as individual items.
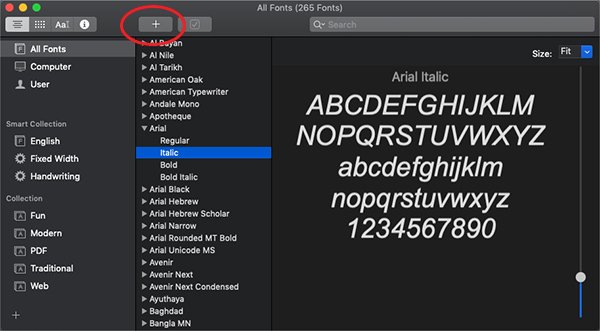
New fonts are easily installed by double clicking the font file and choosing Install or by clicking the plus sign at the top of the Font Book window and navigating to the location of the font file.
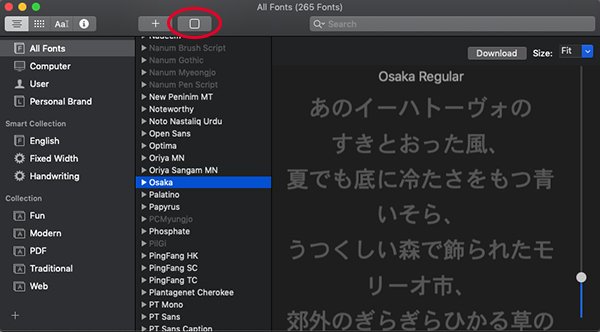
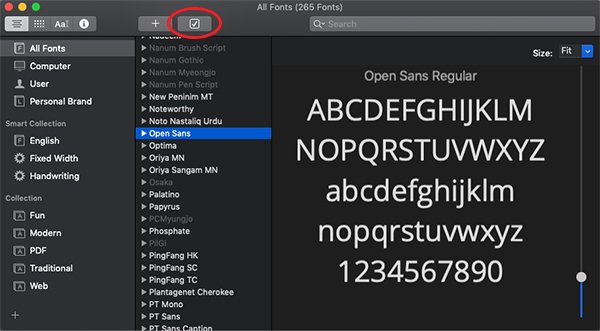
Fonts can be enabled or disabled by selecting a font name, then clicking the box next to the plus sign. Enabled font are bright and disabled fonts are dark.
Organising Within Font Book
Font Book uses Collections, Smart Collections and Libraries to help you organise.
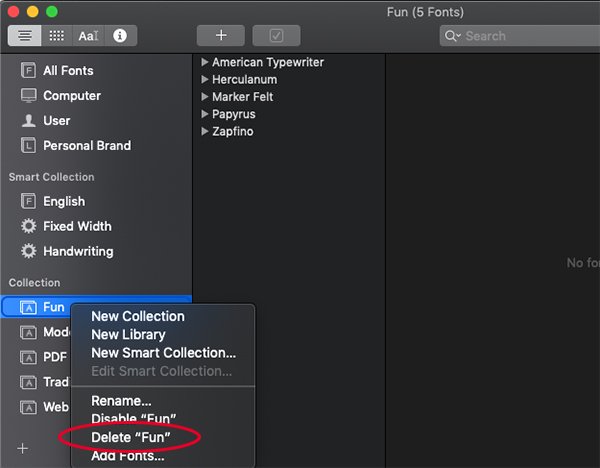
On the left side of the Font Book window, you’ll see a set of default Collections. You can add to these or delete them and create your own.
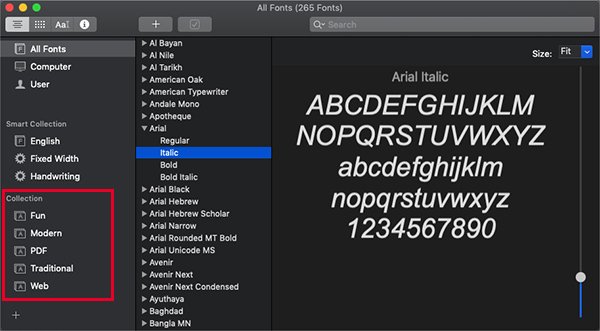
Adding and deleting a Collection does not add or delete a font. It’s strictly a way to organise the master list of fonts under All Fonts. To delete an existing Collection, right- or Ctrl-click on the icon and choose Delete.
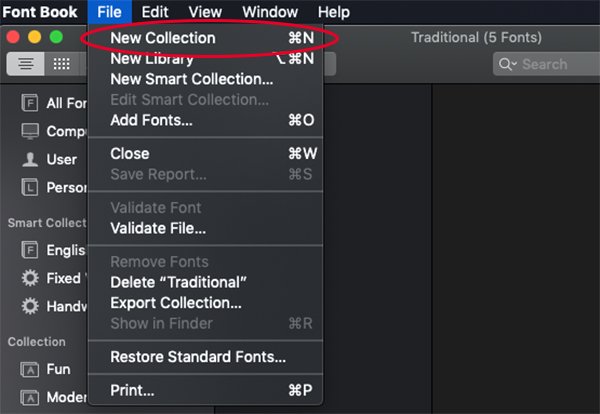
To add a new Collection, go to File > New Collection, then type in a name and press enter. Your new collection will appear in the list under Collection.
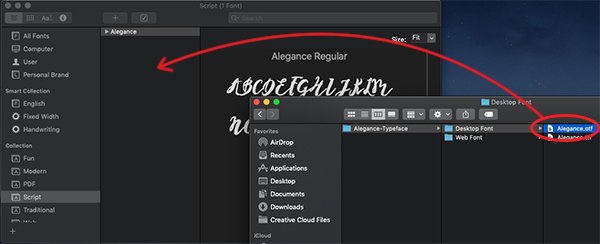
To populate a Collection, you can manually search file folders (which is pretty easy since we’ve already organized those) and simply drag the font into the Collection window while the correct Collection name is highlighted. Or you can go to the list of All Fonts and drag fonts from there into the new Collection.
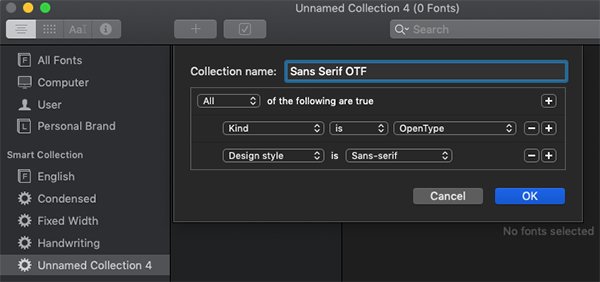
Above Collections, you’ll see a section called Smart Collection. It’s pre-populated with English, Fixed Width and Handwriting. Smart Collections work off of criteria that you select from a list of options instead of being a manual process like Collections.
To create a new Smart Collection, go to File > New Smart Collection. A window will open that allows you to name the Smart Collection, then set criteria. In this case, I’m going to name this one Condensed, then select Design style is Condensed and click OK.
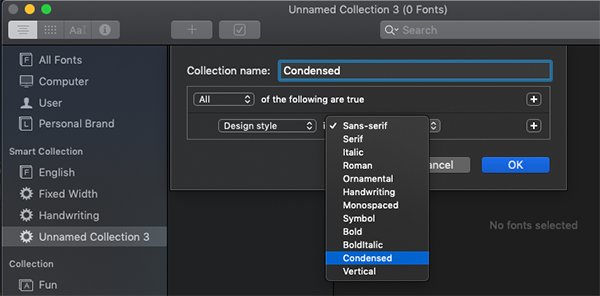
Smart Collections can be as simple or complicated as you want to get. You can type in your own specifications and input multiple sets of criteria. Have fun playing with the options and remember that it won’t affect the actual font files, so it’s safe to experiment!
- Filtering Fonts Within Software
Because there can never be too many ways to sort through fonts, you can also filter them within your design software.
Adobe Photoshop
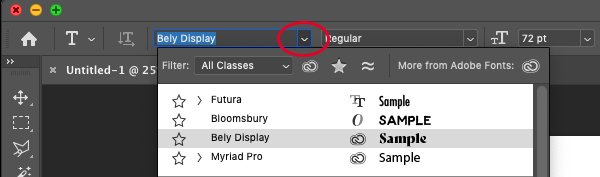
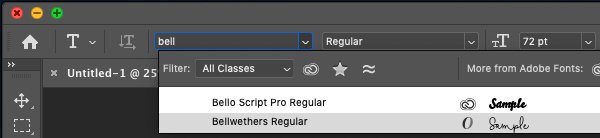
Let’s take a look at Adobe Photoshop. Select the Text tool (t). In either the Options bar at the top of the screen or the Character palette (Window > Character), click on the font name or arrow to the right of it to open the full font list.
Next to Filter, you’ll have a dropdown list to search by classification including Serif, Slab Serif, Sans Serif, Script, Blackletter, Monospace, handwritten and Decorative. Unfortunately, you are currently limited to the existing classes provided by Adobe.
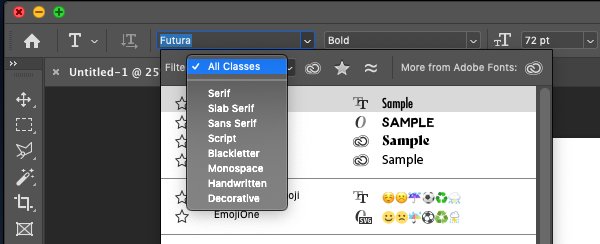
You can also search by simply typing the font name or other descriptor used in the name, such as “variable,” while the font list is open.
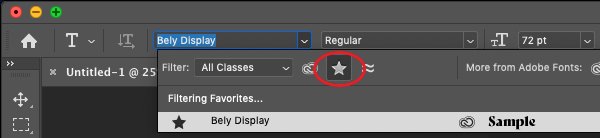
Another handy feature is Favourites. To the left of each font family name is a star outline. Clicking the star will turn it into a filled star and add it to your Favourites list.
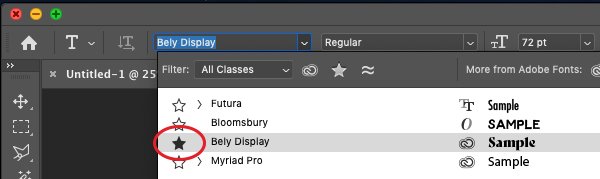
You can view Favourites by clicking the star at the top of the font list.
A font can be removed from Favourites by clicking the filled star, returning it to an outline.
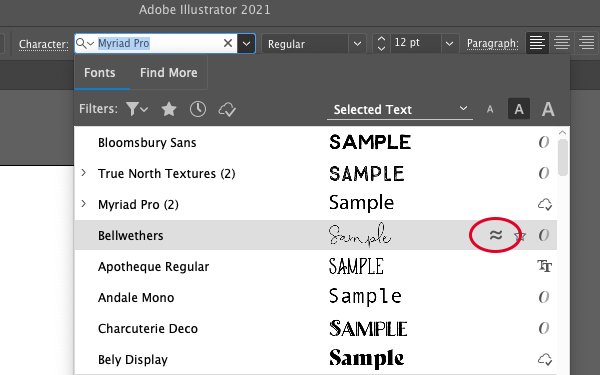
Adobe Illustrator
Illustrator’s Character palette has much of the same functionality as Photoshop when it comes to filtering fonts. You’ll notice a different interface for selecting Classification and an additional section for Properties.
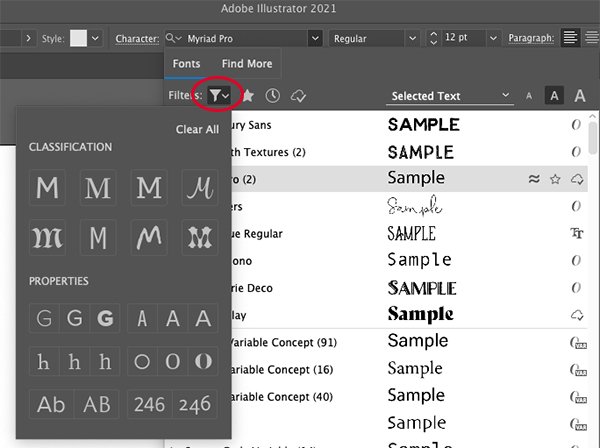
You’ll also be able to filter by similar font. When hovering over a name in the list of fonts, you’ll see a wavy equals icon. Click that to find fonts similar to the one you’re highlighting with your mouse.
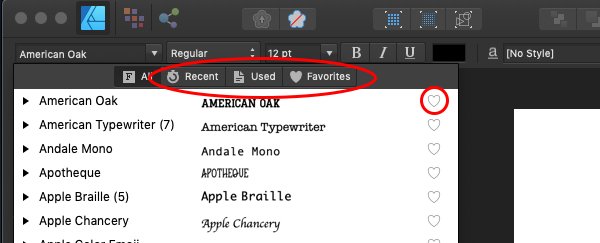
Affinity
Affinity products come with similar font filtering capabilities such as viewing Recent, Used and Favourites. Favourites are marked by a heart icon that can be easily turned on or off with a single click of the icon next to the font name. You can also search using font name or any descriptor used within the font names.
- Freebie Starter Pack
To get you started with your newly organised font life, we’ve put together a zip file that includes a pre-made folder structure. Use this as a starting point and make adjustments to fit your collection in the way that you best remember.
I hope you’re looking forward to getting your fonts organised and easy to find. Once you get your current fonts into an organised system, it’s very easy to maintain and add new fonts. Let us know what’s working best for you—it might well benefit the rest of the Design Cuts community!

Thank you, I have been needing this for some time. You have encouraged me to finally deal with the thousands of fonts I have.
Aww this is awesome to hear Steve, thank you so much for your support!
1. You should NEVER buy fonts that do not include a commercial license! (If you find a font you like but the commercial license is too high priced or unavailable – keep searching – someone somewhere has created a font that looks extremely similar that has a low-cost commercial license!)
2. Font Base for Windows is free and works awesomely!
Hey Paul,
Thank you so much for your comment! Rest assured, all of our resources do come with our single user commercial licence so you can certainly use any of your DC fonts, including your freebies, for commercial projects :).
It’s great to hear that you really like working with Font Base when organising your fonts, however we hope that you found these alternative suggestions helpful for if you ever did fancy a change :).
I agree. I have started doing it.
Hey Kim,
Thank you so much for your comment! That’s great to hear you have started doing this too :)
I wish I had read this article several years ago! Very informative. Two things: I don’t think it’s clear enough in people’s mind that having a ton of fonts is going to slow YOUR WHOLE SYSTEM. That’s one of the reasons why font managers are really useful.
Talking about fon managers: I’ve been using MainType for a few years, and I’m really happy with it. It’s cheaper than the others also: there’s a free version; then it’s $49 for the standard edition, and $79 for the professionnal edition.
https://www.high-logic.com/font-manager/maintype/comparison-chart
Unfortunately no one is paying me to say this.
Hey Olivier,
Thank you so much for commenting! We totally understand how you feel and are definitely going to change up how we organise our own fonts now after hearing these tips hee-hee.
It’s great to hear that you find MainType really handy for organising your own fonts Olivier, and we really appreciate you sharing a link to be able to check this one out!
Thank you for the FontBase mention – I will check that out. I’ve been using NexusFont, but it hasn’t been updated for awhile. Appreciate you sharing your expertise.
You’re so very welcome Jeff and we hope that you find it helpful!
Hi,
Always used Suitcase Fusion and Font Explorer in the past but since Suitcase has started an annual subscription and Font Explorer is £80 I started to look for a better solution that isn’t the standard Apple Font Book which is a bit flakey at the best of times. Fortunately, there is one in the form of RightFont 5 is $49 and it does everything that both the other applications do and more. Have a look at https://rightfontapp.com and you will see that is also provides additional support for Google and Adobe fonts amongst others as well provide a raft of commonly used icons including social media logos. Also supports auto activation for your usual Adobe applications so you do not have to activate your fonts manually whenever you open up an existing document.
Hey Mark,
It’s great to hear that you have found the RightFont app to be the perfect font manager for your needs! We are sure that a lot of our community will really enjoy checking this out as well so thank you so much for taking the time to comment – your support really means so much to us!