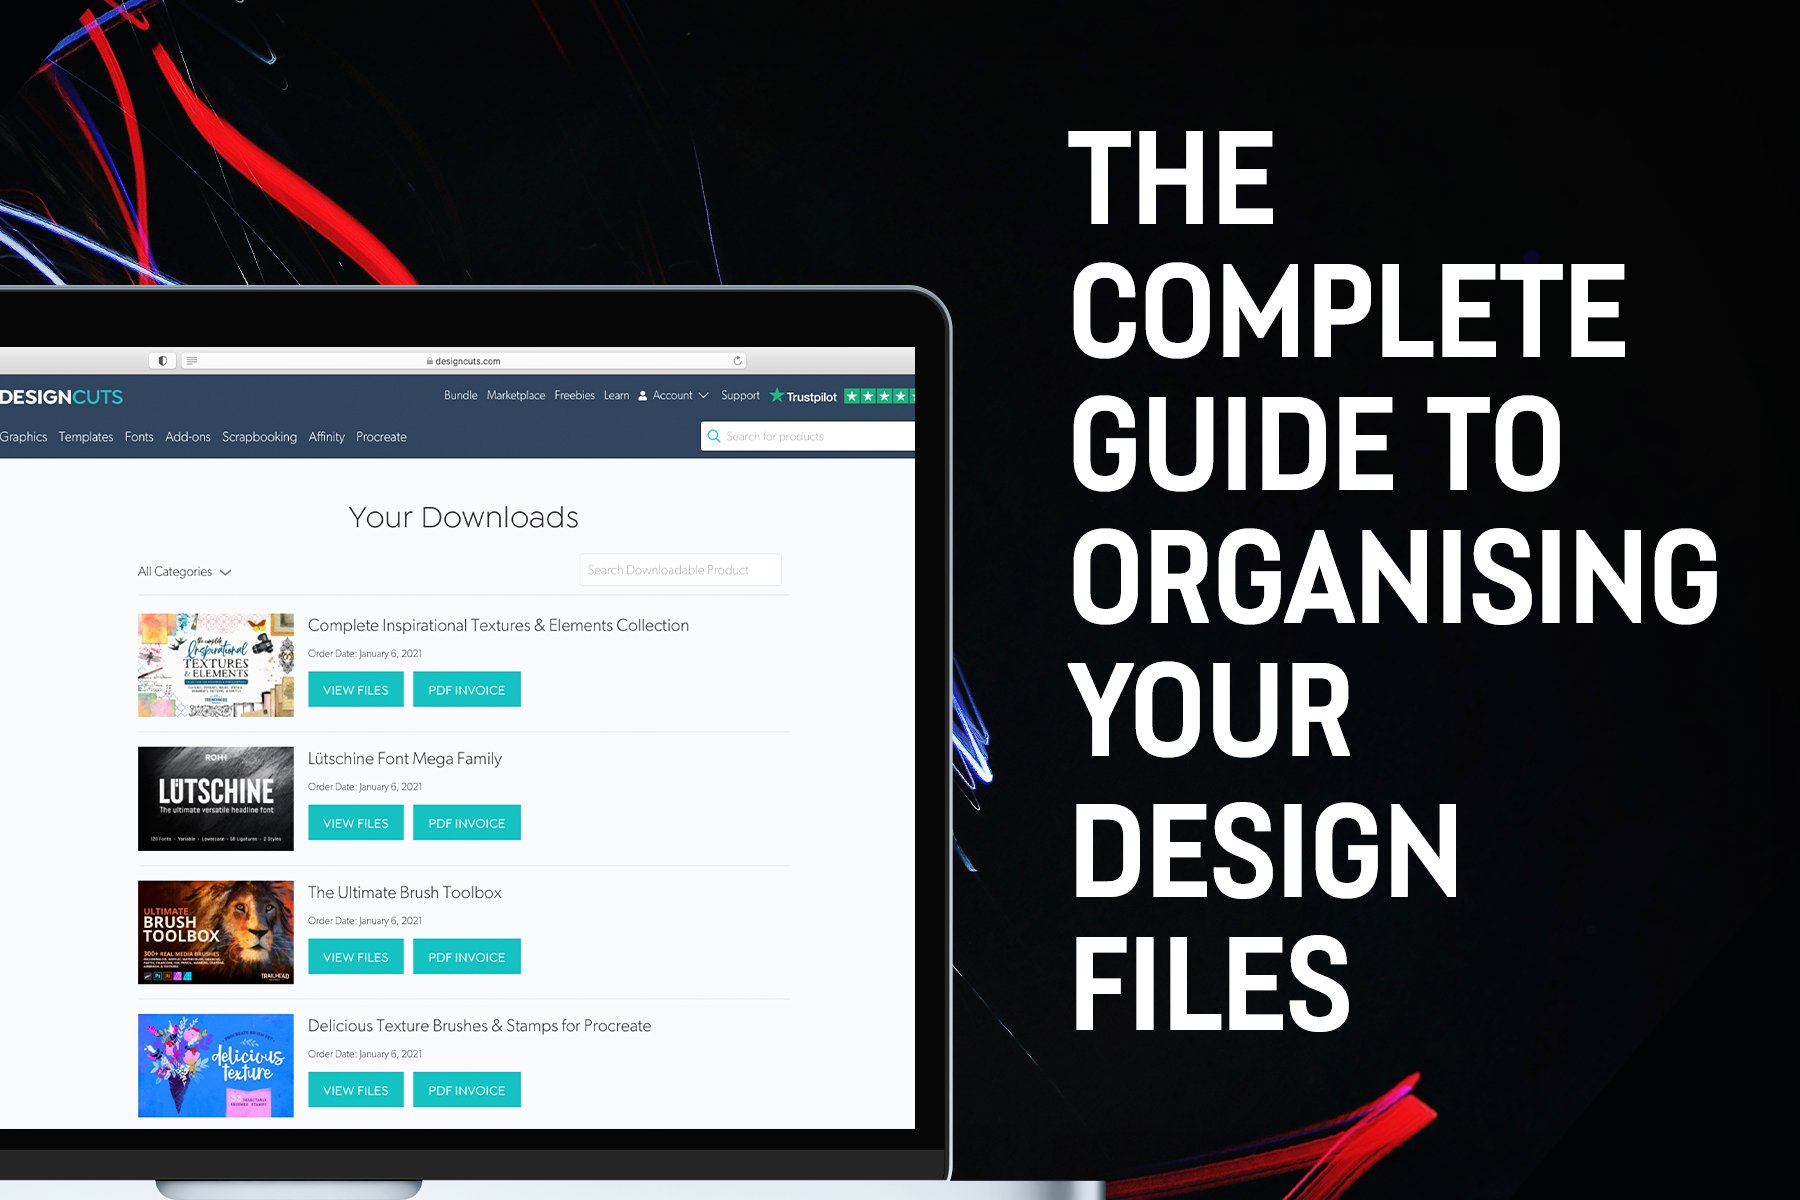
Your Downloads
After logging into your Design Cuts account, you will automatically be taken to Your Downloads. You can also get there from Account > Your Downloads.
Under Your Downloads, you’ll see a filter on the left that’s set to All Downloads by default. You can use this to easily filter any purchase you’ve ever made at Design Cuts by category: Bundle, Fonts, Graphics, Add-Ons, Templates and Procreate. There’s also a search bar on the right that will search only within your available downloads.
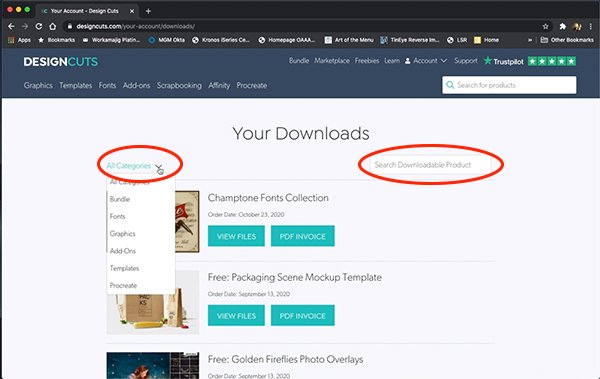
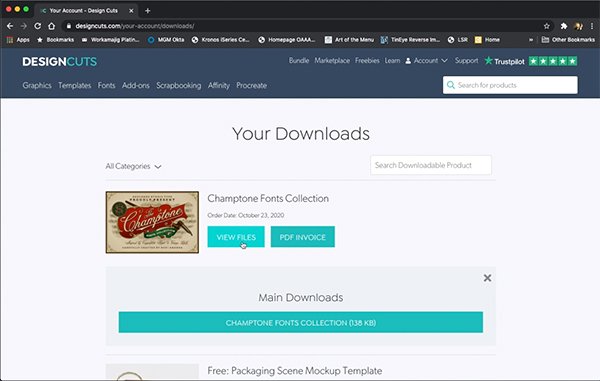
If you click on the thumbnail for the product, a new window will open with the full overview page. This can be especially helpful if you’re referencing much older downloads before the searchable image gallery bundle guide was included with bundle purchases. The View Files button will show you the files associated with that product without taking you to a different page. PDF Invoice will automatically download a PDF of your invoice to your computer.
Now that you have your files, let’s look at how to organise them!
If you use Adobe Creative Cloud and want to set up organised libraries synced across multiple devices, Kim Klassen has an excellent tutorial showing you how to do that here.
Manual Organisation
The Basics
As with any organisational system, you want to keep your folder structure as simple and broad as possible without hindering your ability to find specific files. For example, a folder of Textures labeled Paint Effects might suffice for most users, but if you have a huge collection of paint effects, you may want to break them down further into categories like Oil or Watercolour.
How you name your folders is also important, especially if you’re linking to files. Renaming folders in the future means relinking all those files when you open an older project file. The most important consideration is future proofing, both for yourself and for computer systems. For example, you may think that there’s no way you’d forget that all the vectorized vintage illustrations you have are made by Unember, but that might not be the case a year from now. How would you search for those in the future if you’ve forgotten the maker name?
You also want to consider that you will eventually upgrade your computer, change operating systems or transfer files to external drives or the cloud. Some systems have limits on the number of characters you can use in a file name and don’t like special characters (basically anything that isn’t a number or letter except for hyphens or underscores). By planning ahead, you can avoid extra work or file losses down the road. Future you will be grateful!
If you find that your folder names are getting too long, you can establish a few simple, memorable codes by type or style. For example, MU for Mockup and CA for Clip Art or VT for Vintage and MD for Modern. Just remember that using too many or making it too complicated defeats the purpose.
Design Cuts Files
Should you rename the files? Definitely not! The team at Design Cuts has made efforts to name the files so they’re easily recognisable, plus it would just take too long! It can also be helpful to know the original file names if you ever need to reference them for customer service or in user forums.
The Design Cuts site is already divided into a few categories with subcategories—these can make a great starting point for your folder structure. Just remember that your system should be what works best for YOU. The system that works with your way of thinking might be a little different than what works for someone else.
Folder Structure
Let’s start with Add-Ons. This category from the Design Cuts site includes brushes, actions, effects packs, overlays and more. We can simplify a little by using the subcategories and even combining a few of those.
Actions – I’m using this as the overall category name for actions and presets. If you frequently buy actions for multiple programs, you may want to break it down further that way. Or if you really only buy them for Photoshop, you can divide them by style, whichever is your preference.
In the 'Actions' folder, add the following sub-folders:
- Cartoon and Comic
- Exposure and Lighting
- Grunge - This could include aging, dirt, grime and even glitch effects.
- Metallic - This includes foils, glitter and anything holographic or iridescent.
- Overlays
- Paint and Sketch
- Print Effects - These are actions that mimic printer styles like offset lithography, letterpress, screen printing or even photocopies.
- Typography
- Vintage Photography - This could overlap with other categories, but I find it useful for actions that specifically mimic tintypes and other vintage photo techniques

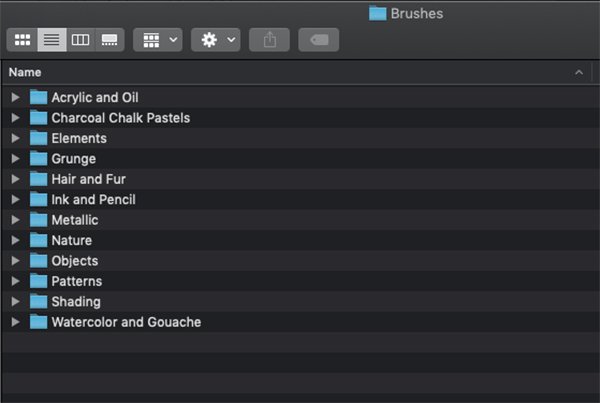
Brushes – If you don’t have many brushes, this might be enough, but if you use them frequently and have a large collection, you’ll want to break it down further. You can do that by programs such as Photoshop, Illustrator and Procreate, but some brush sets come with files for multiple programs so we suggest dividing by style.
In the 'Brushes' folder, add the following categories:
- Acrylic and Oil - Of course you can divide these into separate categories if needed.
- Charcoal Chalk Pastels
- Elements - I use this to represent generic design elements like flourishes and banners.
- Grunge - Again, this can cover a variety of things like splatter, coffee rings and even spray paint brushes.
- Hair and Fur
- Ink and Pencil
- Metallic
- Nature - This covers flowers, plants, leaves, trees, animals and seasonal things like snowflakes.
- Objects - This is a good category for a lot of miscellaneous things that are specific objects, like a set of tarot card images, but where you don’t have enough for a single theme to warrant an individual category.
- Patterns
- Shading - This includes crosshatching, stippling and halftones.
- Watercolour and Gouache
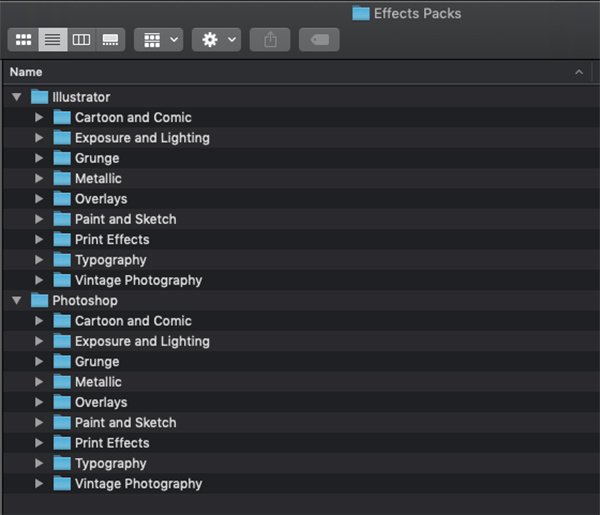
Effects Packs – This is pretty easy to confuse with Actions and you could probably combine them into a single category if it’s too confusing. The main difference is that Effects Packs can contain multiple media types to achieve the effect. They may include actions, brushes, overlays, textures, presets and more within a single pack. Since these tend to be created for a particular program, I’ll divide that way first, then by style.
Within 'Effects Packs', create an 'Illustrator' folder and a 'Photoshop' folder, then populate both with the same sub-folders we used for Actions:
- Cartoon and Comic
- Exposure and Lighting
- Grunge
- Metallic
- Overlays
- Paint and Sketch
- Print Effects
- Typography
- Vintage Photography
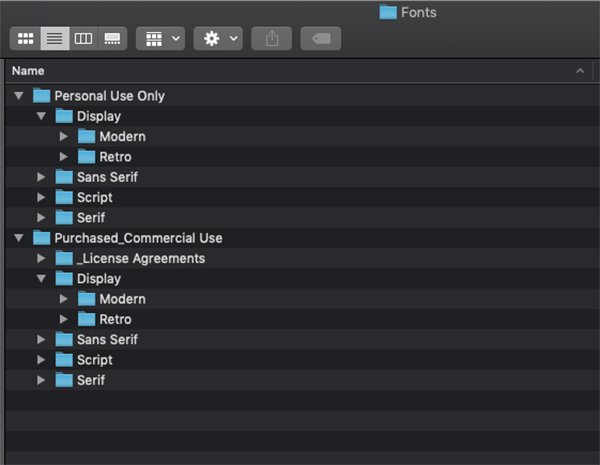
Fonts – With fonts, it’s important to be aware of your license. For this reason, we recommend dividing first by License, then by broad style. We have released a sister article to this one tackling font organisation, so we'll be fairly brief in this post.
Within the Fonts folder, add a folder called 'Personal Use Only' with the following sub-folders:
- Display > Modern, Retro, etc.
- Sans Serif
- Script
- Serif
Copy the 4 folders and go back to the Fonts folder. Create a folder called 'Purchased_Commercial Use' and paste the sub-folders into it. We’ll also add an additional folder called '_License Agreements' so you can easily reference the licensing for purchased fonts. Start the name with an underscore just so it stays at the top of your folder.
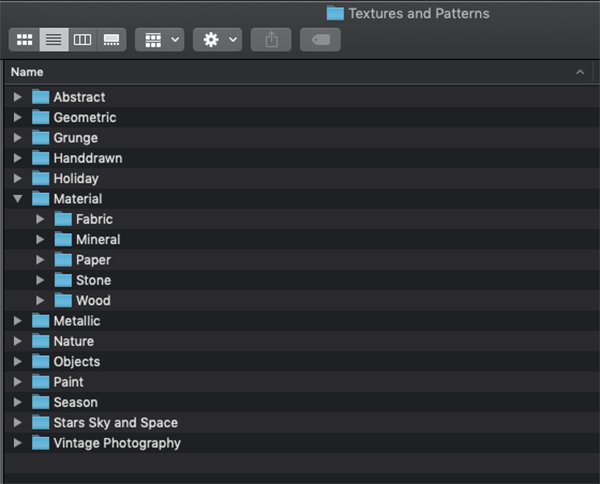
Graphics - Similar to Add-ons, we will bypass the larger category (Graphics) and go straight into subcategories since we know you'll be using these folders a lot and that saves an unnecessary step. It’s worth noting that descriptions like Background, Pattern and Texture can overlap considerably and may trip you up when hunting for a specific item, so it’s easier to combine them into a single category if possible.
Let’s start with 'Textures and Patterns' and fill it with a healthy number of sub-folders since this is something that we, as designers, tend to search through a lot.
- Abstract
- Geometric
- Grunge
- Hand Drawn
- Holiday
- Material > Fabric, Mineral, Paper, Stone, Wood
- Metallic
- Nature
- Objects
- Paint
- Season
- Stars Sky and Space
- Vintage Photography
Next is 'Elements'. This is another big category. You may want to divide by Raster and Vector first if that tends to be a deciding factor for you, but it has the potential to create confusion with the Photo category we’ll be creating later, so I’m going directly into the sub-categories.
- Animals
- Banners and Frames
- Beauty
- Fashion
- Flourishes
- Food and Beverage
- Holidays - You’ll probably want to break this down further with sub-categories of the holidays you celebrate or make artwork for.
- Icons
- Infographics
- Maps
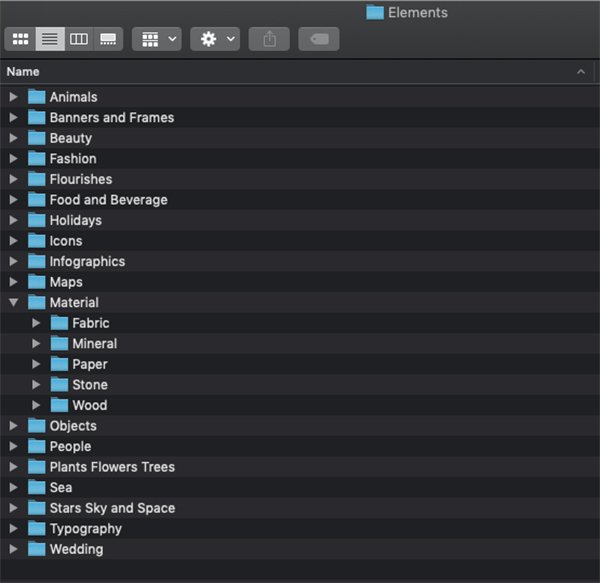
- Material > Fabric, Mineral, Paper, Stone, Wood
- Objects
- People
- Plants Flowers Trees
- Sea
- Stars Sky and Space
- Typography
- Wedding - If your main business is Weddings, then this would obviously be too broad of a category for you, so again, you’d want to create sub-categories suited to your specific needs
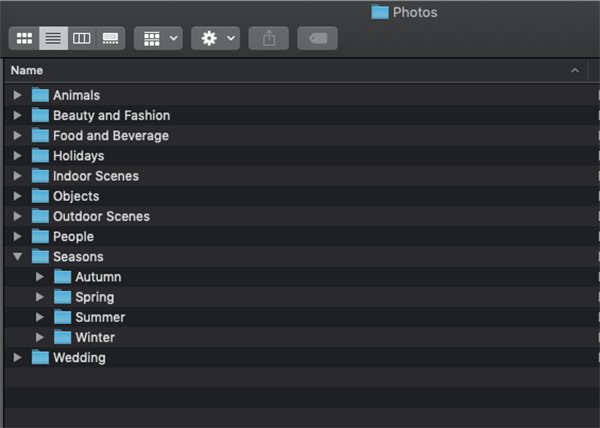
Now we’ll create the 'Photos' folder we mentioned above. This will have similar categories as Elements but they are a little broader and more appropriate for stock photography.
- Animals
- Beauty and Fashion
- Food and Beverage
- Holidays
- Indoor Scenes
- Objects
- Outdoor Scenes
- People
- Seasons > Autumn, Spring, Summer, Winter
- Wedding
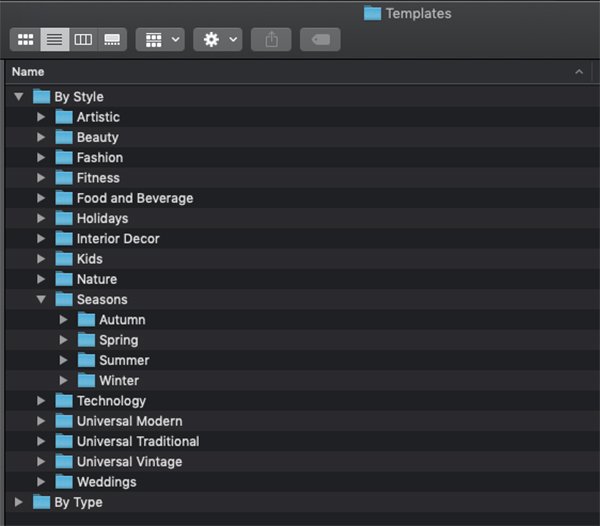
Templates - The Templates category includes things like mockups, scene creators and pre-made templates. If you work with a variety of industries, you could divide by style. If you focus primarily on one style, such as Weddings, you may have more luck dividing by type. Let’s look at both!
By Style
- Artistic - Assets that would fit your design business or promote your art career
- Beauty
- Fashion
- Fitness
- Food and Beverage
- Holidays
- Interior Décor - This covers frames and canvas mockups along with room scenes
- Kids
- Nature
- Seasons > Autumn, Spring, Summer, Winter
- Technology - Computers, tablets and phones
- Universal Modern - These Universal categories cover things that aren’t made for anything specific, like a clean, modern stationery set that could be used for nearly any business.
- Universal Traditional
- Universal Vintage
- Weddings
By Type
- Acquisition > Estimate and Invoice, Pitch and Present, Resume and CV
- Logos
- Mockups > Apparel, Books and Magazines, Branding and Stationery, Packaging, Technology
- Scene Creator > Branding and Stationery, Desktop Scenes, Indoor Walls, Kids Spaces, Mood Boards, Outdoor Walls and Signage, Packaging, Sports and Games, Table and Countertop (food-related)
- Social Media - This could be further divided by platform, style or purpose
- Stationery > Business Cards, Flyers and Brochures, Greeting Cards, Letterhead and Envelopes
- UI - This could be further divided by theme if needed
The main difference between a mock-up and a scene creator is that a mockup is generally an individual product or item whereas a scene creator is setting an entire environment like a desktop with a sheet of letterhead, an envelope, some pens, an iPhone, etc.

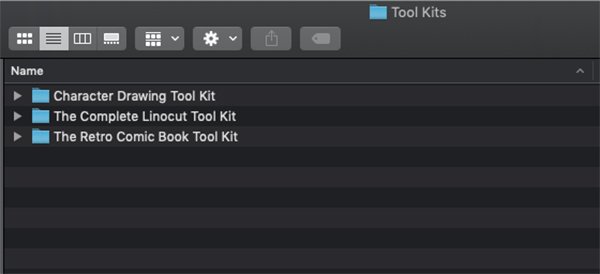
Tool Kits
Design Cuts offers a lot of all-in-one tool kits with mixed asset types. Instead of trying to figure out if you’ll look for it in Effects, Elements or Templates, I find it useful to give them their own dedicated folder called 'Tool Kits' and I place them in with their original names.
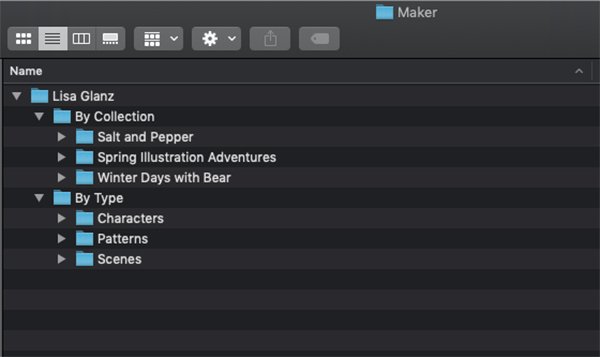
Makers
Makers is a category you might be interested in adding if you buy a lot from the same maker with a unique, identifiable style – something you’d specifically search for. For example, you may use a lot of assets from Lisa Glanz and if you’re looking for something of hers in your collection, you’d prefer to go directly to a folder dedicated to her artwork. Within that folder, you can divide by original collection name or type.
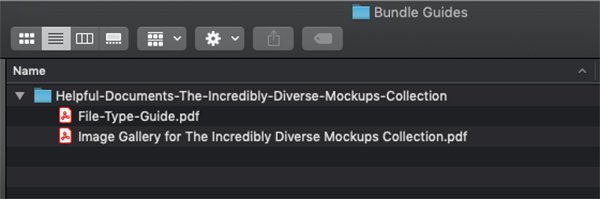
Bundle Guides
Each bundle from Design Cuts comes with a File Type Guide and searchable PDF bundle guide. These are invaluable. They give you the full list of files included in the bundle by maker with reference images. So… how do these work with a manual file organisation system?
This is really going to be determined by your own preference. One option is to keep bundles together in their original folder structure and always search by bundle.
We suggest you create a Bundle Guides folder with the PDFs from every bundle. If you tend to buy a lot of bundles, you may not always remember which asset came from which bundle. This way, you have the option of searching by the bundle guide followed by a file name search to pull up the file you want OR by going to specific folders (such as Templates > Fashion) and flipping through previews of files from multiple bundles manually.
As you begin to use this manual system of organisation, you’ll discover what’s going to work best for you, how you think about assets and where to fit in new types of media. It takes some time when you first start, but after the initial set-up and file migration, we hope you’ll find it to be a quick and intuitive process as you acquire new assets.
Adobe Bridge
Keywords
If you have access to Adobe Bridge, you can use it either in conjunction with the manual file organisation system or instead of it. I prefer to pair the two, so I have multiple search options. Bridge allows you to assign nested keywords to multiple files at the same time without having to rename or reorganise anything. It also allows you to reorganise files AFTER assigning keywords while still keep those keywords associated correctly.
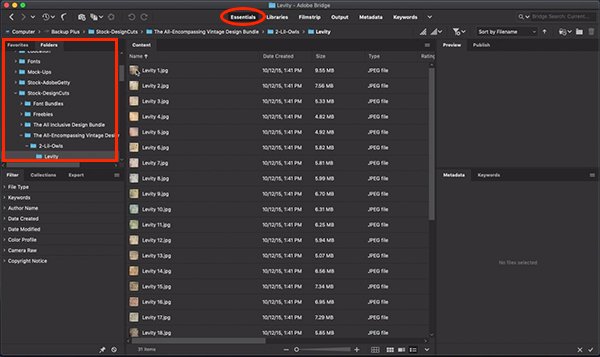
For this example, we'll dig into the All-Encompassing Vintage Design Bundle:
Open Bridge
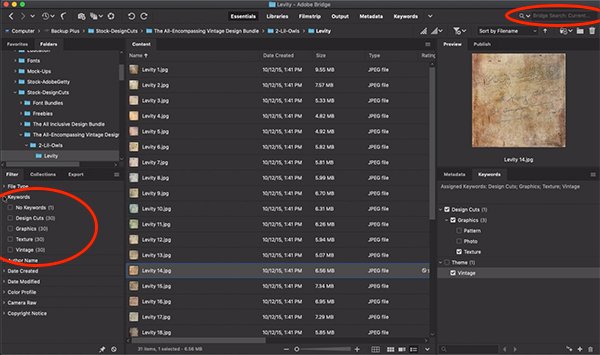
Use the Essentials workspace, with View by List.
Navigate to your files from the Folders tab on the top left. We will use the Levity Fine Art Textures from 2 Lil Owls for this demonstration.
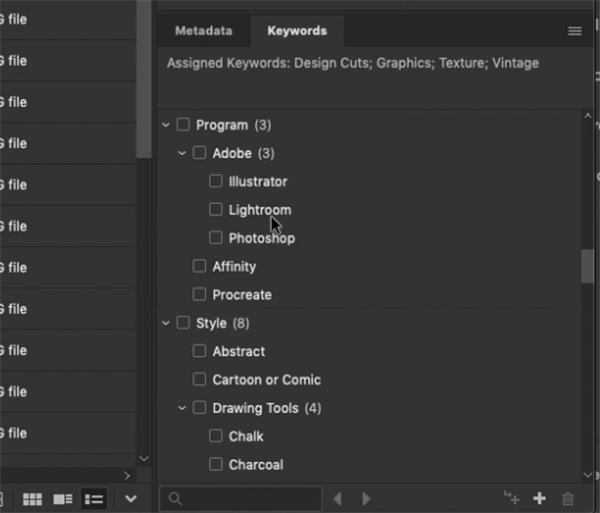
Creating a whole new keyword list can get a little overwhelming if you already have a big collection of files. To get you started, we’ve created a cheat sheet (available at the end of this guide) based on existing categories from the Design Cuts site and other recommendations we will make as we go. You can enter everything in at once or just add what you need as you label new files.
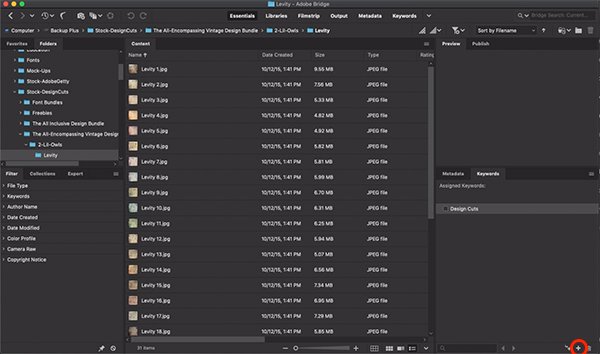
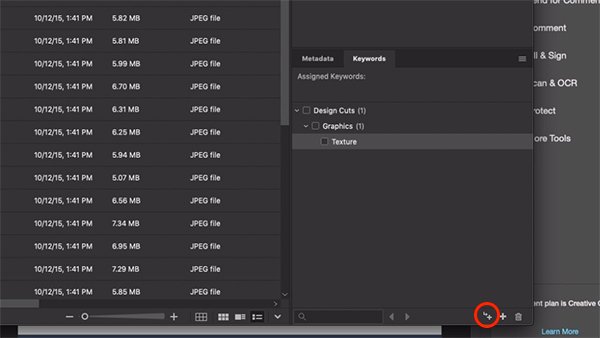
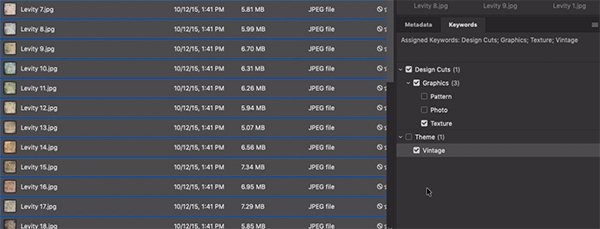
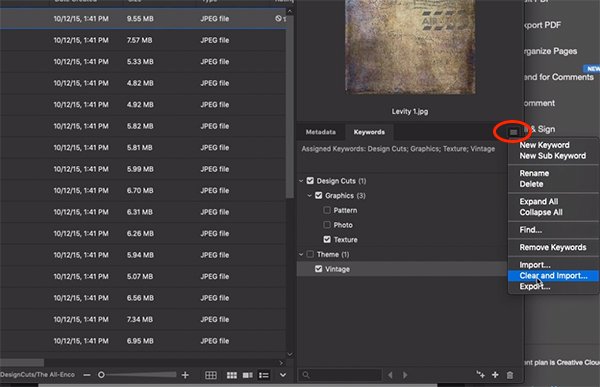
To start with, let’s create a new keyword for Design Cuts. This way, you can search for anything you’ve ever downloaded from Design Cuts. At the bottom right, you’ll see a tab for Keywords and below that, a plus symbol. Click that and type Design Cuts, then press Enter.
If you look at the cheat sheet, you can see that I’ve mimicked all the same categories from Design Cuts, so these will be under Graphics and Texture.
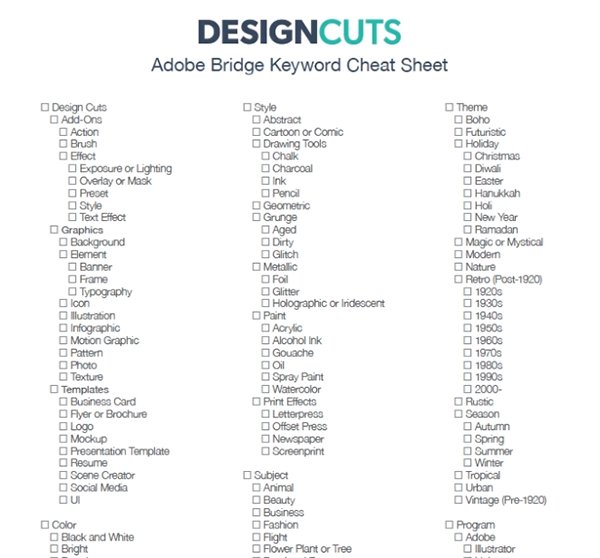
In Bridge, with Design Cuts still selected, click the smaller plus symbol and we’ll add a nested or Sub Keyword of Graphics. Click the small plus symbol again to add a sub keyword under that of Texture.
You can add as many sub keywords as you want under each category, just make sure you have the right Keyword selected to create a sub keyword under it.
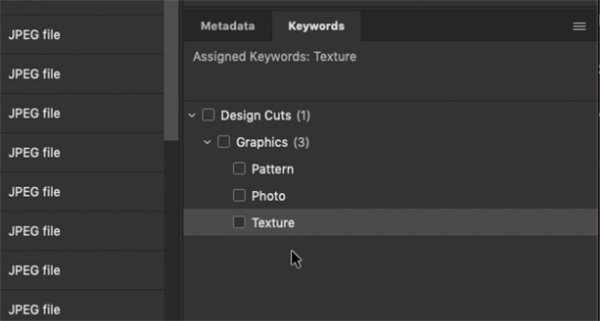
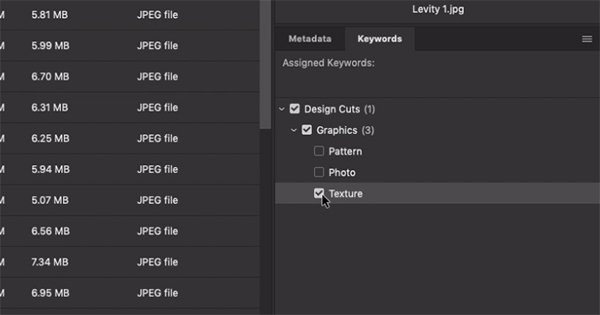
If you click the box next to any sub keyword, only that sub keyword will be applied to the file and none of the parent keywords above or other sub keywords below it. However, if you hold Shift while you click on a sub keyword, it will also apply the parent keyword(s) to the file.
Unfortunately, you’re not able to assign keywords to folders, so you’ll need to go into each folder, select the files and apply keywords.
Now from here, we get into the specifics of how you’ll be searching. You might search by Type, Color, Style, Subject, Theme, Maker or Program. For this example, create a new Keyword of Theme, then add the sub keyword of Vintage.
To apply the keyword or sub keywords to a file or group of files, simply select them in your list and click the box next to the keyword. It’s just as easily removed from the file by clicking it again.
Just like manual file organisation, we recommend keeping the keywords as broad as possible without hindering your ability to find what you need. It’s a balancing act of time spent now vs. time saved in the long run.
Once applied, you can filter files within folders by turning on or off options in the Filter tab under Keywords but more broadly by using the search bar.
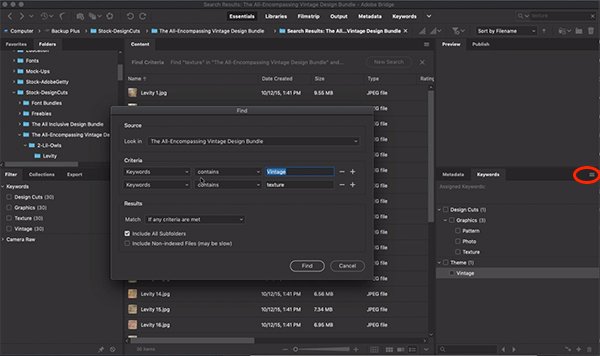
Or by clicking the menu in the Keywords tab and choosing Find, then entering your criteria.
Keywords and sub-keywords are very easily changed or deleted from the list but do so with caution if you’ve gotten pretty far into assigning them. You might be undoing a fair amount of work or rendering some files unsearchable with this method if you’ve not assigned other keywords.
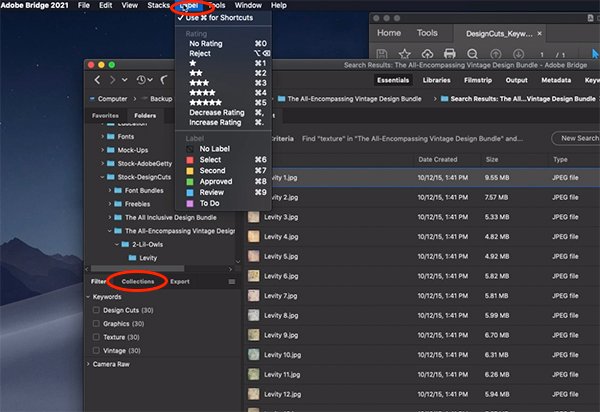
Ratings, Labels and Collections
Bridge has a variety of ways to organise files. You can apply star ratings (1 – 5), colour labels or even add files from across your folder structure to individual Collections. Collections can be especially useful to gather files for individual projects without actually moving the location of the file or having to copy it. Let us know if you’d like to see more about Collections in a future tutorial!
Now you've assigned your keywords, you can manually organise your files into your folder structure. The applied keywords and sub keywords will follow the files wherever you put them.
Cheat Sheets
As mentioned before, we've created a starter cheat sheet of Adobe Bridge keywords that you can use to begin labelling. You can also import the full list directly into Bridge.
In the Keywords tab in Bridge, click the menu and select Import (or Clear and Import if you want to delete any existing keywords) and navigate to the text file provided in the tutorial freebies.
We have also provided a copy of the manual folder structure created here so you can get a jump start on organising your Design Cuts files.
I hope this has given you some idea of how to begin organising your files. Again, each system is going to be unique based on how your brain works! Don’t be afraid to sit down and map out a structure on paper that will work best for you. And don’t think that you have to do it all at once. Maybe you start with a bundle at a time or one folder a week. You’ll get there!

THANK YOU :) this is tremendously helpful … Great teaching … mostly appreciated :)
You are very welcome Marlene. We are so glad to hear how useful you found this tutorial and hope you get great use out of your new design tips!
I loved this article. It was extremely useful! I am just starting on a new computer and setting up my database again with ACDSee. This information has me up and running so quickly.
I downloaded the freebies at the end. And when there were folders for brushes and stuff I thought it was actual brushes etc.
But having the folders setup was beautiful.
The last article you had like this (that I saw) was only about having Design Cuts assets, but this included the Makers section which is really helpful for someone like myself who gets assets from various sources.
I will need to tweak some of the category names etc to suit my needs, but it was really helpful to see the screenshots showing how you set things up.
Thank you for teaching us how to streamline our workflow.
Hey Angel,
Thanks so much for getting in touch for taking the time for leaving feedback on this article. It’s great to hear that you have found this article helpful and we hope that you enjoying organising your resources into the most effective layout for you.
Hi Zack,
I have a question about organizing my files. How do you decide if something is an asset or if it’s an element?
You have material under both sections of the Starter Guide so how would you decide whether a material would go under the asset or the elements section?
Thank you.
Hey Angel,
thanks for getting in touch and I can certainly answer your query now. This comes down to personal preference. Some people like to have more tools as assets, so will put brushes and plugins in this category, whilst others like to consider Elements to be graphics and other textures and patterns. There is no right or wrong answer to this structure Angel, it comes down to what you find more appropriate to your workflow.
I hope this helps Angel and that you find the best organisation for your resources.
Thank you Zack.
Yes, this gives me the information I need to make the right choices for my workflow.
Angel
You are very welcome Angel. It is my pleasure to help and I hope you have a great weekend of designing!
Regarding renaming the files: There are some packages where the file names are just numbers. ie 1.png and if you have a lot of those searching for a file is a nightmare. I use Bridge to rename those files. I leave the number on them and just add something relevant such as “Jardin WC” for the Opia Designs package of Jardin Watercolor Botanicals that had the letters of the alphabet only for the name of the letters and a series of numbers for all the other designs in the package. If I search for Jardin WC I might have a hope of finding the design I am looking for. I also use keywords. For anyone reading this who doesn’t know this: in Bridge open your file folder. Once you can see your designs. Cmd/Crtl A to select all, Cmd/Ctrl+Shift+R to get to Batch Rename (it is in the Tools menu). Leave the files in the same folder, Under New Filename set the first item to Text and type the new name. I usually end it with a space or underscore, Click the + sign. In that row set it to Current Filename, Name, Original Case.
That should get them all renamed in a flash for you.
If you have several folders in the same package and they all have numbers for names you can expedite the process by going to the name of the main folder on the top tool bar inside Bridge and click the folder that contains all those subfolders and files. Right click it. Select “Show Items from Subfolders.” Select them all and then deselect the folder names, leaving the files selected. Run the batch rename after making sure you have the correct name typed in. This is quick and easy. You do have to be careful.
Hey Jeanne,
Thanks for taking the time to comment and for sharing your helpful tips with the rest of our Community. We love seeing our community members help one another and sharing their personal tips and tricks :)
A great article, I have partially ordered my files but this has given me some new ideas. Thanks
You are very welcome Liz. It’s great to hear that you find this article so helpful, We hope that you have fun organising your files to get the most out of your new resources :)
“Should you rename the files? Definitely not! The team at Design Cuts has made efforts to name the files so they’re easily recognisable, plus it would just take too long!”
Many community members have said that 1.png, 2.png, etc. isn’t easily recognizable but in any event, you can use Bridge > Tools > Batch Rename to edit 1 – 1000+ file names in a matter of seconds. Other DAMs also have this functionality.
————————
“We suggest you create a Bundle Guides folder with the PDFs from every bundle.”
Bundle PDF guides do NOT need to be in the same folder in order to search them all at once/the same time. They only need to be on the same drive.
————————
“so you’ll need to go into each folder, select the files and apply keywords.”
Click the arrow at the end of the Path Bar and choose ‘Show Items from Subfolders’. Keyword as needed and then click the X to ‘Cancel Show Items from Subfolders’.
————————
Time Saving Ideas
1. Keywords and regular/smart collections eliminate the need for any manual organizing.
2. Knowing what filter options are available in Bridge/other DAMs will eliminate the need to create certain keywords e.g., software (PS, AI, etc.) and tag any files.
3. Smart vs. Regular Collections will do 95% of the work for you :)
4. Adobe Bridge is free w/a free Creative Cloud subscription so those who use Affinity, Corel, etc. can still take advantage of Bridge.
Hey Julie,
Thank you so much for taking the time to let us know your pointers on our article and sharing some super handy time-saving suggestions. As ever, your support just blows us away and we cannot thank you enough!
I have shared this with our team and we hope that the rest of our community find your comment really helpful too :).