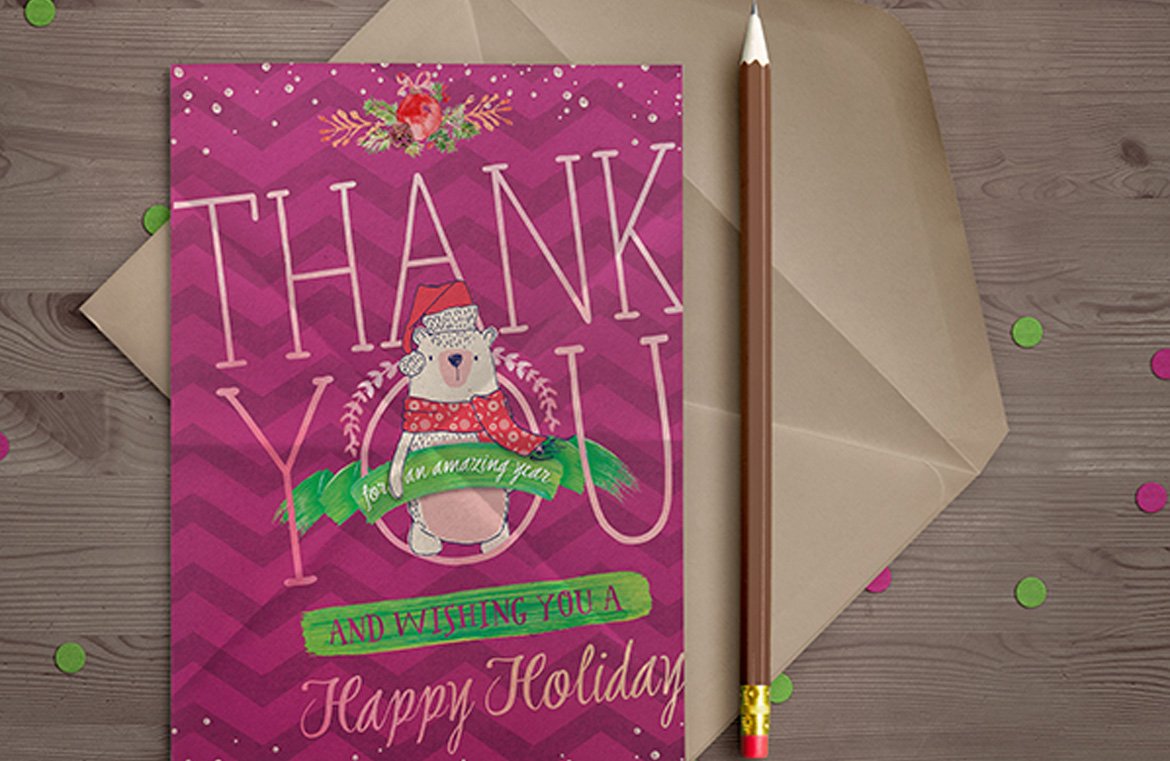
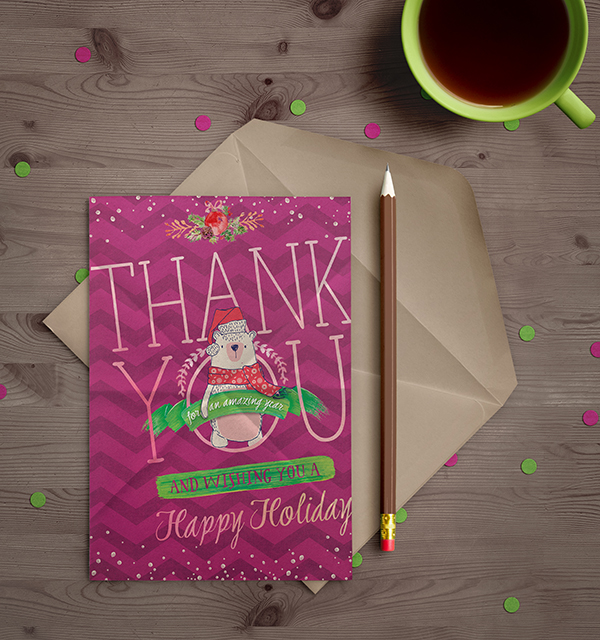
WHAT WE’RE CREATING:
Happy Holidays Design Cutters! Renee reporting in with yuletide greetings and, of course, a new Photoshop tutorial! We’ll be creating a Thank You card fit for the season with watercolor holiday doodles, fun textures, hand drawn fonts, painted banners and an illustrated polar bear vector. After that, we’ll take our card design and place it into a desk scene.
CHECK OUT OUR NEW VIDEO CHANNEL:
After lots of community requests, we are excited to announce the launch of our new Youtube channel. Each tutorial will now include a video version, which you can watch below. You can subscribe to our new video channel for more updates.
Follow along with this tutorial: Download The Massive End of Year Freebie Bundle.
Instead of our usual freebie sample pack, we’re giving away the whole bundle! If you haven’t downloaded it yet, head over to our deals page for The Massive End of Year Freebie Bundle. This free bundle is our way of saying thanks to you, our amazing community, for an incredible year. To show you how much we appreciate your continued support, we’ve packed this free bundle full of fonts, vectors, graphics, textures, mockups, gorgeous photos and more!
Step 1: Background
Open Photoshop and create a new file. We’ll use a half-page size of 5.5” x 8.5”. Set your resolution to 300 ppi and Color Mode to RGB.

Open your Layers palette (Window > Layers) and click on the Create a New Group icon at the bottom of the palette. Double click on the name (Group 1) in the Layers palette and rename the group Pattern.
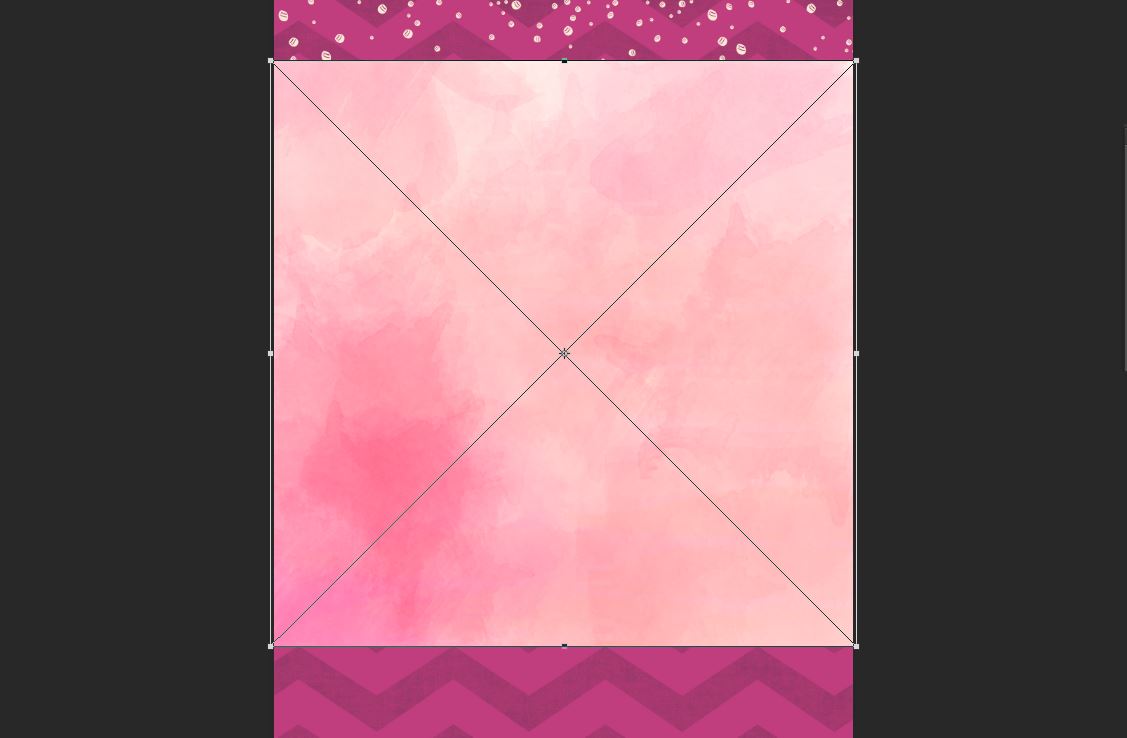
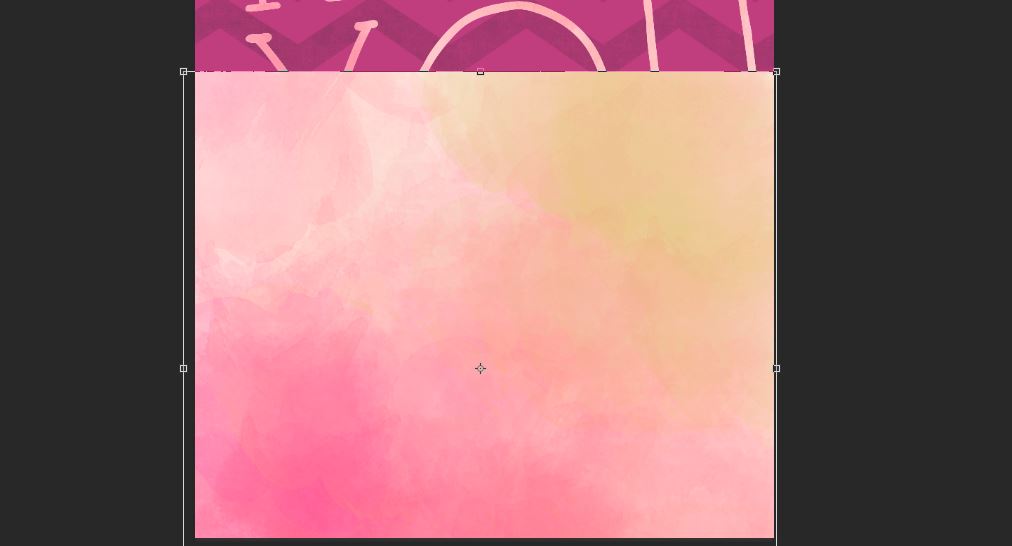
Go to File > Place Linked and navigate to The Little Cloud folder in the bundle, then the Peach and Mint folder. Select 8.jpg and press Place.
Hold shift (to maintain aspect ratio) while clicking and dragging out the corner handles until the pattern completely covers the artboard.
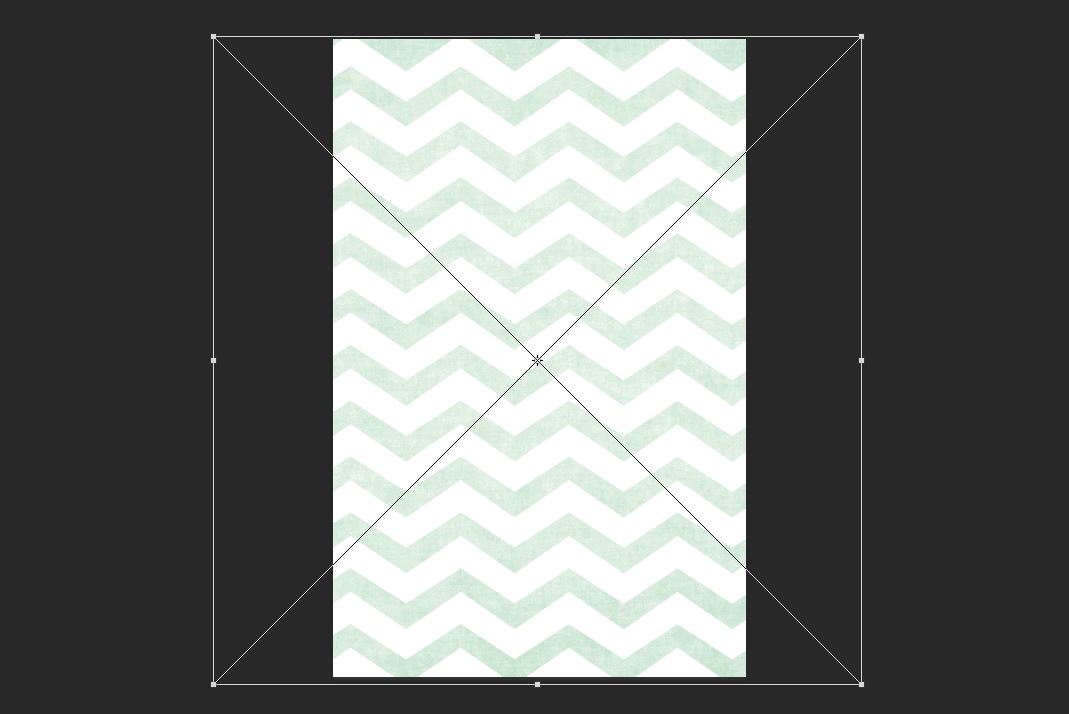
In the Layers palette, drag the layer into the folder named Pattern.
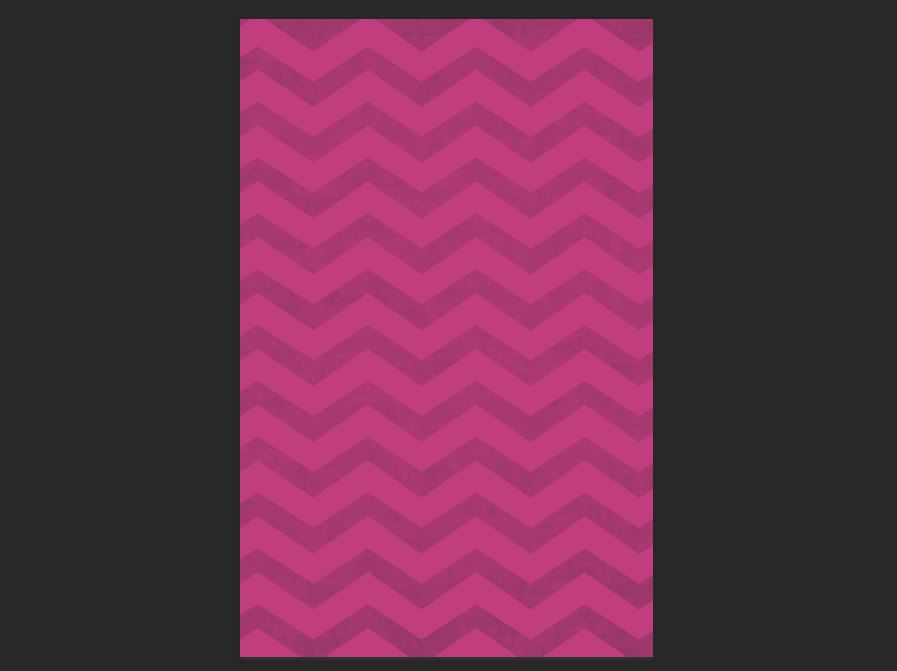
Click the Create a New Layer icon at the bottom of the Layers palette. Now click on the foreground color swatch located at the bottom of your Tool Bar. In the Color Picker pop-up, select a muted magenta color – I went with RGB values of 192/61/126. Press OK.
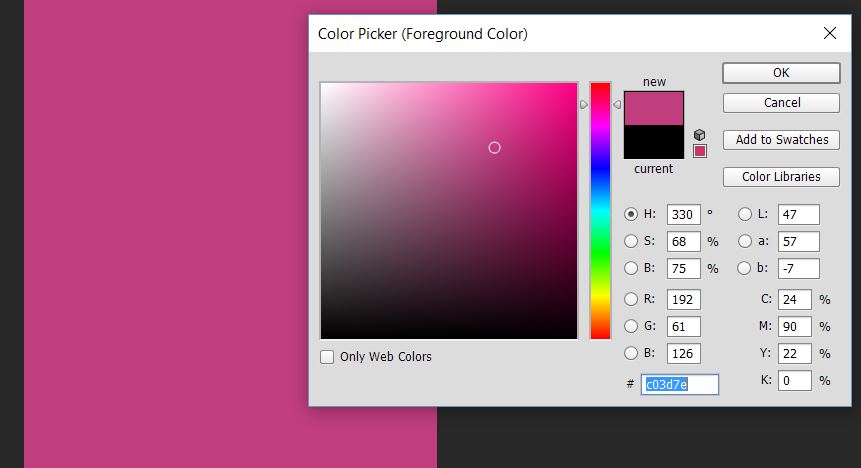
Hit opt/alt + backspace to fill the new layer with the foreground color we’ve just selected. At the top of the Layers palette, change the Blend Mode (in the drop down menu that currently says Normal) to Multiply.
Open Illustrator. Navigate to the Lisa Glaanz folder in the bundle files. Open the Winter Bear folder. From there, enter the Vector folder and open the file.
Note: If you don’t have Illustrator, you can achieve the same effects by using the PNG files located in the Winter Bear folder.
Use your Selection tool (v) to select the snowflakes. Press cmd/ctrl + c to copy.
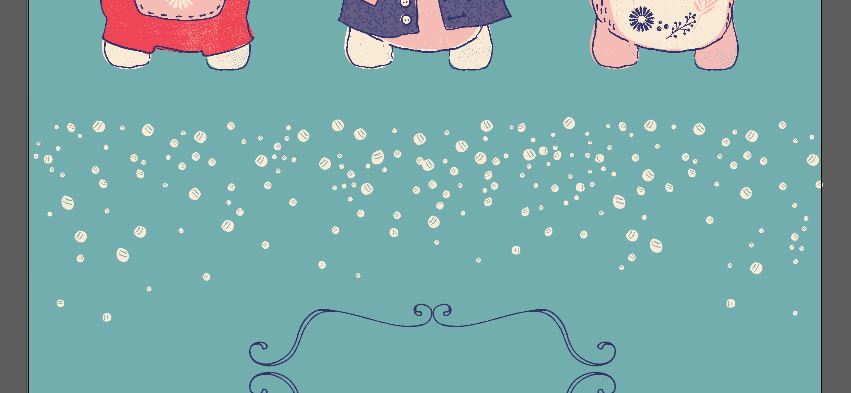
Go back to the layout file in Photoshop. Click on the Create a New Group icon at the bottom of the Layers palette and change the group name to Snow.
Press cmd/ctrl + v to paste in the snow we copied in Illustrator. Drag out the corner handles while holding shift until the snow is a little bigger than the artboard. Press Enter to complete the transformation.

In your Layers palette, drag the layer into the Snow group and double click the name, Vector Smart Object. Rename the layer Snow Top.
Still in the Layers palette, drag the Snow Top layer down to the Create New Layer icon. This will create a copy of the layer. Name the new layer Snow Bottom.
Go to Edit > Free Transform. Find the rotation controls by hovering over the corner handles until you see the curved, double sided arrow. Rotate 180 degrees by holding shift while you drag the mouse down. Holding shift will only allow the object to rotate at 45 degree increments.
After rotating the snow, use your Move tool (v) to drag it down to the bottom of the artboard.

Step 2: Text
In the Layers palette, create a new Group and name it Thank You.
Select your Type tool (t). Open your Character palette (Window > Character) and select the font Taluhla. Change your foreground color to white by clicking x on your keyboard. I’m using a font size of 72 pt, but we’re going to change that in a few steps, so your font size doesn’t matter much at this point.
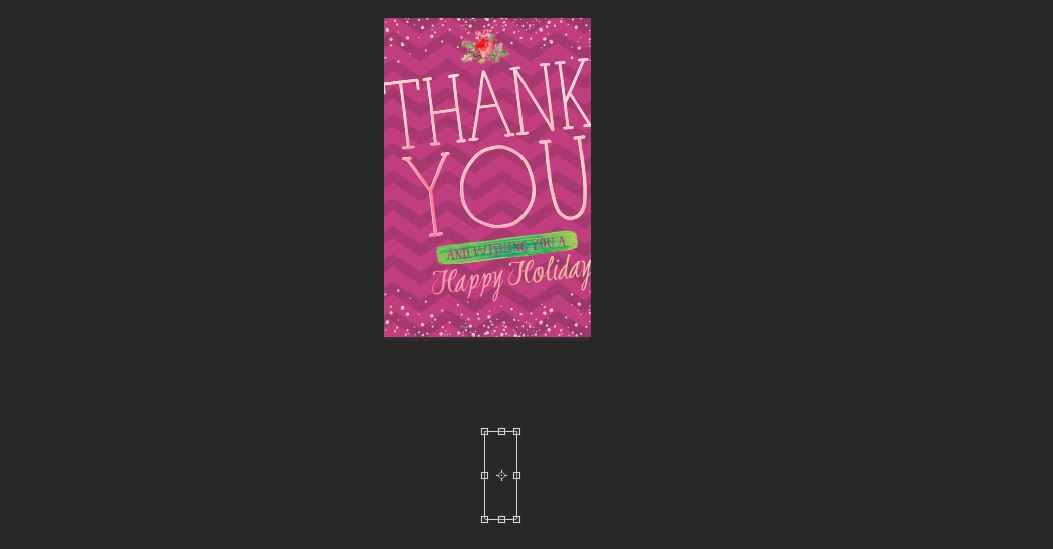
Click on the artboard once, then type Thank You. Press enter after “Thank” to add a line break and force “You” to the second line.

Go to Edit > Free Transform. At the top of your artboard, you will find a little angle icon next to a box to Set Rotation. Enter -7. This gives us a slight rotation.
Hold shift and use the corner handles to enlarge the text until “Thanks” spans the width of the card. The font size will be about 165 pt.
Select your Type tool (t) and select just the word “You”. Open your Character palette and increase the font size until it’s about the same width as “Thanks”. Mine is about 198 pt. We’ll also need to adjust the Leading – that’s the box to the right of the font size. Change the Leading until the lines are pretty close together – around 172 pt.

Next, we’ll place in a watercolor image to use for our text color. Go to File > Place Linked. Navigate to The Little Cloud’s Pink Watercolor Backgrounds folder and choose 1.jpg. Press Place. Make sure the image is large enough to fit edge-to-edge on the layout, then press Enter to apply.
In your Layers palette, hold cmd/ctrl down while clicking on the thumbnail image on the Thank You text layer. This will create a selection around the text.
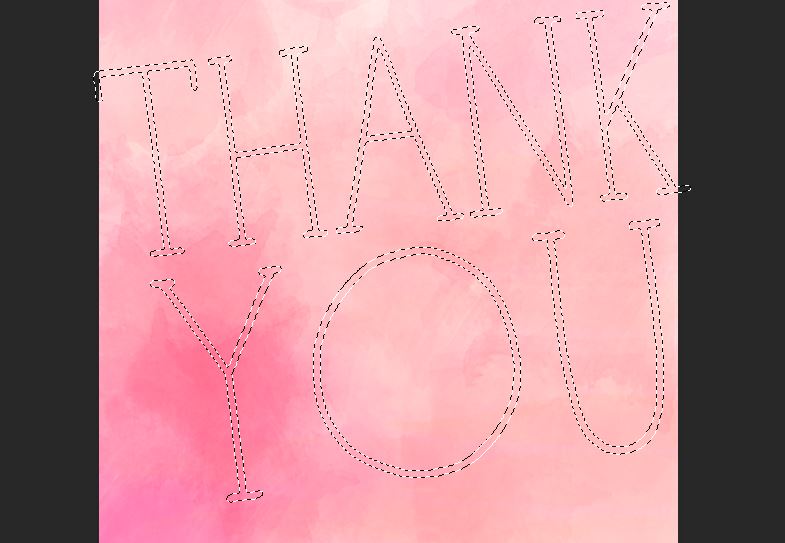
With the selection in place, release the cmd/ctrl button. Click once on the watercolor layer to make it the active layer, then click the Add Layer Mask icon at the bottom of the Layers palette.

Now turn off the original Thank You text layer by clicking on the eye icon to the left of the name in the Layers palette.
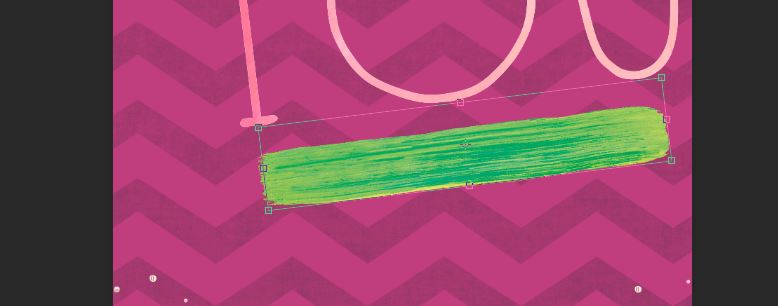
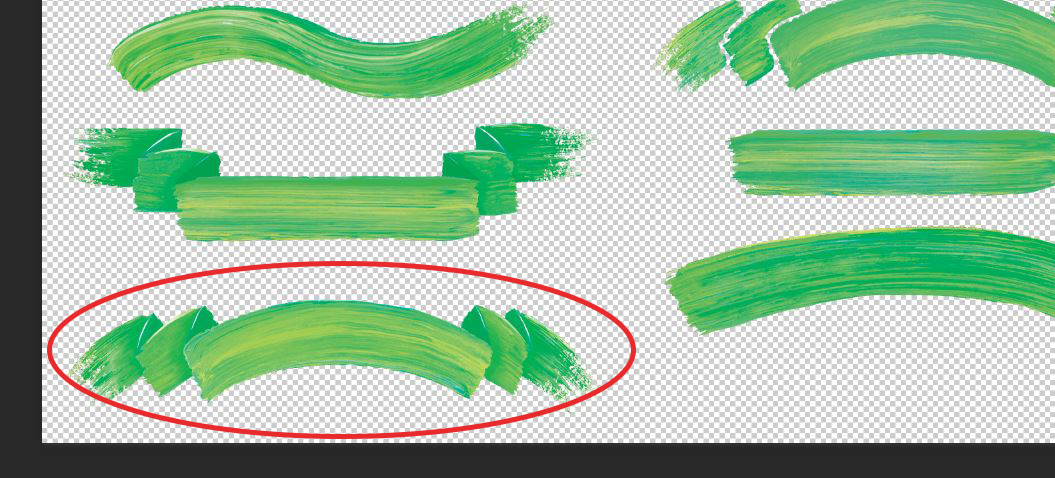
Next, we’ll add a hand painted banner below our Thank You. From Photoshop, navigate to the Artifex Forge folder, then go into Hand Painted Banners and open the file Banners_Green.
We’re going to use the straight banner on the left side – banner 3.
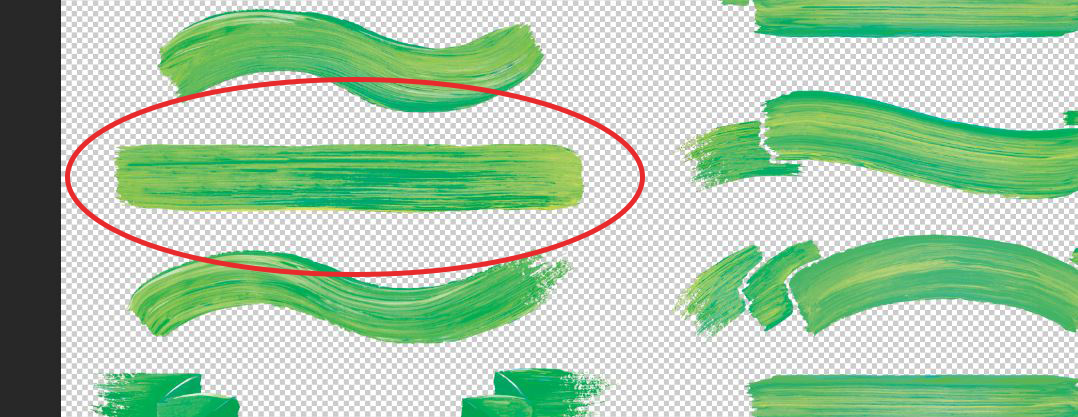
Select the group named Banner 3 and go to Layer > Duplicate Group. In the pop-up dialog, select your layout file and click OK.
Go back to your layout file and you should see a giant green banner! With the Banner 3 group highlighted in the Layers palette, go to Edit > Free Transform and use the handles to reduce the size of the banner and give it a matching -7 degree angle. Position the banner below Thank You.
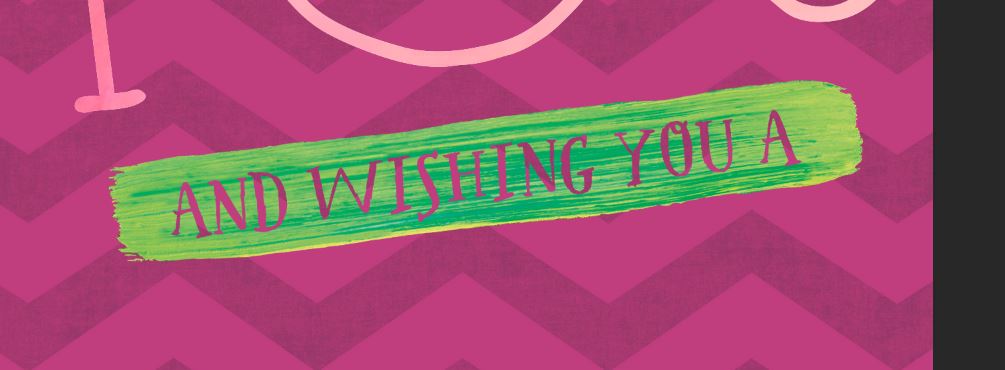
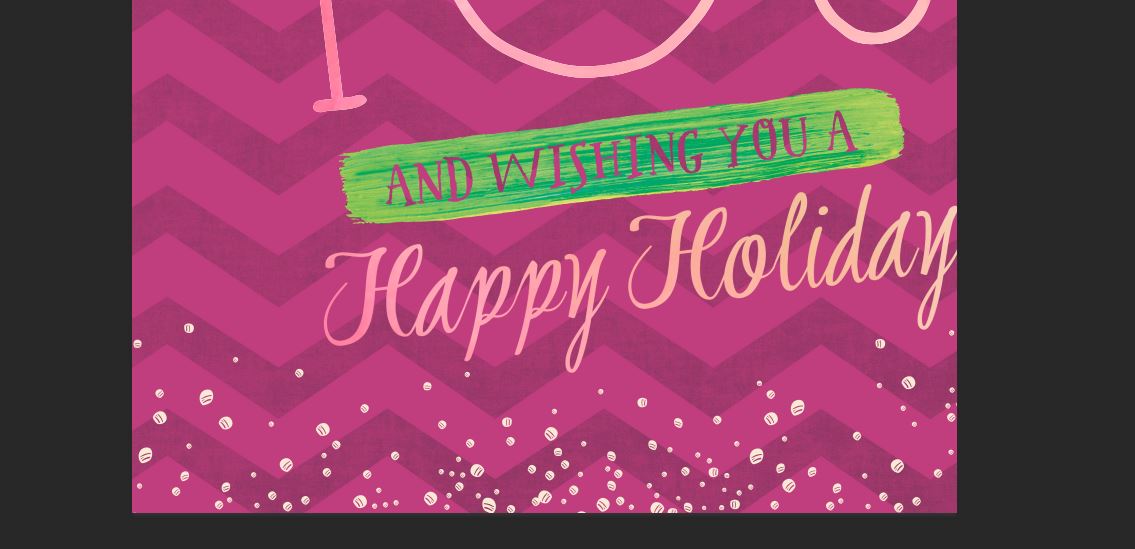
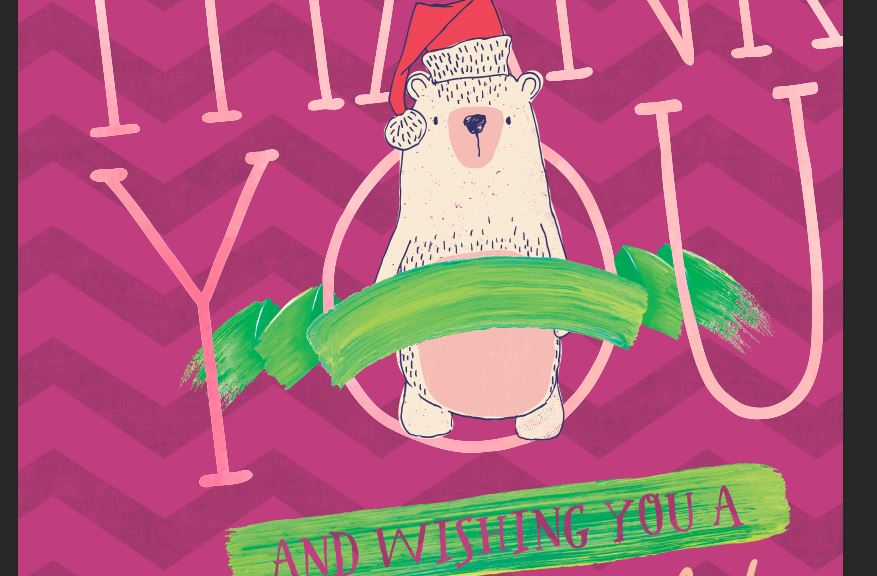
Select your Type tool (t). Open your Character palette and change the font to Westcoast Letters at 30 pt. Click once on your artboard and type: And wishing you a”.

Go to Edit > Free Transform and in the Set Rotation box at the top of the artboard, enter -7 degrees. Position the text over the banner.

Instead of placing a texture over this text, we’re going to punch it out of the banner. To do that, open the Banner 3 group and select the layer named Banner 3. At the bottom of the Layers palette, click the Add Layer Mask icon.
Now hold cmd/ctrl while clicking on the thumbnail next to the “and wishing you a” layer to create a selection.
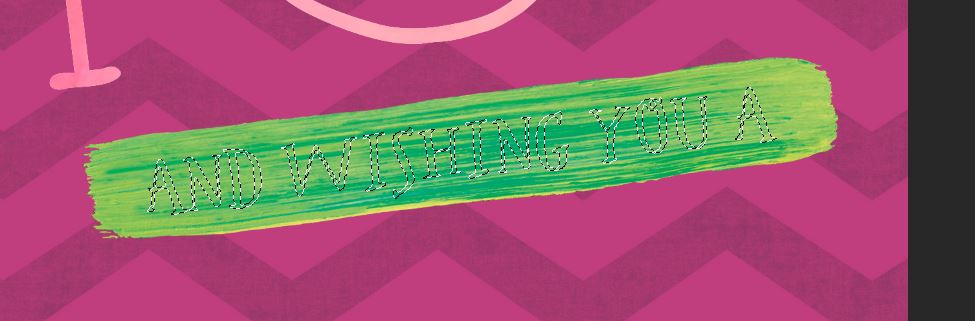
On layer masks, the black area is hidden and white areas are visible. So to punch out the text, make your foreground color black by pressing d. Select the layer mask thumbnail next to Banner 3 and press opt/alt + backspace to fill the selected area with black.
Drag the “and wishing you a” text layer into the Banner 3 group folder, then turn off visibility to the text layer by clicking the eye icon next to the layer name.
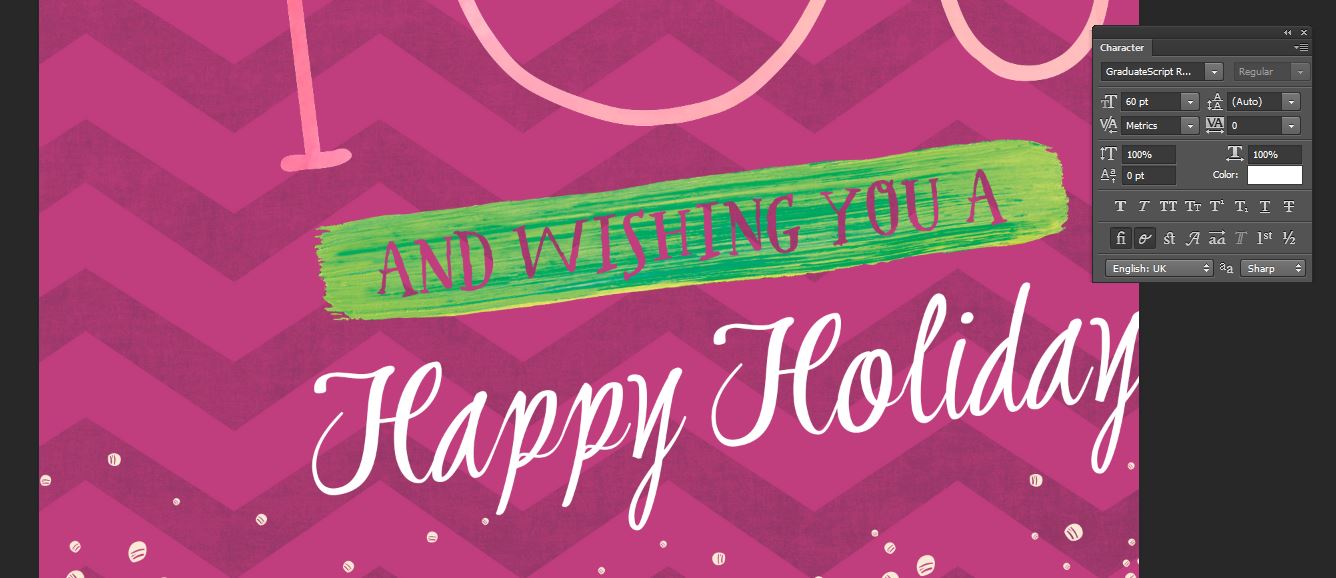
In the Layers palette, create a new group and name it Happy Holiday. Select your Type tool (t). In your Character palette, change the font to Graduate Script at 60 pt. Click once on the artboard, then type Happy Holiday. Use Edit > Free Transform to rotate the text -7 degrees and place it below the green banner.
We’ll repeat the process we used on Thank You. Go to File > Place Linked. Navigate to The Little Cloud’s Pink Watercolor Backgrounds folder and choose 2.jpg. Press Place. Make sure the image is large enough to fit edge-to-edge on the layout and drag it towards the bottom of the artboard, then press Enter to apply.
In your Layers palette, hold cmd/ctrl down while clicking on the thumbnail image on the Happy Holiday text layer to create a selection around the text.
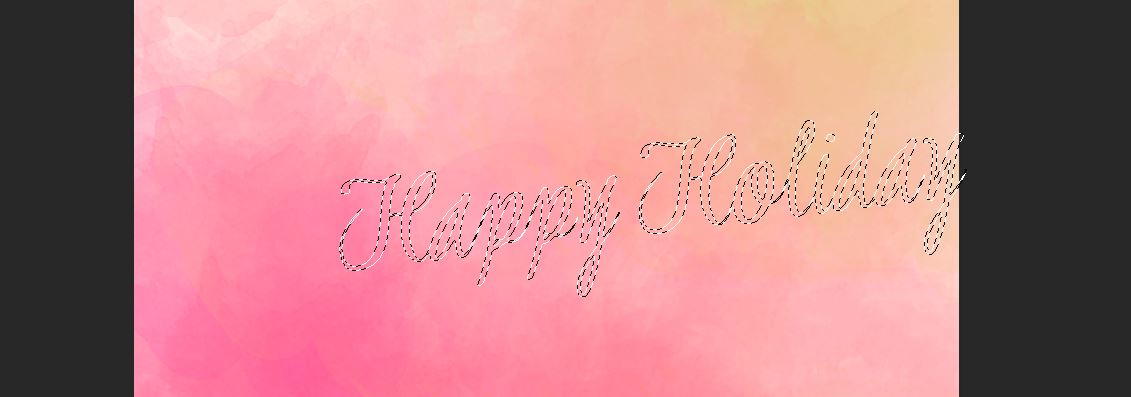
With the selection in place, release the cmd/ctrl button. Click once on the watercolor layer to make it the active layer, then click the Add Layer Mask icon at the bottom of the Layers palette.
Now turn off the original Happy Holiday text layer by clicking on the eye icon to the left of the name in the Layers palette.
Step 3: Ornaments and Illustration
Now we’ll add the super cute stuff!
In Photoshop, go to File > Open and navigate to Amine Gayiran’s Watercolor Doodles folder. Open the file Xmas Watercolor Assets.psd.
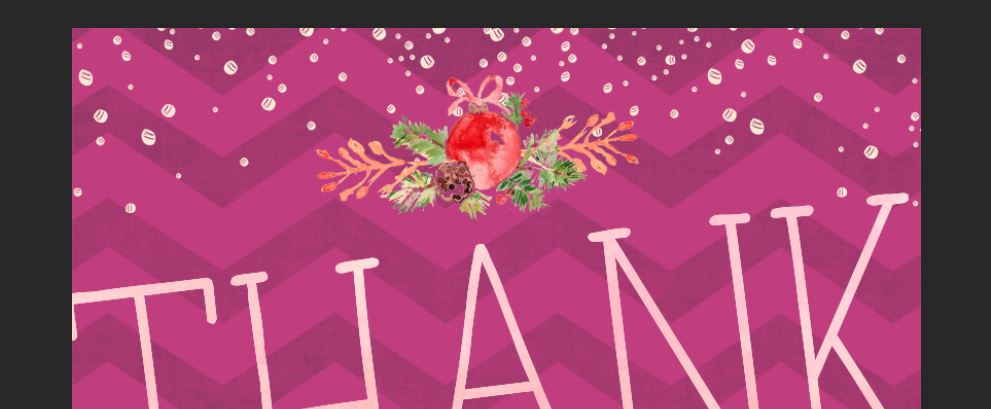
We’re going to use one of the top ornaments and the first leafy branch ornament.

It’s kind of hard to tell which layer you need to copy in this file, so I’m going to turn on Auto Select on the top left of the artboard. This means that whenever you click on an object, the layer it’s on will automatically be selected.
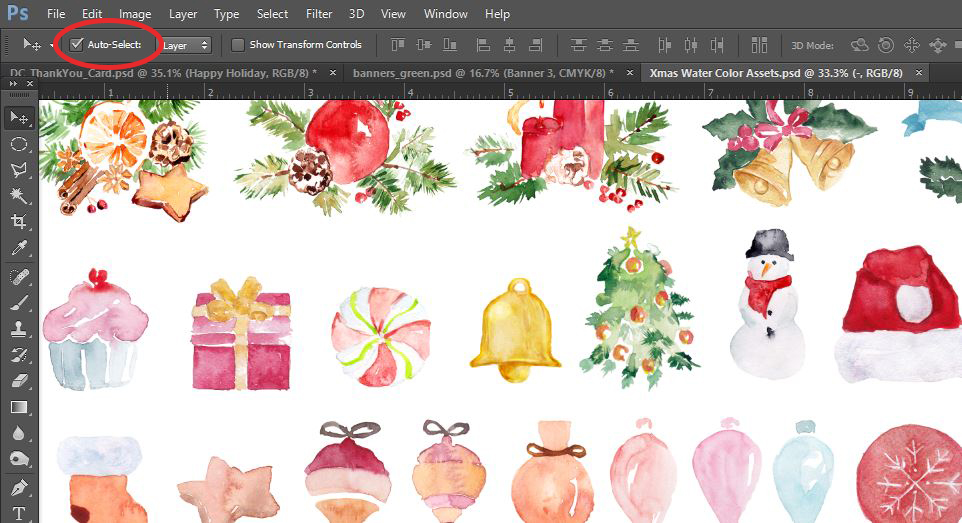
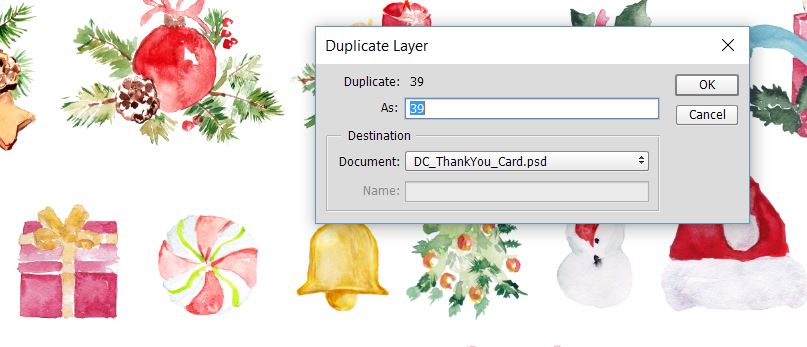
Click on the top ornament to select the correct layer, then go to Layer > Duplicate Layer. In the pop-up dialog box, select your layout file for the Destination Document then click OK.
Repeat for the leafy branch. Click on it to activate the correct layer, then go to Layer > Duplicate Layer and select your layout file, then click OK.
Turn off the auto-select option at this point by unchecking the box at the top left of the artboard.
Go back to your layout file. Create a new group above the Happy Holiday group and name it Top Ornament.
Drag the two new layers into the new Top Ornament folder.
Select the ornament layer, 39, and go to Edit > Free Transform. Reduce the size, add a -7 degree rotation and position it above Thank You on the artboard.

You may notice that your leafy branch is nowhere to be found on the artboard. Since we copied from a larger file, it’s currently located way off our visible artboard space. To find it, select the layer in the Layers palette and go to Edit > Free Transform. This will create a selection around it, even off the artboard. Press cmd/ctrl and the hyphen key several times to zoom out until you can see it.
Drag the branch up to the left of the ornament and use the corner handles to reduce the size and rotate -7 degrees. Place so the leaves are peeking out of the left side of the ornament.

In your Layers palette, drag the layer to the Create New Layer icon to copy it. Go to Edit > Free Transform and use your corner handles to rotate the copied layer 180 degrees.
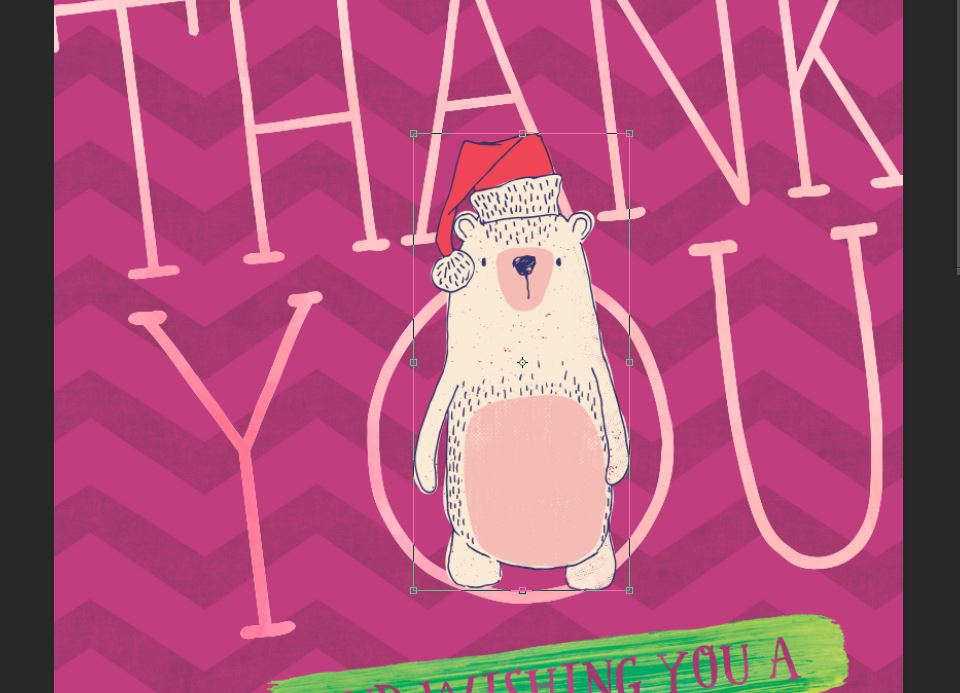
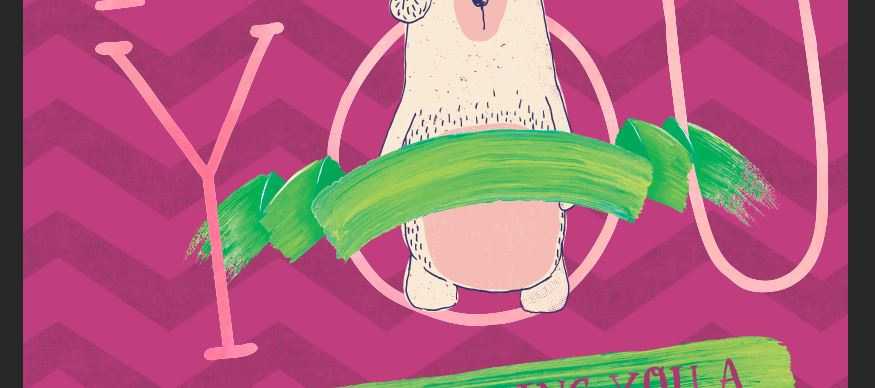
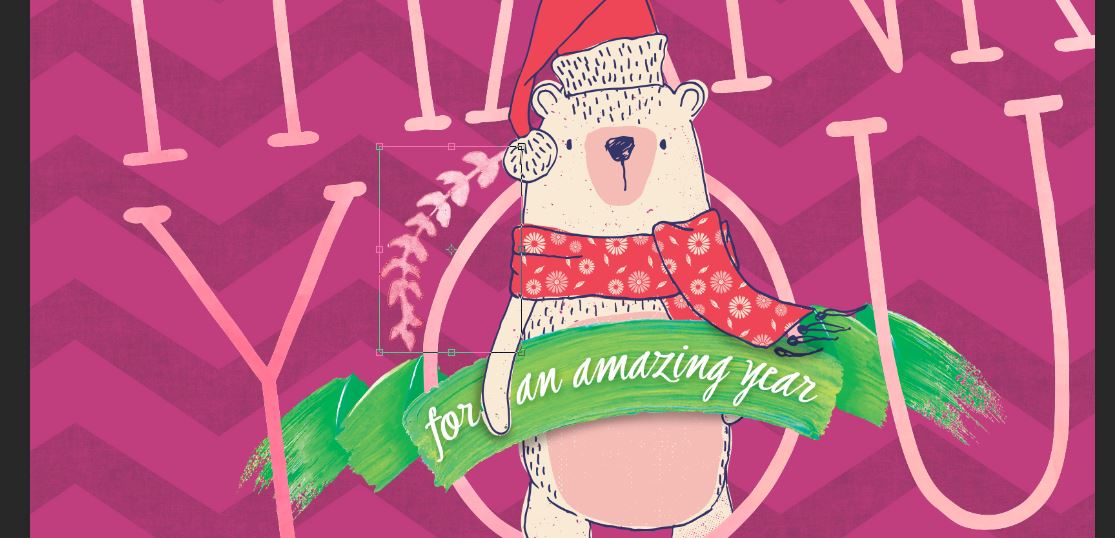
Now we get to add our winter bear. He’s so cute!
Go back to the Lisa Glaanz Winter Bear file in Illustrator. We will be using the top bear and the Santa hat.

Use your Selection tool (v) to select the Santa hat and place it on top of the bear’s head. The hat is currently behind the bear, so with the hat selected, go to Object > Arrange > Bring to Front.
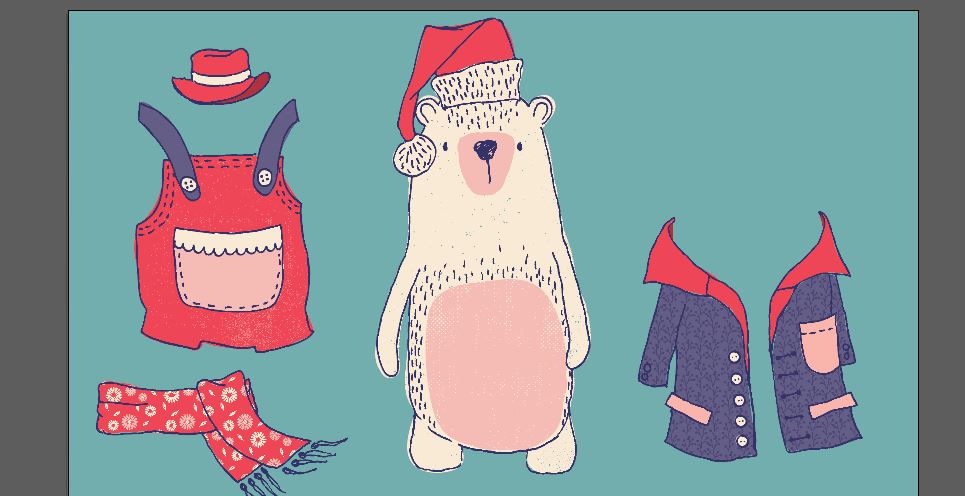
Hold shift and click on the bear and the hat to select both. Press cmd/ctrl + c to copy. Go back to your layout file in Photoshop and press cmd/ctrl + v to paste.
Position the bear inside the “O” in You. Press enter to apply.
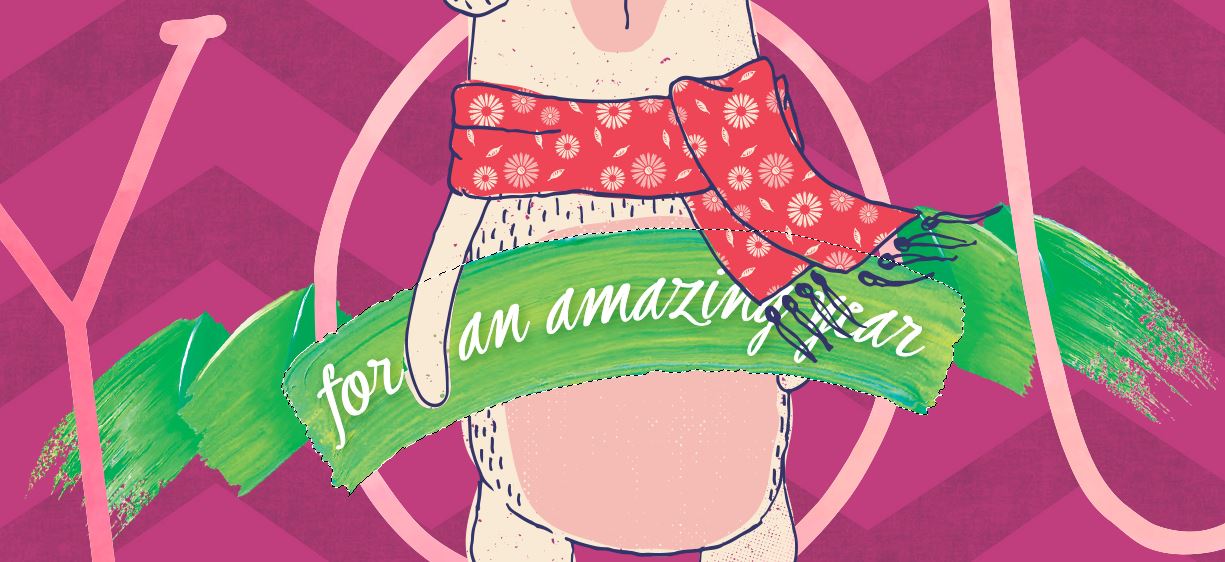
Go back to the Banners Green file from Artifex Forge. This time, select Banner 6.
Go to Layer > Duplicate Group and select the layout file. Press OK. You can close the Banners Green file now.
In the layout file, select the Banner 6 group in the Layers palette and go to Edit > Free Transform. Locate the banner (below the artboard again) and drag it up to the bear. Use the corner handles to rotate and reduce the size of the banner until it just overlaps the edges of the “O” in You and leaves a tiny bit of the bears armpit visible. Who doesn’t love bear armpit?!
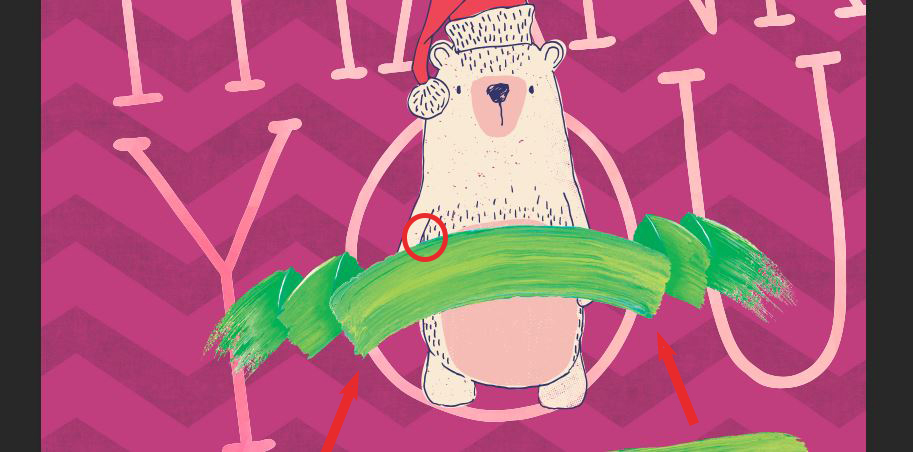
We want the banner to interact with our text for a more realistic, cohesive look. So we’re going to create the illusion of the edges of the banner being behind the Thank You text.
Open the Banner 6 group and select the layer named Back. At the bottom of the Layers palette, click on the Add Layer Mask icon.
Now open the Thank You group. Hold cmd/ctrl and click on the thumbnail next to the Thank You text layer (it’s turned off, but the selection will still be created).
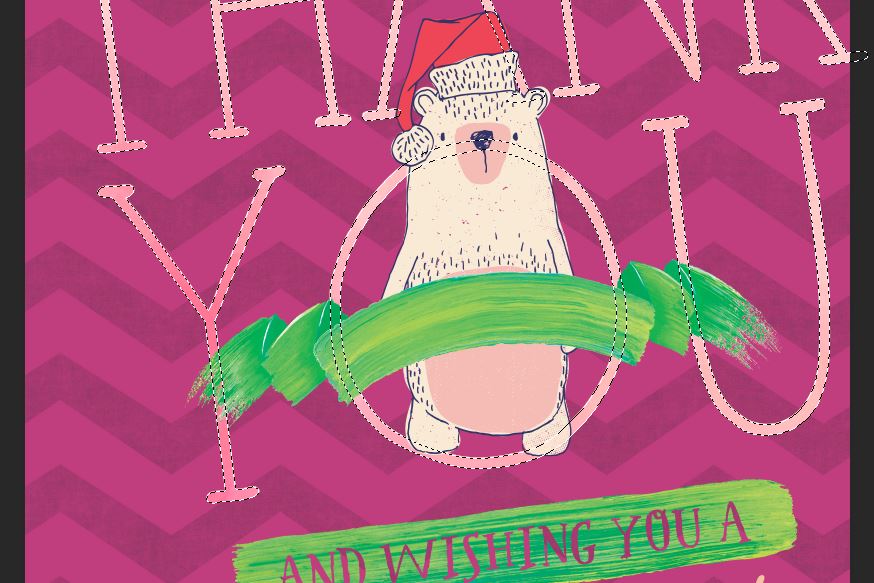
Press x, then d to ensure your foreground color is black. Make sure your layer mask on the Back layer is selected. Press opt/alt + backspace.
Repeat this exact same process for the layers named Shade 2, Middle and Shade 1 – add a layer mask to the layer, create a selection around Thank You, then fill the selected area on the mask with black.
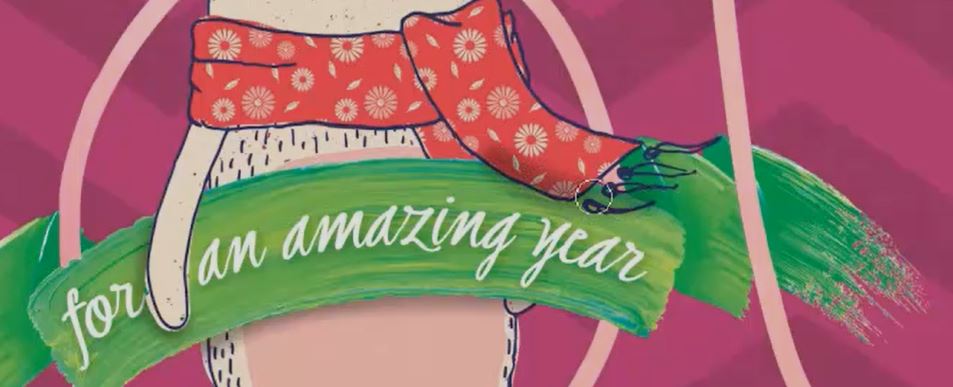
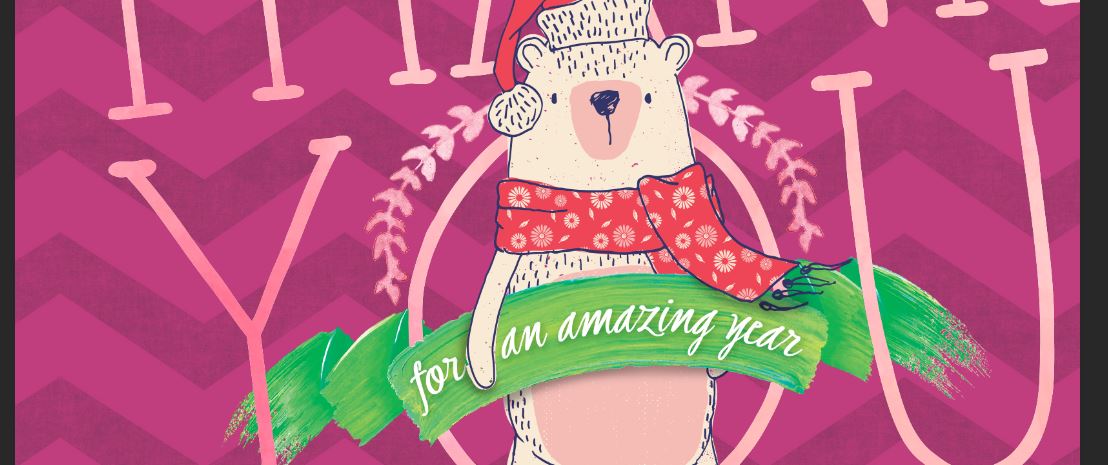
To have the bear interact with the banner, we’ll have his left paw appear to be in front of the banner.
In the Banner 6 group, select Front and click the Add Layer Mask icon. Click on the Winter Bear thumbnail in the Layers palette while holding cmd/ctrl to create a selection.
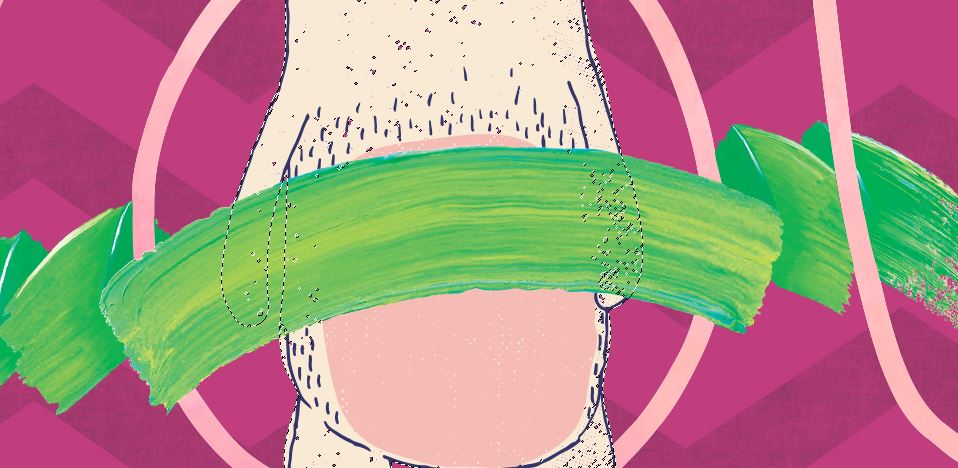
Select your Brush tool (b) and in the top left of your screen, click the Brush Preset Clicker and select a hard round brush. Make sure the Opacity is set to 100%.
In the Layers palette, click on the mask thumbnail next to Front. Set your foreground color to black by pressing x, then d. Use your Brush tool to brush over the left bear arm only.

Now we’ll add some text to our banner. Select your Type tool (t) and click once on the artboard. In your Character palette, change the font to Graduate Script at 19 pt. Click on the box to the right of Color to bring up the Color Picker for the type. Select white and click OK.
Type “for an amazing year”.
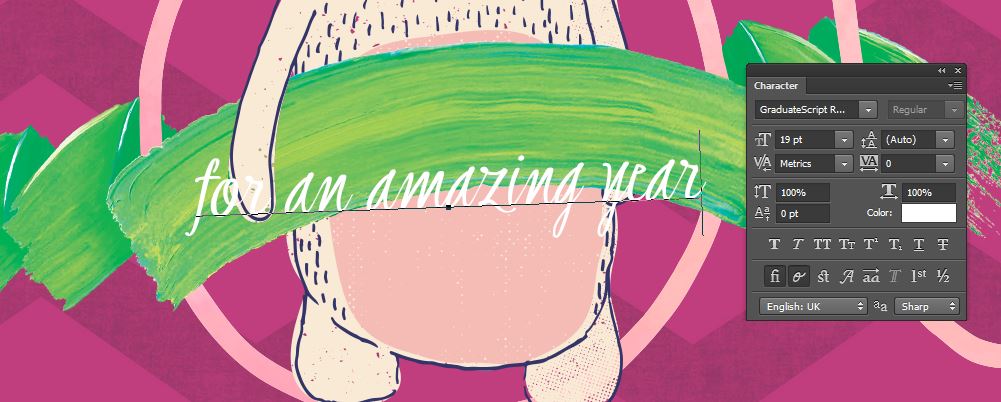
In the Layers palette, drag this layer into the Banner 6 folder, above the other layers in the Banner 6 group.
Go to Type > Warp Text. In the dialog box, choose a Style of Arc and change Horizontal to +32. Click OK. This will fit our text to the shape of our banner. Now go to Edit > Free Transform and set the rotation to -7 degrees. Position the copy on top of the banner.
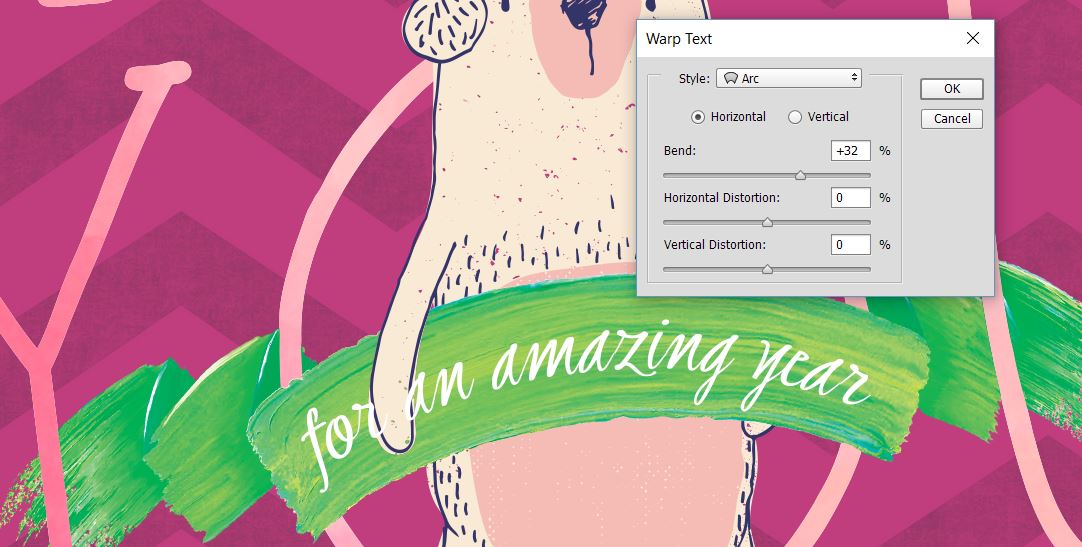
You may notice that our bear’s left arm is interfering a little with the text. Use your Type tool to select the space between the first two words and add 2 extra spaces.
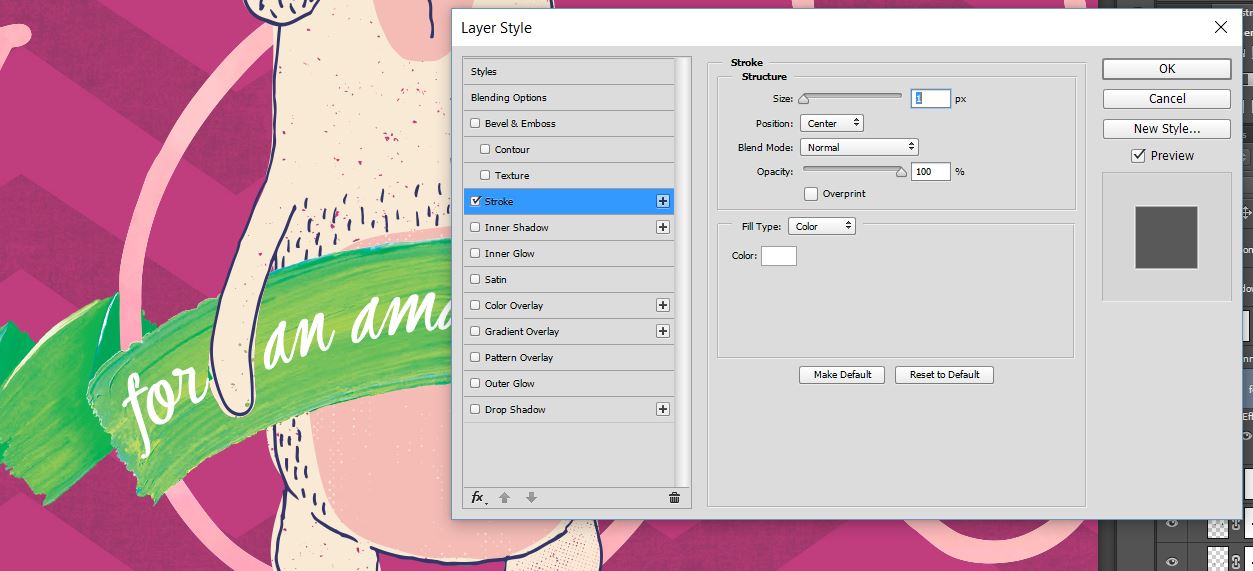
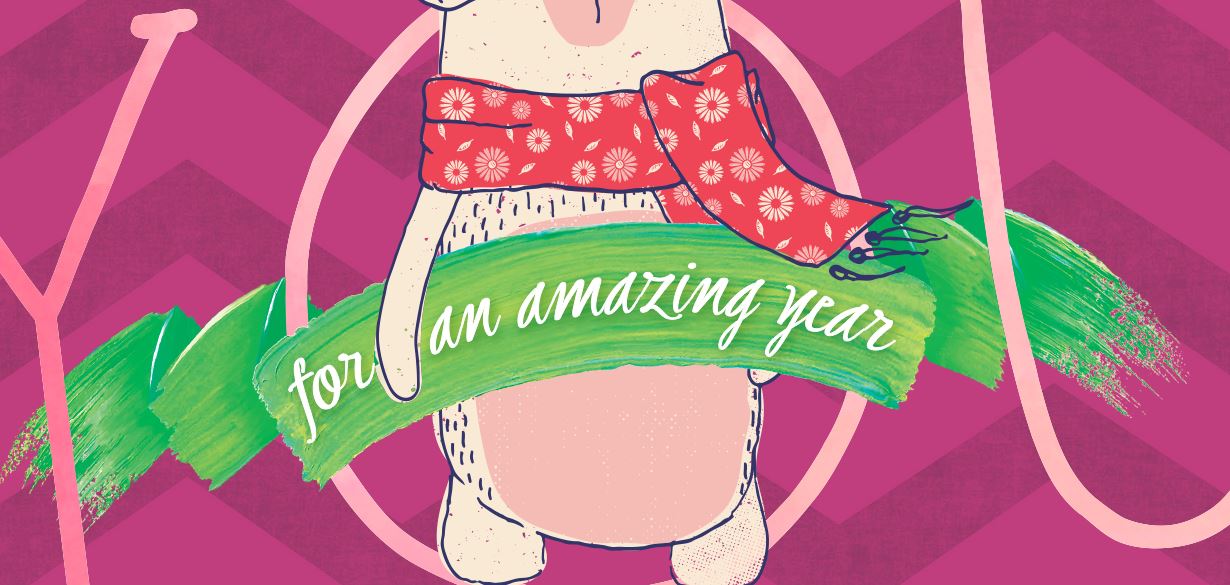
To get our text to stand out a little more on the banner, we’ll add a stroke and a wee bit of shadow.
Cick on the FX icon at the bottom of the Layers palette and select Stroke. In the dialog box, select a Size of 1 and change the Color to white. This will give us a faux bold effect.
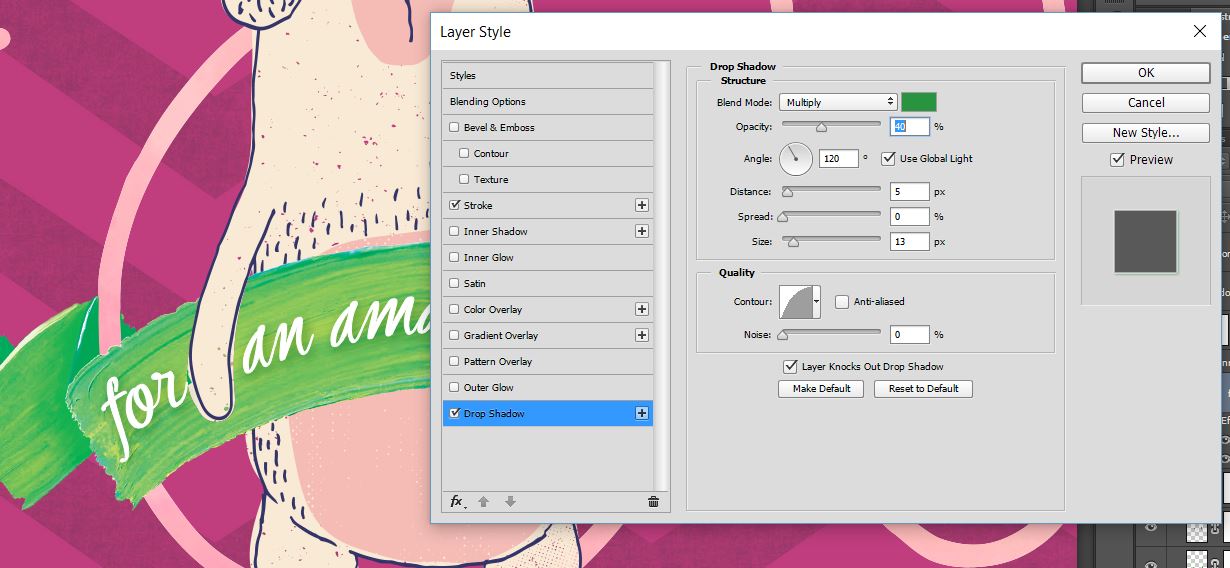
On the left side of the dialog box, select Drop Shadow. For Blend Mode, select Multiply. For the color, I opened the color picker by clicking on the color box and using the eyedropper (that you’ll see when you hover over the artboard when in Color Picker mode) to select a dark green from the banner.
Set Distance to 5 px and Size to about 13 px. Click OK.
Now we’ll add a scarf to our bear. Go back to the Winter Bear file in Illustrator one last time. Select the red scarf and press cmd/ctrl + v to copy. You can now close the winter bear file.
In Photoshop, press cmd/ctrl + v to paste the scarf and position it over the bear. In the Layers palette, this should be the top layer above Banner 6.
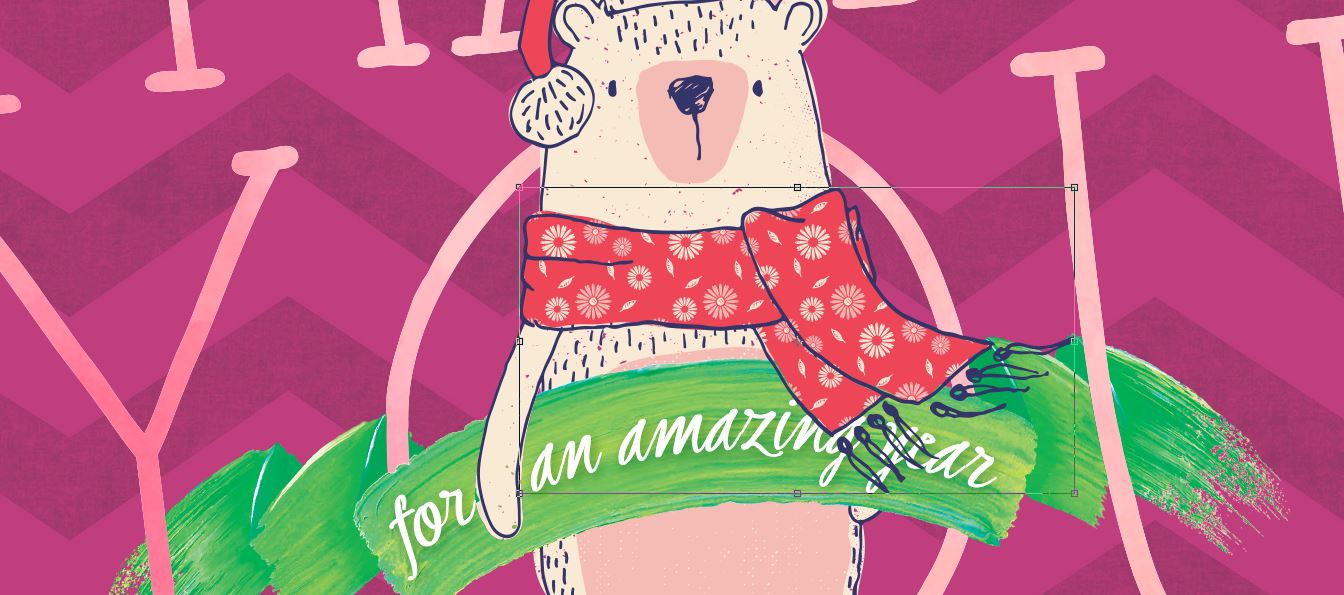
Again, we’ll add a little interaction between objects by having one end of the scarf go behind the banner.
On the Scarf layer, click the Add a Layer Mask icon.
Open the Banner 6 folder and hold cmd/ctrl while clicking on the thumbnail to the left of Front. This will create a selection around the front of the banner.
Select your Brush tool (b) and carefully brush over the left end of the scarf. Fortunately, the illustrative style means it doesn’t need to be perfect!
Step 4: Shadows and Final Touches
Create a new layer and name it Shadows.
Hold cmd/ctrl and click on the thumbnail next to the winter bear layer. This will restrict our active area to the selection.
Select your Brush tool (b). In Brush Presets (at the top left of the screen), select a Soft Round Brush and reduce Opacity to 20%. Drag your Brush across the bottom edge of the green banner a couple of times to create a shadow over the bear’s belly.

To remove the paint on the banner area, press cmd/ctrl and click on layer named Front in the Banner 6 group.

Now press backspace and we’re left with just the shadow on the bear.

Now use the Brush tool to draw a darker area under the visible scarf end.
To get rid of the dark areas on top of the scarf, select your Eraser tool (e). In the top left Brush Preset Picker, select a Hard Round Brush and set your Opacity to 100%. Manually erase the brushed areas over the scarf (again, we get to be totally imperfect since we’re working with this awesome illustrative style).
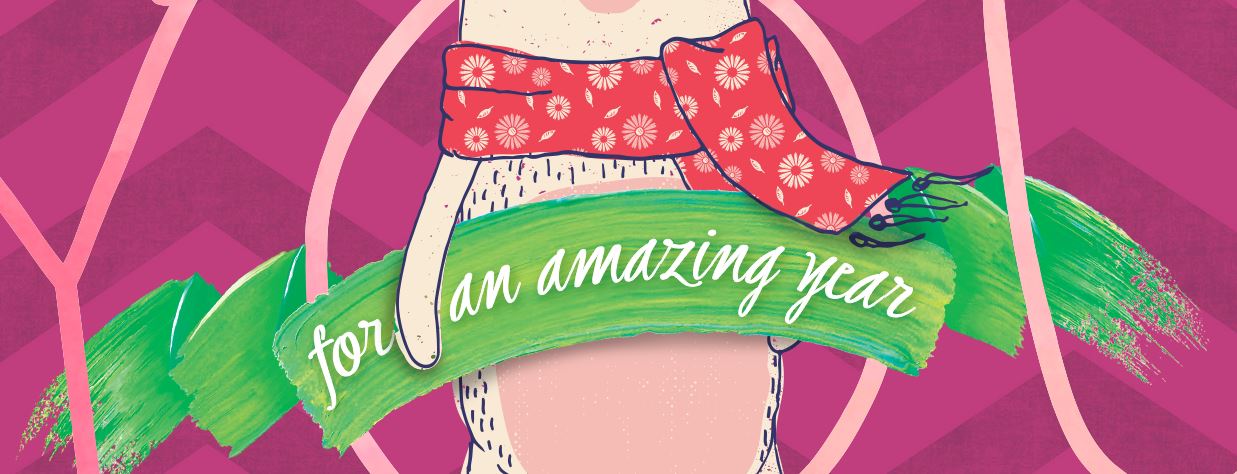
For our last bit of beary interaction, we’ll mask out his right foot so it looks like he’s stepping out of the “O” in You.
Select the Winter Bear layer and click the Add Layer Mask icon.
Press cmd/ctrl and click the thumbnail next to the Thank You text layer in the Thank You folder.

WIth the selection in place, press b to select your Brush tool. In the Brush Preset Picker, choose a Hard Round Brush and change your Opacity to 100%.
Brush over the bear’s right foot. This will leave a little section peeking out for now.

Deselect by pressing cmd/ctrl + d. Then, use your Brush to go over the remaining section of the right foot.

In your Layers palette, create a new group and name it Pink Foliage. Drag the folder below the Thank You group. We’re going to place some extra ornamentation around the “O” in Thank You.
In the Xmas Watercolor Assets file, find the pink leafy branch.

Turn on auto-select in the top left corner, then click on the pink branch to locate the correct layer. After doing so, deselect the auto-select option. Go to Layer > Duplicate Layer, choose your layout file and press OK. You can now close this file.
In the Layout file, reduce the size of the branch and rotate so that it fits snugly on the left side of the “O” in Thank You. Make sure to drag the layer into the Pink Foliage folder we created.
In the Layers palette, duplicate the pink branch by dragging the layer into the Create New Layer icon at the bottom of the Layers palette. Go to Edit> Transform > Flip Horizontal, then drag the copy to the right side of the letter “O”.
For our final effect, we’ll add a folded paper texture. Go to File > Place Linked and navigate to Click Chic’s Folded Paper Overlays. Choose Diagonal Folds.jpg and press Place. Use the corner handles while holding shift to entirely fill the artboard, then hit enter to apply.

Make sure this is the very top layer in the Layers palette. At the top of the Layers palette, change the Blend Mode to Multiply and the Opacity to 20%.
Save your file and close it. We’re ready to put this card on a desk!
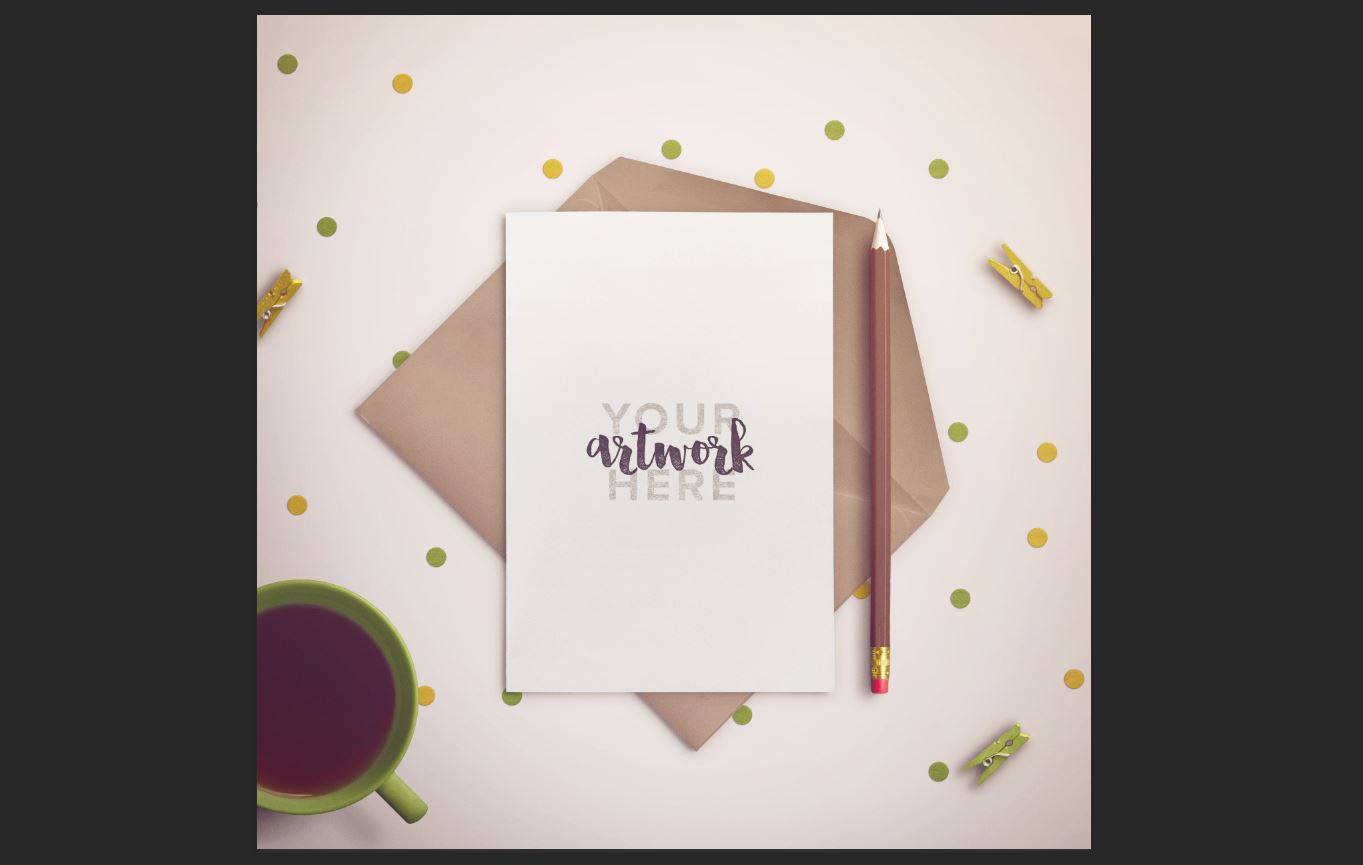
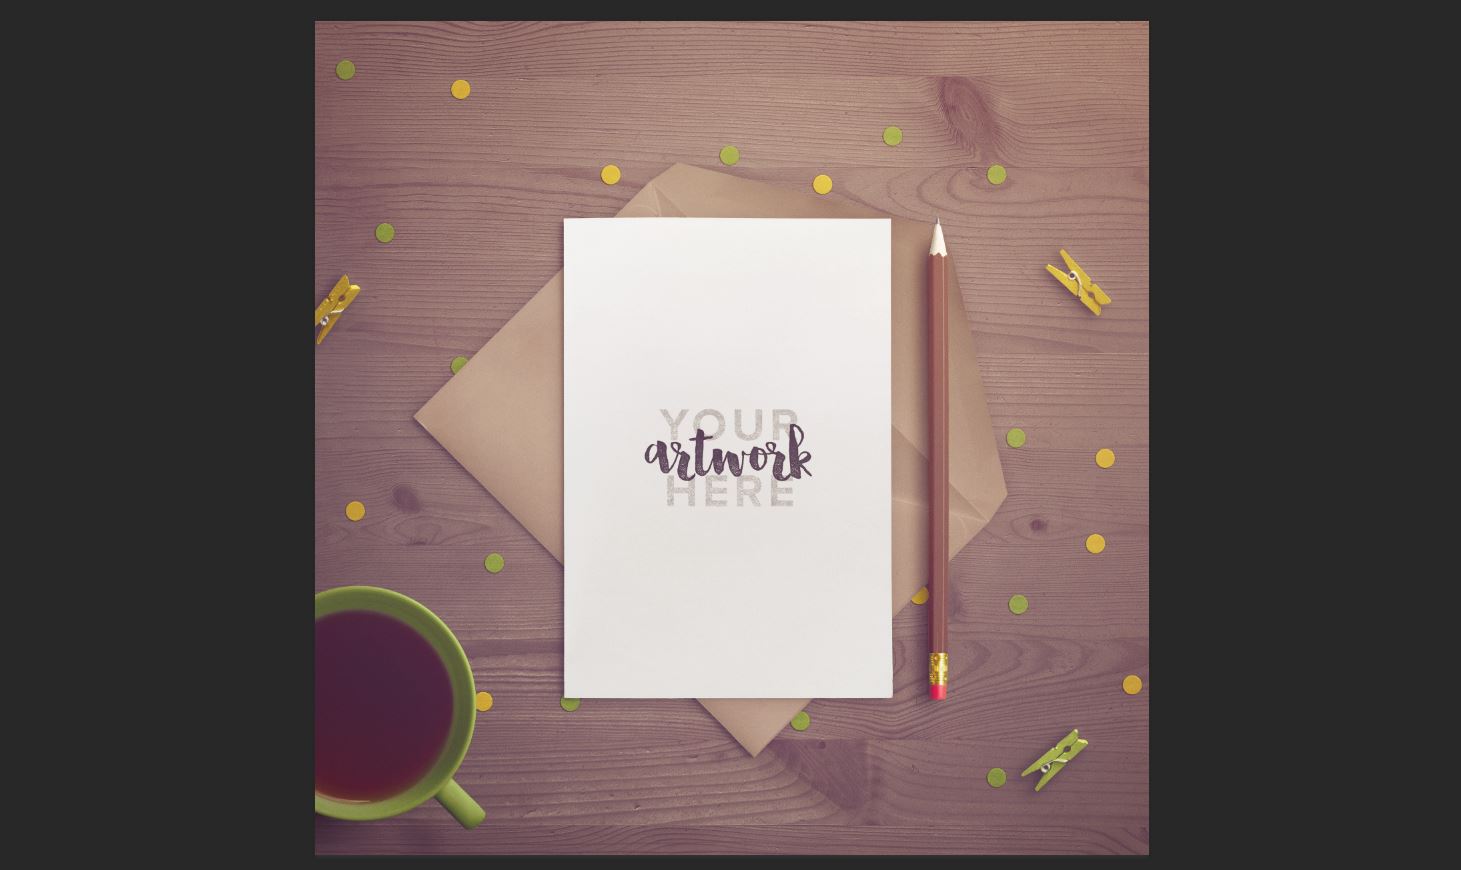
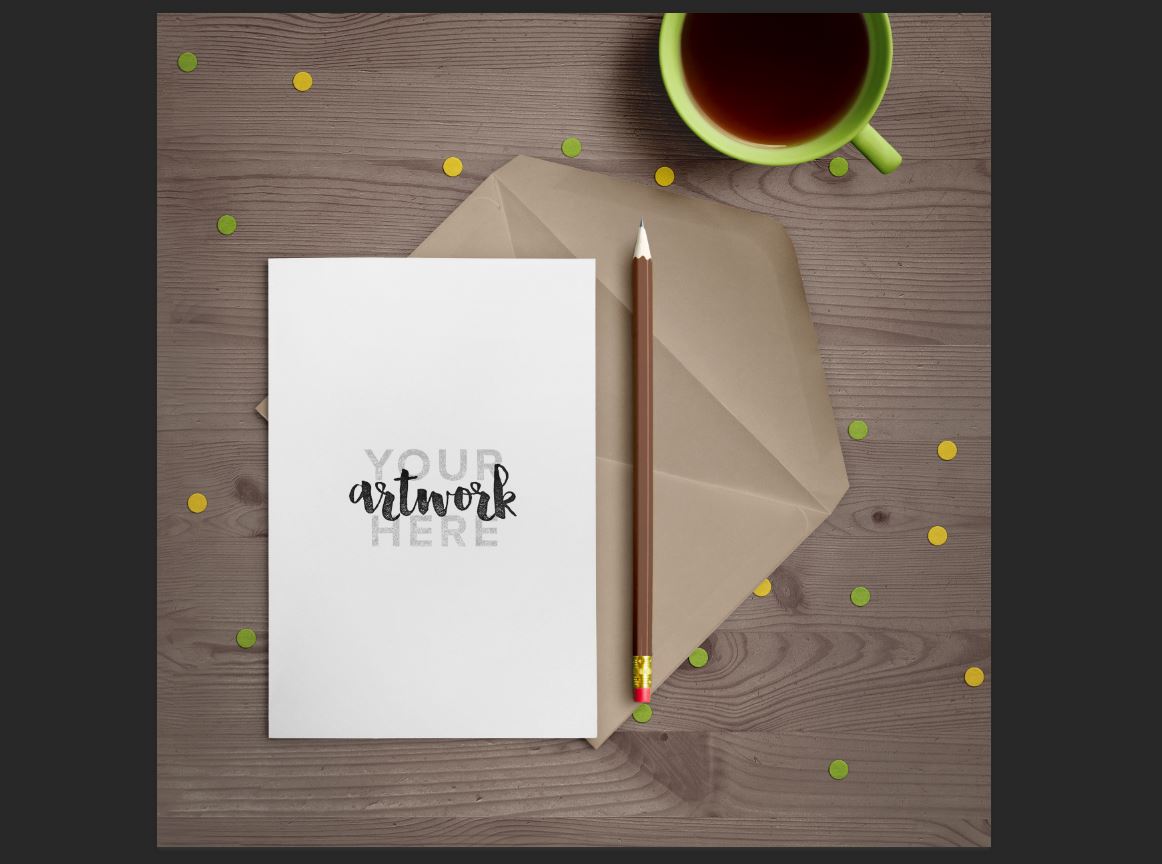
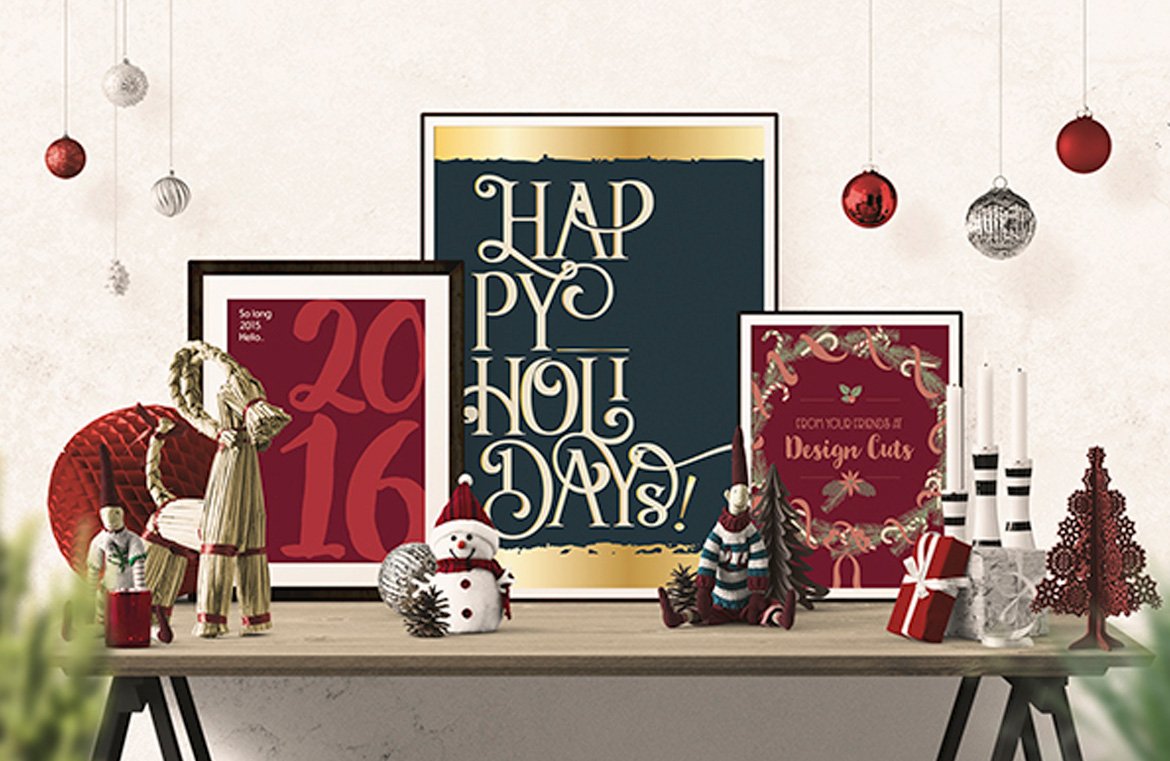
Step 5: Desk Scene Mockup
In the Roman Jusdado folder, find and open Pre-Made-Scene-5. I’m using the High-Res version, but you can use the Standard Res if the High Res version slows your computer down.
Turn off the top layer named HIDE ME by clicking on the eye icon to the left of the layer in the Layers palette.
This is our main desk scene.
In the same Roman Jusdado folder, open Pre-Made-Scene-9. We’re only using the background wood texture from this one.
In the Layers palette, open the folder named Background and select the wood texture layer named Textures. Go to Layer > Duplicate Layer and select Pre Made Scene 5. Now you can close Scene 9.
In Pre Made Scene 5, drag the wood Textures layer into the Background folder, under the adjustment Color: Light layer.
Select the Color: Light layer and at the top of the Layers palette, change the Blend Mode to Color and the Opacity to 75%.
Next, turn off the group named Filters and all three Mini Pegs groups by clicking the eye icon to the left of the layer name.
In the Layers palette, select the Tea group and drag it to the top right of the image.
To get a little more of the envelope in the scene, select the group named Card and drag it down and to the left.
And we’ll move our Pencil group to the left a little to be closer to the card.
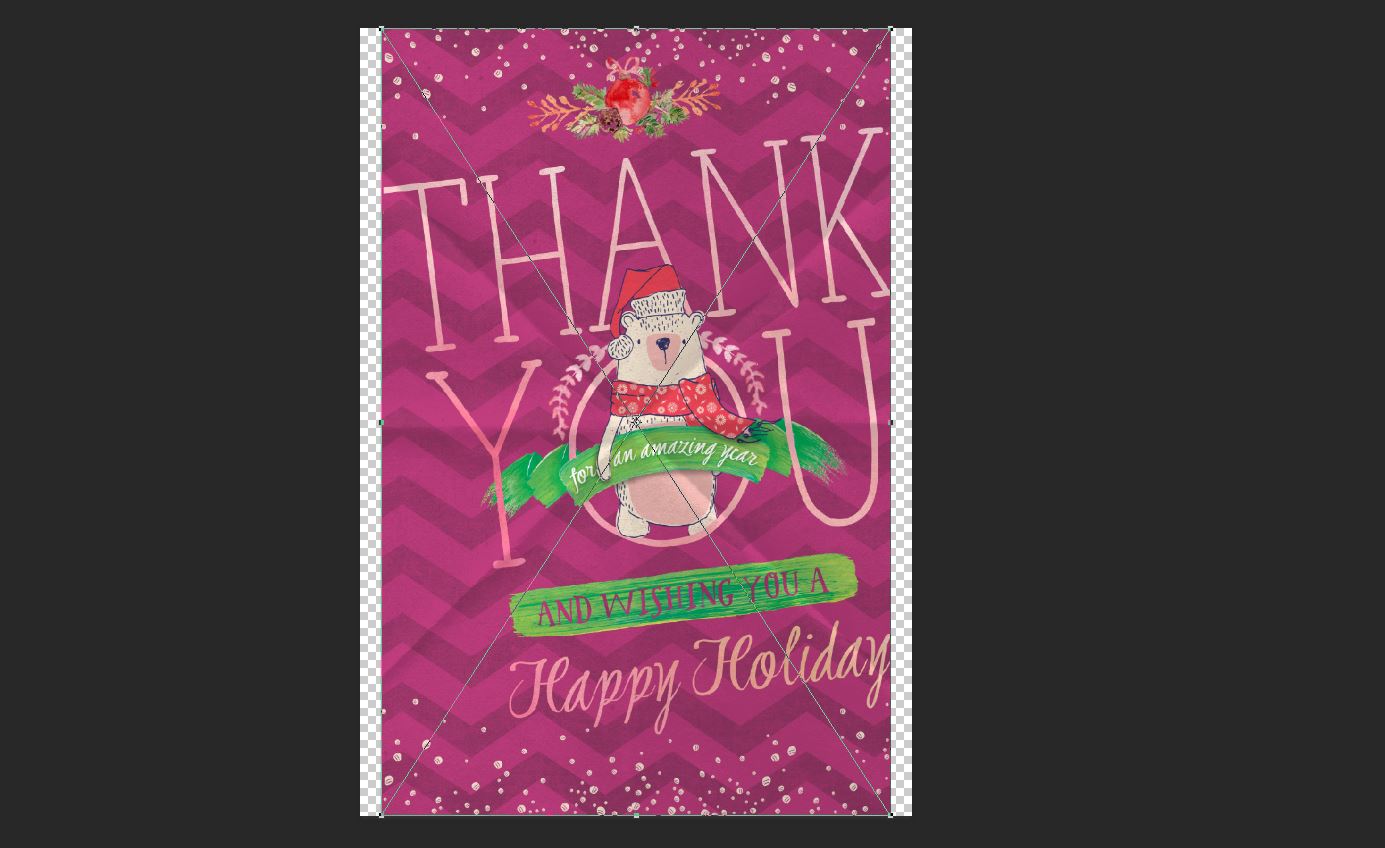
Open the Card folder. Inside is another folder named Card. Open that and find the layer named Edit Content. Double click on the thumbnail for that layer to open the linked image.
In the new file that opens, design.psb, delete the layer named Delete Me. Go to File > Place Linked and navigate to your layout file. Select it and press Place.
The image will be placed in the middle of the canvas with some blank area on either side – this is ok. Press enter to complete the action, then press cmd/ctrl + s to save the file, then close design.psb (cmd/ctrl + w).
Back in our desk scene, our card has magically appeared on the desk (because scene generators are awesome).

The last thing we’ll do is adjust the colors of the confetti on the desk to match our card.
Open the folder named Confetti and click on the lowest layer (also named Confetti). Open your Adjustments palette (Window > Adjustments) and click on the Hue/Saturation icon (hover over the icons to see tool tips if you aren’t sure which one it is).
In the Properties palette that opens, enter a Hue of -17, Saturation of -11 and Lightness of +7. At the bottom of the Properties palette, click the far left icon that clips the adjustment to the layer below it (so it only affects that layer).
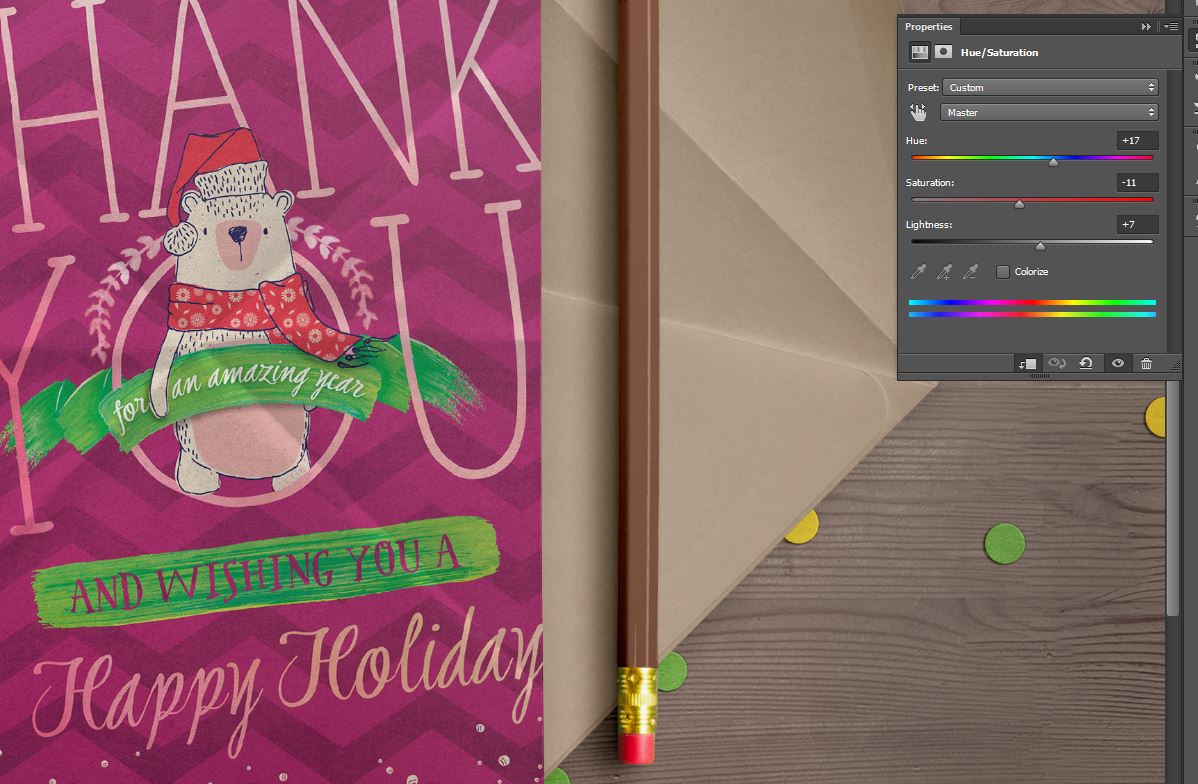
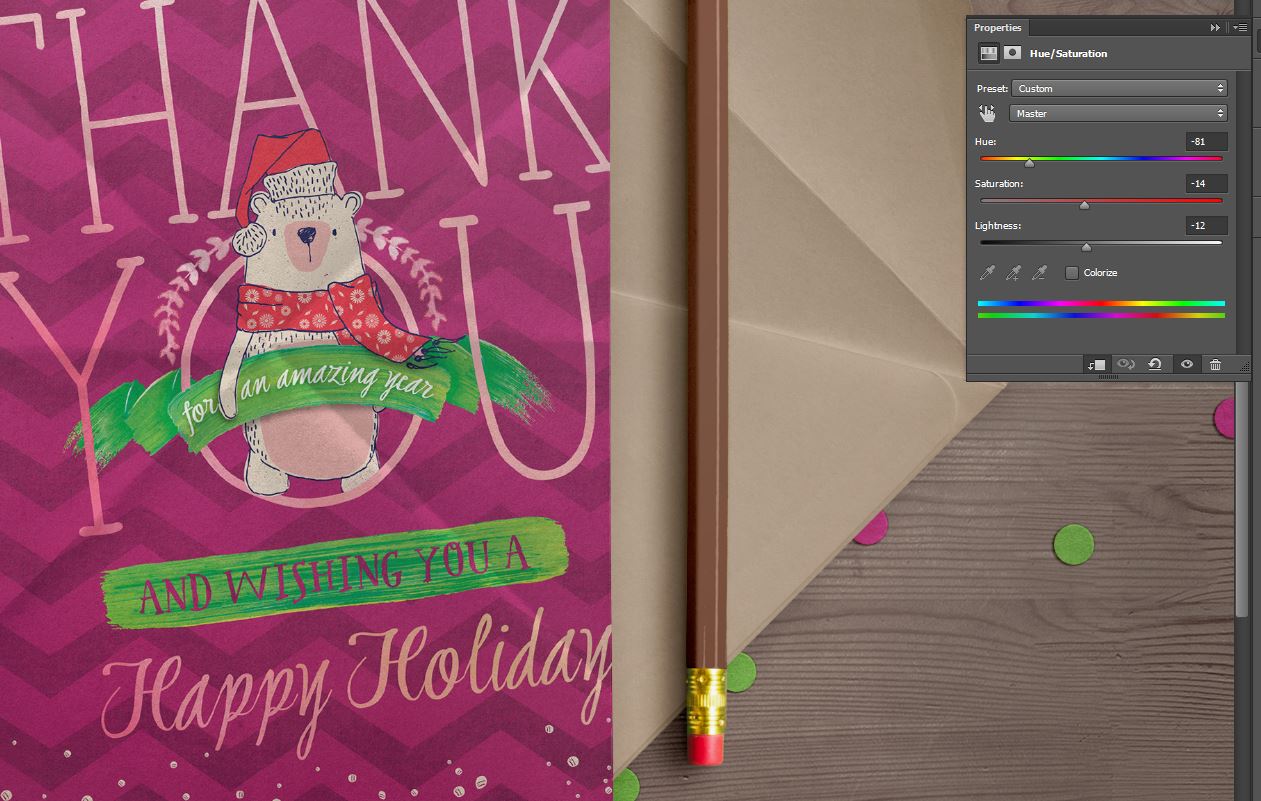
Now we’ll repeat the same process for the top layer in the Confetti folder. Select the layer and click the Hue/Saturation icon in the Adjustments palette.
In the Properties palette enter a Hue of -81, Saturation of -14 and Lightness of -12, then click the icon on the left bottom of the Properties palette to clip the adjustment to the layer below it.
And we’re done!
I hope you guys have enjoyed playing with just a few of the many resources in The Massive End of the Year Freebie Bundle.
We’d love to see what you’ve used them for on our Facebook page.
Please leave a comment if you have any questions or suggestions. As always, I look forward to hearing from you!
If you haven’t grabbed our current free end of year bundle, we definitely recommend checking it out, as there’s a ton of value included, and it’s expiring soon: The Massive End of the Year Freebie Bundle.
Thank you again for being the most delightful and creative community on the internet! We love you guys!
Hi,
Your works are awesome. I haven`t known about this site previously. And the your license policy shows that you`d love to see
the creativity that your works inspire.
I`ve stumbled upon this (expired) deal. Is there a chance to list them among the Freebies section?
Thank you in advance,
& Wishing you all a very Merry Christmas
Hey Xen,
Thanks for the comment on this one and we are so pleased to hear you found us!
Unfortunately the bundle that this tutorial was linked to is from 2015 so is no longer available. All of our bundles run for a limited time only, even our free bundles, as the designers have allowed us to feature them for a specific period of time. However we do have a Freebie section as well as a Friday freebie every week which you can check out on our website :)
Thank you so much for this tutorial! I have one question though. Can I build up a card that looks similar to this and sell as a JPG file on an online card store? Or does that count as piracy of your original work? I am asking because I don’t want to run into trouble if the final images of the tutorials are copyrighted :)
I love DC and have been buying your bundles ever since I found out about your site.
Hey Joy,
Thanks so much for getting in touch and thanks for taking part in this tutorial, I hope you enjoyed it :)
I can certainly help you with this you query! All our bundles and freebies come with extended license, which means that you can use them commercially so as long as you are creating a unique design that is completely flattened you should be good to go!
We have just released our updated EULA and the full license can be read here: http://bit.ly/1PVBzLH
I hope this helps, Joy, and please don’t hesitate to contact me should you have any other questions. I’m always happy to help!
The best gift! The best lesson! Thank you, guys, LOVE what you do!
Thank you so much, Kate! I really appreciate you taking the time to get in touch with your kind words :)
I’m so pleased you enjoyed Renee’s tutorial, she did an incredible job putting it all together!
I wish all tutorials were as easy to follow and straight to the point as this! Cannot wait to see the next one!
Hey Tess,
Thank you so much for your kind words about this tutorial! I’m so pleased to hear that you enjoyed it and I’m sure Renee will be thrilled as well. She did a fantastic job with it :)
Thanks again, Tess. If there is ever anything I could assist you with please do get in touch. I’m always happy to help!
I am usually not a fan of Photoshop, but I had a blast doing this tutorial, I even learned a few new things I didn’t know. Thank you for this tutorial, I love doing things like this to keep my skills sharp.
That is fantastic to hear, Christina!
I’m so pleased to hear you were able to learn some new tricks from Renee’s tutorial :) She’ll be super pleased to hear that you enjoyed it!