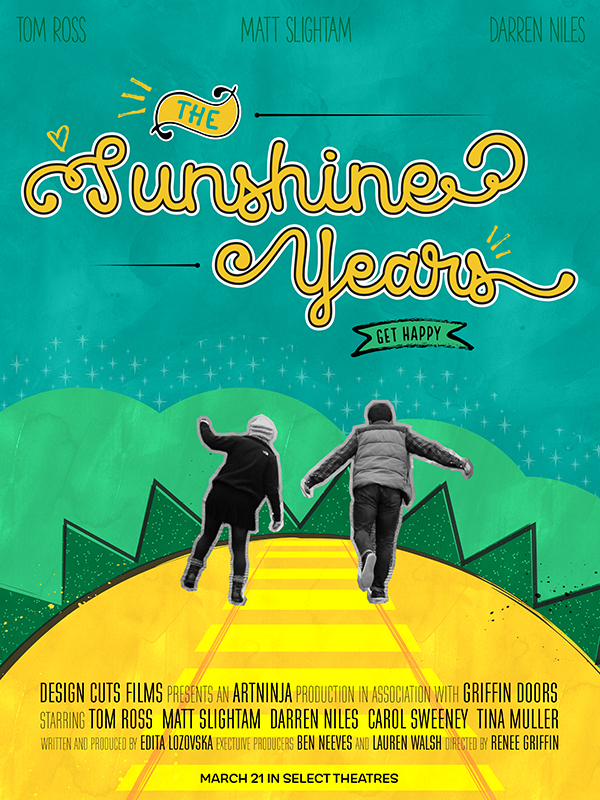
WHAT WE’RE CREATING:
Hello design cutters! Renee here with a tutorial sure to get you in the mood for Springtime adventures. We’ll be combining stellar fonts with patterns, ornaments, photo effects, simple illustration and watercolor styles, using both Photoshop and Illustrator.
This tutorial features an artistic freebie pack, as well as lots of awesome fonts from our current 20 Professional Grade Fonts Bundle.
HAVE YOU SEEN OUR NEW YOUTUBE CHANNEL?
Watch the video tutorial below and subscribe to our YouTube channel for regular updates direct to your inbox.
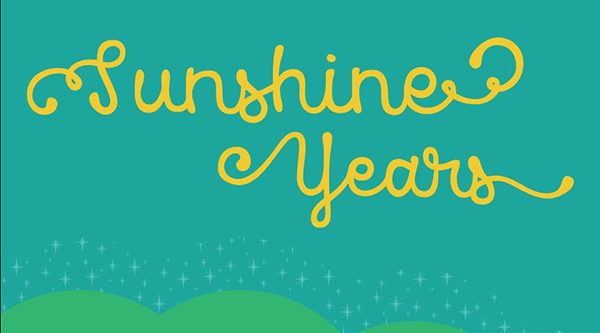
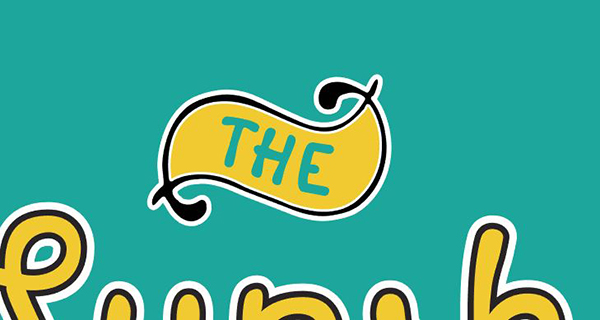
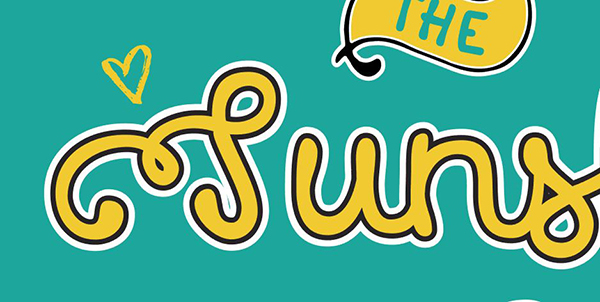
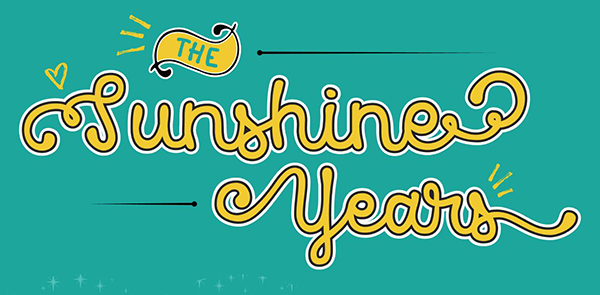
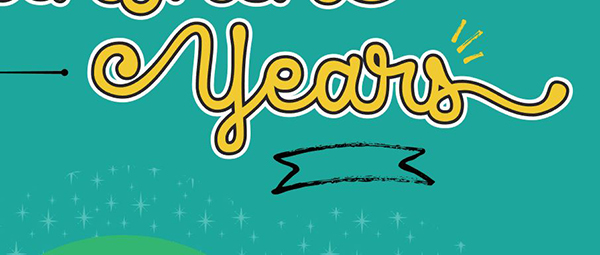
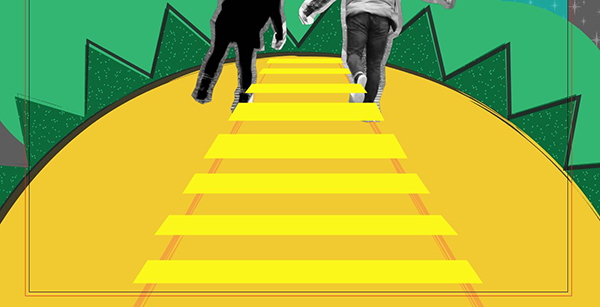
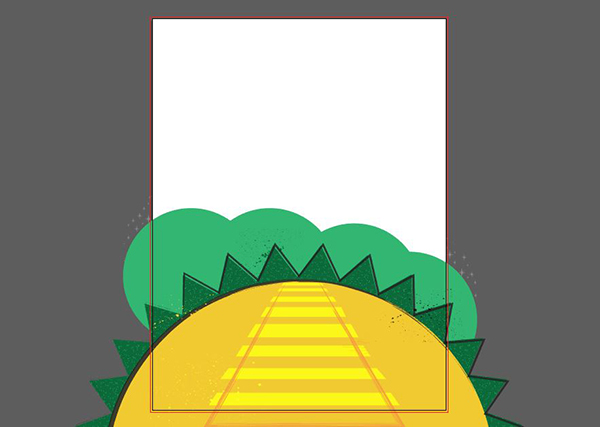
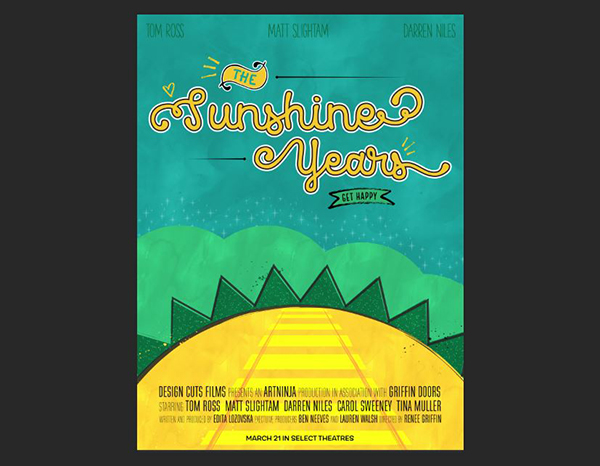
Here’s a quick look at the finished piece:
Follow along with this tutorial: Download the freebie files
The freebie pack includes bonus vectors, patterns, styles and ornaments from Kimmy Design, Make Media Co., Nicky Laatz, Set Sail Studios and Sideshow. Plus, we’ll get a look at just a few ways to use phenomenal fonts from Tinkov, Kimmy Design, Lettering Inc., Cultivated Mind, Latinotype and La Goupil Paris.
This freebie pack is a tiny hint of the resources available in 20 Professional Grade Font Families for just $29 (that’s a full 98% off). This bundle features robust, professionally crafted font families that will take your work to new heights.
INSPIRATION
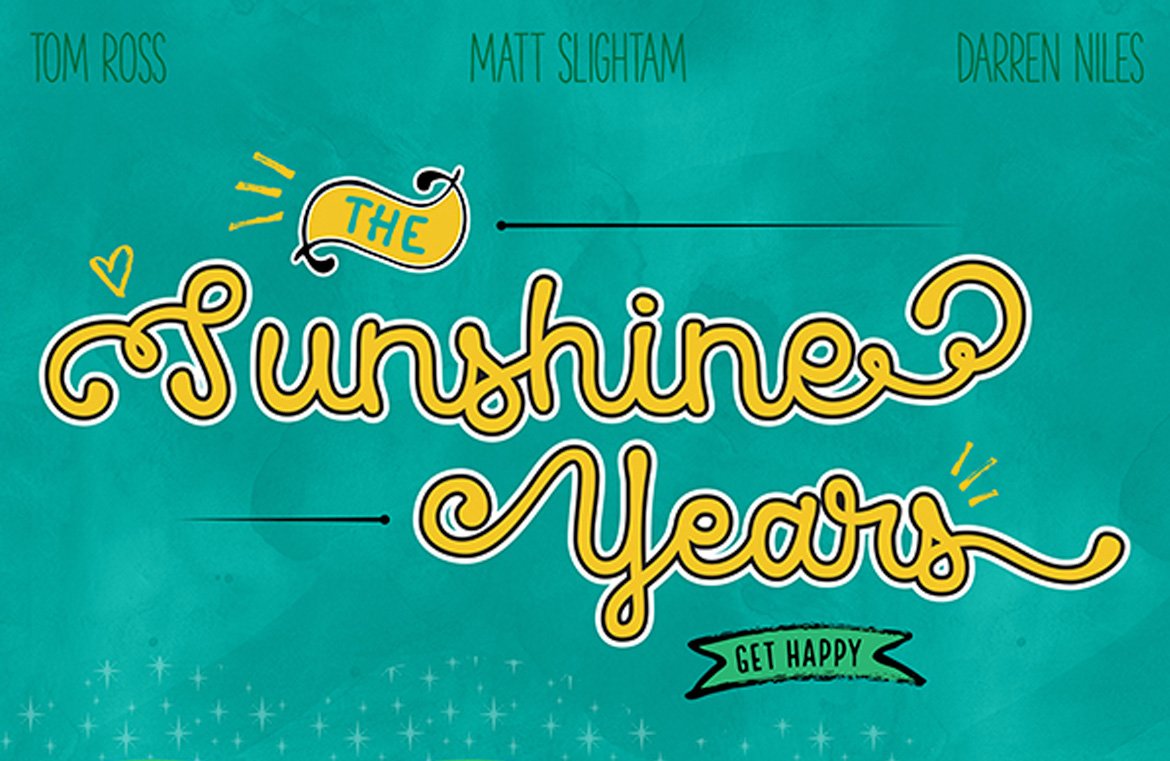
Knowing that we wanted a whimsical, happy and somewhat nostalgic feel to support our movie title, The Sunshine Years, I drew inspiration from movies like Moonrise Kingdom (and nearly anything by Wes Anderson) and Amelie, plus tv shows like Pushing Daisies. They capture a timeless feel while operating within a very defined world where even the tiniest detail contributes to building a cohesive universe.
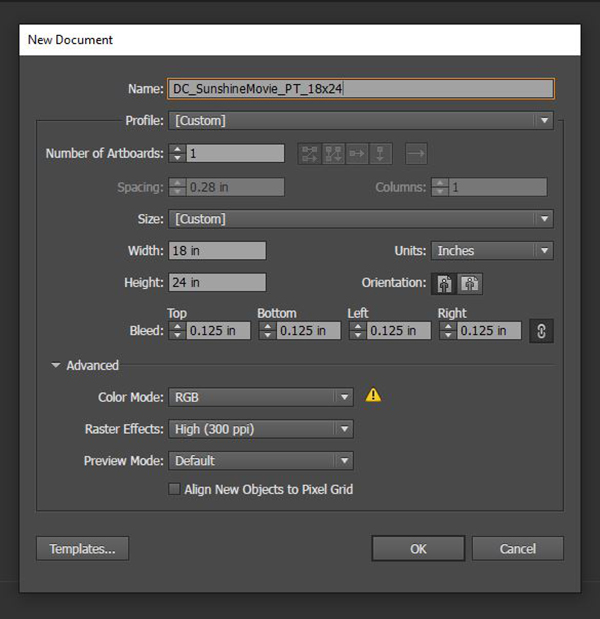
Step 1: Background
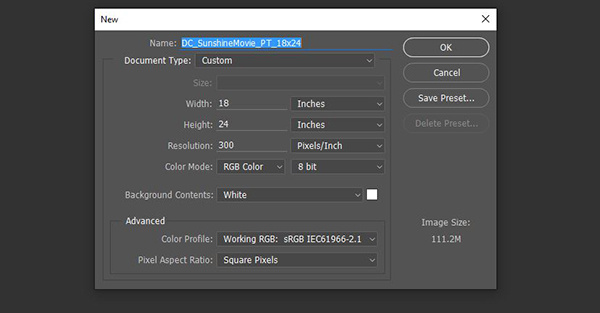
Open Illustrator and go to File > New. In the New Document dialog box, enter a width of 18 inches, a height of 24 inches and a resolution of 300 ppi. Under Advanced, select a Color Mode of RGB.
Click OK to create the document.
Save your file.
Select your Rectangle tool (m) and draw a rectangle covering the entire background.
Open your Color palette (Window > Color) and enter RGB values of 0/167/157 for the fill color. Make sure to choose None for the Stroke color.

Open your Swatches palette (Window > Swatches) and click the New Swatch icon to add the new color. Name it Teal.
Select your Ellipse tool (L) and click once on the artboard. Enter a Width and Height of 24 inches, then click OK.
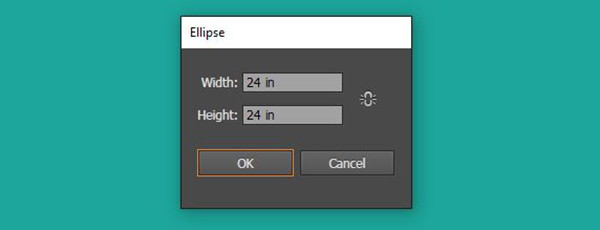
In your Color palette, enter RGB values of 243/199/39 for the fill color.

In your Swatches palette, click the New Swatch icon and name this one Sun Yellow.
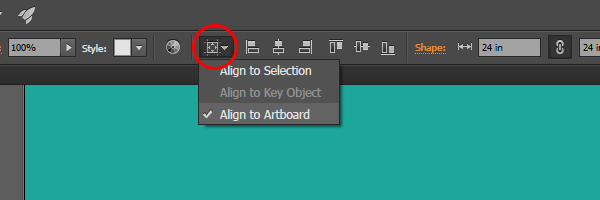
At the top of the artboard (or in your Align palette), select the Horizontal Align Center icon. If nothing happens when you click it, you may need to make sure you are aligning to the artboard.
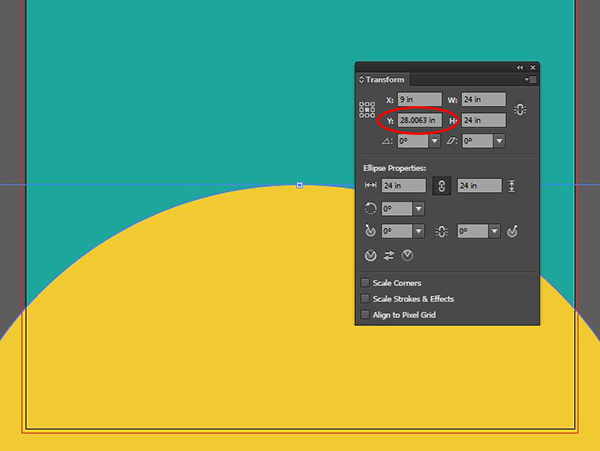
Position the circle so that it falls mostly below the artboard. Taking a look at my Transform palette tells me that my Y value is at about 28 inches.
Now we’ll add a brush stroke. Start by changing your Stroke color to black. Then, open your Brushes palette and click the flyout menu on the top right. Choose Open Brush Library > Artistic Brushes > Artistic_Ink.
In the Ink brush palette that opens, choose Calligraphy 1.

Open your Stroke palette and change the Weight to 3 pt.
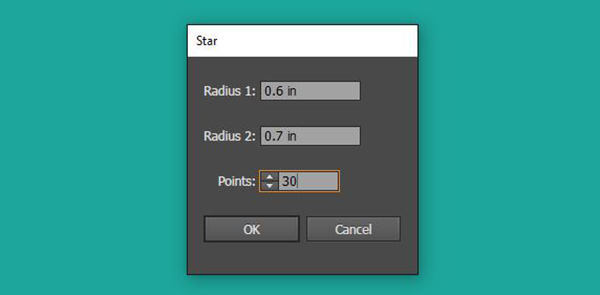
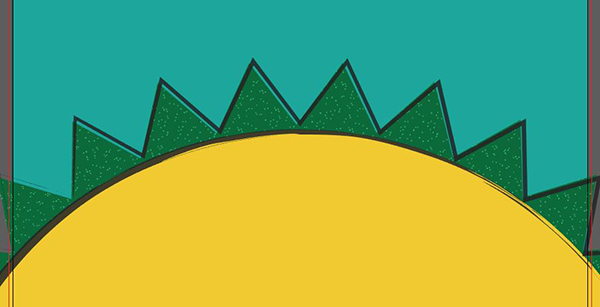
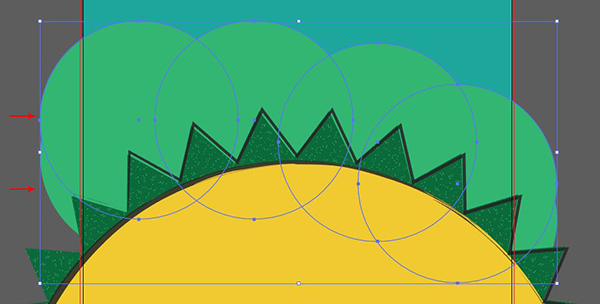
Next, we’ll use our Star tool. Click and hold on the Ellipse icon in the toolbar to access the flyout menu and choose the Star tool.
Click once on the artboard and enter Radius 1 of .6 inches, Radius 2 of .7 inches and 30 for Points. Click OK.
This will give us a pretty small starburst. At the top of the artboard, change the Width and Height to 28 inches.
Change the Fill color to None and position directly on top of the yellow circle.
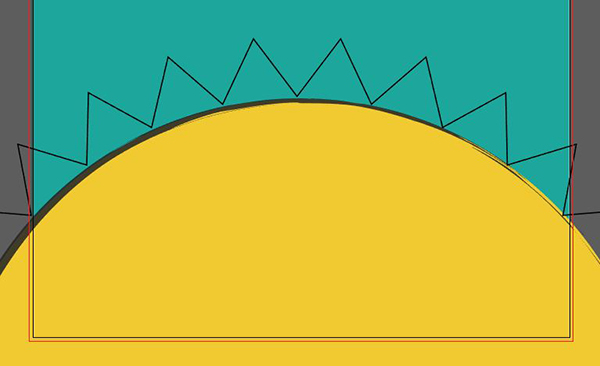
In the Artistic_Ink palette, click Calligraphy 1 to apply the brush to the starburst.
I don’t like the extreme disparity between the weights on the left and right of my starburst, so feel free to rotate the starburst until you like the weight distribution of the brush.
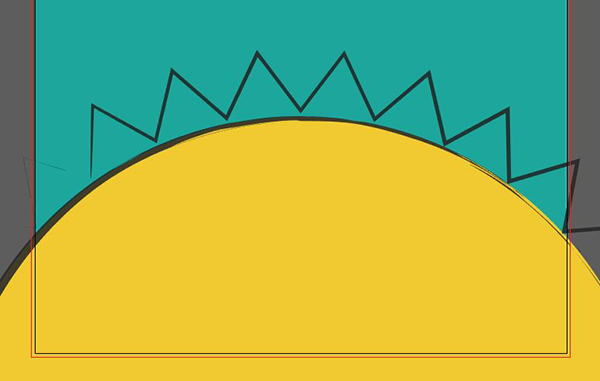
Copy your starburst by pressing cmd/ctrl + c, then paste it in front by pressing cmd/ctrl + f. Change the stroke color to None and in the Color palette, enter fill RGB values of 0/104/56.
Add to the Swatches palette and name it Tree Green.

Press cmd/ctrl + f to paste another copy of the starburst. We’re going to fill this one with a pattern.
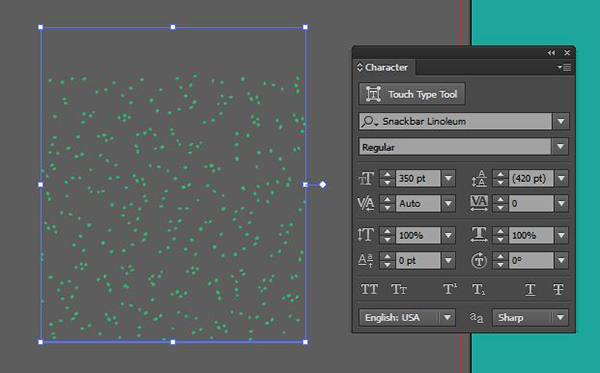
Select your Type tool and click once anywhere on or off the artboard. In your Character palette (Window > Type > Character), choose Snackbar Linoleum and change the size to 350 pt. Now type a lowercase m.
In your Color palette, change the fill RGB values to 43/182/115.
To turn this into a seamless pattern, we’ll need to first outline it. Go to Type > Create Outlines or press shift + cmd/ctrl + o.
Now go to Object > Pattern > Make. In the Pattern Options, name your pattern Green Dots and click Done.
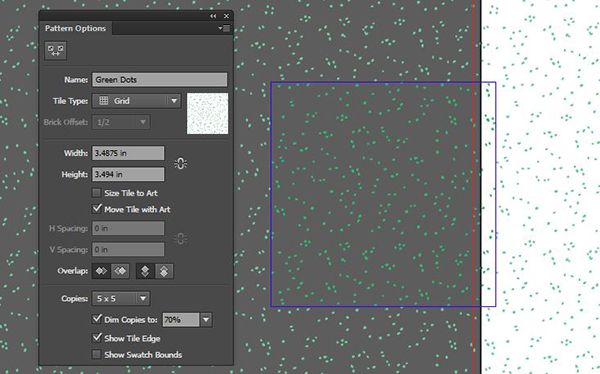
Use your Selection tool (v) to select your top starburst and in your Swatches palette, select the swatch we just made – Green Dots.

Drag your Selection tool across the edge of the starbursts to select all three. Go to Object > Arrange > Send Backward to move them behind the yellow circle.
Select just the starburst with the black stroke and give it a very slight rotation to set it apart from the other starbursts. Lastly, bring this layer in front of the other starbursts by going to Object > Arrange > Bring to Front twice (or press cmd/ctrl + ] twice).
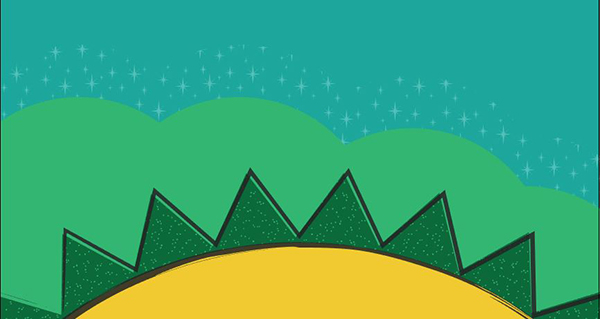
Select your Ellipse tool again and this time, draw a circle at about 8.5 inch diameter. Change the fill color to 43/182/115.

Position on the left of the artboard along the top of the yellow circle and starbursts, but overlapping both.
Make a copy of the circle by holding opt/alt while clicking on the circle and dragging to the right. Do this three times for a total of 4 circles.
Arrange the circles so that they are gradually positioned lower on the artboard as you move to the right.

Use your Selection tool and hold shift to select all four circles. Press cmd/ctrl + g to group them together, then shift + press cmd/ctrl + [ to send them all the way to the back. Now press cmd/ctrl + ] to bring them forward one layer so they’re in front of the teal background.

Select the group of circles and hold opt/alt while dragging up to make a copy of the group. This group will only be about 1.5 inches higher than the original group of circles.
Select your Type tool. In the Character palette, make sure you’re still set to Snackbar Linoleum at 350 pt. Click once on the artboard and type a lowercase t. Change the fill color to white.
Go to Type > Create Outlines. Then, go to Object > Pattern > Make. Name the new pattern White Sparkles and click Done.
Back on the layout, select the top circle group, then select the White Sparkles pattern in the Swatches palette.
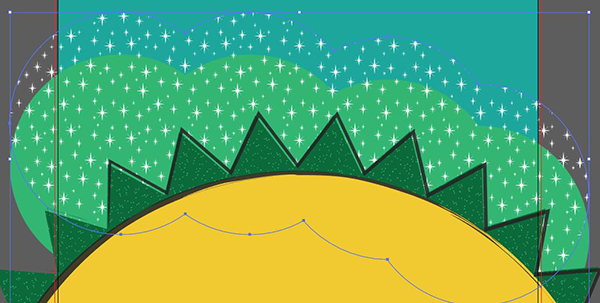
Now, open your Transparency palette and change the Opacity to 30%. Then send the sparkles behind the green circles by pressing cmd/ctrl + [.
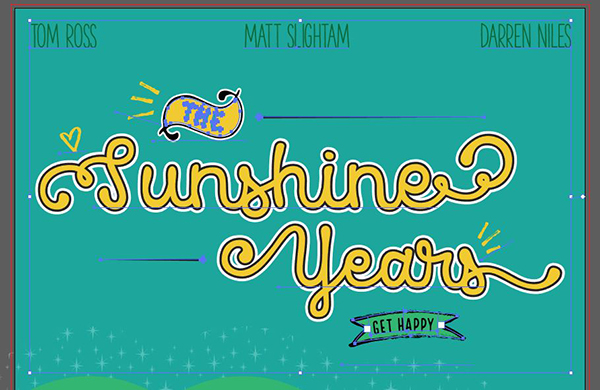
Step 2: Title
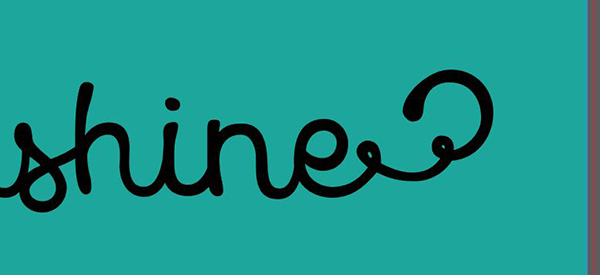
Select your Type tool. In the Character palette, change your font to Avaline Script Regular at 240 pt. Click once near the top of the artboard and type Sunshine.
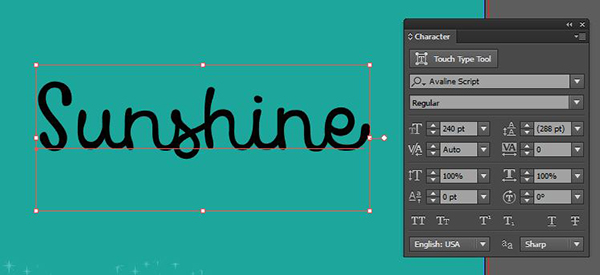
We’re going to use alternate letters for the first and last letter. Open your Glyphs palette (Window > Type > Glyphs). At the top of the palette next to Show, choose Alternates for Current Selection.
Use your Type tool to select the first S in Sunshine. In the Glyphs palette, find and double click this decorative alternate.

Now repeat the same process with the last e. Select it and in the Glyphs palette, choose this alternate.
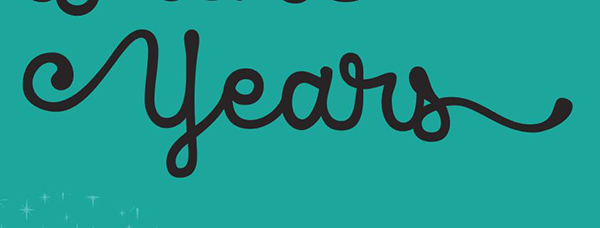
Click again on the artboard with the Type tool and type Years. I want “Sunshine” to be very subtly more prominent, so change the font size of Years to 220 pt.
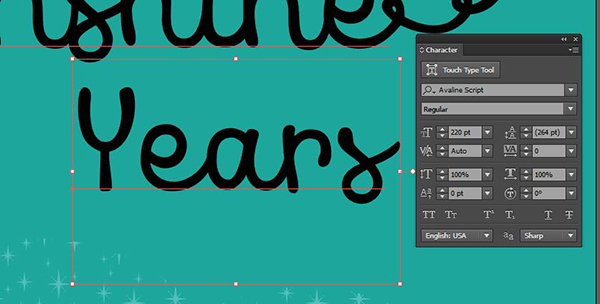
In the Glyphs palette, replace the Y and s with these alternates.
Position Years so that the beginning of the Y rests roughly under the s in shine. Select both words by holding shift while clicking on each with the Selection tool and center them on the artboard.
In your Swatches palette, change the fill color to Sun Yellow.
We’re going to add a layer with strokes, but we’ll want to paste this plain yellow text on top after we’re done, so copy it by pressing cmd/ctrl + c.
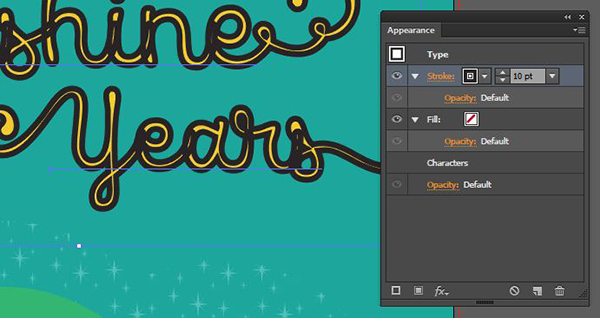
Open your Appearance palette and with both words still selected, click the Add New Stroke icon on the bottom left of the palette.
Leave the Stroke color Black and change the Weight to 10 pt.
Click the Add New Stroke icon again. Choose the bottom stroke in the palette and change the color to White and the Weight to 22 pt.
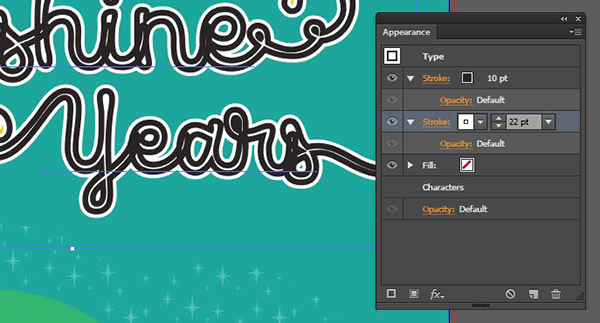
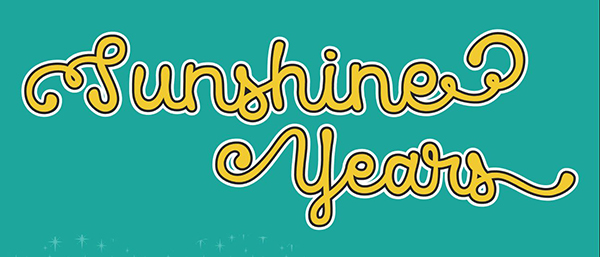
Now press cmd/ctrl + f to paste the yellow text on top of it.
With your Type tool selected, change your font to Avaline Catchwords and type a lowercase a at 230 pt in black. Drag the catchword, the, above the un in Sunshine.
Go to Edit > Copy. We’ll use this copy after we style this initial piece.
Add a Stroke color of White and in the Strokes palette, increase the Weight to 4 pt. Next to Corner, select the middle icon for Round Join. This will keep us from having any sharp edges poking out.
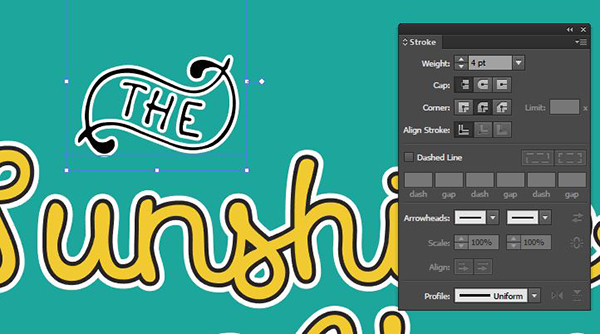
Now go to Edit > Paste in Place (or hit cmd/ctrl + f) to paste the plain black catchword on top. We’re going to pick this apart a little bit, so go to Object > Create Outlines.
Select your Group Selection arrow (the white arrow with a plus sign – available on the flyout menu that appears when you click and hold the Direct Selection tool on the toolbar).
Select the innermost path on the banner section of the catchword.
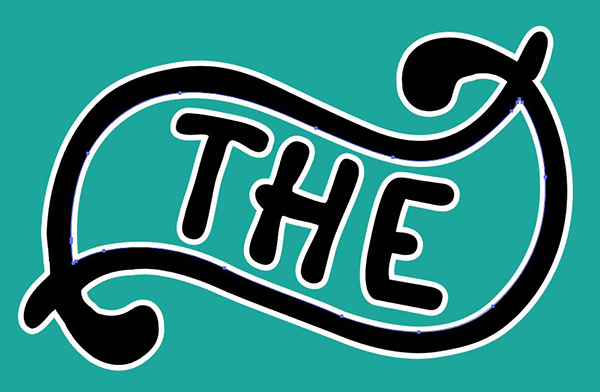
Copy by pressing cmd/ctrl + c. Paste your copy in place by pressing cmd/ctrl + f. Open your Swatches palette and change the fill color to Sun Yellow and stroke color to None. Then, press cmd/ctrl + [ to move it just behind the black-only banner.
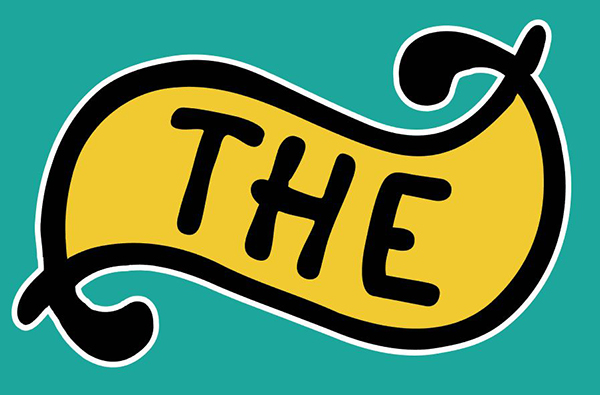
Lastly for the catchword, use your Group Selection tool again to select only the letters THE. Hold shift to select more than one item at a time.
With all three letters selected, press cmd/ctrl + x to cut, then press cmd/ctrl + f to paste in place. This will separate the letters from the group with the banner. Now press cmd/ctrl + g to group the letters together.
Press v to switch to your regular Selection tool, then hold shift and drag one of the corner handles in to reduce the size of the letters a tiny bit. In the Swatches palette, change the fill color to Teal.
We’ll finish off our title with a few hand drawn ornaments.
Select your Type tool and change the font to Hello Lucky Ornaments at 78 pt. Click once on the artboard and type a lowercase u.
Change the color to Sun Yellow and position the heart ornament over the dip in the swash on the capital S in Sunshine.
Click again on the artboard and change the font size to 130 pt. Type a lowercase s and change the color to Sun Yellow. Position this ornament to the left of the catchword banner. Use your Selection tool to rotate the ornament to the right about 18 degrees so it flows naturally from the edge of the banner.

Click again on the artboard and change the font size to 108 pt. Type a lowercase t and change the color to Sun Yellow. Position this ornament to the top right of the last s in Years. Rotate this one about 30 degrees to the left.

Let’s give this a more cohesive feel by adding a couple of lines that hold the words together.
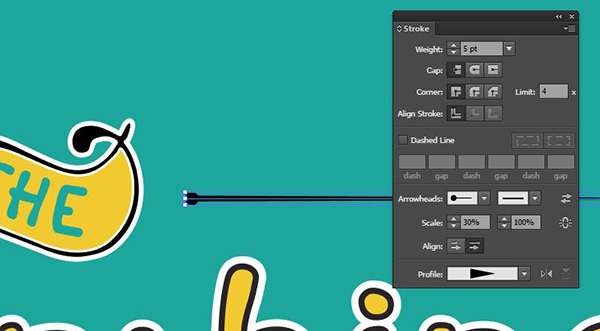
Grab your Pen tool (p). Click once to add a point just to the right of the catchword banner, then hold shift and click again above the curly swash at the end of the e in Sunshine. Holding shift while drawing your path ensures that you will draw a straight line.
Open your Strokes palette and increase the Weight to 5 pt. Next to Profile, choose Width Profile 4.
Let’s add a little cap to the blunt end of the line. In your Stroke palette, click on the first dropdown menu for Arrowheads and select the solid black circle (Arrow 21). Next to Scale, change the first box to 30%.
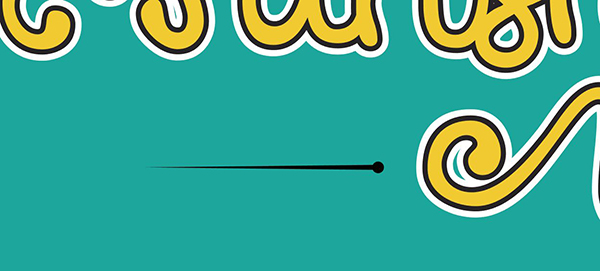
Now we’ll repeat this basic process for a second line to the left of Years. With your Pen tool, click once just to the left of the Y in Years. Hold shift and click again below the first S in Sunshine.
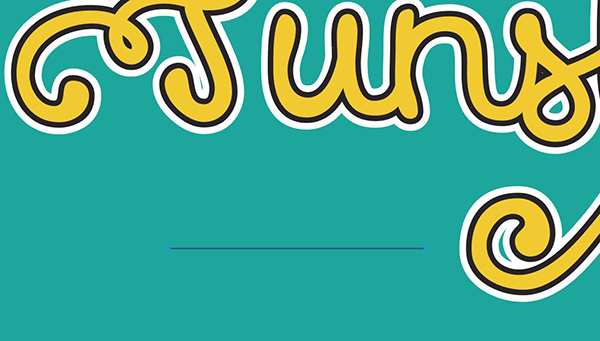
Open your Strokes palette and increase the Weight to 5 pt. Next to Profile, choose Width Profile 4. Click on the first dropdown menu for Arrowheads and select the solid black circle. Next to Scale, change the first box to 30%.
And that’s our completed title. Now we’ll add a tiny tagline.
Step 3: Tagline and Headliners
Select your Type tool and with your font still set to Hello Lucky Ornaments, change the size to 238 pt. Click once on the artboard and type a capital M. Leave the color Black and position it below the “ear” in Years.
Now we’ll make a path for our tagline. Select your Pen tool (p) and click once on the inside left of the banner. Click again in the middle of the banner, but this time, hold and drag to the right to create a curved point. Finally, click one last time at the inside right of the banner.

Click and hold on the Type tool in the toolbar. On the flyout menu, choose the Type on a Path tool. Click once on the path and type Get Happy. Don’t worry if you can’t see it yet.
Choose your Direct Selection Tool (a). In your Character palette, change the font to Local Brewery Four at 42 pt with -20 Tracking (space between letters). Open your Paragraph palette and select Align Center.
Now we’ll adjust our text path to make sure it’s centered and we can see everything properly.
With your Direct Selection Tool, click on the vertical line at the left of your text and drag it to the far left of the path.

Do this again on the right, but move it out to the right side of the banner.
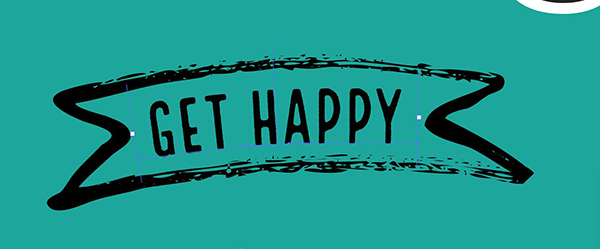
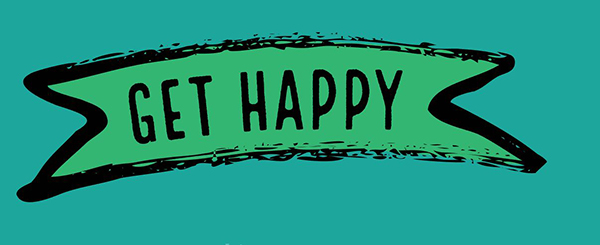
To finish the banner, let’s give it a background color. Select your Pen tool (p) and roughly draw around the perimeter of the banner. Click once for hard corners and click/drag for curved points. After drawing around the edge, click once on the beginning point to close the path.

Change the color to 43/182/115, then press cmd/ctrl + [ twice to send the shape behind the banner outline.

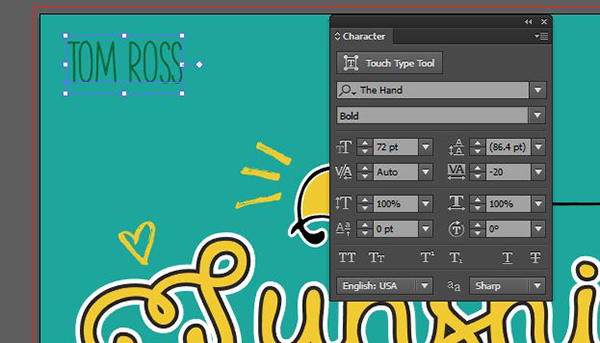
Now we get to let people know who’s in our movie! Grab your Type tool (t) and change your font to The Hand at 72 pt. On your Character palette, click the arrow on the top right to access the flyout menu and select All Caps.
Click once in the top left of the artboard and type Tom Ross. Change the fill color to Tree Green.
In your Paragraphs palette, choose Align Left.
Grab your Selection Tool. Copy Tom’s name by holding alt + shift and dragging to the far right of the artboard.
In your Paragraph palette, select Align Right.
Select the copy with the Type tool and replace with Darren Niles.
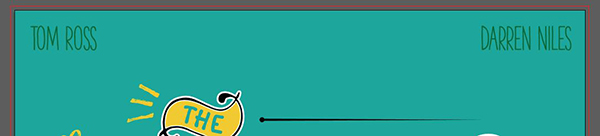
Copy Tom’s name one more time and drag it to the middle of the artboard. In the Paragraph palette, select Align Center. Select the type with the Type tool and change it to Matt Slightam, then visually center it between the two other names.

Step 4: Photos and Final Elements
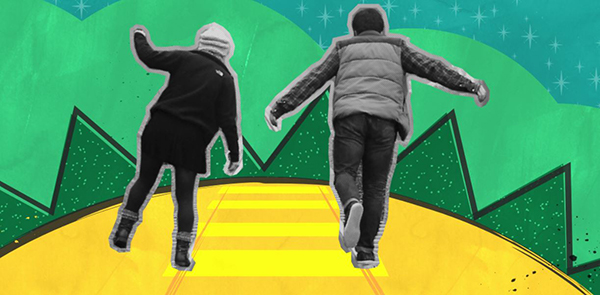
We’ll be adding our final photos once we move over to Photoshop for texturing, but first we’ll need to draw some train tracks for them to walk on. In order to get our tracks at the right angle and size, we’ll need to place our people in Illustrator temporarily.
We’ll start by downloading this fantastic image from UnSplash.
After downloading, open the image in Photoshop. Press z to select your Zoom tool and click and drag to the right on the image to zoom in to the people.
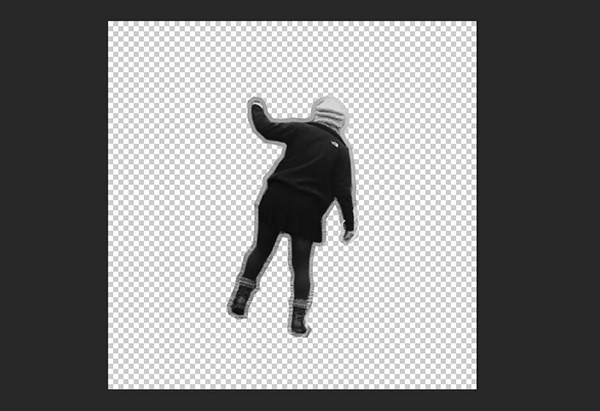
We’re going to rough-cut the people out. We’ll start with the girl on the left.
Select your Polygonal Lasso tool. You’ll find it by clicking and holding on the Lasso tool in the toolbar until you see the flyout menu.
Now we’ll click around the edges of the girl. Try to keep the space between points fairly small so we don’t see any super long edges, but don’t worry about being perfectly consistent – we want this to look rough!
Check out the red circles on the below image to see where I was clicking to add points.
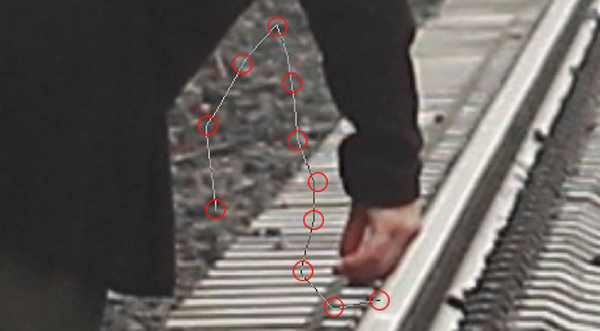
Continue your way around until you’ve returned to your starting point. Click the starting point to complete the selection.

Press cmd/ctrl + j to duplicate the selected area onto its own layer.
With the new layer selected, go to Image > Adjustments > Desaturate.
Now go to Image > Adjustments > Levels. The clothing is a little dark in black and white, so we want to lighten it a little. Click on the white point slider on the far right of the histogram, then drag it to the left until the clothing has lightened. I’m going to about 142.
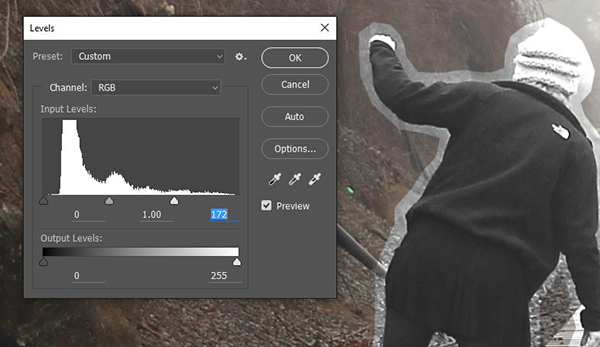
Hold cmd/ctrl and click once on the thumbnail of the layer to create a selection around the girl.
Go to Select > Modify > Contract. There will be a little bit of trial and error for this part because it all depends on how far out you drew your initial selection. To start, enter 20 px, then click OK. If your selection is mostly around the girl and not the outside edges, then you’re good to go. If it’s too far in, then simply undo by pressing cmd/ctrl + z and go back to Select > Modify > Contract and enter a smaller number. Mine ended up being around 12 px. Again, this doesn’t have to be perfect, but an approximation of the outline of the girl.

Go to Select > Inverse. Now we have the outside edges selected. We just want to lighten the contrast so it isn’t so distracting from the main image of the girl.
Go to Image > Adjustment > Levels. This time, select the middle slider and drag it to the left until the outer edges on the image are washed out. I went pretty far – about 2.5.
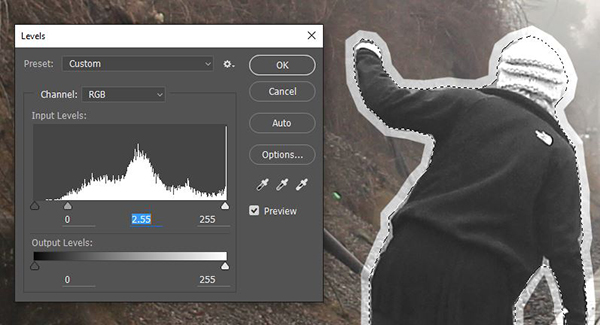
Deselect by pressing cmd/ctrl + d. Now we’ll add a halftone effect.
First, press d to set your foreground color to black and background to white. Our halftone filter will use our foreground and background colors. Then, go to Filter > Filter Gallery.
In the Folders on the right, choose Sketch, then select Halftone Pattern. In the options on the far right, keep Size at 1 and change Contrast to 0. Pattern Type should be set to Dot.
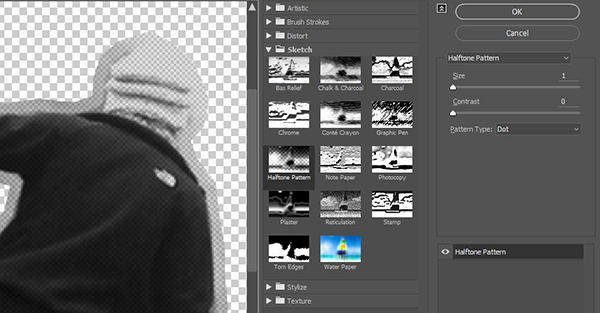
Press OK to apply the filter.
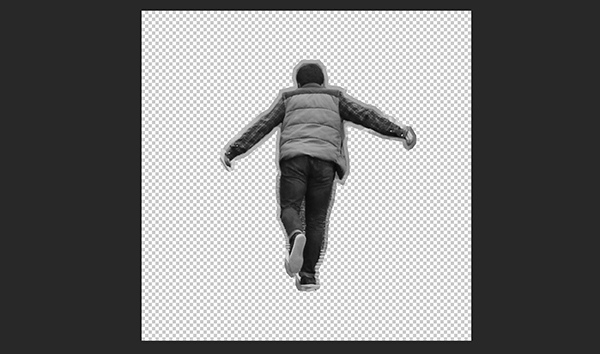
Now we’ll repeat these same steps for the boy on the right.
Select your Polygonal Lasso tool and click roughly around the edges of the boy. After completing the selection, press cmd/ctrl + j to duplicate the selected area onto its own layer.
With the new layer selected, go to Image > Adjustments > Desaturate, then Image > Adjustments > Levels and lighten the image slightly by dragging the white point slider to the left. The boy’s clothing isn’t as dark, so it will need less lightening.
Hold cmd/ctrl and click once on the thumbnail of the layer to create a selection around the boy. Go to Select > Modify > Contract. Enter the same pixel amount that you used on the girl (12 px in my case). Then go to Select > Inverse.
Go to Image > Adjustment > Levels. Select the middle slider and drag it to the left until the outer edges on the image are washed out – about 2.5 again. Press cmd/ctrl + d to deselect.
This time, we can just duplicate our last filter effect. Press cmd/ctrl + f.

To finish these up, we’ll put each layer in it’s own file. Select the girl layer and go to Layer > Duplicate Layer. In the popup, name your layer, then next to Document, choose New. Then name your new file.
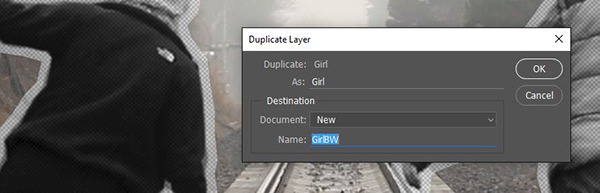
This will pop open a new document at the same size as the original. We don’t really need it to be this big, so go to Image > Canvas Size and enter a width and height of 16 inches.

You will get a warning, but press Proceed. Use your Move tool (m) to move the image of the girl to the middle of the new, smaller canvas. Then save your document as a PSD file (cmd/ctrl + s) and close it (cmd/ctrl + w).
Now we’ll repeat the same steps for the boy layer. Select it and go to Layer > Duplicate Layer. Name it and choose New Document. When it opens in the new document, go to Image > Canvas Size and enter a width and height of 16 inches each. Center the boy on the canvas, then save the file and close it.
At this point, you can choose whether you want to save your original photo as a PSD file. Since we’ve saved the layers out separately, it isn’t necessary, but I usually save everything until I’m sure I don’t need it.
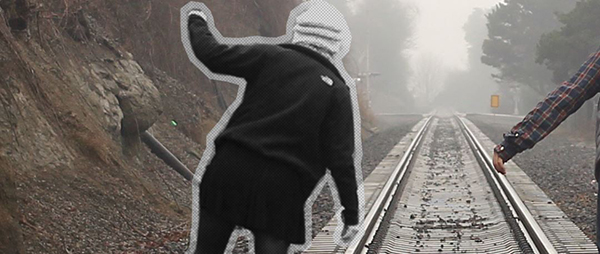
Next, we’ll place these guys into our Illustrator file so we know where to put our railroad tracks.
Go back into Illustrator and go to File > Place Linked. Navigate to the photoshop file of the girl and click Place, then click once on the artboard.
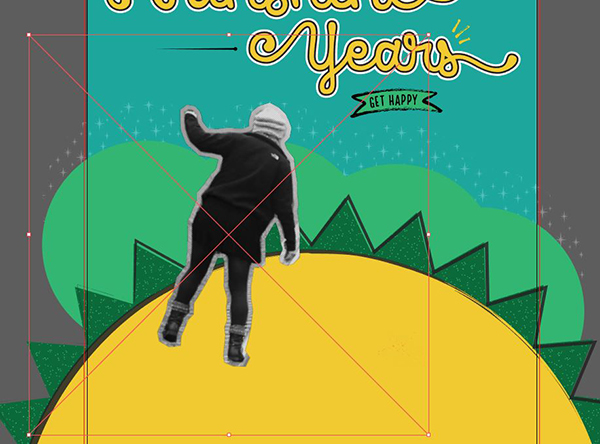
Let’s reduce the size of the image so we aren’t overpowering our title. At the top of the artboard, change the width and height of the image to about 8.7 inches.

Then go to File > Place Linked and navigate to the PSD file of the boy, click place and click once on the artboard. Position him to right of the girl (similar to the original photo, but a bit closer) and reduce his size the same as the girl (about 8.7 inches square). Position them toward the top of the circle, centered horizontally.

Use your Selection tool (v) while holding shift to select both images, then press cmd/ctrl + 2 to lock them.
Step 5: Final Vector Touches
Now that we have a frame of reference, we can draw our railroad tracks.
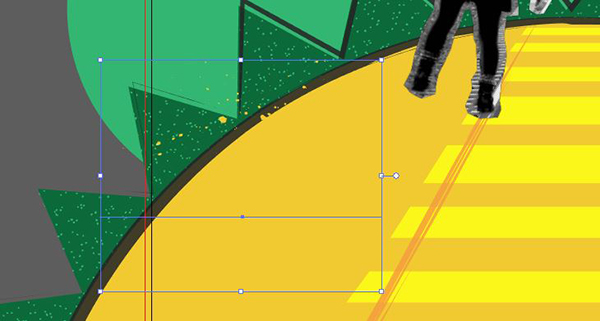
Select the Pen tool (p). Using the tracks under the feet of the people as a guide, start by clicking once at the top of the circle, then below the bottom of the artboard.
Don’t worry about being too exact – we’ll have to make adjustments after we add a brush stroke.
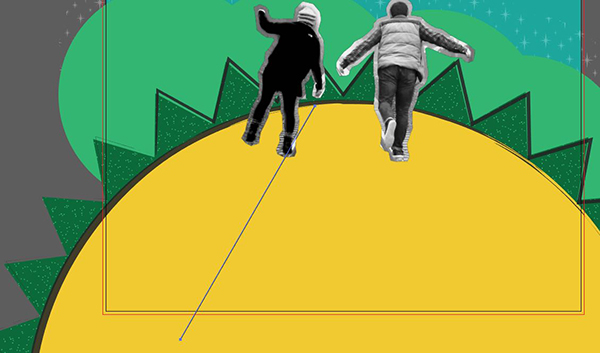
Follow that with a point at the bottom right, then another at the top of the circle, using the rail below the boy’s foot as a guide.
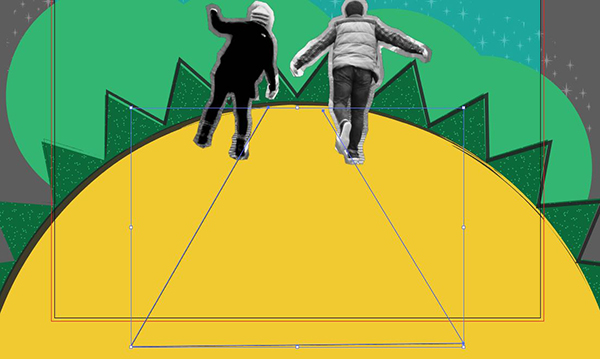
Change the stroke color to 246/137/31. In your Artistic-Ink brushes palette, choose Dry Ink 1. Then open your Stroke palette and increase the weight to 2 pt.
With this brush applied, the stroke will no longer be lined up with the location of the railroad tracks under the feet of our people. Use your Direct Select tool (a) to individually select any of the four points used to make the line and use your arrow keys to move the points until the visible brushed part of the path lines up with the tracks.

To make these look like railroad tracks, we need to add some wood planks.
Select your Rectangle tool (m) and click and drag across the orange path at the top of the circle. Change the fill color to 255/242/0.
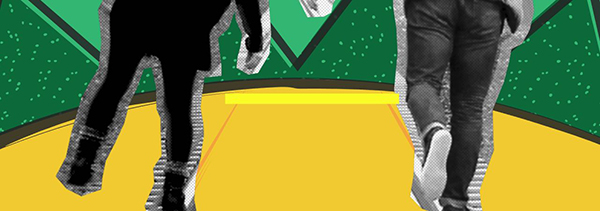
Now we’ll continue drawing wood planks with our Rectangle tool. As we move further down the artboard, make each plank a little larger and slightly further apart to give a sense of perspective. I’m intentionally doing this visually so it’s slightly irregular and supports our care-free, hand drawn look.
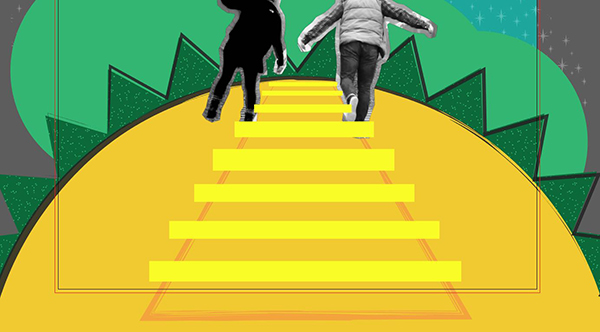
To further enforce the perspective, we need to adjust the angles of the left and right sides of our bright yellow rectangles.
Select your Direct Selection tool (a). Let’s start at the top and work our way down. Select the top left point on the top rectangle and use your arrow key to move it to the right so that the angle of the left side of the rectangle matches the angle of the orange path.
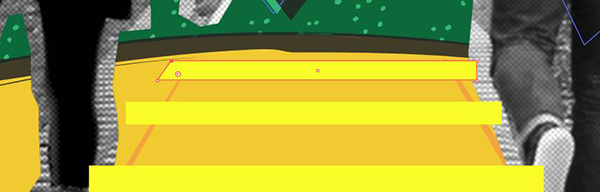
Repeat on the right side. Select the top right point of the rectangle and use your arrow key to move it to the left until the right side of the rectangle matches the angle of the path.

Now we’ll repeat this process for the remaining rectangles.
Our last step for the wood planks is to group them (cmd/ctrl + g) and send them behind the orange path by pressing cmd/ctrl + [.

Now we’ll add a few subtle ink splatters. Select your Type tool and change the font to Sabotaged at 200 pt. Click on the artboard and type a lowercase r. Change the color to Sun Yellow and position so that it overlaps the trees on the left side of the yellow circle.
In the same font, you can also type lowercase v and s for ink splatters (or see the freebies file for outlined versions). Place a few ink splatters here and there along the bottom half of the artboard, but be careful not to overdo it. I used one in bright yellow along the bottom left side of the tracks, a couple of black splatters along the tree area and an orange splatter along the middle right side of the tracks.

When creating the black splatters, make sure to open your Transparency palette and reduce the Opacity to about 80%. The ink brush strokes we’ve used in black include a degree of transparency and the splatters will look too dark if used at 100% opacity.

Step 6: Credits
This wouldn’t be a movie poster without credits and a release date. Fortunately, we have the amazing Directors Gothic font to give us the perfect look.
Start by opening your Layers palette and clicking the Create a New Layer icon. We want to separate this part since we’ll be adding textures to everything else later.
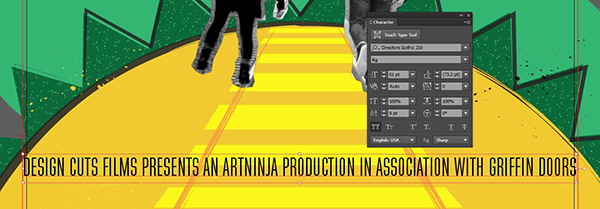
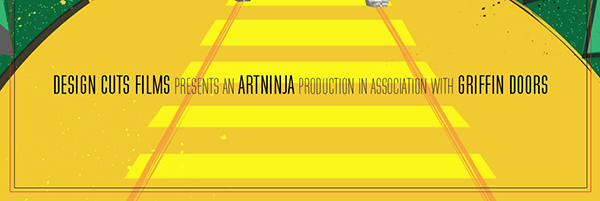
Select your Type tool (t) and click once on the artboard. Type the following (or make up your own awesome credits): Design Cuts Films presents an Artninja Production in association with Griffin Doors
Grab your Selection Tool, then change open your Character palette and change the font to Directors Gothic 210 Regular at 61 pt. In the flyout menu on the top right of the Character palette, choose All Caps.
We want our names to stand out, so we’ll highlight the descriptors and reduce their weight and size.
Use your Type tool to select “presents an”. Change the font to Directors Gothic 210 Thin and the size to 51 pt.
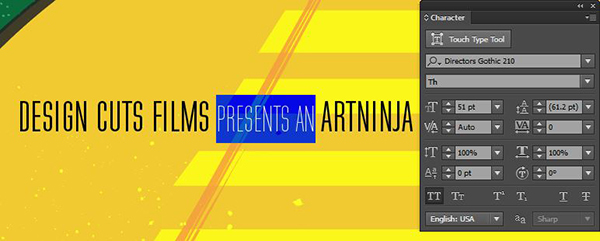
Make the same change to “production in association with”.
Choose your Selection Tool and open your Align palette. Select Horizontal Align Center (The second icon under Align Objects) to center the text on the artboard.
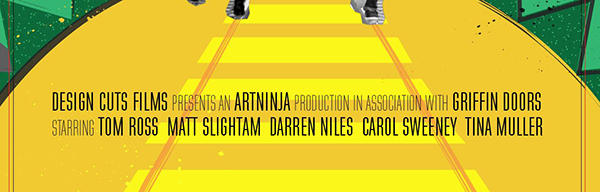
Duplicate this line of copy by selecting it and holding shift + opt/alt while dragging down.
With your Type tool, select all of the copy and change it to: Starring Tom Ross Matt Slightam Darren Niles Carol Sweeney Tina Muller. Note that I’ve added double spaces between the names to add some separation.
Use your Type tool to select “starring”, then select your Eyedropper tool from the toolbar and sample “presents an” in the line above to copy the style.
Use your Selection Tool to select the entire second line. Hold shift and drag in on one of the right corner handles until the right side lines up with the copy above it.
Now we’ll do this one more time for the last line. Select the second line, hold shift + opt/alt and drag down to duplicate.
Use your Type tool to select the text and replace it with: Written and Produced by Edita Lozovska Executive Producers Ben Neeves and Lauren Walsh Directed by Renee Griffin.
Select sections that aren’t names and use the Eyedropper tool to sample the thinner, smaller Directors Gothic used above. Then use the corner handles to reduce the size until it’s the same width as the other two lines.
Adjust the lines (by selecting them with the Selection Tool and using your arrow keys) so they are about the same vertical distance from each other.

Our last bit of copy before we move on to texturing is the release date. Select your Type tool and change your font to Globa at 28 pt, again with All Caps selected.
Click on the bottom middle of the artboard and type: March 21 in Select Theatres.
In your Align palette, choose Horizontal Align Center to center it on the artboard. I was able to position it right in the middle of my last yellow plank of the railroad.

Step 7: Texture
Go to Object > Unlock All. This should automatically select the two photos we placed earlier. Press backspace to delete them. We’ll add them back in when we move to Photoshop.
With your Selection Tool, drag across the top half of the poster to select the three names at the top, the title and its accompanying elements and the tagline. To deselect anything extra (like the background), hold shift and click on the objects you want to deselect.
Open your Layers palette. We’re going to move the selected objects up to our second layer and Illustrator makes it very easy. Click and hold on the brightly colored dot to the right of the layer name, then drag it up to the same spot on the layer above it.
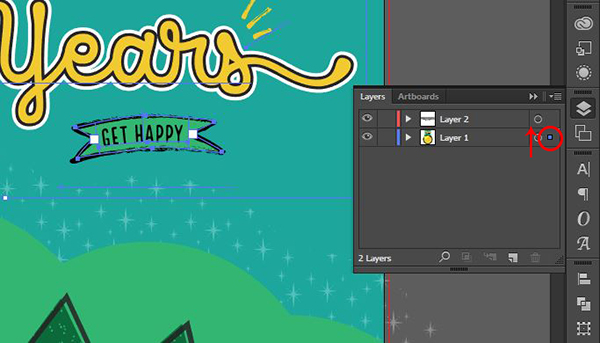

With all of the text and title elements move to the top layer, click the eye icon to the left of Layer 2 to turn it off.
Then, use your Selection Tool to select your teal background and press cmd/ctrl + 3 to hide it.
Go to File > Save As and save as a separate file with the word Background in the name – for instance, mine is DC_SunshineMovie_Background.
Leave this file open for now. We’ll copy our other elements from it in a moment.
Open Photoshop and go to File > New. Enter a width of 18 inches and a height of 24 inches with a resolution of 300 ppi. Use RGB color space.
Go to Layer > New Fill Layer > Solid Color. Name it Teal Background, then in the Color Picker, enter RGB values of 0/167/157 and press OK.
Open your Styles palette (Window > Styles). Click on the menu icon at the top right of the palette and choose Load Styles. Navigate to Boutique_Styles in the Bonus folder for Make Media Co’s Boutique Script font. Select it and press Load.
Choose the style called Lazy Sunday (hovering over the thumbnails will give you their names). This will add a Pattern Overlay effect to your teal layer.
In your Layers palette, double click Pattern Overlay. In the popup box, change the Blend Mode to Luminosity, the Opacity to 30% and the Scale to 380%. Press OK.
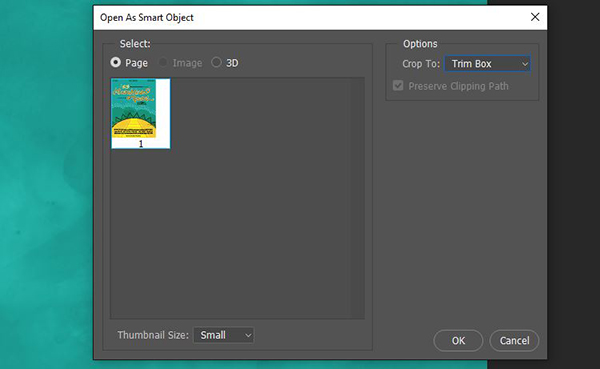
Now go to File > Place Linked and navigate to the DC_SunshineMovie_Background file we made in Illustrator and press Place.
In the dialog box, select Trim Box in the drop down menu next to Crop To, then press OK.
Our image will automatically be placed in the right position. Press enter to complete the placement.
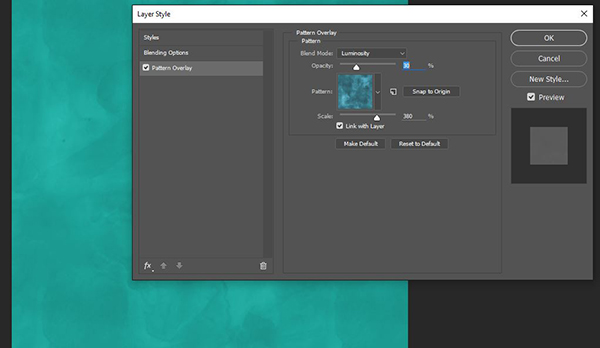
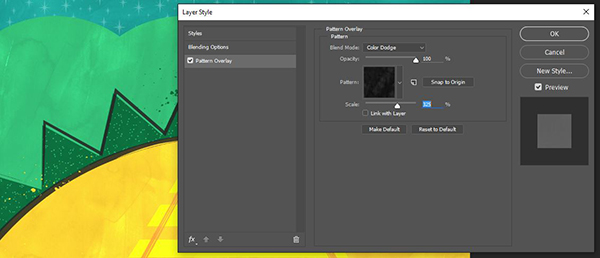
In the Styles palette, choose the style named Burn. In the Layers palette, double click Pattern Overlay (under the DC_SunshineMovie_Background layer). Select a Blend Mode of Color Dodge and change the Scale to 325%, then press OK.
Go back into Illustrator. In your Layers palette, lock Layer 1 by clicking the space directly to the left of the Layer name. Turn on Layer 2 by clicking the far left space to the left of the layer name. Click on Layer 2 to select it, then press cmd/ctrl + a to Select All.
Press cmd/ctrl + c to copy.
Go back into Photoshop and press cmd/ctrl + v to Paste. Again, Photoshop will be kind enough to paste everything in at the right size and in the correct position.
Now all we need to do is add our people back in.
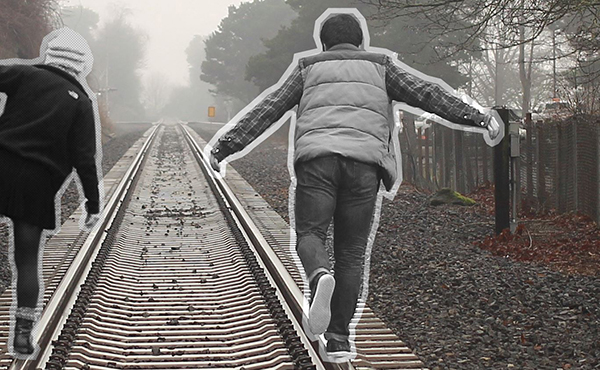
Go to File > Place Linked and navigate to the PSD of the girl. Press Place.
At the top of the artboard, next to W (width), type 8.71 in, then click the link icon to the right of it to scale proportionally. Press enter to complete the transformation.

Use the orange railroad as a guide for placing her in the correct position.

Now we’ll repeat for the boy. Go to File > Place Linked and navigate to the PSD of the boy. Press Place.
At the top of the artboard, change the width to 8.71 in and click the link icon to scale proportionally. Press enter to complete.
Use the orange rail as a guide to place him in the correct position.
And we are done! This was a long one. Mad props for sticking through to the end!
Remember that whether it’s your outcome for this tutorial or something new you’ve made, we’d love to see your designs on our Facebook page.
Please leave a comment if you have any questions or suggestions. I always look forward to hearing from you!
There’s still time to check out 20 Professional Grade Font Families to add some extra dazzle to your designs!
I’m having difficulty understanding how to add the dots to the dark green starburst. Is there any way to simplify the steps for me? Also, why are the dots so small? Not having any luck. Please advise. Thank you.
Hey Wendy,
Thank you so much for getting in touch, I’m really sorry to hear you are having some trouble with one of the tutorial steps. Rest assured, I am on the case!
I have sent you a quick email to get some more information form you and help get you up and running with this tutorial!
I hope it helps, Wendy, and please don’t hesitate to contact me should you have any other questions. I’m here to help!
By the way, What is the font manager that you design cuts team suggest to us, only the free ones, okay!
Adobe developed so many programs n improved Ps a lot but really they are not offering any Ps inbuilt font manager!(They introduced the typekit but no answer for font manager!)
Corel Draw created it’s very own bit stream font manager from it’s very earlier editions & tons of free fonts also!
We are geeting heavy probs here with font managers, Please answer this any body from Design Cuts!
Thank you in advance!
Hey Pranaytony,
Thanks for getting in touch, I can certianly help you out with your query :) I have sent you a quick email to offer some font manager suggestions to you.
I hope it helps, and please don’t hesitate to contact me should you have any other questions. I’m always happy to help!