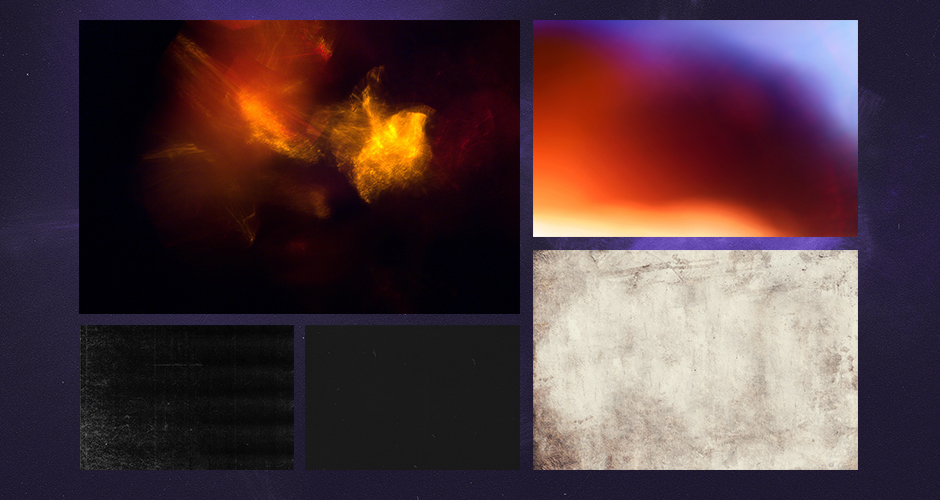
In this tutorial, I will be showing you how to create a beautiful magical scene in Photoshop. To create our scene we will be using actions, textures, and overlays from The Ultimate, Essential Photography Bundle featuring artists such as Photo Spirit, Pro Add-Ons, Twinbrush, and many more. This all-new design bundle is our first ever photography bundle, which brings you the most varied and high-quality photography collection available anywhere! This lesson will give you a nice overview of some of these elements you can expect to find as we create some beautiful and professional looking effects. If you’re all ready to make some magic then fire up Photoshop and let’s get started!
Please note: This tutorial is not linked to Lisa Glanz’s Magical Scene Creator.
HAVE YOU SEEN OUR YOUTUBE CHANNEL?
Watch the video tutorial below and subscribe to our YouTube channel for regular updates direct to your inbox.
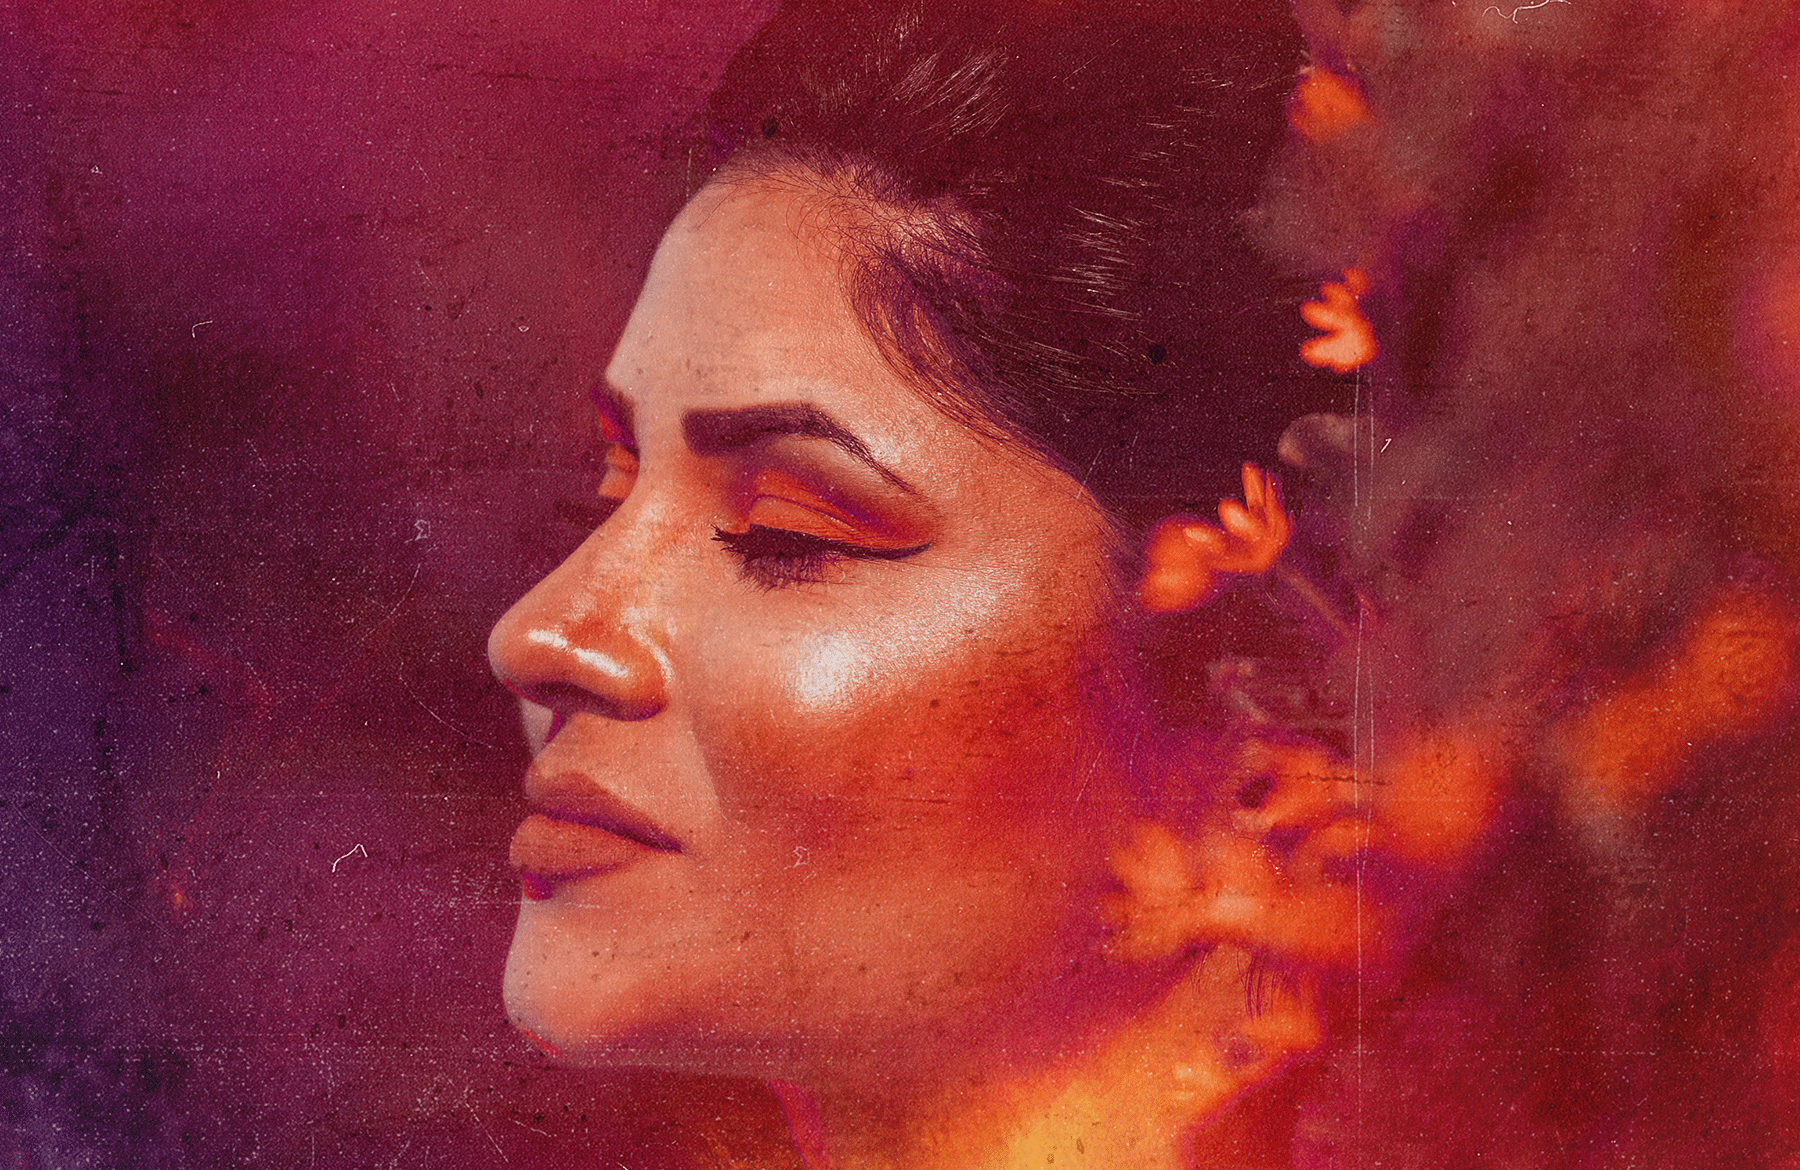
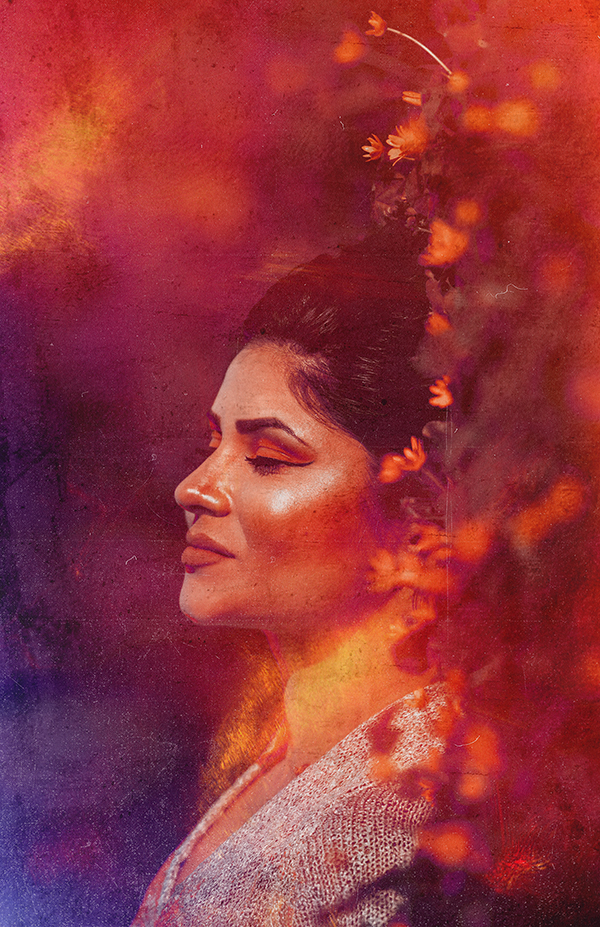
Here’s a look at what we’ll be creating:
Follow along with this tutorial: Download the freebie files
The freebie for this tutorial is just a small sample of the quality you can expect to find in The Ultimate, Essential Photography Bundle for just $29 (that’s 99% off). Discover this massive collection of high quality collection that is an absolute must for anybody looking to take their photos to the next level!
Step 1: Magical Scene
To begin, create a new document that is ’11’ inches wide x ’17’ inches tall. Let’s check to make sure that the ‘Resolution’ is set to ‘300’ and then give your document a name – here I am using ‘magical-scene-tutorial’. The ‘Color Mode’ can stay as RGB and we can leave the ‘Background Contents’ set to white. Once you have set the parameters for your document, go ahead click ‘Create’ from the lower right corner.
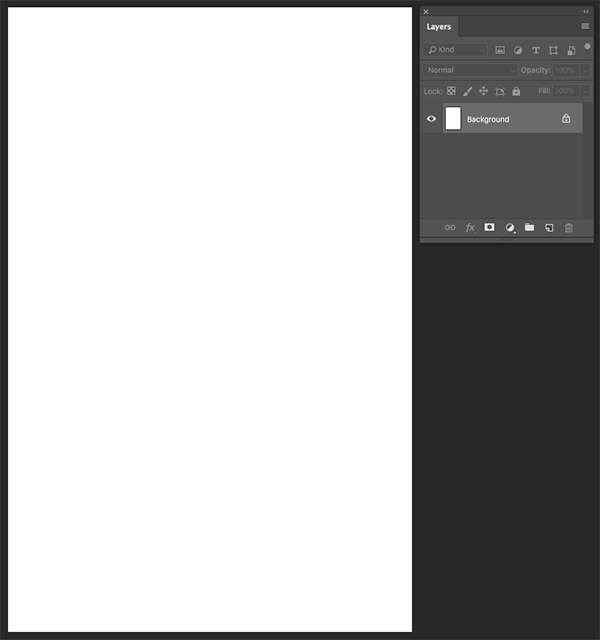
After creating your new document you will have a single ‘Background’ layer filled with solid white and a small lock icon next to it as shown below:
Step 2: Importing The Stock Photo
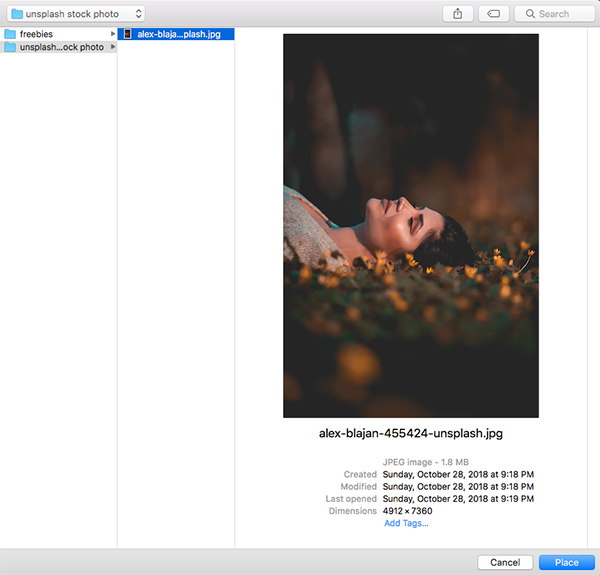
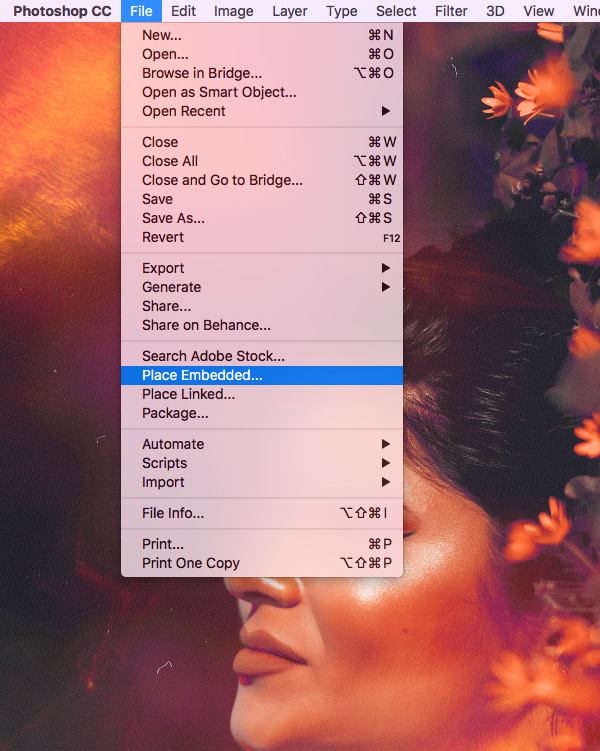
Next, visit Unsplash and download the free stock image here and save it somewhere that’s easy for you to find. Once you’ve done that, return to Photoshop and go to the File menu before choosing ‘Place Embedded…’ from the dropdown.
Navigate to the location where you saved the free stock image and then choose ‘Place’ from the lower right corner to import it into your document.
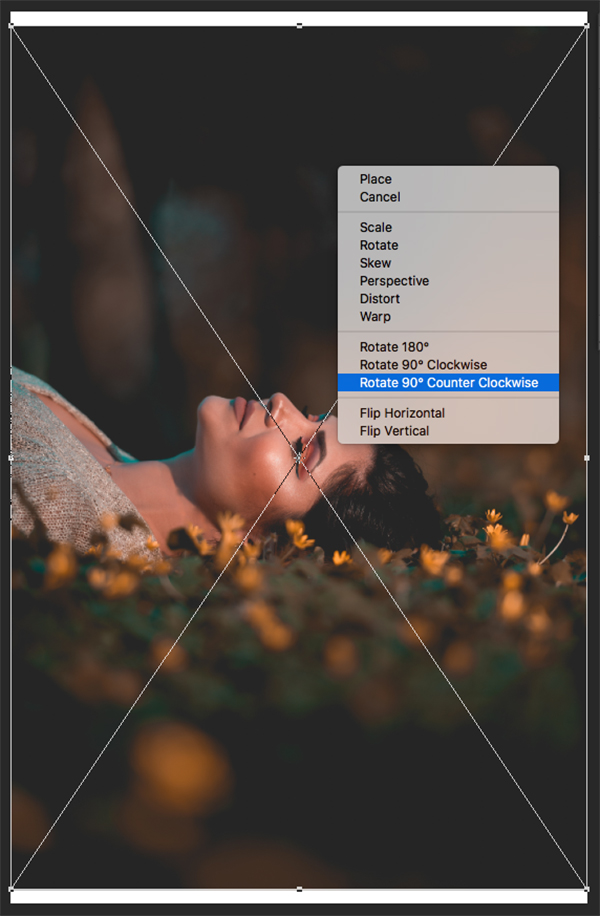
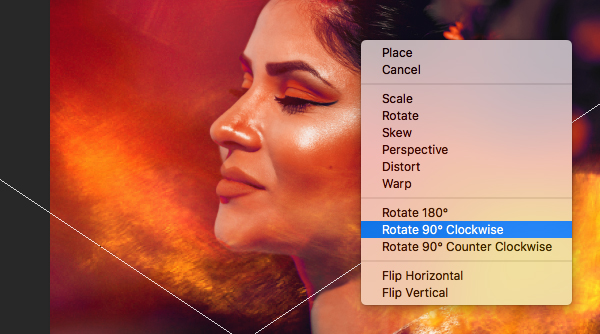
Hold the Control key and click anywhere on the image while it still has a bounding box around it and then choose ‘Rotate 90º Counter Clockwise’ as shown here:
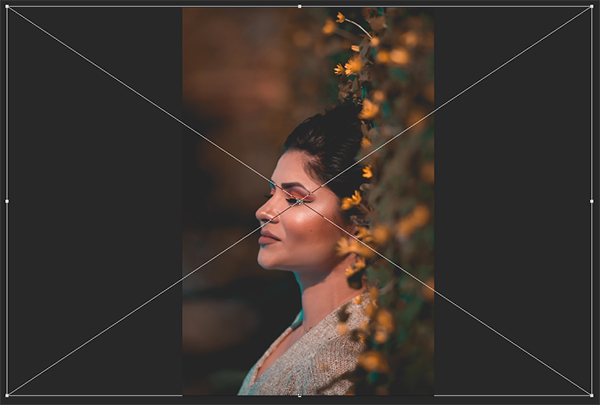
After rotating the image, click and drag outwards from any of the four corners of the bounding box while holding the Alt/Option and Shift keys to fill the canvas vertically, and then press ‘Return’ to apply the changes. Here we will want to position the photo so that the woman is placed roughly in the center of the canvas as shown below:
Step 3: New Background
After we place the image, select the original ‘Background’ layer and delete it so we are just left with the photo layer.
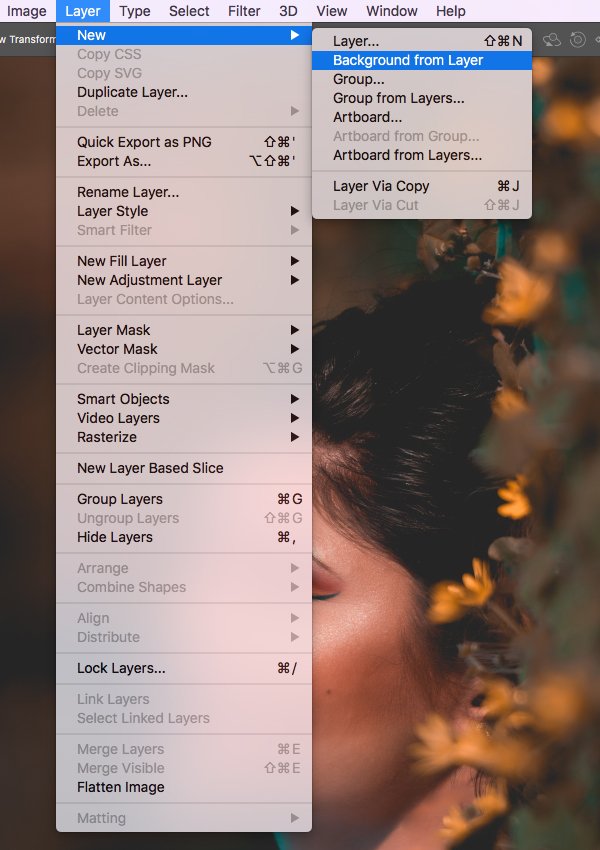
With the photo layer selected in the Layers Palette, go to the Layer menu and choose ‘New > Background from Layer’ to make the current layer the new background.
Now your Layers Palette should look like this:
Step 4: Lights, Camera, Actions!
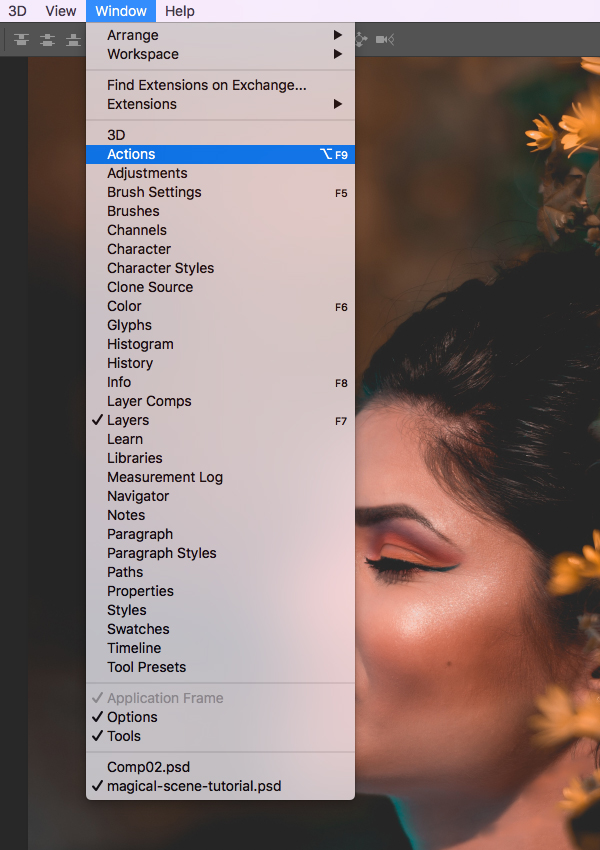
Go to the Window menu and choose ‘Actions’ from the dropdown menu that appears.
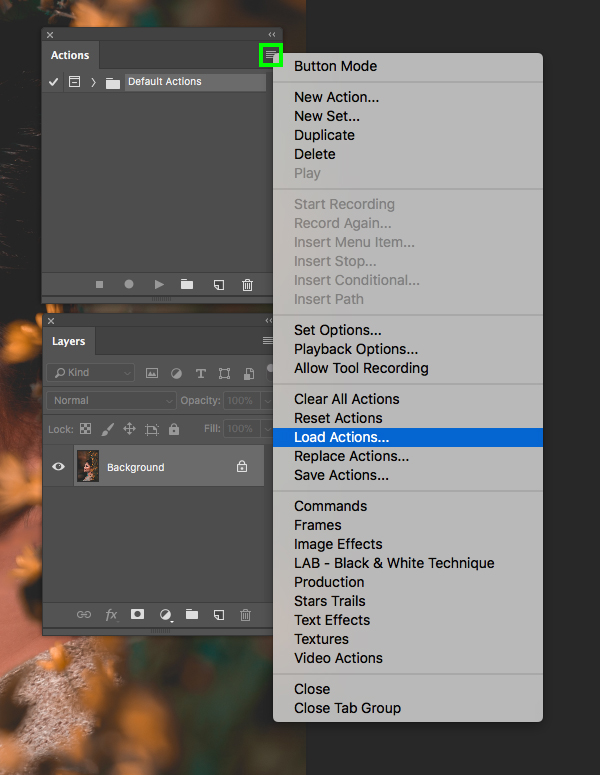
In the Actions panel, click on the hamburger menu in the upper right corner to reveal a dropdown menu. From the list, choose ‘Load Actions…’ as shown in the image below:
If you have purchased The Ultimate, Essential Photography Bundle, navigate to the HDR Effect Photoshop Action folder from Twinbrush and select the ‘Twinbrush Authentic HDR – ACR 10.atn’ file inside of the ‘Actions’ folder before choosing ‘Open’ from the bottom right to load the action. Otherwise you can find the Authentic HDR Photoshop Action on the Design Cuts Marketplace. If you don’t have this product and don’t want to add an HDR action, please skip the below steps and go straight to Step 8.
After loading the action, you should see it pop up in the Actions panel. Here we will want to twirl down the main folder to reveal the action inside and then select the layer inside of this folder and press the play button to run the action. This is a great action that will apply several HDR photo effects to the image giving us some very professional looking results!
Step 5: HDR FX
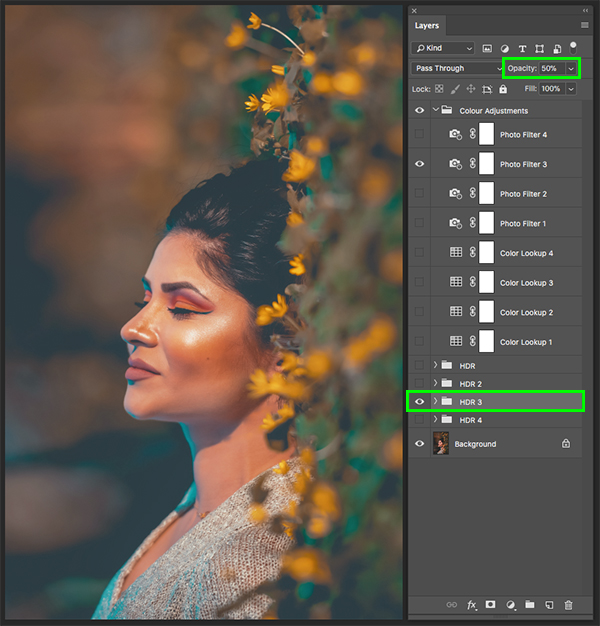
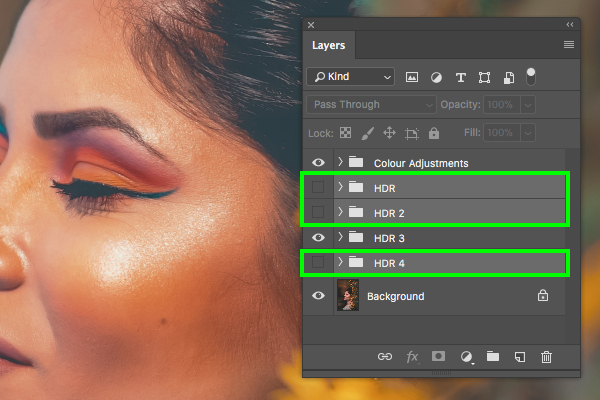
After running the action you should notice that you now have a handful of new folders and layers that have been added to the Layers Palette. Let’s turn on the visibility of the ‘HDR 3’ folder which we will select and then press the number ‘5’ on the keyboard to reduce the opacity to ’50%’. After that, turn off the visibility of all of the other ‘HDR’ folders. Once you have done that, turn on just the ‘Photo Filter 3’ layer found inside of the ‘Colour Adjustments’ group as shown below:
Collapse the folders and then hold the Command/Ctrl key and click on the ‘HDR’, ‘HDR 2’, and ‘HDR 4’ folders to select all three of them simultaneously.
With these three folders selected, press ‘Delete’ to remove them so we are just left with the ‘Colour Adjustments’ and ‘HDR 3’ folders.
Step 6: Curves Adjustment Layer
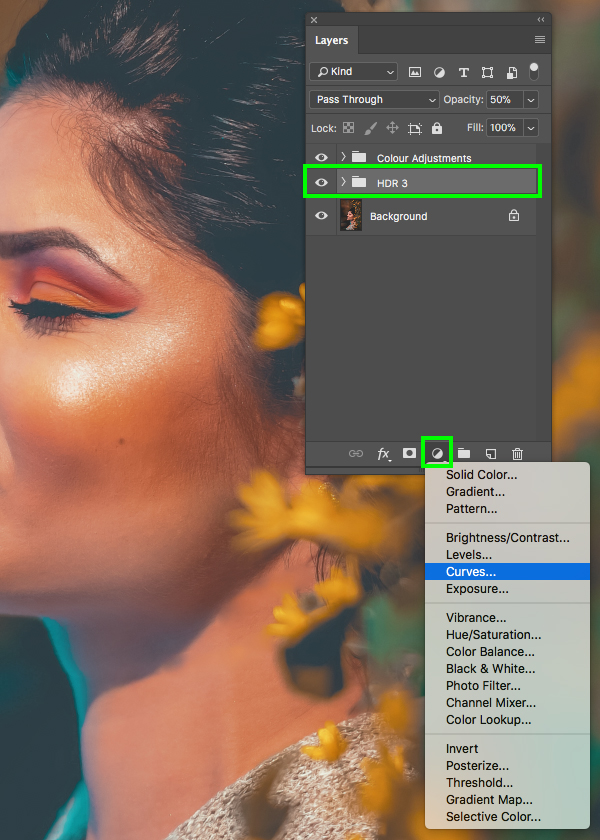
Select the ‘HDR 3’ folder and then click on the Adjustment Layer icon at the bottom of the Layers Palette and choose ‘Curves…’ from the list.
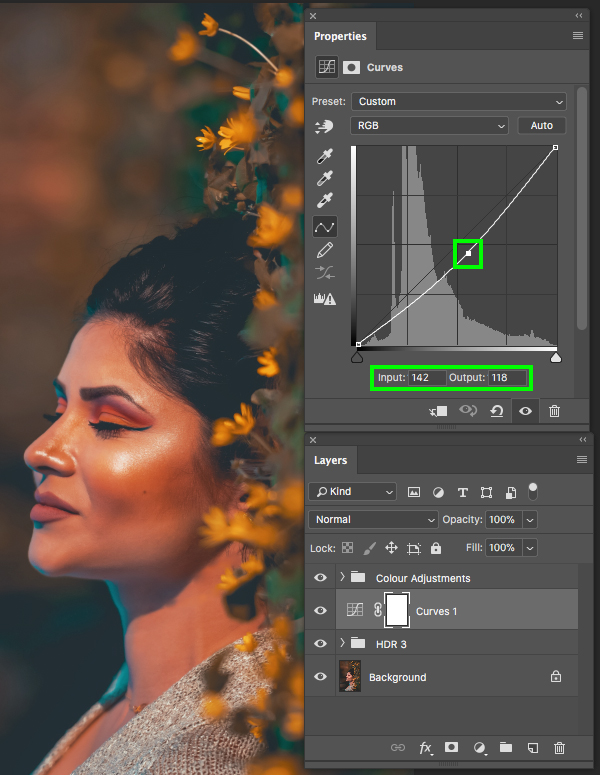
After adding the new Curves Adjustment Layer, go to the Properties and add a point in the middle of the grid. Move this point down and to the right so that the ‘Input’ is set to ‘142’ and the ‘Output’ is set to ‘118’.
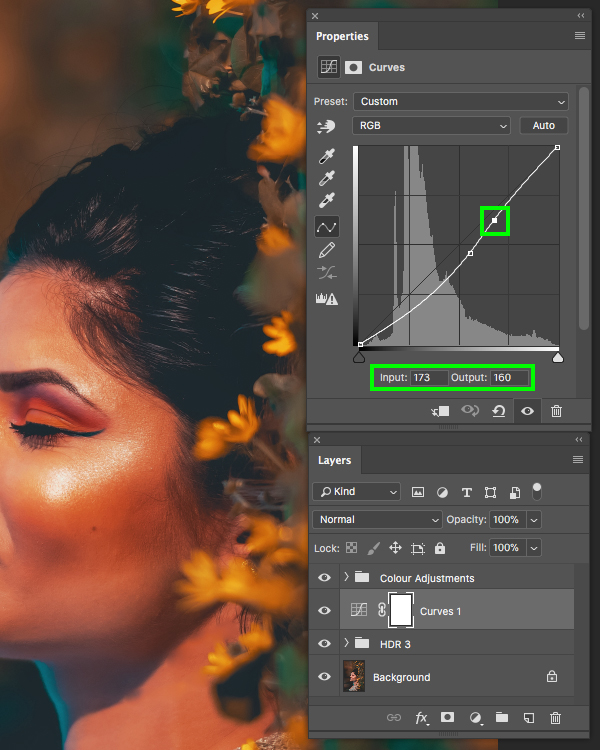
Add a second point in the grid a little bit above and to the right of the first point. Let’s change the ‘Input’ setting of this point to ‘173’ and the ‘Output’ setting to ‘160’ to give our image more contrast.
Step 7: Black & White Adjustment Layer
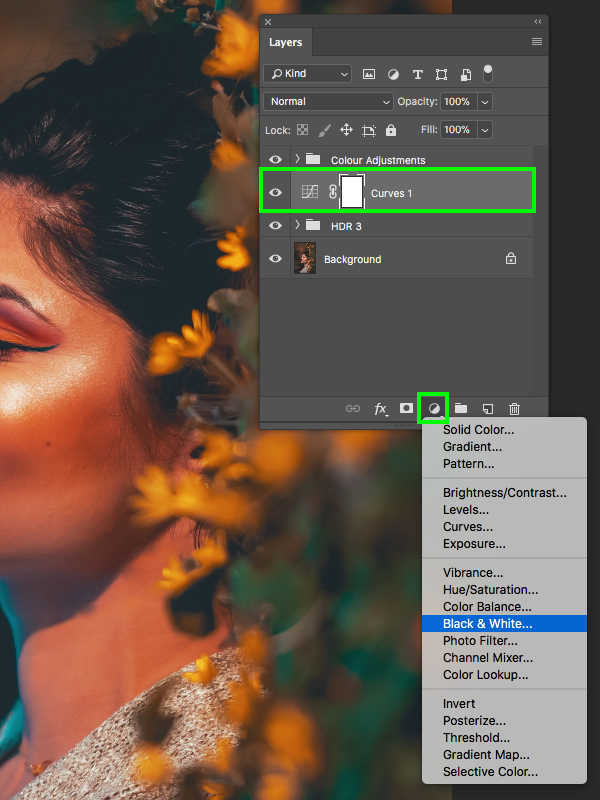
Select the Curves Adjustment Layer and then return to the Adjustment Layer icon at the bottom of the Layers Palette and choose ‘Black & White…’ from the dropdown menu.
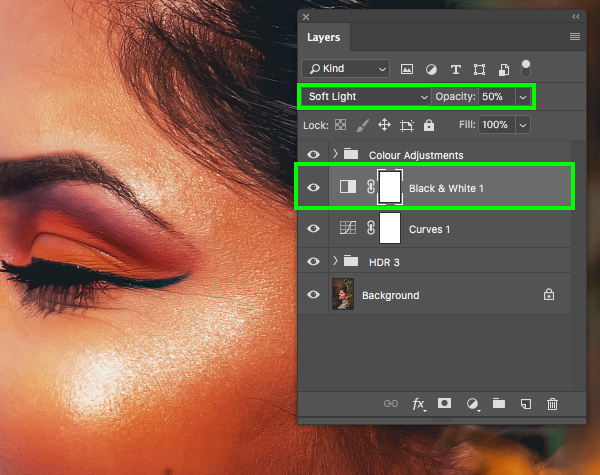
After adding the Black & White Adjustment Layer, change the Blending Mode to ‘Soft Light’ and reduce the opacity to ’50%’ as shown here:
Step 8: Gradient Map
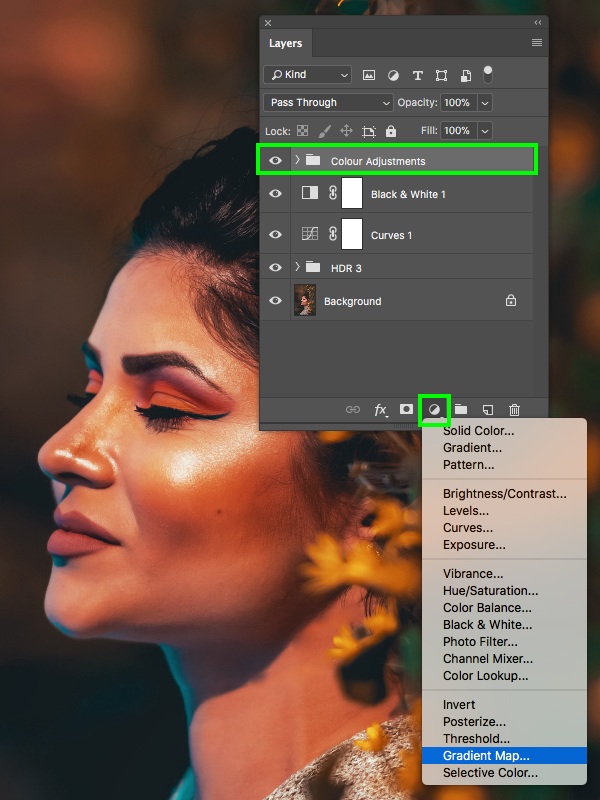
Select the ‘Colour Adjustments’ folder and then return to the Adjustment Layer icon once again. This time let’s choose the ‘Gradient Map…’ option.
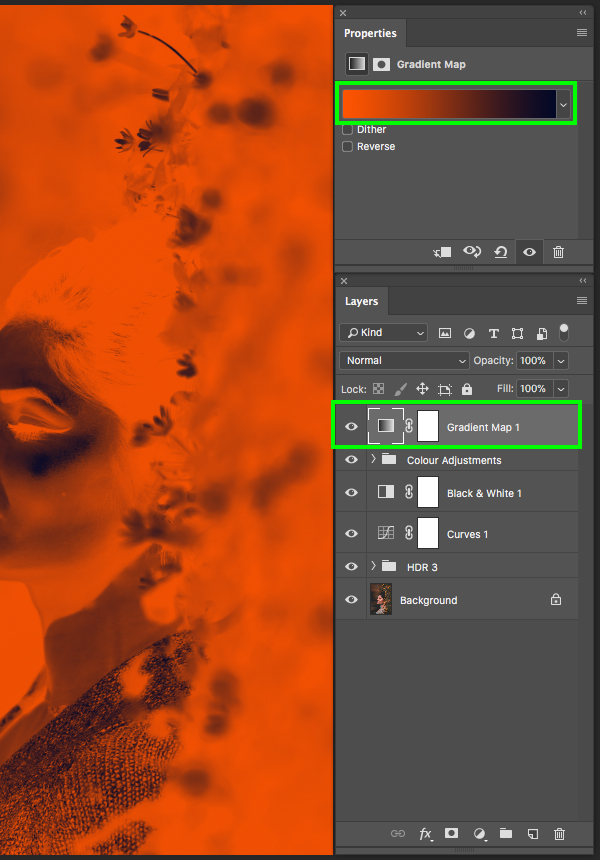
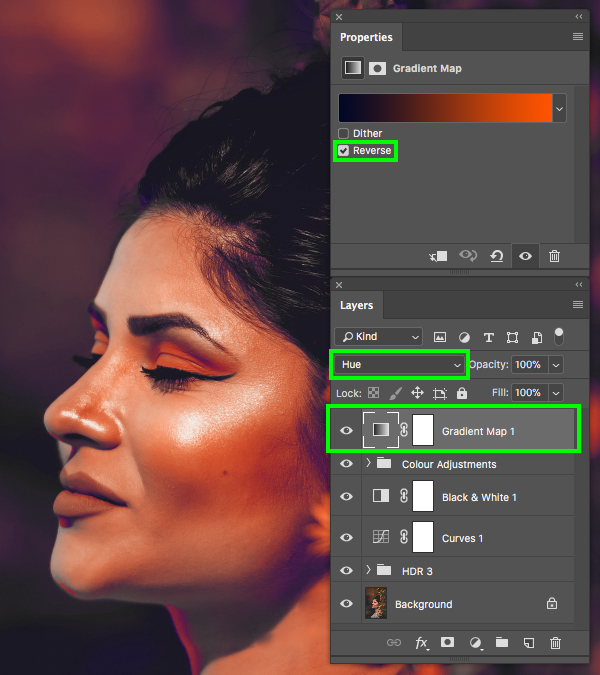
Once the Gradient Map Adjustment Layer has been added to the top of the Layers Palette, go to the Properties and click on the color gradient strip to change the colors.
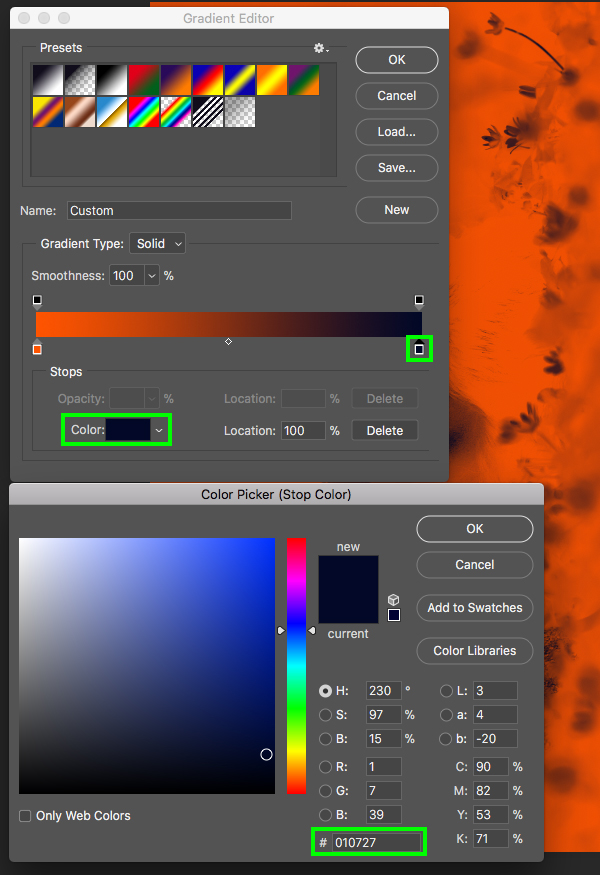
You should now see the Gradient Editor panel which will allow us to modify the colors. Select the bottom left square and then click on the ‘Color’ box to bring up the ‘Color Picker’. Once you have the Color Picker open, enter the hex value ‘#FF5400’ and then press ‘Return’ or click ‘OK’ to close out.
Next, click on the square at the bottom right of the color strip and then click the ‘Color’ box once again. This time, let’s enter the hex value ‘#010727’ inside of the Color Picker and then press ‘OK’ to close out of the Gradient Editor.
Inside of the Properties let’s check off the small box that says ‘Reverse’ and then select the ‘Gradient Map 1’ Adjustment Layer in your Layers Palette and change the Blend Mode to ‘Hue’. This will create a nice color effect over the image using the values we entered in the previous steps.
Step 9: Levels
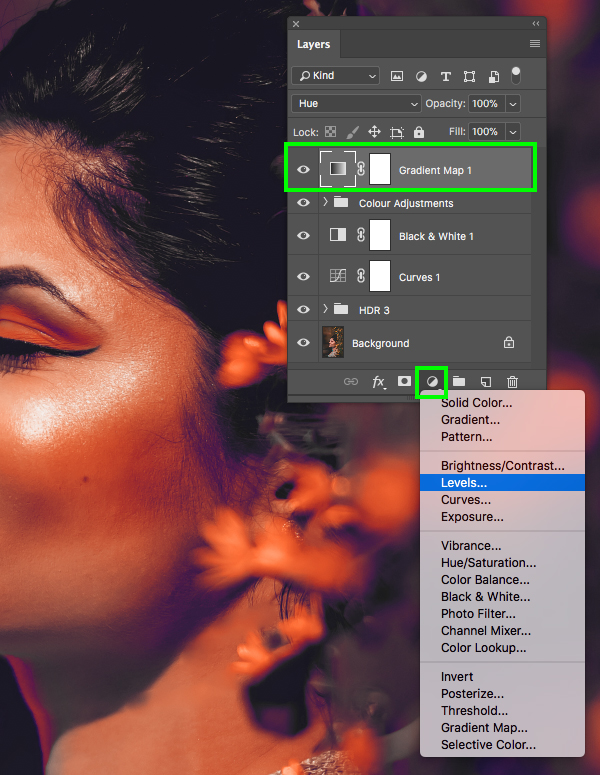
With the ‘Gradient Map 1’ layer selected, return to the Adjustment Layer icon and choose ‘Levels…’ from the dropdown.
In the Properties, move the left gray slider in towards the middle until it’s set to ’13’ as shown in the image below:
Step 10: Grouping The Effects
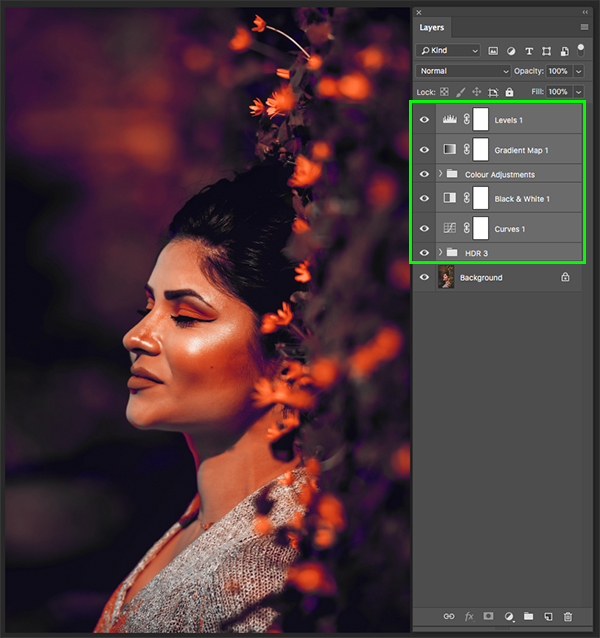
Select the top layer, which should be the ‘Levels 1’ Adjustment Layer, and then hold the Shift key and select the ‘HDR 3’ folder in the Layers Palette to select everything except for your ‘Background’ layer as shown here:
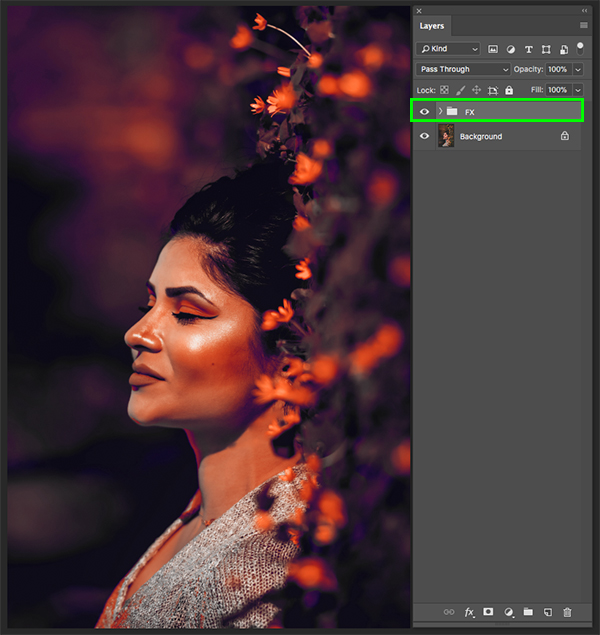
With all of your layers and folders still selected, press Command/Ctrl+G to put them into a new folder and then double click the ‘Group 1’ text and rename the folder ‘FX’.
Step 11: Magical Light
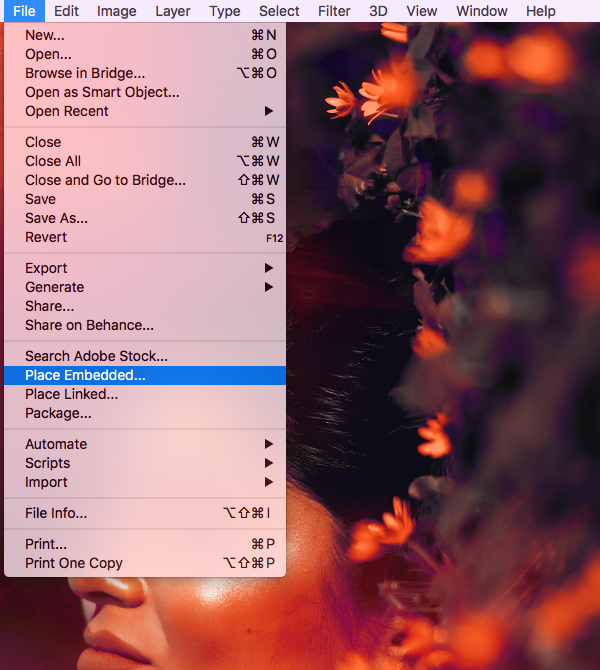
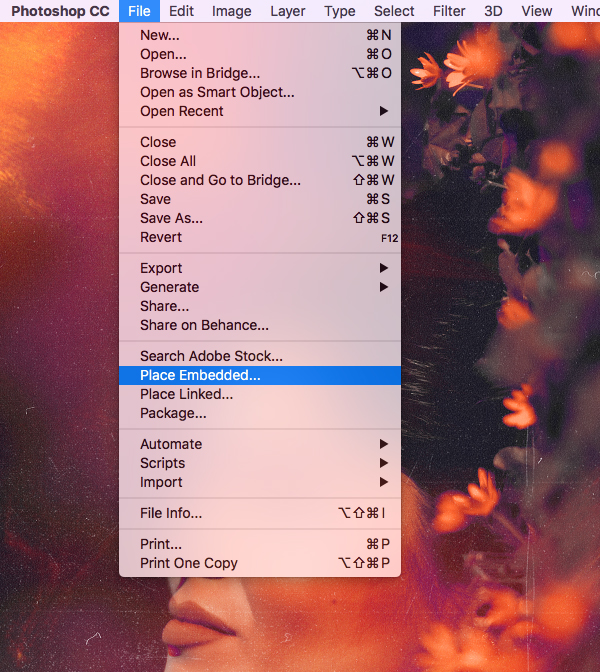
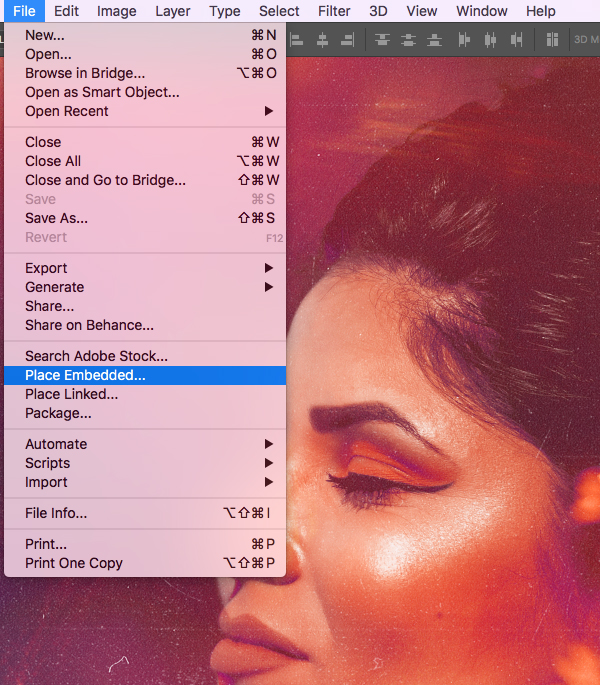
Go to the File menu and choose ‘Place Embedded…’ as shown below:
Navigate to the ‘2.jpg’ image inside of the ‘Pro Add-Ons’ folder with the freebies for this tutorial and then choose ‘Place’ from the lower right.
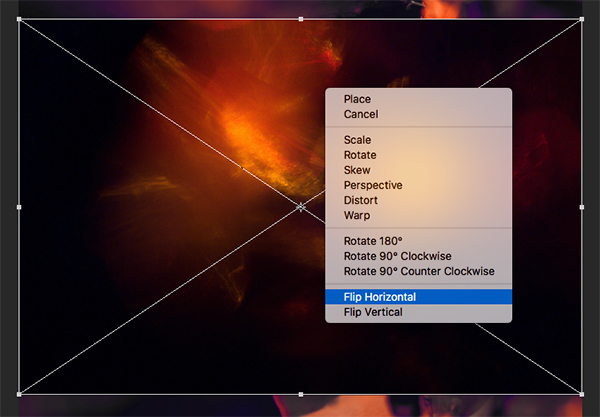
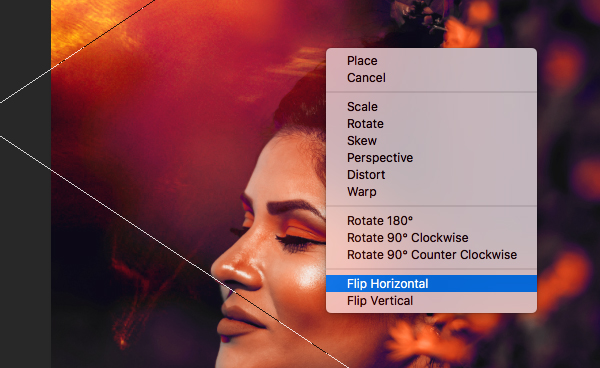
After importing the light image hold the Control key and click on it before choosing ‘Flip Horizontal’ from the dropdown menu.
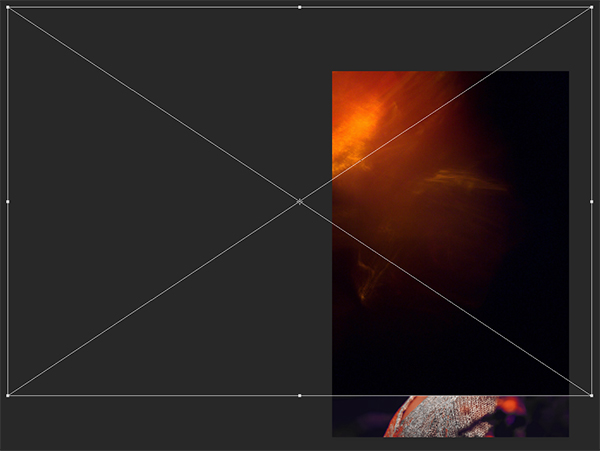
After flipping the image, hold the Shift key and scale it up by dragging outwards from any of the four corners of the bounding box. Once you have done that, position the image so that only the right side is showing while the rest is cropped out. Use the image shown below as a guide for the size and placement of the light in the canvas area.
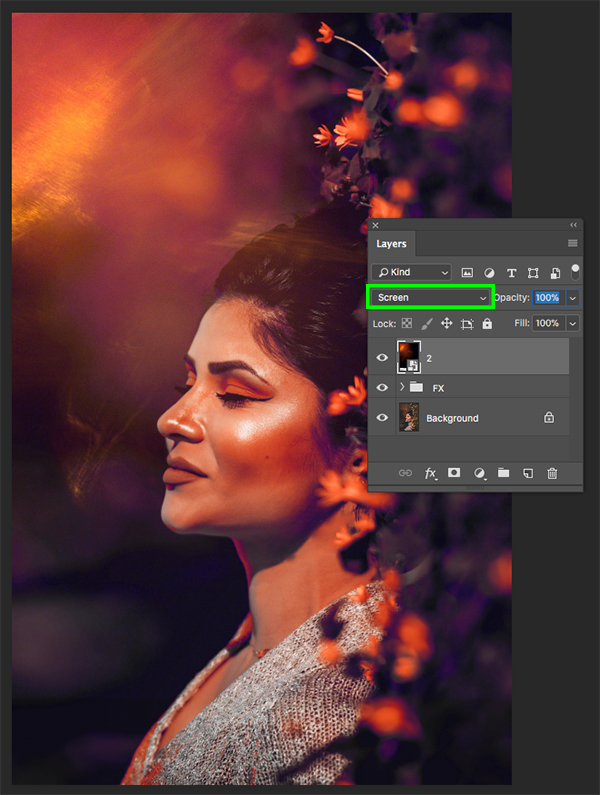
Once the light image is in place, change the Blend Mode of the layer to ‘Screen’ to allow the image below to show through.
Step 12: Adjusting The Light
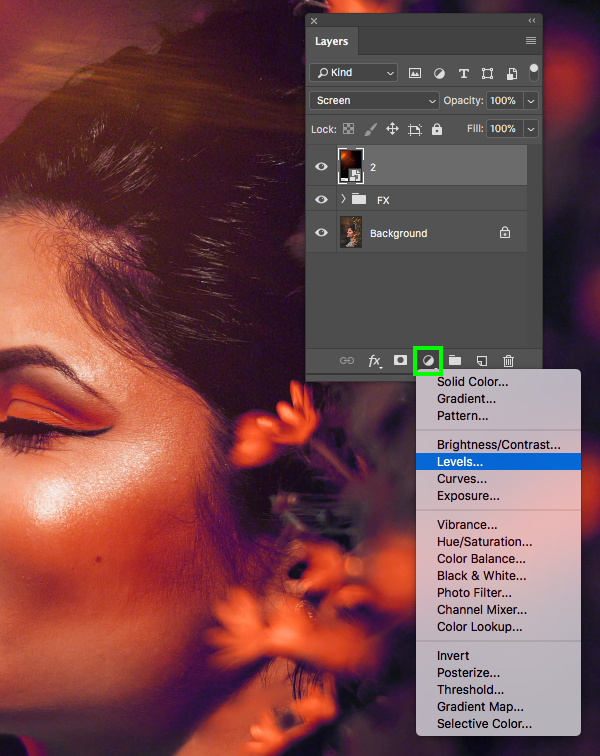
Select the ‘2.jpg’ Smart Object layer and then hold the Alt/Option key and click on the Adjustment Layer icon at the bottom of the Layers Palette. From here, choose ‘Levels…’ from the menu that appears.
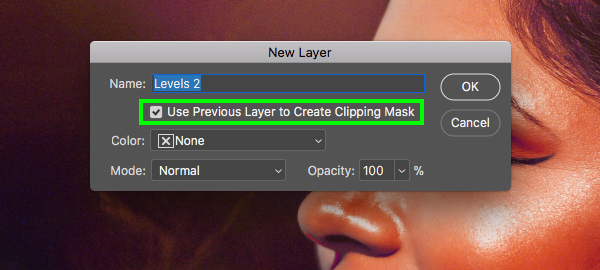
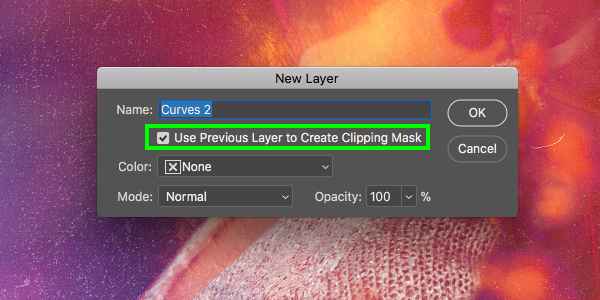
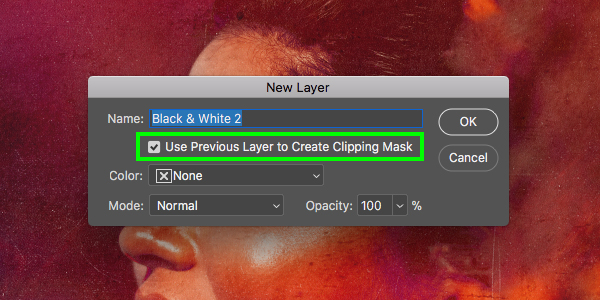
When prompted with the ‘New Layer’ dialog box, check off the option that says ‘Use Previous Layer to Create Clipping Mask’ and then click ‘OK’ to proceed.
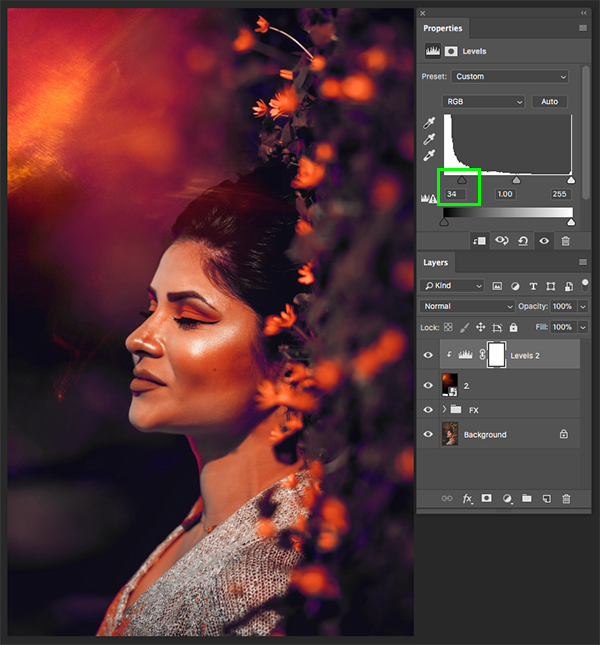
You will now have a new Levels Adjustment Layer with a Clipping Mask applied to it so that it only affects the Smart Object directly below it. In the Properties section, move the left slider in towards the center until it’s set to ’34’ as shown below:
Step 13: Duplicating The Light
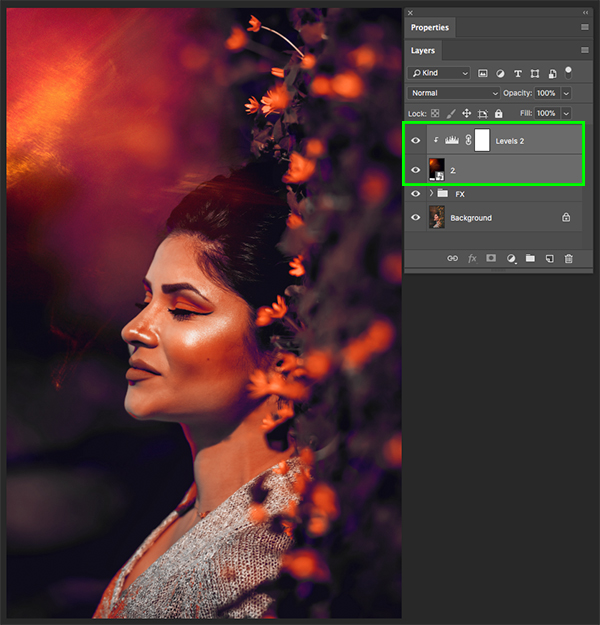
Select the top Levels Adjustment Layer, hold the Shift key and then select the ‘2.jpg’ Smart Object directly below so both layers are selected together. From here, press Command/Ctrl+J to duplicate both of these layers.
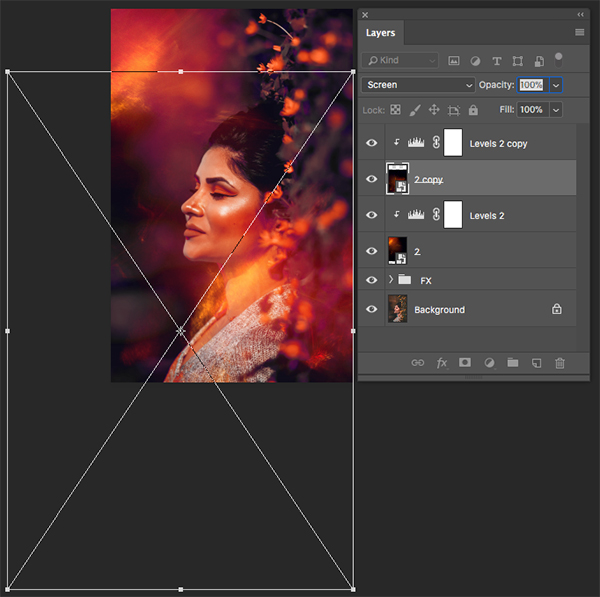
Select the new copy of the ‘2.jpg’ Smart Object, press Command/Ctrl+T to initiate a Free Transform, and then hold the Control key and click on the image. From the dropdown menu that appears, let’s choose the ‘Flip Horizontal’ option as shown below:
After that, hold the Control key and click again, this time choosing ‘Rotate 90º Clockwise’.
Once you’ve rotated the image, hold the Shift key and scale it down a bit before repositioning it like this:
Step 14: Light Folder
Now that we have two copies of our lights and their corresponding Adjustment Layers, let’s select the top one in our Layers Palette, hold the Shift key, and then select the original ‘2.jpg’ Smart Object layer. You should now have all four of these layers selected simultaneously.
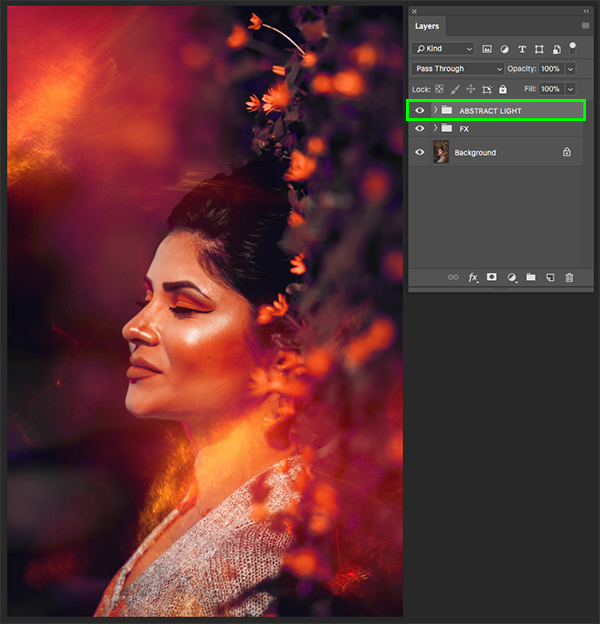
With the layers still selected, press Command/Ctrl+G to place them into a new folder and double click the ‘Group 1’ text and rename the folder ‘ABSTRACT LIGHT’ as shown below:
Step 15: Bring The Noise!
Return to the File menu and choose ‘Place Embedded…’ once again.
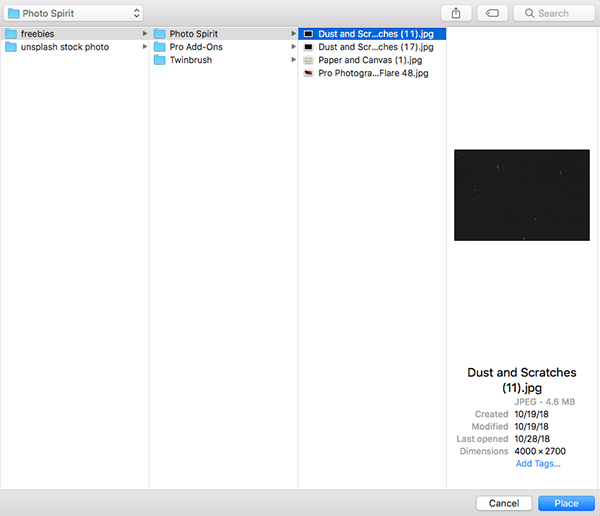
Navigate to the ‘Dust and Scratches (11).jpg’ file inside of the ‘Photo Spirit’ folder with the freebies and then choose ‘Place’ from the lower right to import the texture.
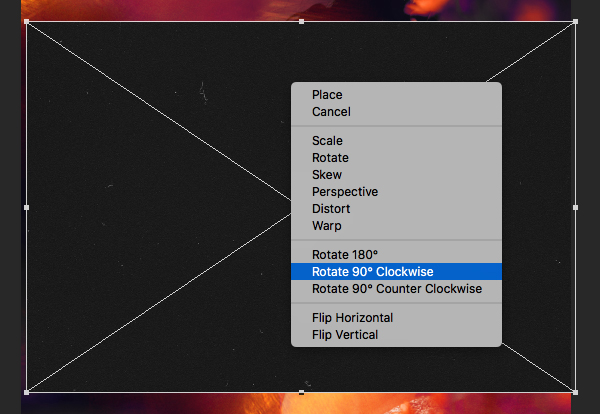
After importing the image, hold the Control key and click on it before choosing ‘Rotate 90º Clockwise’ from the dropdown list.
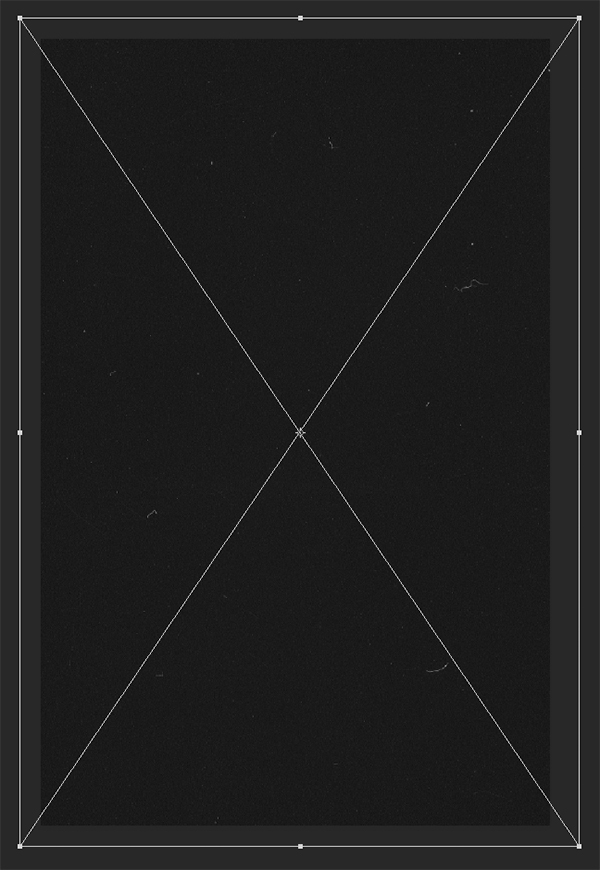
Next, hold the Alt/Option+Shift keys and drag outwards from any of the four corners of the bounding box to scale the image up from the center until it extends a bit outside of the canvas.
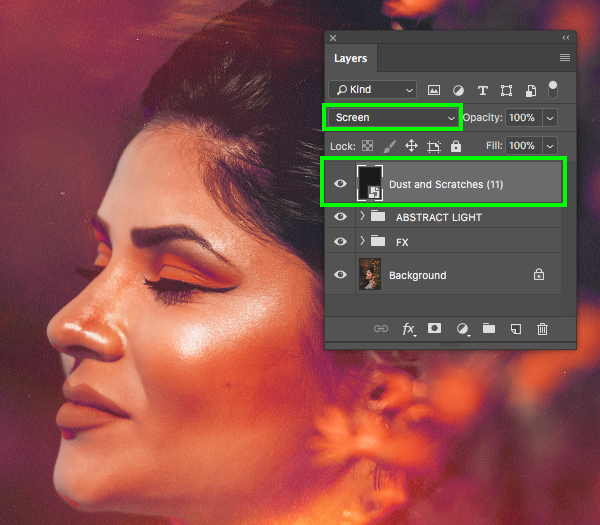
Press ‘Return’ to apply the changes and then let’s change the Blend Mode of the layer from ‘Normal’ to ‘Screen’ as shown here:
Step 16: Bring More Of The Noise!
Let’s jump back to the File menu and choose ‘Place Embedded…’ to bring in our next image.
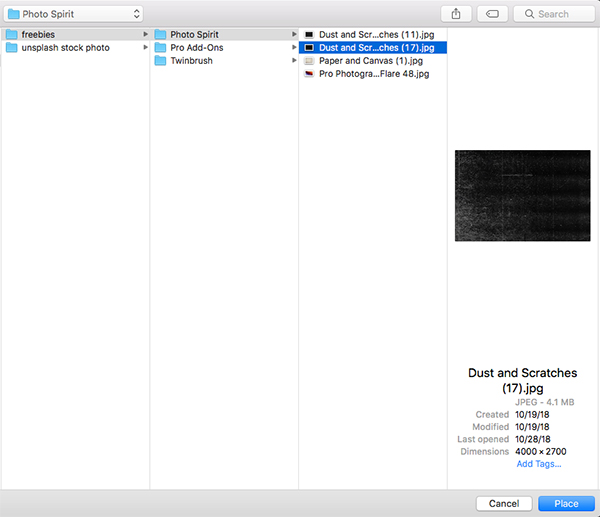
This time let’s grab the ‘Dust and Scratches (17).jpg’ file inside of the ‘Photo Spirit’ folder and then choose ‘Place’ from the lower right once again.
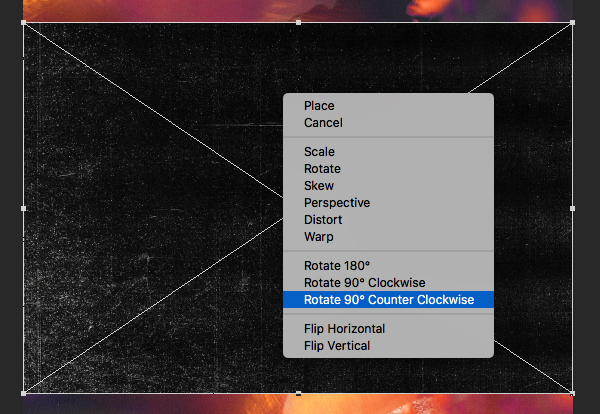
Once you’ve imported the image, hold the Control key and click on it before choosing ‘Rotate 90º Counter Clockwise’ from the dropdown menu as shown here:
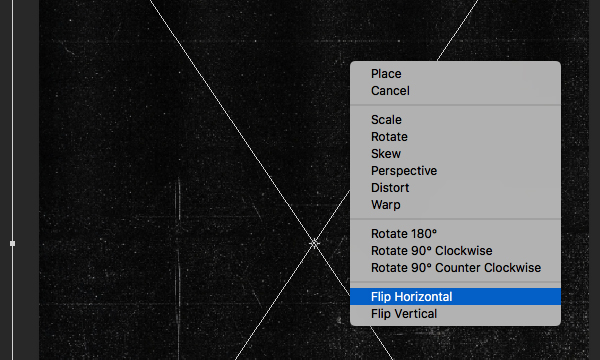
Click another time while holding the Control key and then choose ‘Flip Horizontal’.
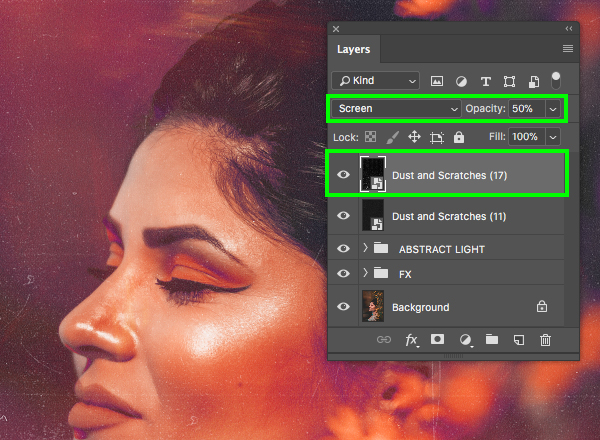
Press ‘Return’ to apply the changes and change the Blend Mode to ‘Screen’ and then press the number ‘5’ on the keyboard to reduce the opacity of the texture to ’50%’.
Step 17: Noise Group
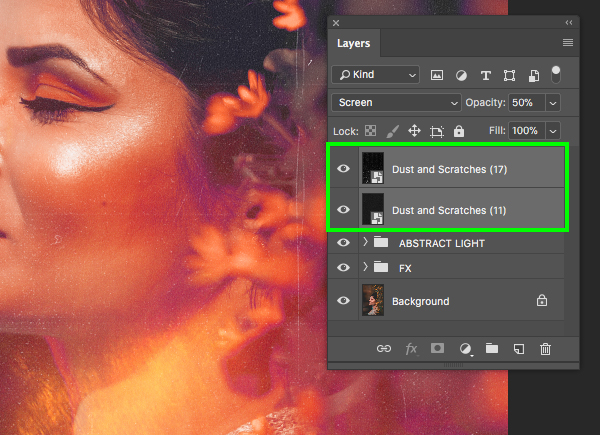
Select the top texture Smart Object, hold the Shift key, and then select the Smart Object texture layer below so both of the scratch textures are selected together.
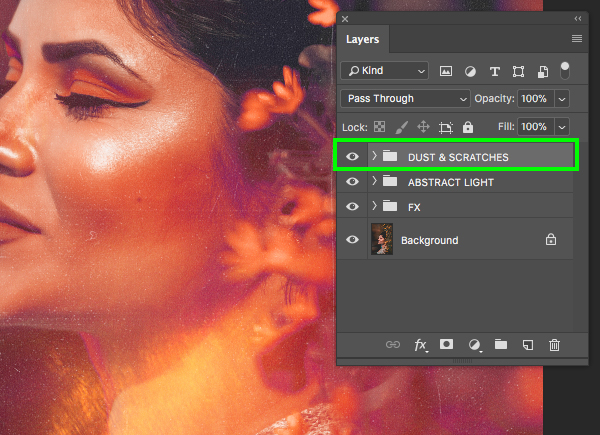
With both layers still selected, press Command/Ctrl+G to place them into a new folder and double click the ‘Group 1’ text before renaming the folder ‘DUST & SCRATCHES’.
Step 18: Dust To Dust
With the newly created ‘DUST & SCRATCHES’ folder selected, hold the Alt/Option key and click on the Adjustment Layer icon at the bottom of the Layers Palette. When the dropdown menu appears, choose ‘Levels…’ from the list.
In the ‘New Layer’ panel, click on the ‘Use Previous Layer to Create Clipping Mask’ option and then click ‘OK’ to proceed.
You will now have your new Levels Adjustment Layer with a Clipping Mask attached. Inside of the Properties panel, move the left slider in towards the center until it’s set to ’12’ to increase the contrast as shown here:
Step 19: Flares
Return to the File menu and choose ‘Place Embedded…’ from the list.
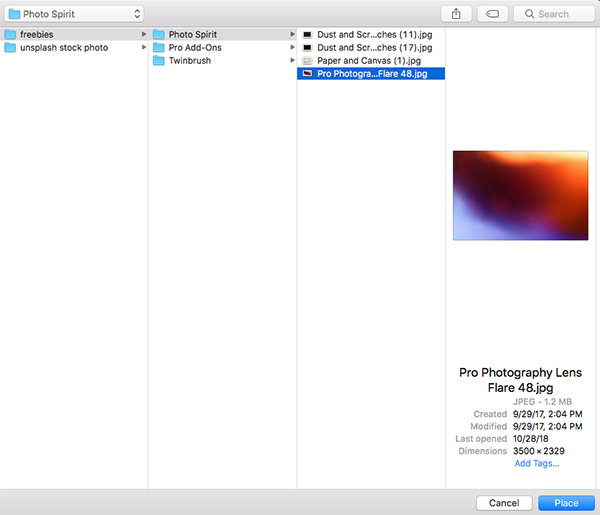
Inside of the freebies folder for this tutorial, navigate to the ‘Photo Spirit’ folder and select the ‘Pro Photography Lens Flare 48.jpg’ before choosing ‘Place’ from the lower right corner of the dialog box.
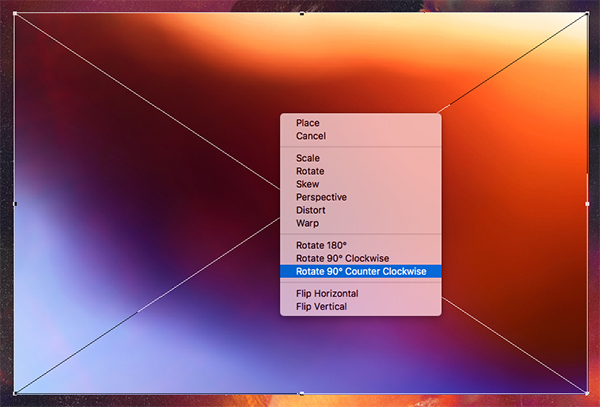
After bringing in the image, hold the Control key and click on the flare image and then choose ‘Rotate 90º Counter Clockwise’ to rotate the image.
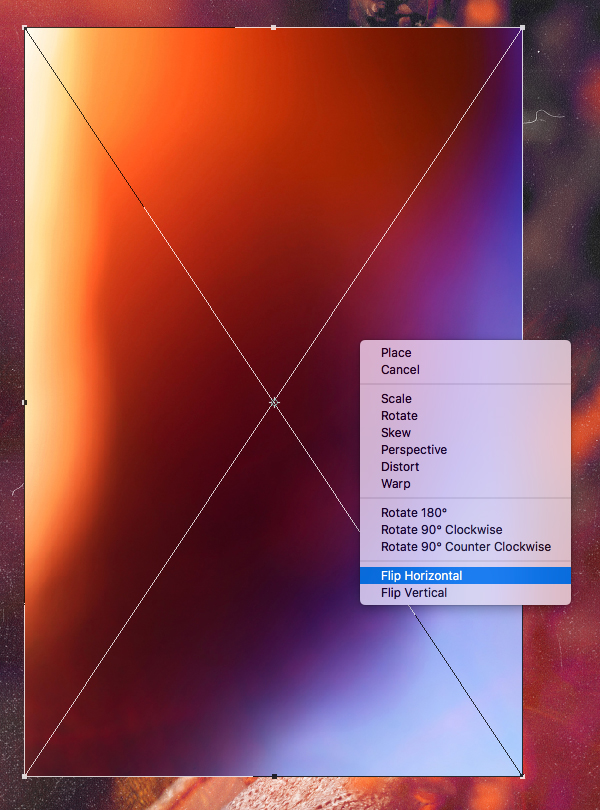
Click on the image another time while holding the Control key and now choose the ‘Flip Horizontal’ option as shown here:
Hold the Alt/Option+Shift keys together and drag outwards from any of the four corners of the bounding box to scale the image up so that it looks like this:
Step 20: Flare Curves
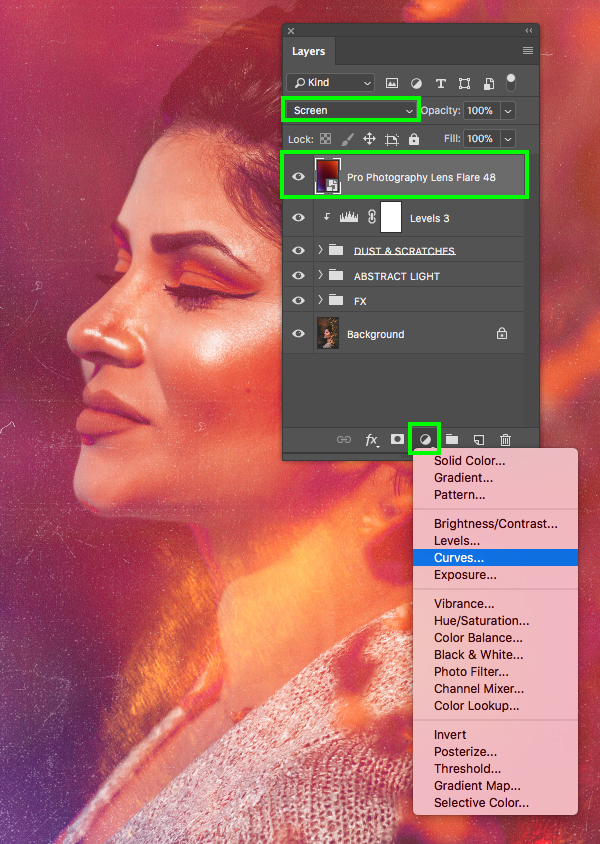
Press the ‘Return’ key to apply the transformation from the previous step if you haven’t done so already, and then change the Blend Mode of the layer to ‘Screen’. Select the flare Smart Object and then hold the Alt/Option key and click on the Adjustment Layer icon at the bottom of the Layers Palette before adding a ‘Curves…’ layer.
Check off the ‘Use Previous Layer to Create Clipping Mask’ option and then click ‘OK’ to continue.
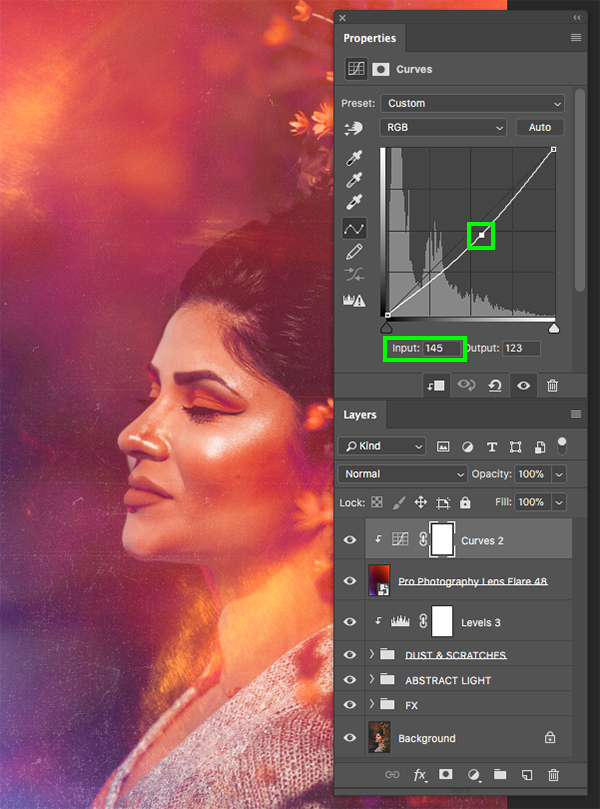
In the Properties panel, click to make a point in the center of the grid and drag it slightly over towards the right so the ‘Input’ is set to ‘145’ and the ‘Output’ is set to ’123’ as shown below:
Step 21: Flare Folder
Select the newly created Curves Adjustment Layer, and then hold the Shift key and click on the flare Smart Object below so that both layers are selected together.
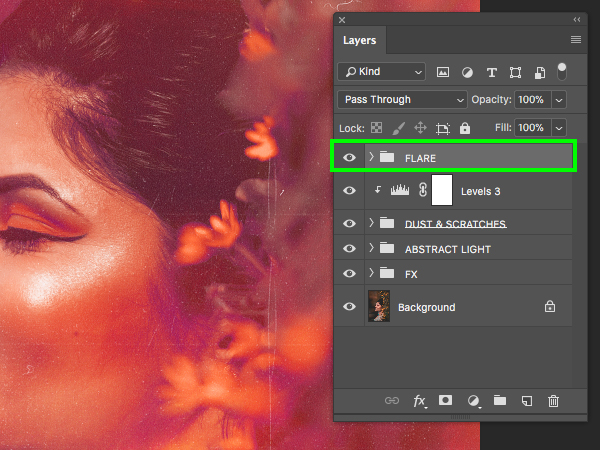
With both layers selected, press Command/Ctrl+G to place them into a new folder and rename it ‘FLARE’.
Step 22: Paper Texture
Head over to the File menu and choose ‘Place Embedded…’ from the menu to bring in our next image.
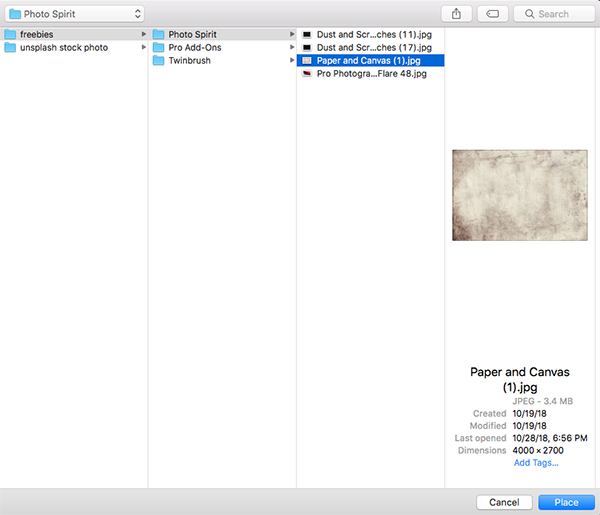
Navigate to the ‘Photo Spirit’ folder and then let’s choose the ‘Paper and Canvas (1).jpg’ image and select ‘Place’ from the bottom right to import the paper texture into the document.
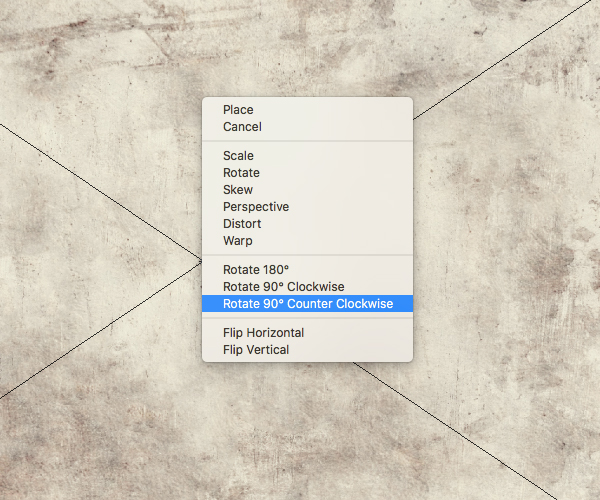
Once you’ve brought in the paper texture, hold the Control key and click on the texture before choosing ‘Rotate 90º Counter Clockwise’ from the list to rotate it.
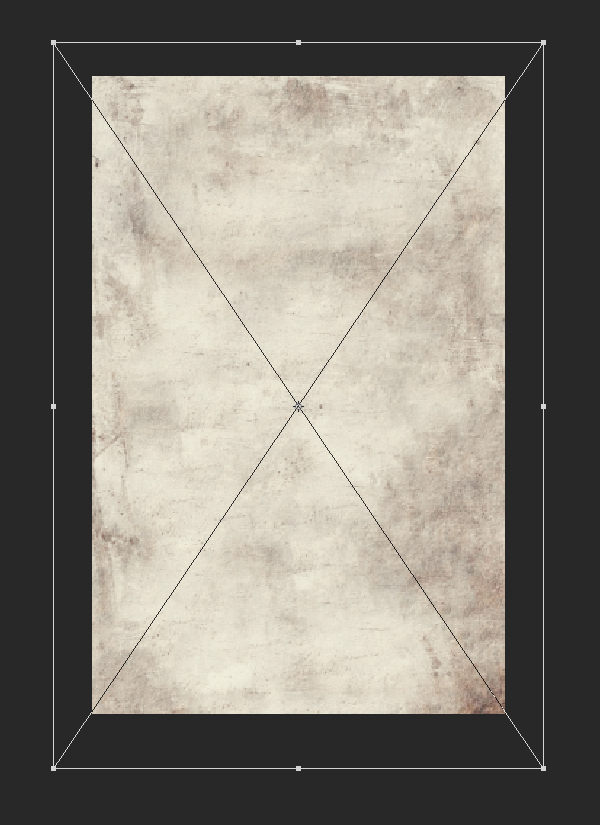
After rotating the image, hold the Alt/Option+Shift keys and drag outwards from any of the four corners of the bounding box to scale the image up from the center until it extends a bit outside of the canvas as shown below:
Step 23: Inverted Texture
With the paper Smart Object layer selected, go to the Image menu and choose ‘Adjustments > Invert’ to invert the Smart Object.
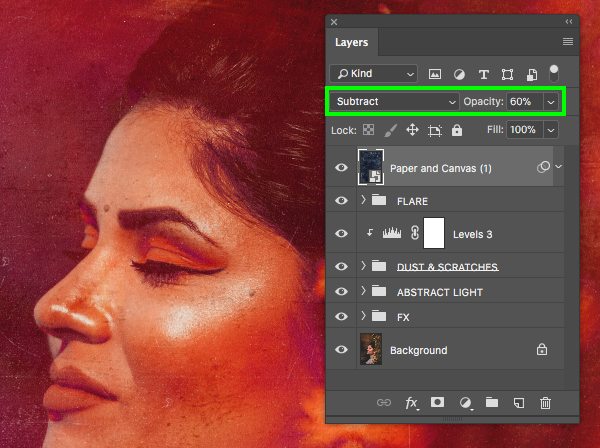
Change the Blend Mode from ‘Normal’ to ‘Subtract’ and then press ‘6’ on the keyboard to reduce the opacity to ’60%’ as shown below:
Let’s scale the texture up even more by selecting the Smart Object, pressing Command/Ctrl+T and then dragging outwards from the top right corner while holding the Shift key until it looks about the same size as the image shown here:
Step 24: Black & White Adjustment
Select the ‘Paper and Canvas (1)’ Smart Object layer and then click on the Adjustment Layer icon while holding the Alt/Option key. From the menu that appears, choose ‘Black & White…’ as shown below:
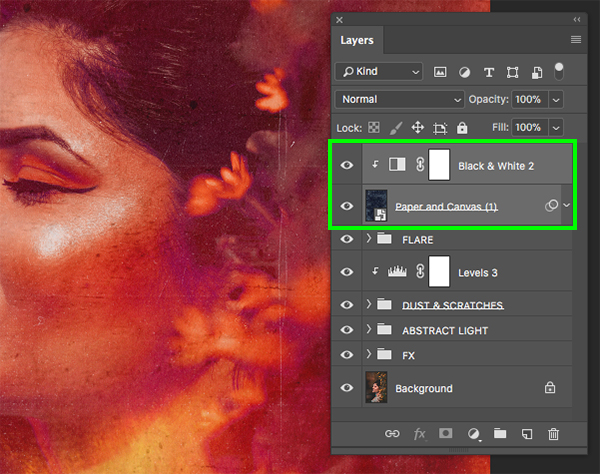
When prompted with the ‘New Layer’ dialog box we will once again check off the ‘Use Previous Layer to Create Clipping Mask’ option and then click ‘OK’ to continue. This will make it so that the texture itself is completely black and white, but it will only affect the texture and none of the layers below it.
Step 25: Paper Folder
Select the top ‘Black & White 2’ layer hold the Shift key, and then click on the paper texture layer below so that both layers are selected together.
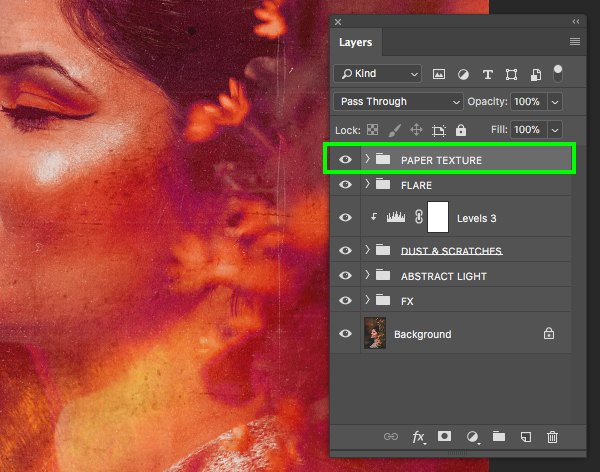
With both layers still selected, press Command/Ctrl+G to place them into a new folder and rename the folder ‘PAPER TEXTURE’ as shown here:
We have now finished creating our beautiful magical scene in Photoshop. To create our design we’ve used a small handful of textures, overlays, and a very useful Photoshop action from The Ultimate, Essential Photography Bundle. Be sure to check out the full bundle to gain access to this diverse and varied collection of Lightroom presets, retouching kits, stunning photo overlays, video tutorials and more.
Remember that whether it’s your outcome for this tutorial or something new you’ve made, we’d love to see your designs on our Facebook page.
Please leave a comment if you have any questions or suggestions. I always look forward to hearing from you!
There’s still time to check out The Ultimate, Essential Photography Bundle to help you make your work look better than ever all for an unheard of 99% discount!



















Wow! The creativity in this video was inspiring and opened up a new world of ideas for photos using Photoshop, Lightroom and The Ultimate, Essential Photograph Bundle. Thank you everyone at Designcuts for providing another wonderful video and a stellar bundle of design tools. Make it a great day! Cheers!
Thank you so much for your awesome support and kind words! We’re so thrilled that you loved our tutorial and hope that it gave you some great new tips :)
Happy designing!
this is great thanks for the tutorial
You’re so welcome and we hope that you had great fun working through this one :)
Love this tutorial!
Yay thank you so much for your lovely comment Andrea :)
It is very beautiful, thanks a lot :)))
Excuse-me but, as I very badly speak English, maybe I badly understood : in the e-mail I received, it was written : How to Create a Beautiful Magical Scene In Photoshop (PLUS FREE SAMPLE PACK)
But here I see “The Ultimate, Essential Photography Bundle for $29”.
Is it free finally or not?
Thank you very much in advance for your answer,
Hey Polly,
I’m so sorry for any confusion caused by our tutorial freebies and rest assured your English is fantastic. The freebies for this tutorial are just a small sample of some of the resources that you can find in The Ultimate, Essential Photography Bundle for just $29 so I’m so sorry if this was possibly the cause for any confusion!
I hope that you enjoy working with your sample freebies for this tutorial Polly and please do not hesitate to pop us an email at hello@designcuts.com if yo have any other questions.
This is beautiful! Thank you!!
You’re so welcome Su and we hope that you really enjoyed working through this one :)
Thanks so much Su! Glad you enjoyed this one!
Woohoo thanks for another awesome tutorial Eric :)