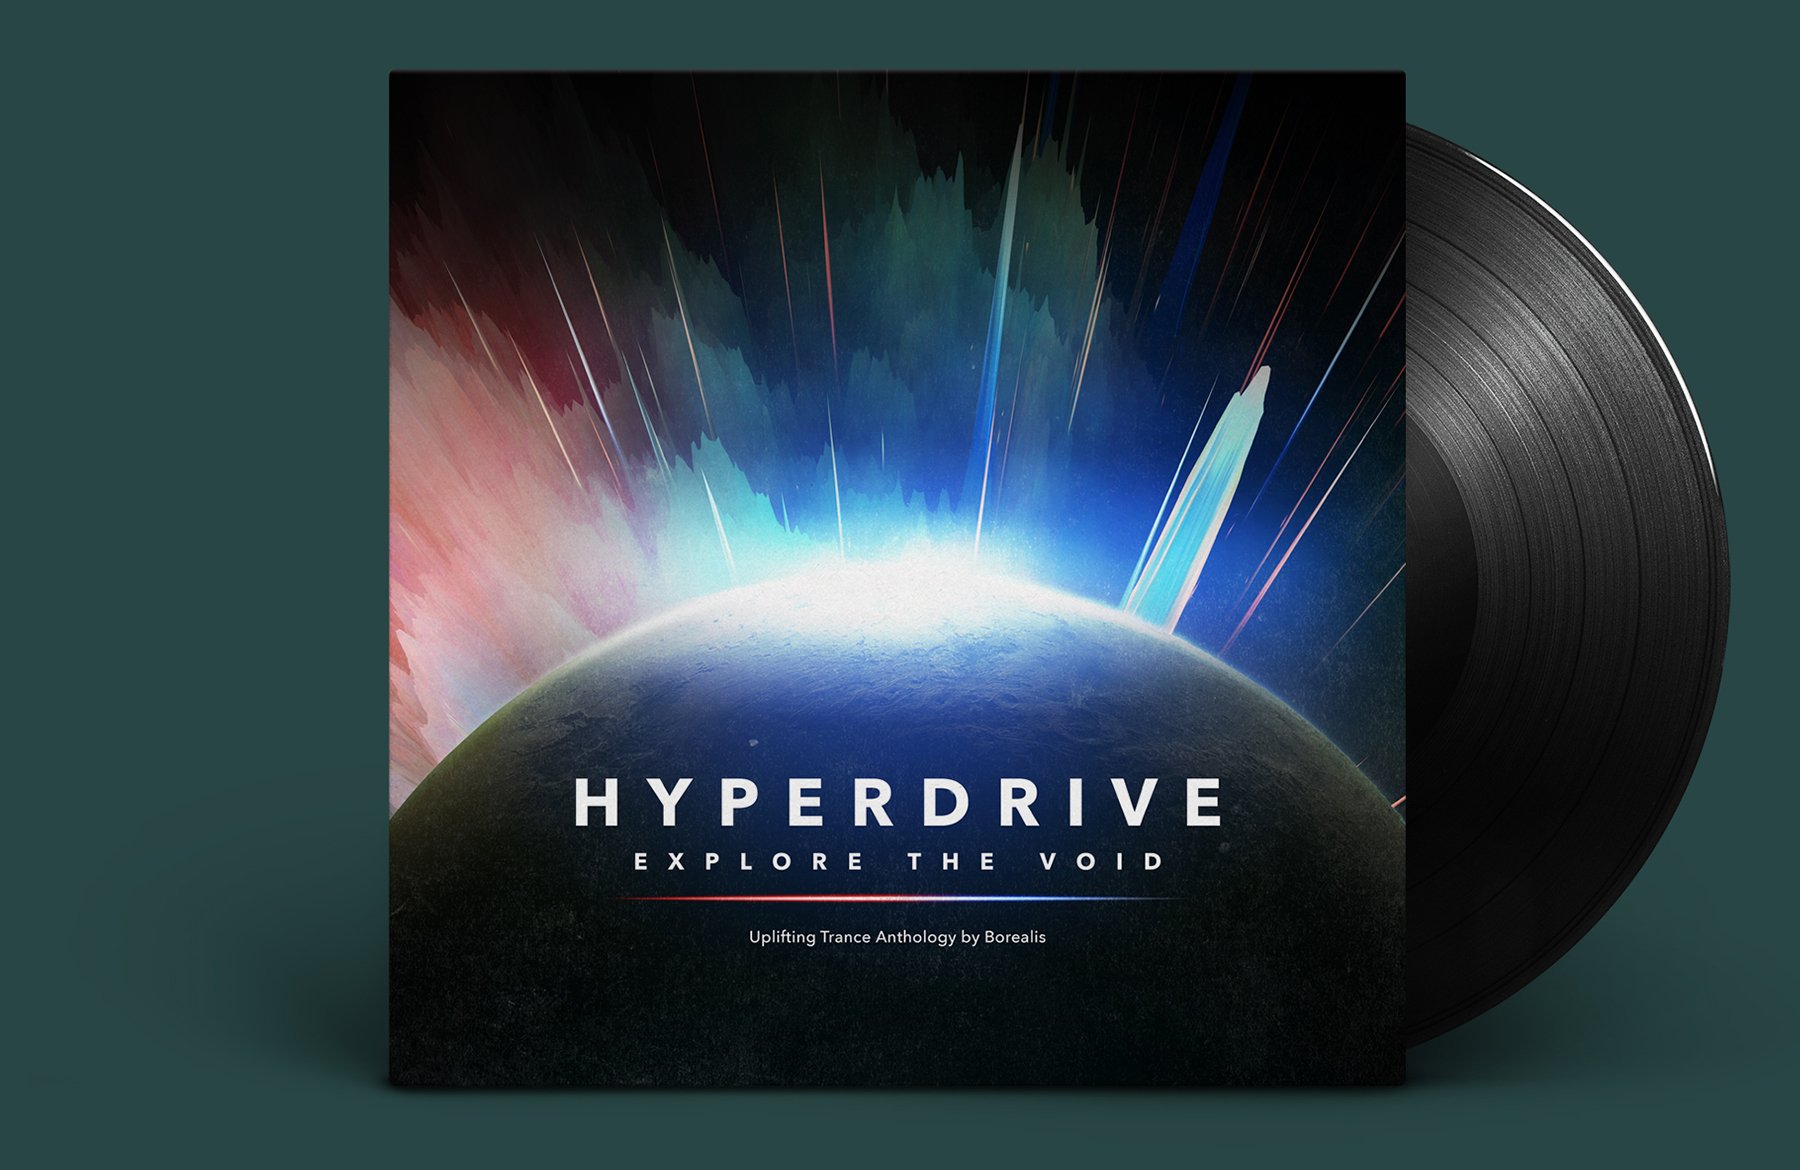
In this design tutorial I will be taking you through my process for creating a futuristic, space age album cover in Photoshop. We will create our cover design using elements from ArtistMef, Honnum Graphic Art, and RuleByArt along with a free vinyl cover mockup to complete the scene. If you’re ready to get started on this fantastic voyage then fire up Photoshop and let’s get started!
HAVE YOU SEEN OUR YOUTUBE CHANNEL?
Watch the video tutorial below and subscribe to our YouTube channel for regular updates direct to your inbox.
Here’s a look at what we’ll be creating:
Follow along with this tutorial: Download the freebie files
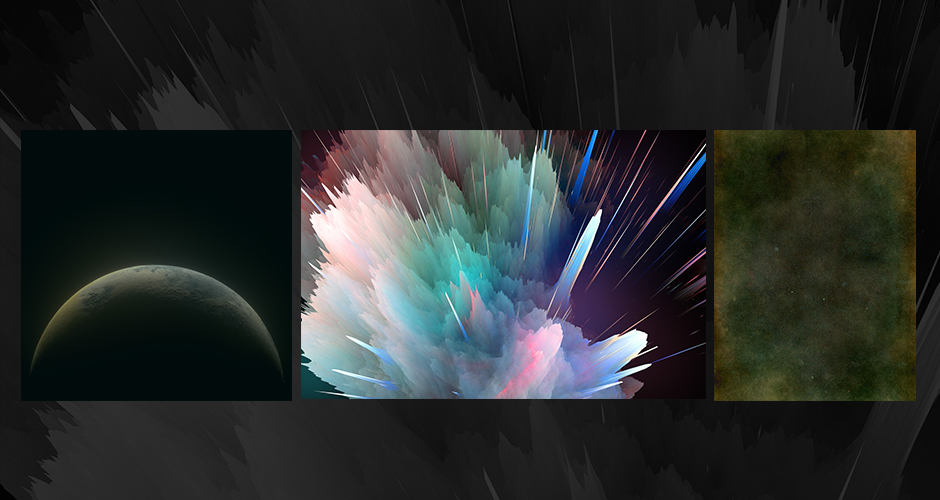
This freebie pack includes hand-picked samples of planet imagery, deep space explosions, and ancient textures.
The freebie pack is just a small sample of what you will find in the The Diverse Textures and Patterns Collection for just $29 (that’s 99% off). This bundle will provide you with stunning quality textures and patterns, guaranteed to enhance your design projects.
Step 1: Hyperdrive Album Cover Design
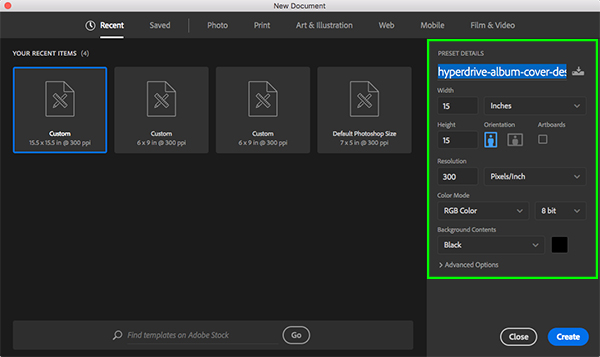
Let’s begin by opening Photoshop and creating a New Document. Make the document ’15”x15” with a ‘Resolution’ of ‘300’, ‘Color Mode’ of ‘RGB’, and the ‘Background Contents’ set to ‘Black’ and then click ‘Create’ from the lower right corner.
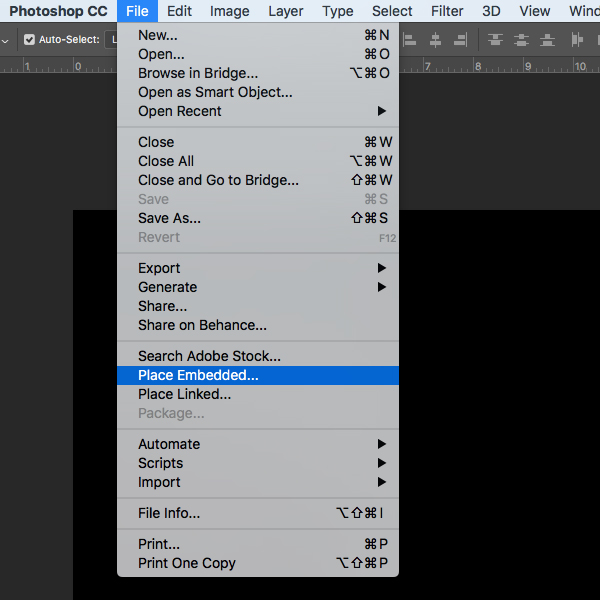
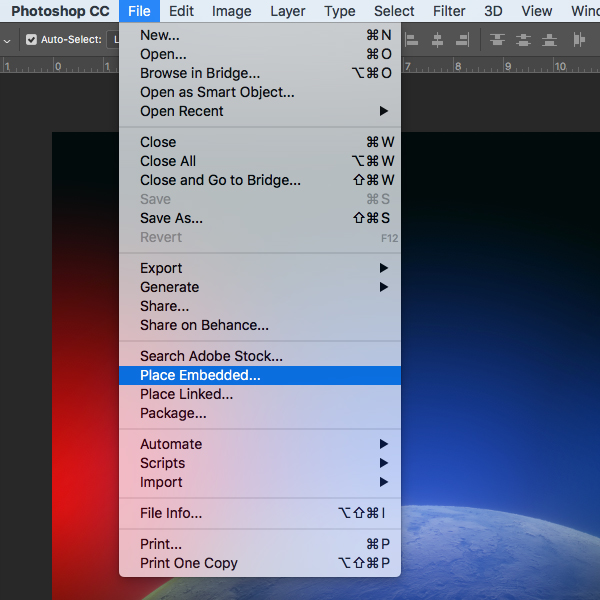
Once you’ve made your new document go to the ‘File’ menu and choose ‘Place Embedded…’
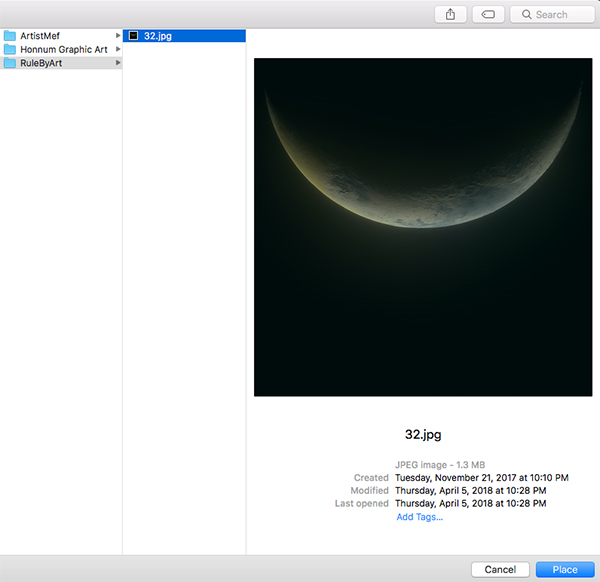
Go to the freebies folder for the tutorial and navigate to the ’32.jpg’ file from RuleByArt and then choose ‘Place’.
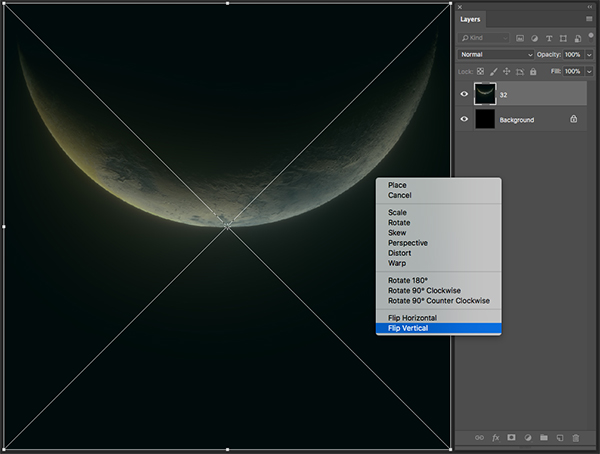
After importing the file you will see the bounding box around the image. Before pressing ‘Return’ to apply the changes, hold the Control key and click anywhere on the image to reveal a dropdown menu. From here, select ‘Flip Vertical’ as shown below:
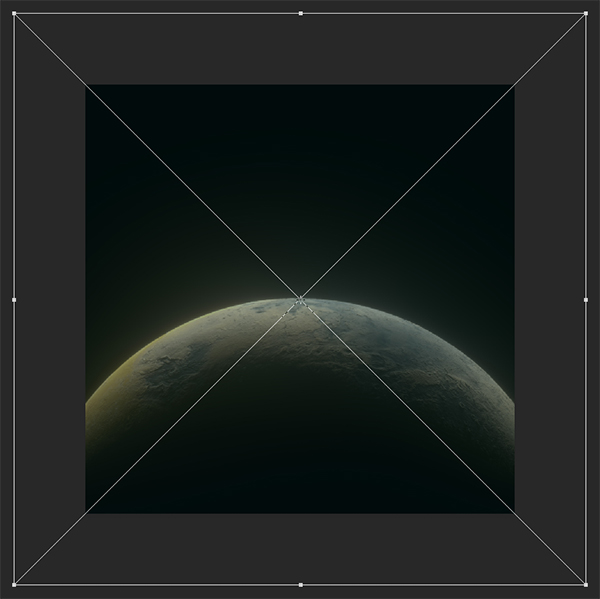
After flipping the image vertically, hold the Alt/Option+Shift keys and drag outwards from any of the four corners of the bounding box to scale the image up a bit more. Use the image below as reference for the size and placement, and then press ‘Return’ on the keyboard to apply the transformation.
Step 2: Color Gradients
Press ‘G’ on the keyboard to switch to the Gradient Tool and then take a look at the top toolbar to see the preferences for your tool. We want to choose a ‘Radial Gradient’ that fades from solid to transparent as indicated by the highlight boxes in the image below:
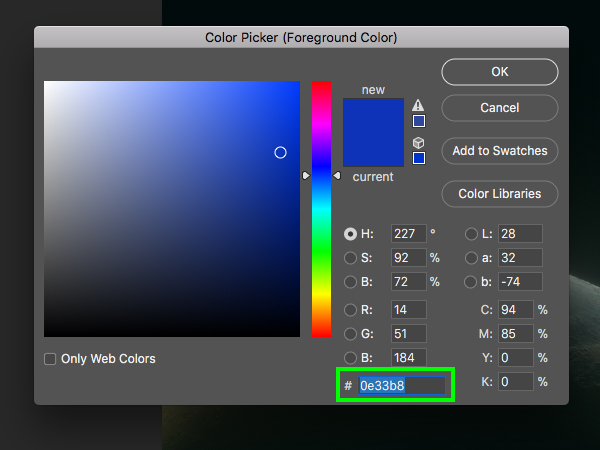
As for the fill color, let’s use a vibrant blue such ‘#0E33B8’ as shown here:
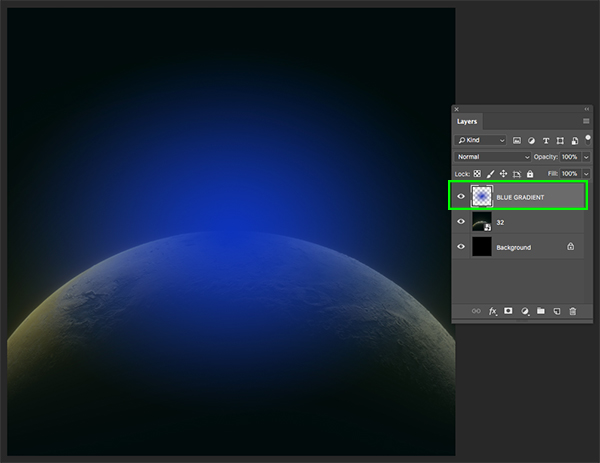
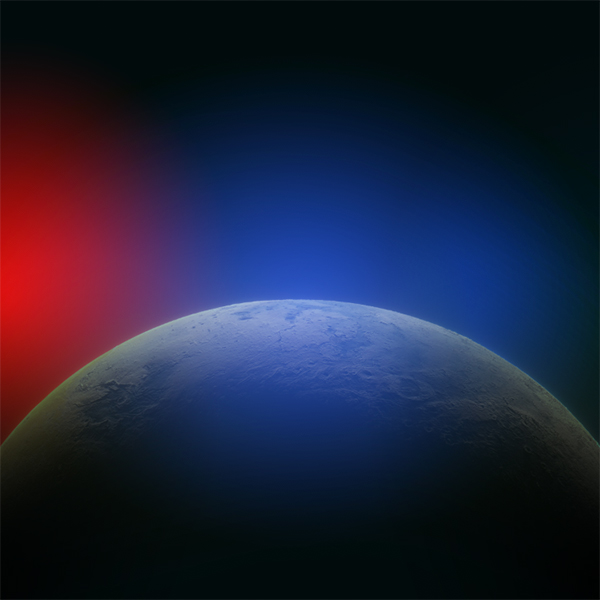
Next, create a new layer by pressing Command/Ctrl+Alt/Option+Shift+N on the keyboard (or by clicking on the ‘Create a new layer’ icon at the bottom of the Layers Palette) and then click and drag outwards from the top/center point of the planet to create your gradient. You should now have something like this:
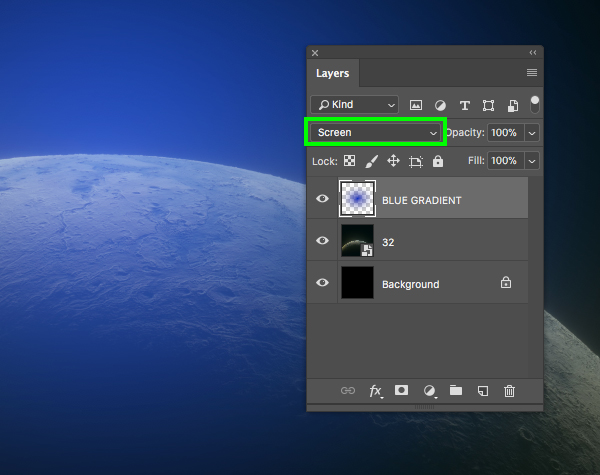
Double click on the ‘Layer 1’ text and rename the layer ‘BLUE GRADIENT’ and then change the Blend Mode from ‘Normal’ to ‘Screen’.
Step 3: Side Color Gradients
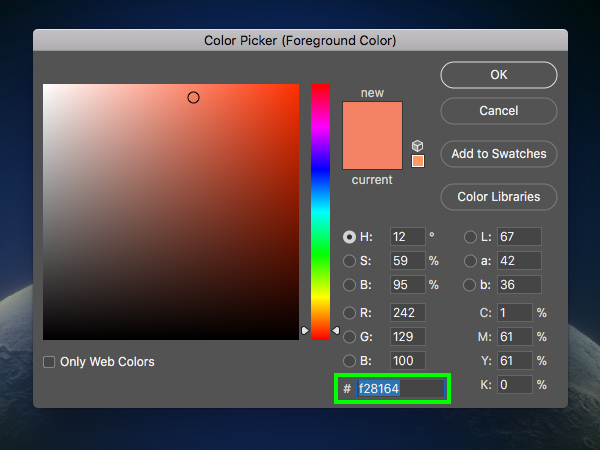
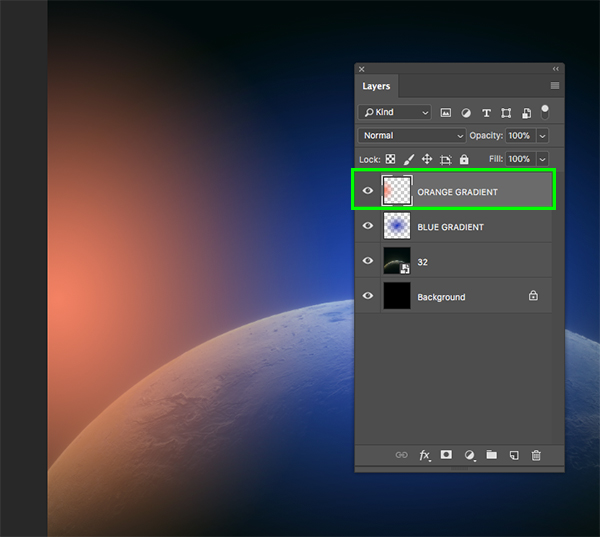
Create another new layer above the ‘BLUE GRADIENT’ layer and press ‘G’ to once again select the Gradient Tool. This time, change the fill color from blue to the hex value ‘#F28164’ as shown below:
Click and drag outwards from the center of your image to create a second gradient and move this one towards the left side of the composition as shown here:
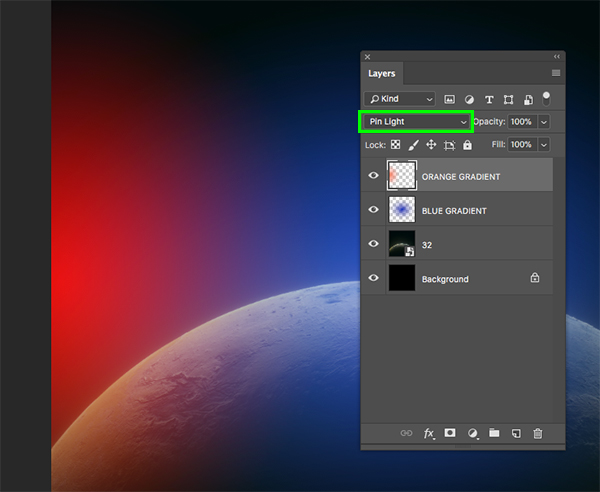
After placing the gradient to the left, change the Blend Mode of this layer from ‘Normal’ to ‘Pin Light’ as shown below:
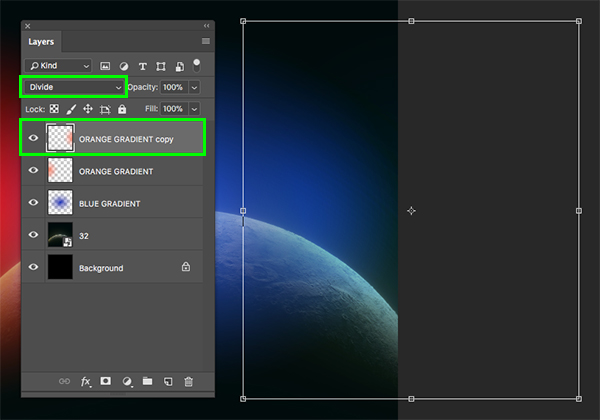
Press Command/Ctrl+J to duplicate this gradient and move it to the opposite side of the composition. After that, change the Blend Mode from ‘Pin Light’ to ‘Divide’ as shown here:
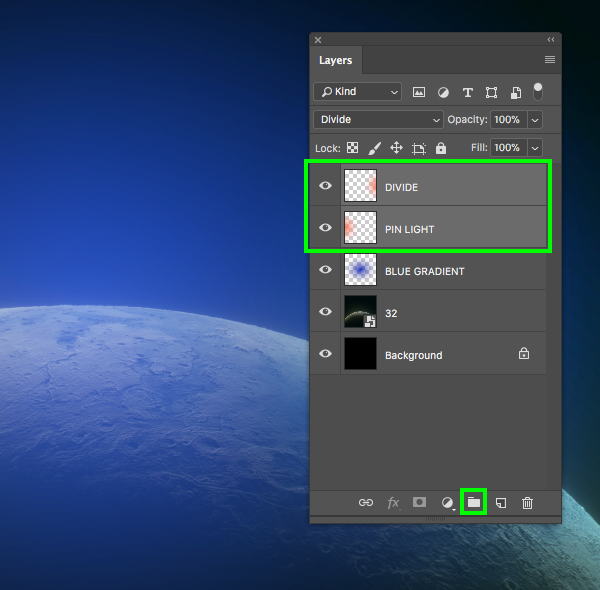
We will now double click the name of each of the layers in the Layers Palette and rename them ‘PIN LIGHT’ and ‘DIVIDE’ to reflect the Blend Mode of each. After you’ve renamed these two layers, select the top one, hold the Shift key, and then select the one below. Once both of the gradient layers are selected, click on the small folder icon at the bottom of the Layers Palette or use the keyboard shortcut Command/Ctrl+G to place them into a new folder.
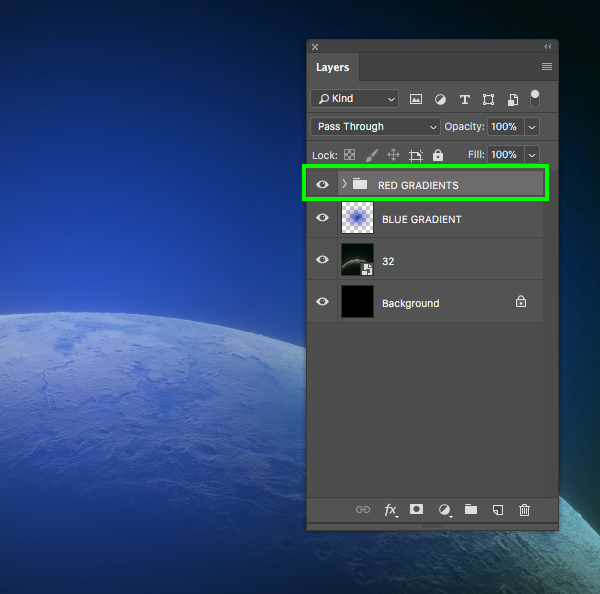
Double click on the ‘Group 1’ text and rename the folder ‘RED GRADIENTS’ as shown below:
Step 4: Planet Mask
Press ‘W’ on the keyboard to select your Magic Wand Tool and then change the ‘Tolerance’ setting in the top toolbar to ’32’ as shown in the image below:
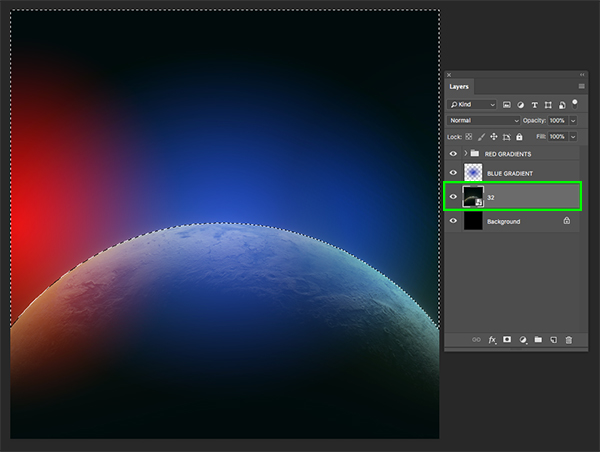
Select the ’32’ Smart Object layer containing your main planet image and then use the Magic Wand Tool to click anywhere outside of the planet. You should now have a nice clean selection of the background going around the planet. If there are any areas that you weren’t able to grab by clicking the first time, hold the Shift key and click on that area to add it to your current selection.
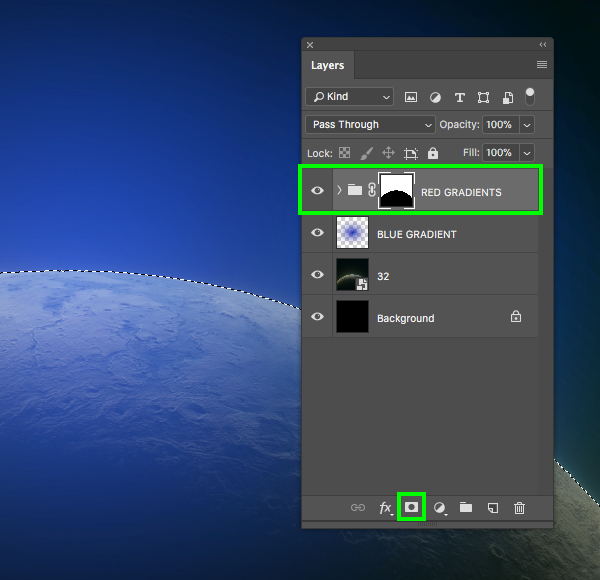
With your selection still active, select the ‘RED GRADIENTS’ folder and then click on the ‘Add layer mask’ icon from the bottom of the Layers Palette to apply a mask. Your gradients should now only be appearing outside of the planet itself.
Step 5: Corner Fade
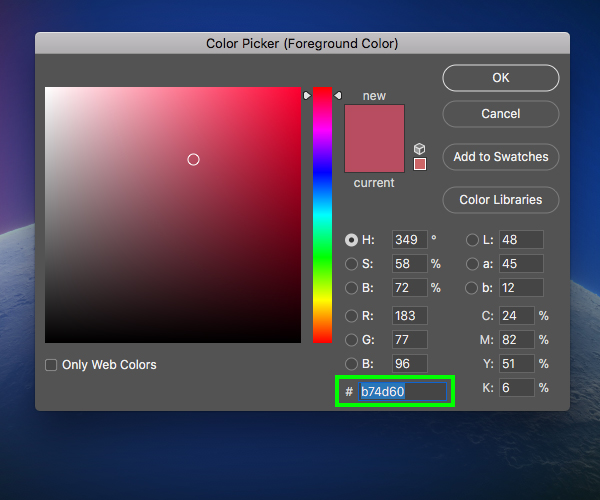
Add a new layer and then grab your Gradient Tool (G) once again. Change the fill color to the hex value ‘#B74D60’ as shown here:
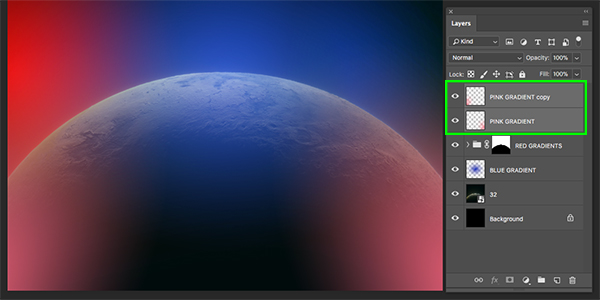
Click and drag outwards to create the gradient on your new layer and then move it to the lower left corner. Press Command/Ctrl+J to duplicate the gradient layer and move this copy to the opposite side. After that, select the top layer, hold the Shift key, and then select the copy below so you have both of these gradients selected simultaneously.
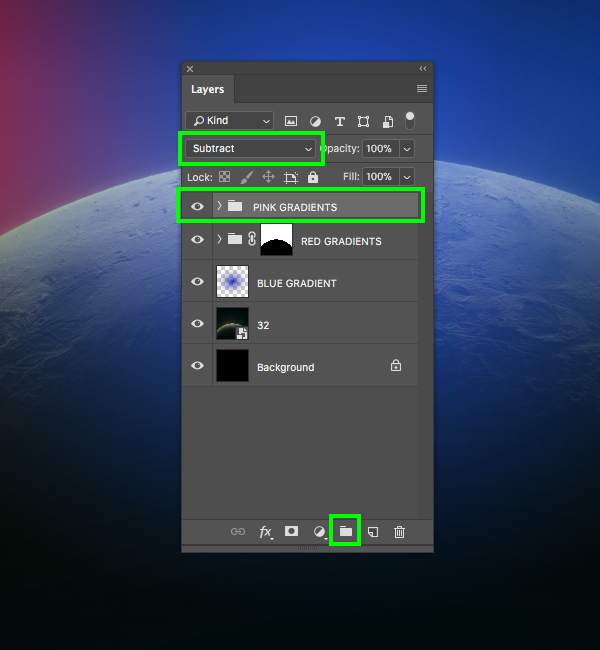
With your layers still selected, press Command/Ctrl+G to put them into a new folder and then double click on the ‘Group 1’ text to rename the folder ‘PINK GRADIENTS’. Once you’ve done that, change the Blend Mode of the folder from ‘Normal’ to ‘Subtract’ which will change the color from pink to a deep blue color.
Step 6: Keeping Things Organized
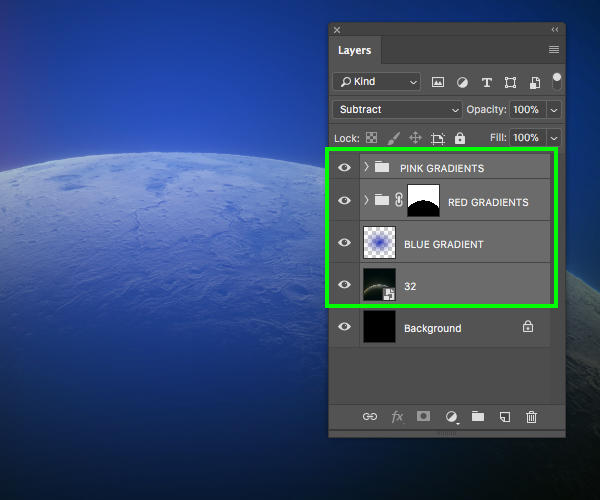
Select the top folder in your Layers Palette (this should be the ‘PINK GRADIENTS’ folder), hold the Shift key, and then click on the ’32’ Smart Object layer so they are all selected together.
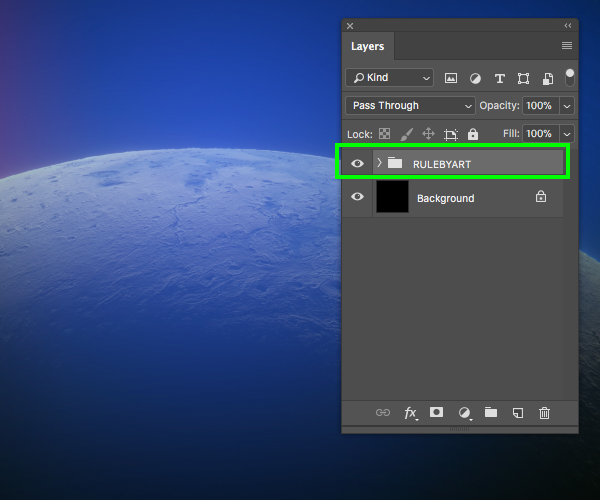
Press Command/Ctrl+G to put all of these layers into a new folder and then double click on the ‘Group 1’ text and rename the folder ‘RULEBYART’ as shown here:
Here is how your image should be looking so far:
Step 7: Space Explosion
Return to the File menu and choose ‘Place Embedded…’ once again.
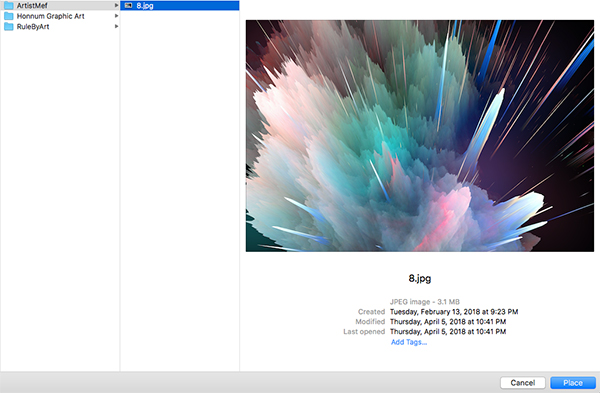
Navigate to the ‘ArtistMef’ folder in the freebies and choose the ‘8.jpg’ file before clicking ‘Place’ from the lower right.
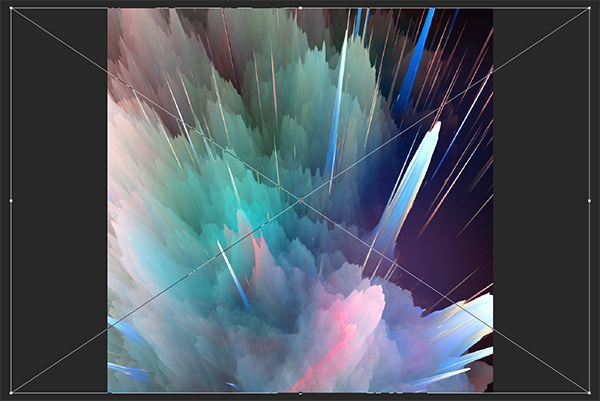
Once you’ve imported the space explosion image, hold the Alt/Option+Shift keys and drag outwards from any of the four corners of the bounding box to scale the image up until the height of the image matches the height of your document. After that, press ‘Return’ on the keyboard to apply the transformation.
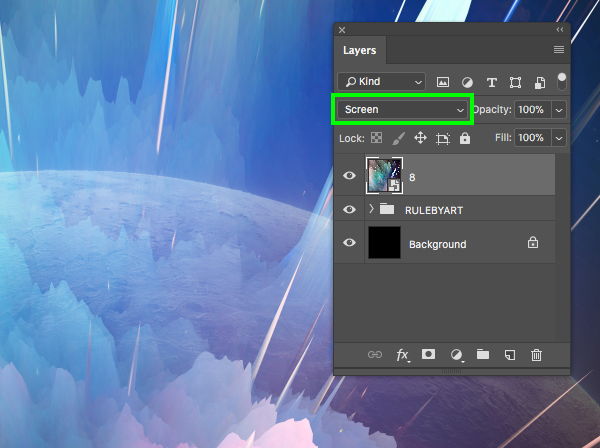
Now that we have placed our image, let’s change the Blend Mode from ‘Normal’ to ‘Screen’ as shown below:
Step 8: Adjustment Layers
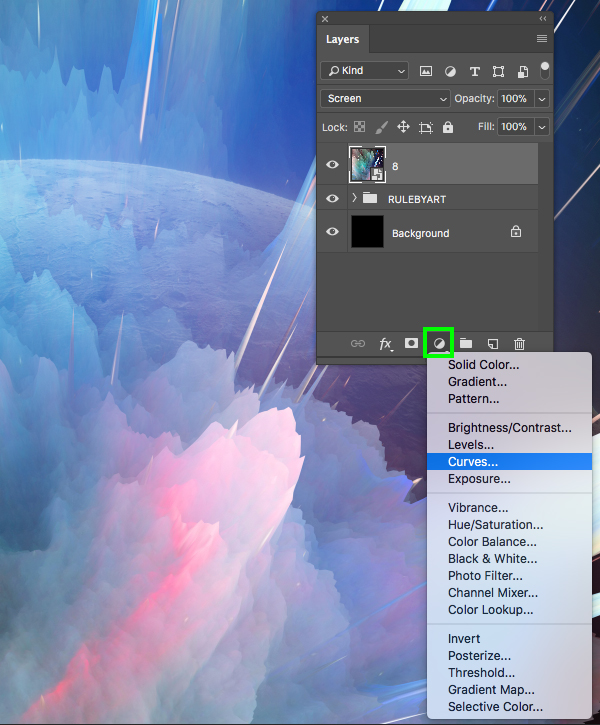
Select your ‘8.jpg’ Smart Object layer and then hold the Alt/Option key and click on the ‘Create new fill or adjustment layer’ option from the bottom of the palette. Once the dropdown menu appears we want to choose ‘Curves…’ from the list.
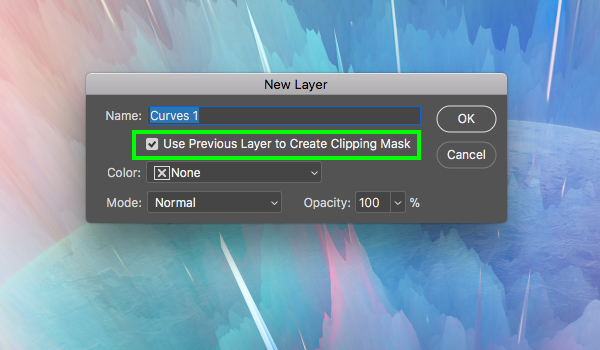
When the following menu pops up, be sure to check off the box that says ‘Use Previous Layer to Create Clipping Mask’ and then click ‘OK’ to proceed.
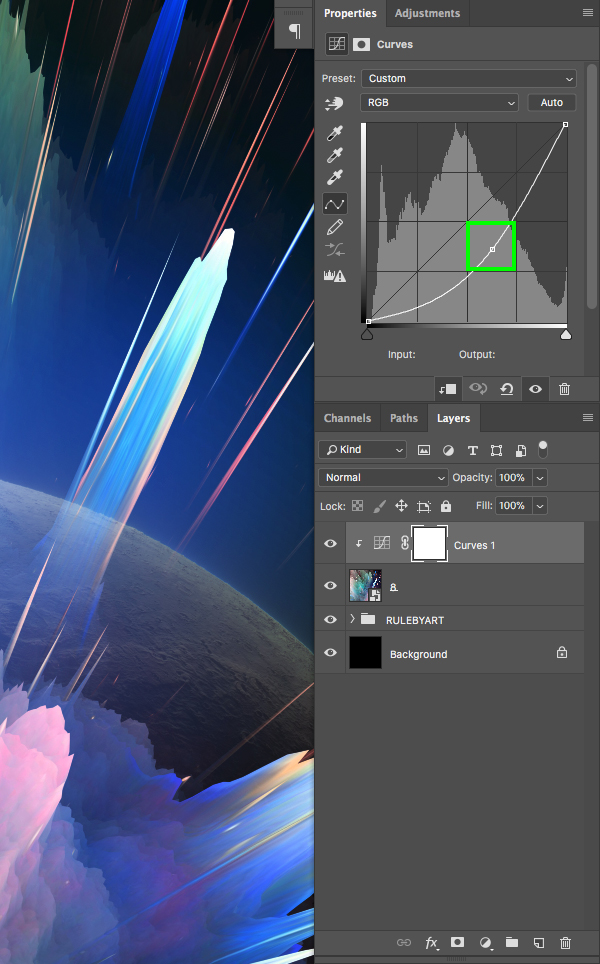
You should now have your Curves Adjustment Layer with a Clipping Mask applied to your space explosion image. For the properties let’s add a single point in the center of the grid and move it down and to the right as shown in the image below:
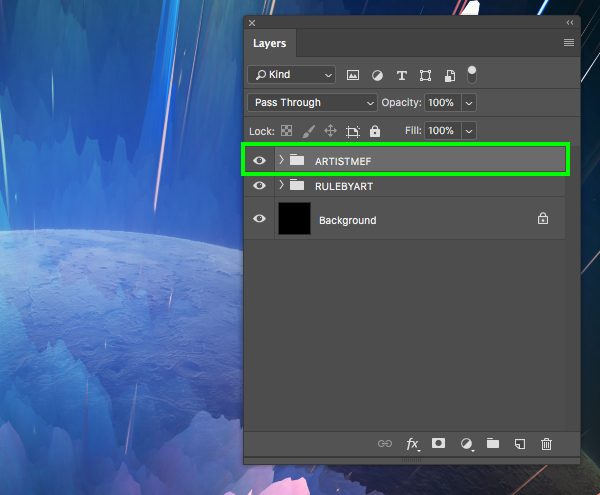
After setting up the Curves Adjustment Layer, select the Adjustment Layer and then hold the Shift Key and select the ‘8.jpg’ Smart Object below. From here, press Command/Ctrl+G to place the layers into a new folder and double click on the ‘Group 1’ text to rename the folder ‘ARTISTMEF’.
Step 9: Explosion Mask
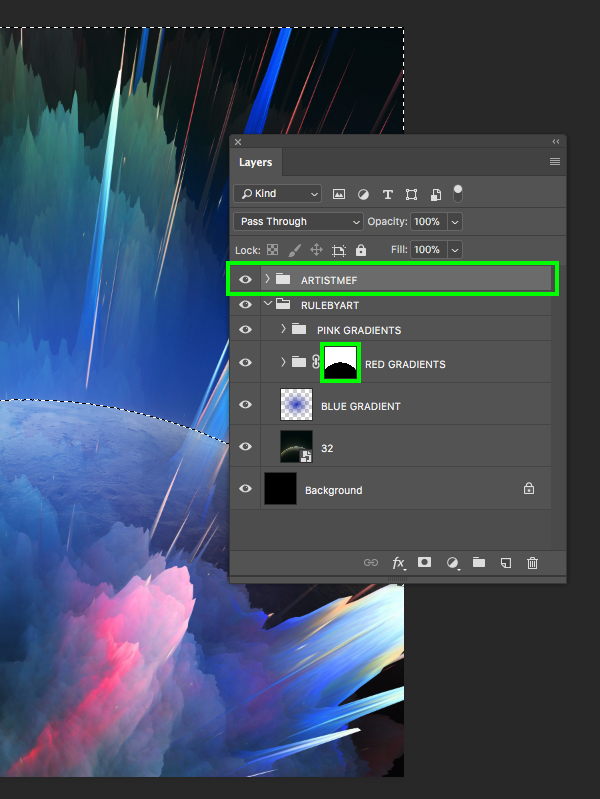
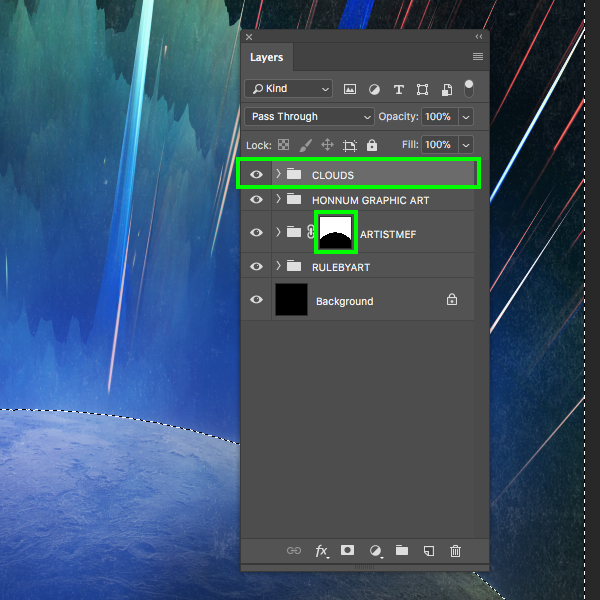
Select the top folder, which, in this case should be the ‘ARTISTMEF’ folder. From here, expand the ‘RULEBYART’ folder below and then hold the Command/Ctrl key and click on the layer mask thumbnail icon to activate the same selection we used for our mask earlier on.
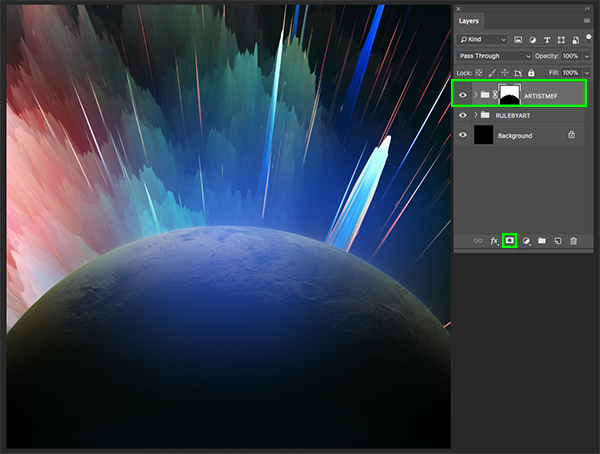
While your selection is active and you still have the ‘ARTISTMEF’ folder selected, click on the ‘Add layer mask’ icon from the bottom of the Layers Palette to apply a new mask to this folder.
Step 10: Grunge Texture
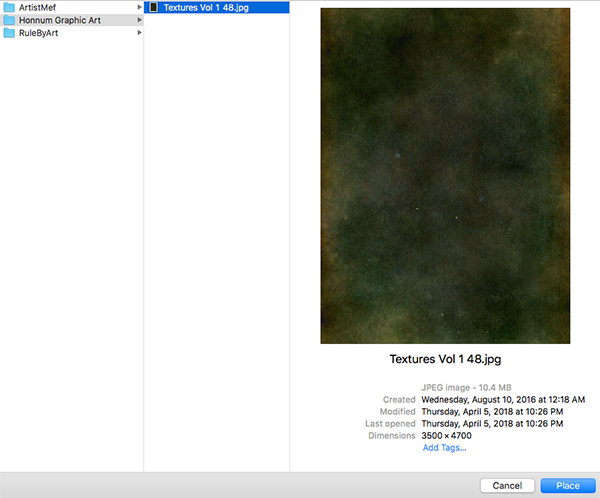
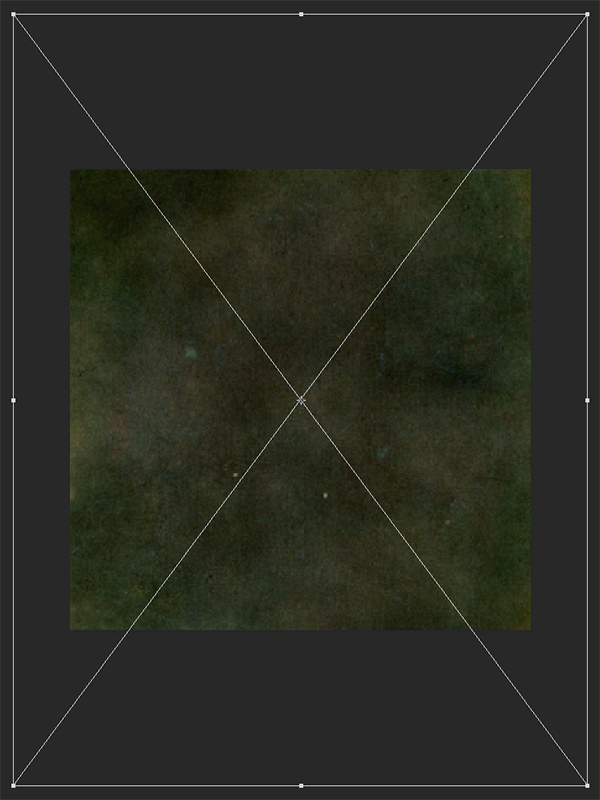
Return to the File menu and choose ‘Place Embedded…’ once again. This time we will navigate to the ‘Textures Vol 1 48.jpg’ image from Honnum Graphic Art and then choose ‘Place’ from the bottom right corner.
After placing the Smart Object in your document, hold the Alt/Option+Shift keys and drag outwards to scale the texture up and then press ‘Return’ on the keyboard to apply the transformation.
Step 11: Grunge Texture Adjustment Layers
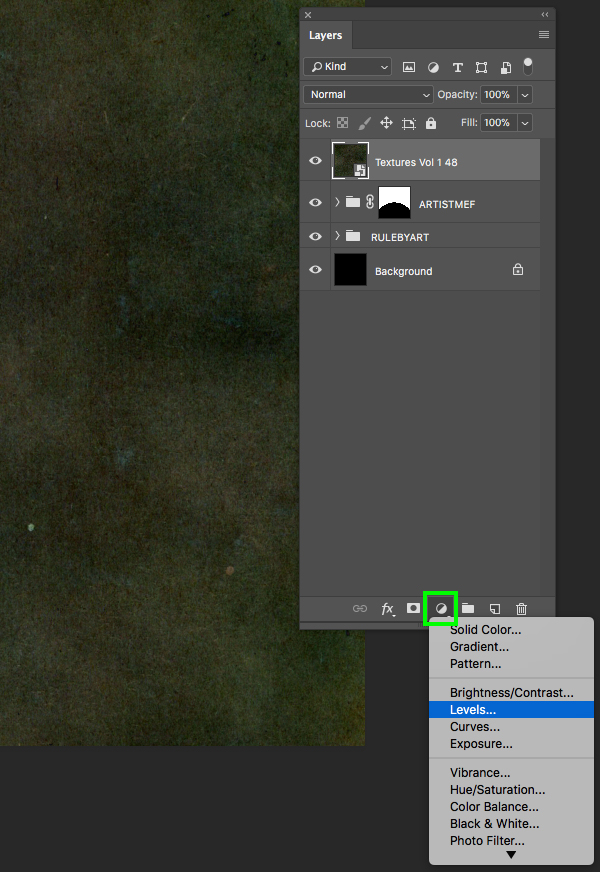
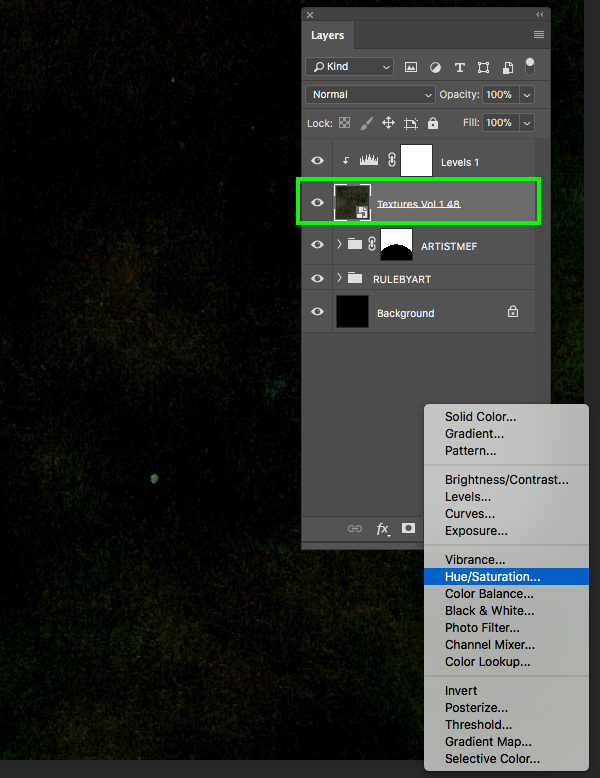
Select the ‘Textures Vol 1 48.jpg’ Smart Object and then hold the Alt/Option key and click on the ‘Create a new fill or adjustment layer’ icon once again. This time, choose ‘Levels…’ from the menu that appears.
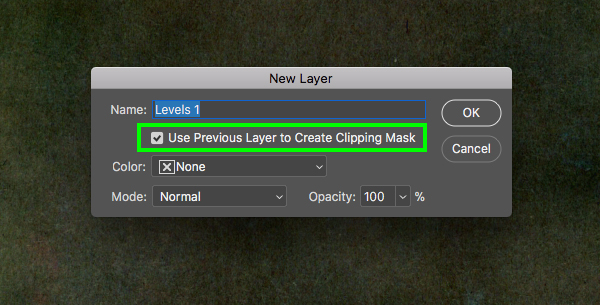
We will once again check off the box that says ‘Use Previous Layer to Create Clipping Mask’ and then click ‘OK’.
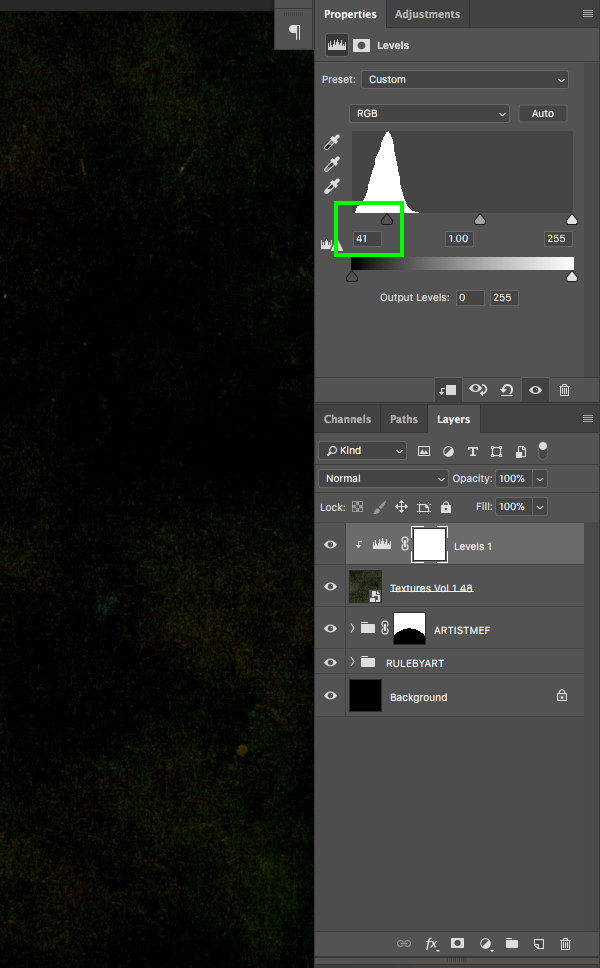
For the properties, simply move the dark gray slider on the left inwards until it’s set to about ’41’ as shown in the image below:
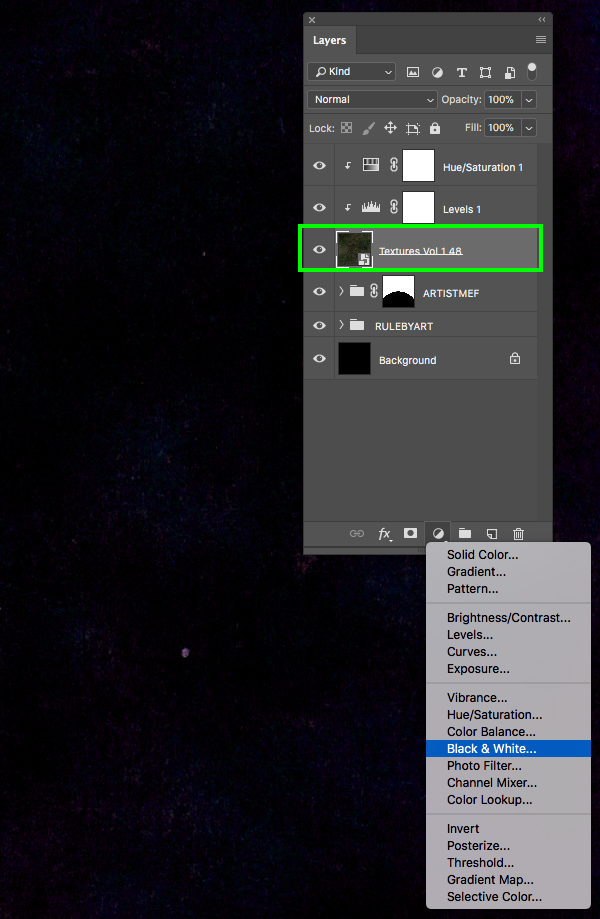
Next, make sure you have the Smart Object layer selected and then click on the Adjustment Layer icon at the bottom of the Layers Palette once again. This time around we are going to select the ‘Hue/Saturation…’ option from the list.
Move the ‘Hue’ slider all the way to the right so that it’s set to ‘+180’ and then press Command/Ctrl and the right bracket key on the keyboard to move the Adjustment Layer up one spot in the Layers Palette so that it is above the Levels Adjustment Layer as shown below:
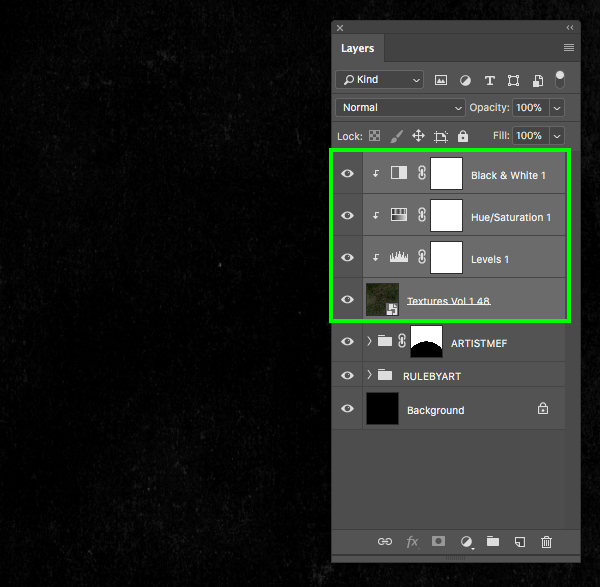
Select the texture Smart Object layer once again, and then return to the Adjustment Layer icon and choose ‘Black & White…’ from the menu.
After applying the Black & White Adjustment Layer, press Command/Ctrl and the right bracket two times to move the layer above the previous two Adjustment Layers. Next, select the top, Black & White Adjustment Layer, hold the Shift key, and then choose the main texture Smart Object layer.
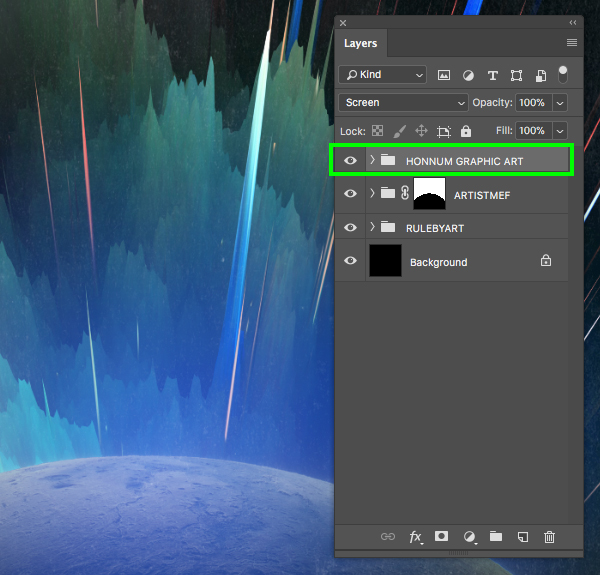
Press Command/Ctrl+G to place all of these layers into a new folder and double click the ‘Group 1’ text to rename the folder ‘HONNUM GRAPHIC ART’ as shown below:
Step 12: Clouds
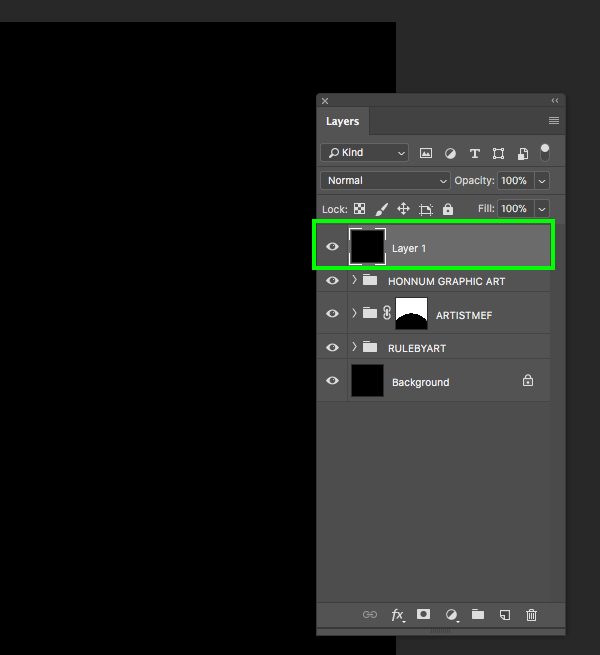
Create a new layer at the top of your Layers Palette and then press ‘D’ on the keyboard to get your default colors. Check to make sure that black is your foreground color, and if it is not then press ‘X’ to toggle between the black and white default colors until it is in the foreground.
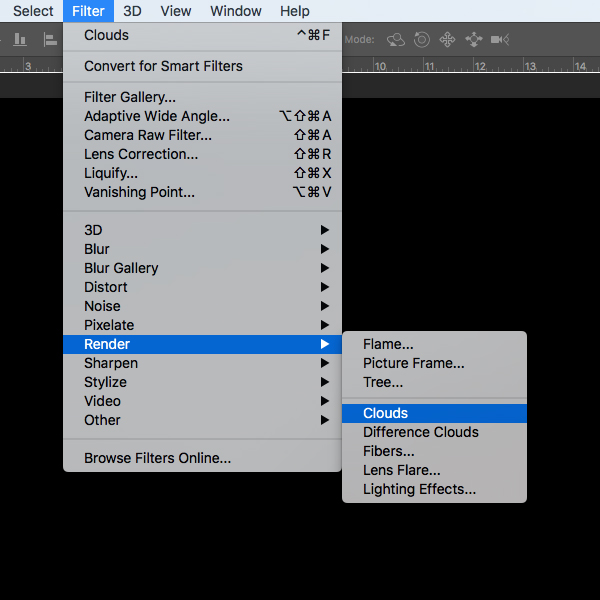
Go to the Filter menu and choose ‘Render > Clouds’ from the menu.
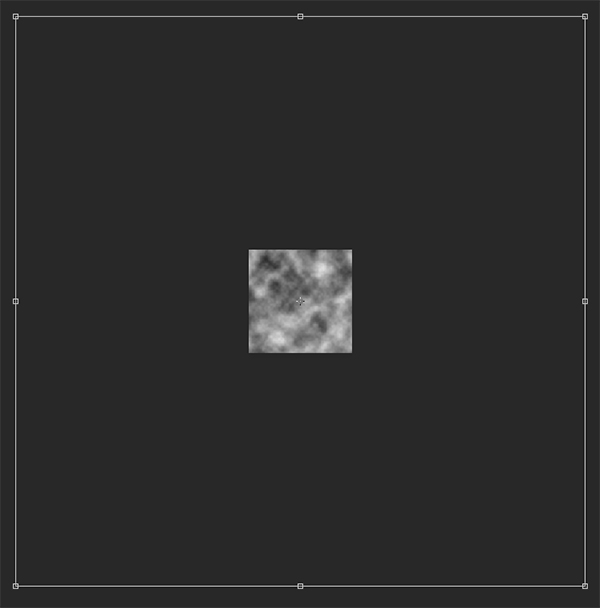
After rendering your clouds, double click the ‘Layer 1’ text and rename the layer ‘CLOUDS’. Once you have done that, press Command/Ctrl+T and then press Alt/Option+Shift and drag outwards from any of the four corners of the bounding box to scale the clouds up very large. Once you have done that, press ‘Return’ on the keyboard to apply the transformation.
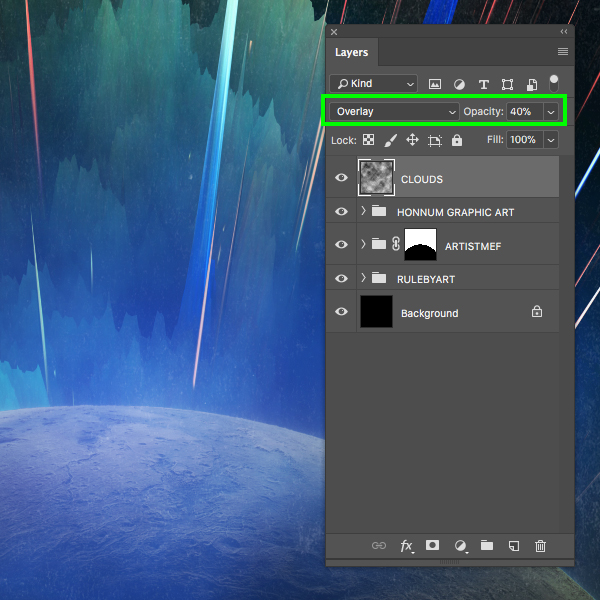
After scaling up the clouds, change the Blend Mode from ‘Normal’ to ‘Overlay’ and then reduce the Opacity to ’40%’ as shown below:
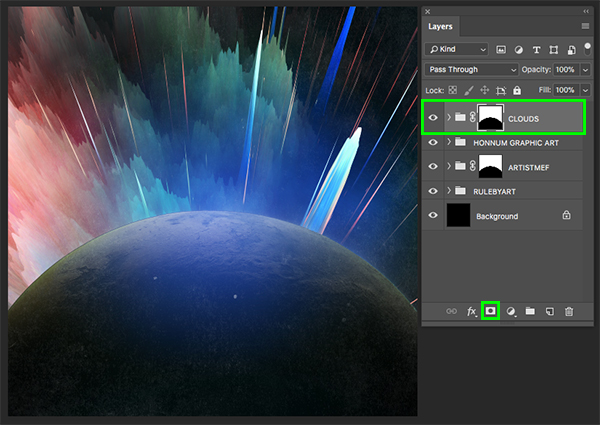
With your ‘CLOUDS’ layer still selected, press Command/Ctrl+G to put them into a new folder with the same name. Then, hold the Command/Ctrl key and click on the ‘ARTISTMEF’ layer mask thumbnail to activate a selection from the mask.
With the mask selection active and your ‘CLOUDS’ layer selected, click on the ‘Add layer mask’ icon from the bottom of the Layers Palette so that your clouds are only visible outside of the planet.
Step 13: Creating a Ring
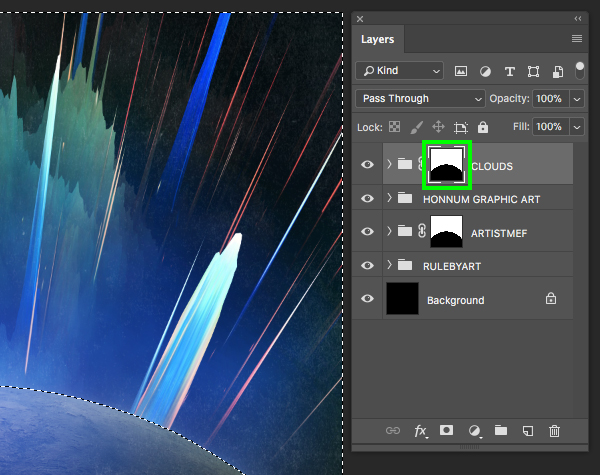
Next, hold the Command/Ctrl key and click on the layer mask thumbnail icon of the ‘CLOUDS’ folder to activate another selection.
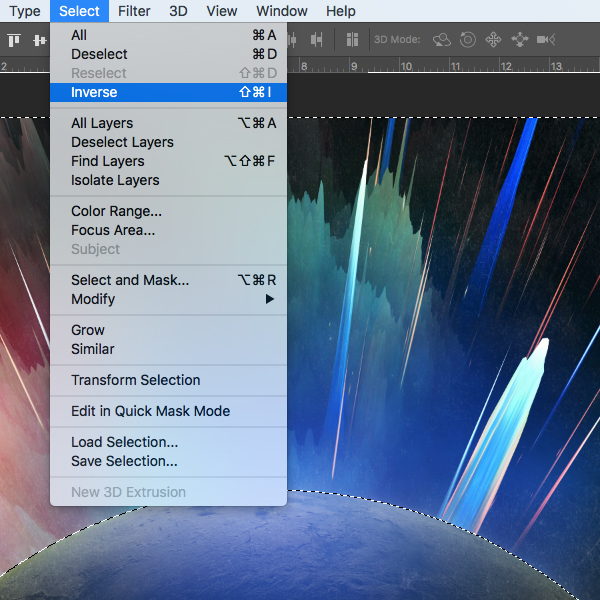
Go to the Select menu and then choose ‘Inverse’ to invert the selection.
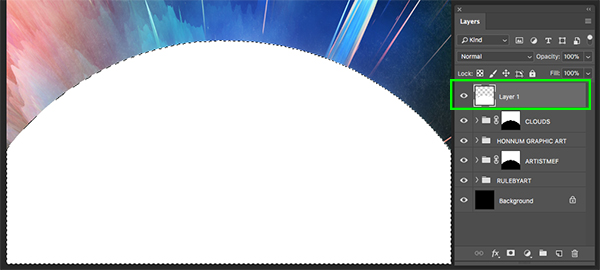
With your inverted selection still active, add a new layer to the top of your Layers Palette, press the ‘X’ key to toggle your default colors so that white is now in the foreground, and then press Alt/Option+Delete on the keyboard to fill the selection with solid white as shown here:
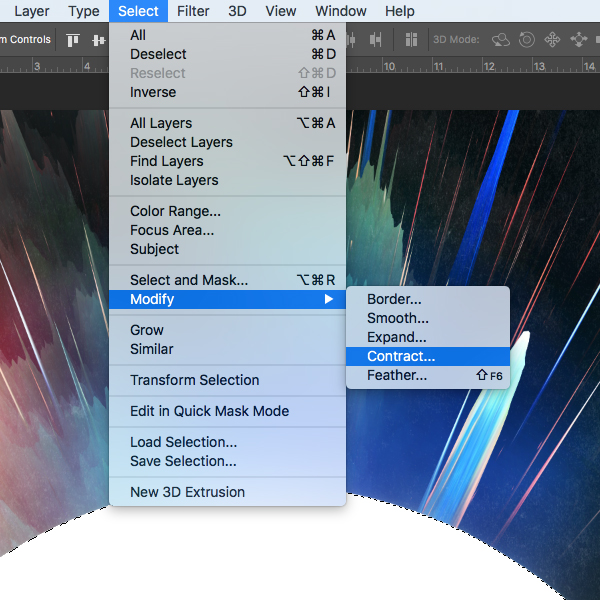
From here, return to the Select menu and choose ‘Modify > Contract…’ from the list.
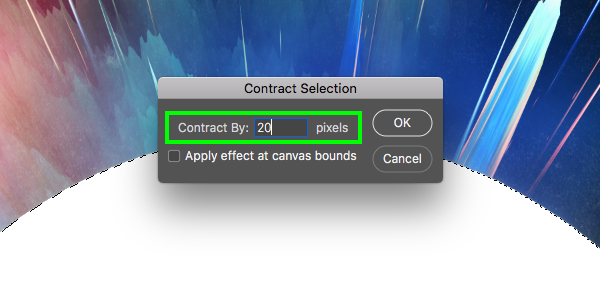
Contract your selection by about ’20’ pixels and then press ‘OK’.
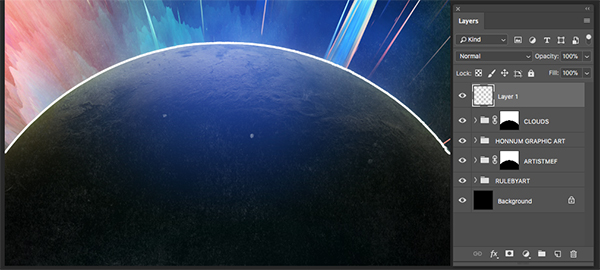
After contracting your selection, press ‘Delete’ on the keyboard. Once you’ve done that, press Command/Ctrl+D to ‘Deselect All’ and you should be left with this:
Step 14: Creating a Ring Glow
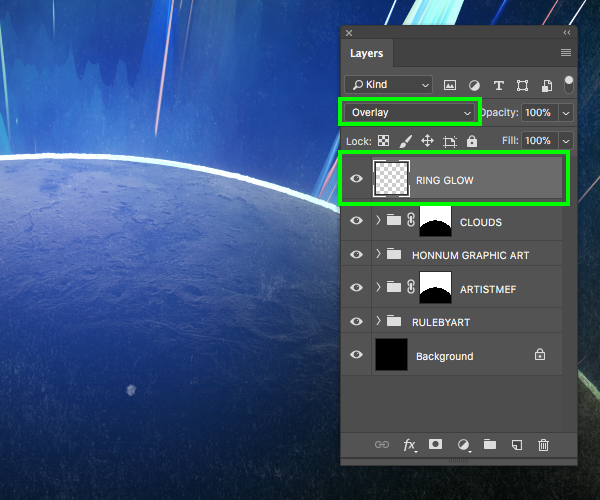
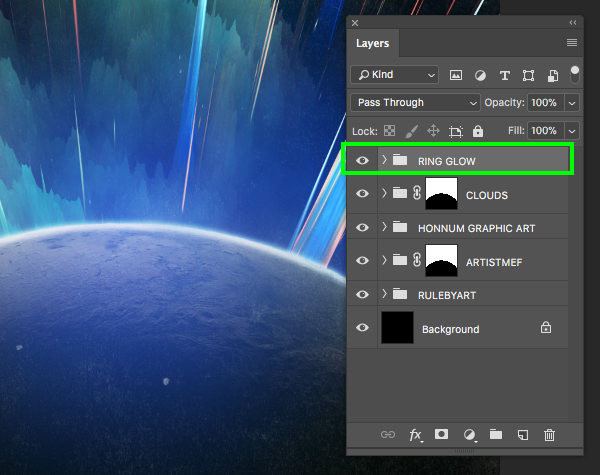
Rename your ring layer ‘RING GLOW’ and then change the Blend Mode from ‘Normal’ to ‘Overlay’.
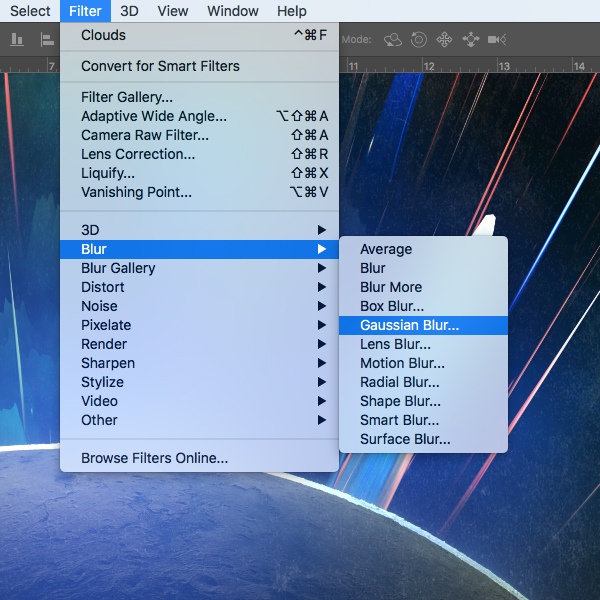
Go to the Filter menu and choose ‘Blur > Gaussian Blur…’ from the list.
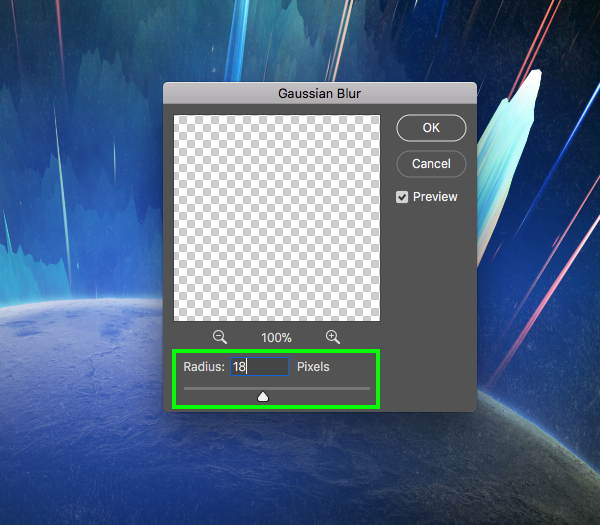
Enter a ‘Radius’ value of about ’18’ pixels and then press ‘OK’ to apply the effect.
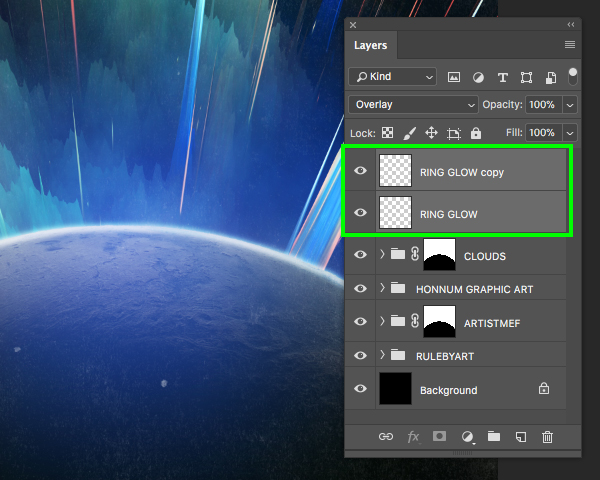
After applying the glow to the layer, press Command/Ctrl+J to duplicate it in order to intensify the effect. From there, select the top copy, hold the Shift key, and then select the original copy below.
With both copies of the ‘RING GLOW’ selected, press Command/Ctrl+G to put them into a new folder with the same name.
Step 15: Masking the Glow
Select your Gradient Tool (G) and then press ‘X’ to toggle back to a solid black foreground color. We want to make sure that we have a Linear Gradient that fades from solid black to transparent as shown here:
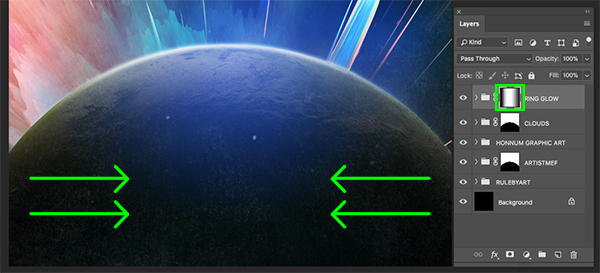
Add a Layer Mask to the ‘RING GLOW’ folder and then use your Gradient to click and drag from the left side in towards the center. Doing this will fade out the left part of the glow. Repeat this for the right side as well so that the majority of the glow is visible on the top of the planet and not the sides.
Step 16: Center Highlight
Press ‘X’ to toggle back to a solid white foreground color and then return to your Gradient Tool (G) and change the gradient type from radial to linear. You should now have a solid white to transparent fade in your settings.
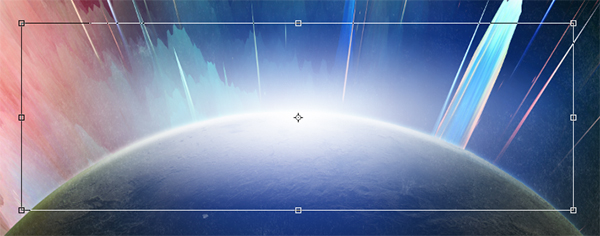
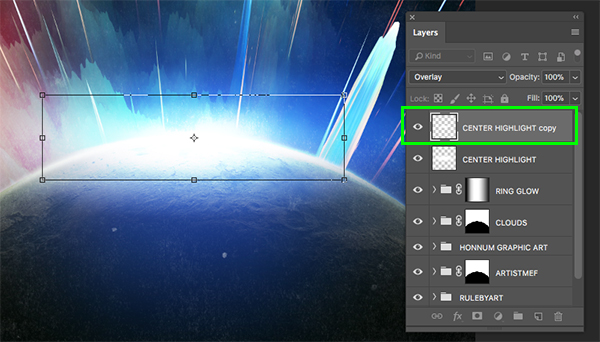
Create a new layer and then click and drag outwards from the top, center point of the planet to create your gradient. From here, press Command/Ctrl+T to initiate a Free Transform and then hold the Alt/Option key and drag either the left or right handle outwards to stretch it out. Continue to hold the Alt/Option key and drag either the bottom or top handles in towards the center to squash the gradient even further so you have more of an oval shaped gradient. Once you have done that, press ‘Return’ on the keyboard to apply the changes.
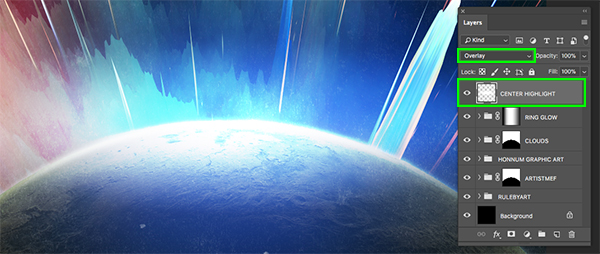
Rename your layer ‘CENTER HIGHLIGHT’ and then change the Blend Mode from ‘Normal’ to ‘Overlay’.
Press Command/Ctrl+J to duplicate the ‘CENTER HIGHLIGHT’ layer and then use the Free Transform once again to scale the highlight down by dragging inwards from any of the four corners while holding the Alt/Option+Shift keys.
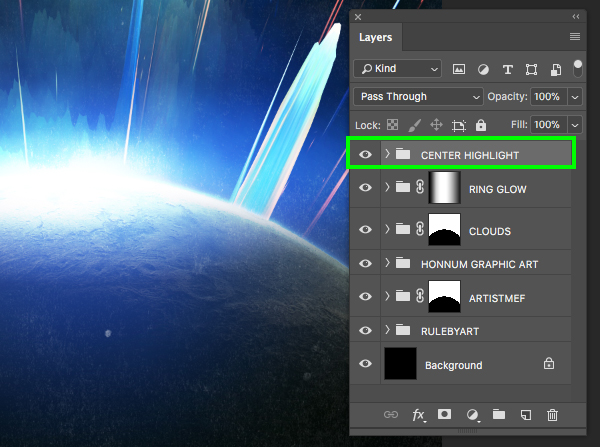
Once you are happy with the size and positioning of your two highlights, select the top copy, hold the Shift Key, and then select the original copy below so both instances of the highlight are selected at the same time. From here, press Command/Ctrl+G to place them into a new folder and rename it ‘CENTER HIGHLIGHT’ as shown below:
Step 17: Creating a Focal Point
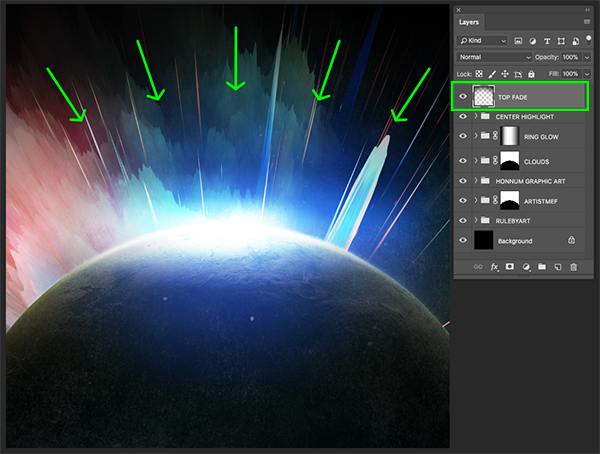
Create another new layer and then press ‘G’ to get back to your Gradient Tool. After that, select a Linear Gradient that fades from black to transparent as shown below:
On your new layer, click and drag from the top down, and then from the upper left and right corners in towards the center of the image to create a nice rounded fade. Doing this will help by darkening the outer bounds of the image to keep the focus on the center.
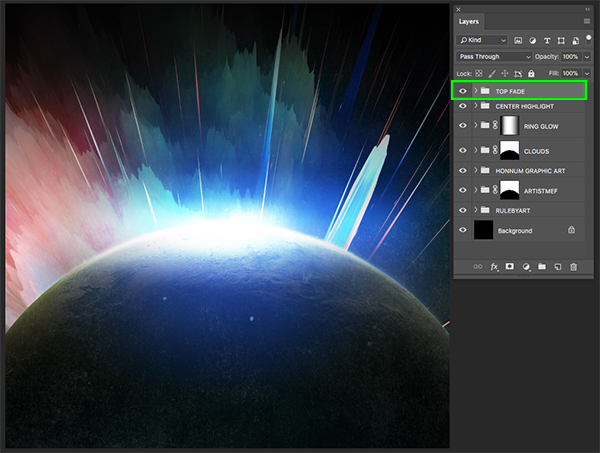
After creating your fade, select the layer and press Command/Ctrl+G to put it into a new folder called ‘TOP FADE’ as shown in the image below:
Step 18: Adding the Title Text
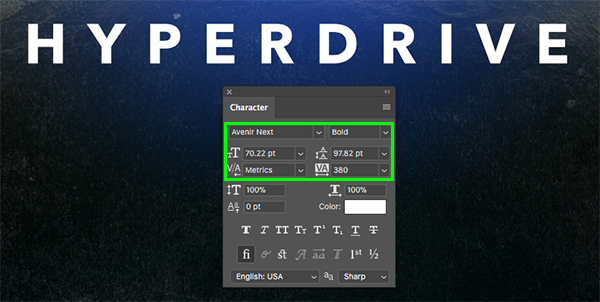
Create a new layer and then press ’T’ on the keyboard to switch to your Type Tool. Click towards the bottom part of the image over the dark part of the planet and then type out the word ‘HYPERDRIVE’ in all uppercase. For this you will want to open up your Character Panel which can be found by going to the Window menu and choosing ‘Character’ from the dropdown menu. Here I am using a clean, sans serif typeface called ‘Avenir Next’ in a ‘Bold’ style. The fill color is solid white, the size is about ’70.22’ pt and a ‘Tracking’ setting of ’380’ as shown in the image below:
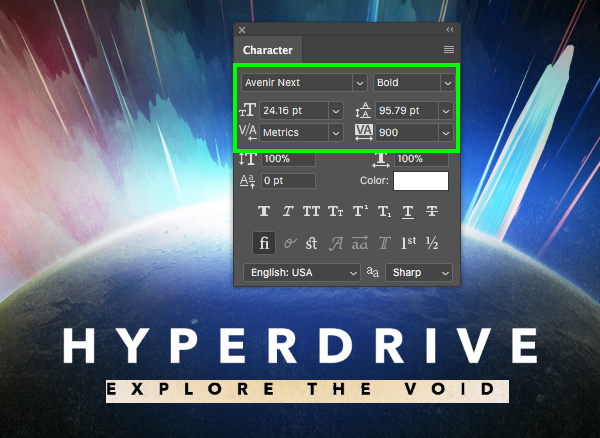
Press Command/Ctrl+J to duplicate the layer and then hold the Shift key and tap the down arrow to move it down. Use your Type Tool (T) to click inside of the text box and type out the words ‘EXPLORE THE VOID’ using the same font, but this time change the size to ’24.16’ pt and the ‘Tracking’ to ‘900’.
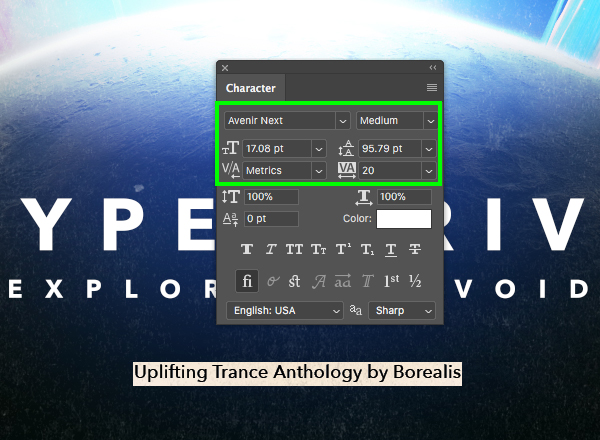
Repeat this one more time to create a third line of text below the previous two lines. We also want to leave a bit of extra space here as we are going to put a divider between this line and the others. This time type out ‘Uplifting Trance Anthology by Borealis’ in upper and lowercase. Use the Character Panel to change the size to ’17.08’ pt and the ‘Tracking’ can be set to about ’20’.
Step 19: Adding the Divider
Create another new layer and go back to your Gradient Tool (G). Make sure you have a solid white to transparent Radial Gradient selected as shown here:
Click and drag outwards to create your gradient and then use the Free Transform tools to extend the gradient out to the sides and then squash it like we did earlier on until you have a thin tapered gradient like this:
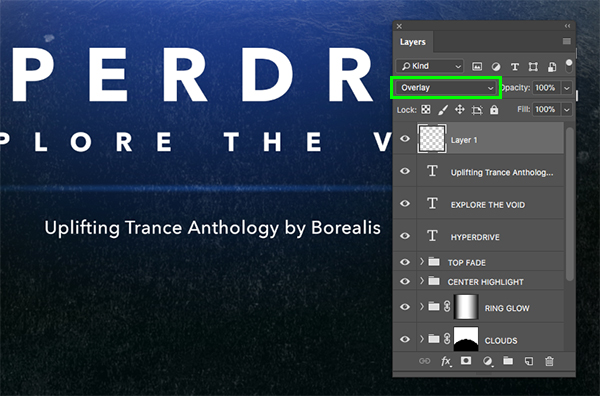
From here, change the Blend Mode from ‘Normal’ to ‘Overlay’ as shown below:
Step 20: Adding Color to the Divider
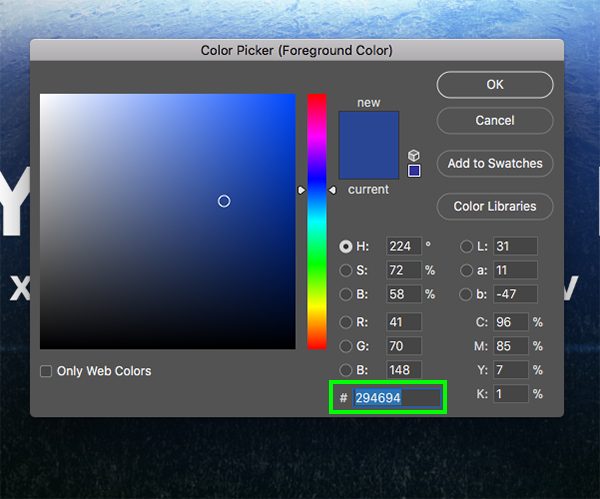
With your Gradient Tool (G) still selected, change your fill color to the hex value ‘#294694’.
Create another gradient and squash it down before placing it on top of the previous white gradient like this:
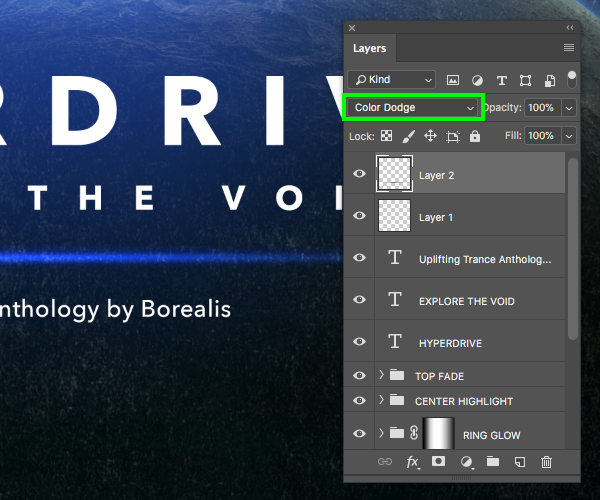
For the blue gradient, let’s change the Blend Mode to ‘Color Dodge’.
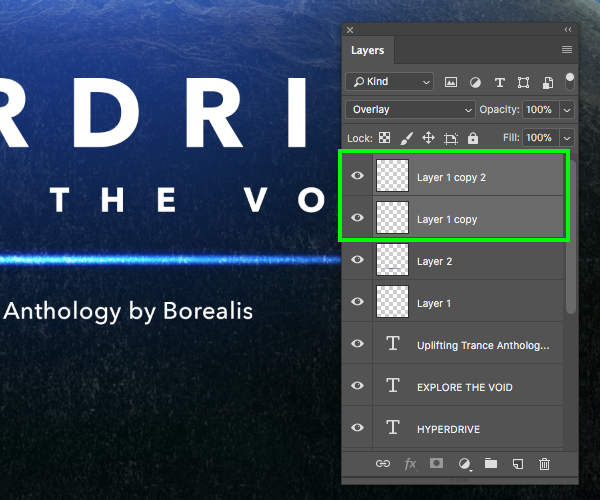
Next, select the white Overlay gradient layer and press Command/Ctrl+J two times to duplicate the layer twice and intensify the effect. We then want to grab both of these layers and place them above the blue Color Dodge gradient as shown here:
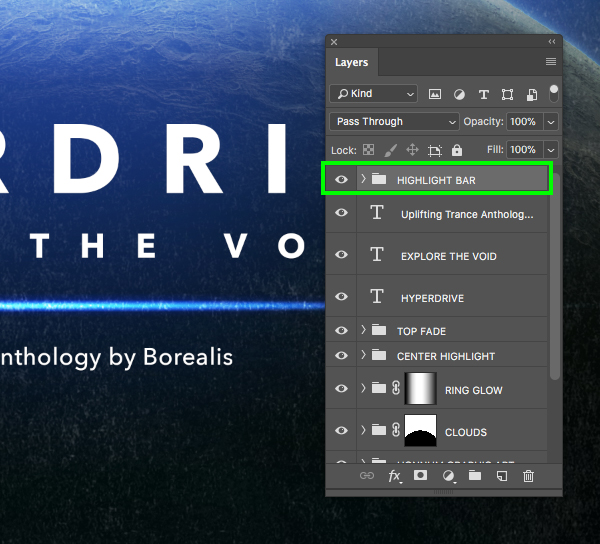
Select the top gradient layer, hold the Shift key, and then click on the bottom copy. After that, press Command/Ctrl+G to put the four gradients into a new folder and rename it ‘HIGHLIGHT BAR’.
Step 21: Color Adjustment
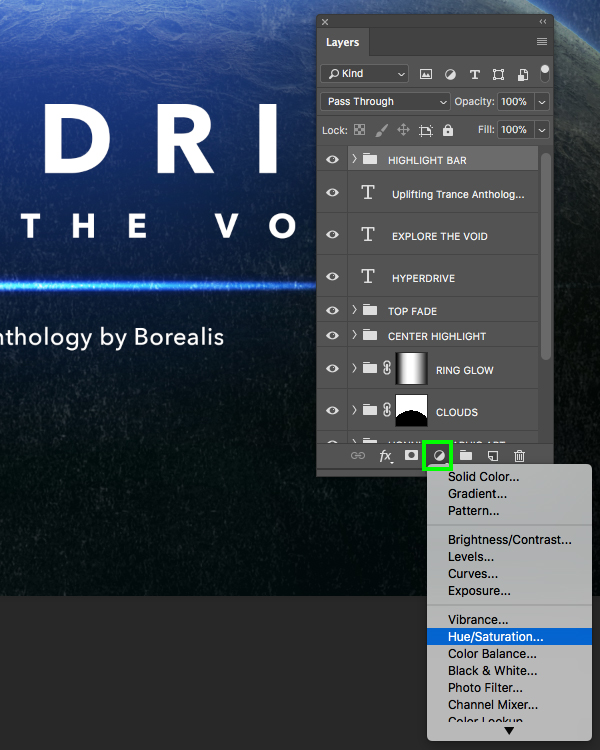
Select your newly created ‘HIGHLIGHT BAR’ folder and then hold the Alt/Option key and click on the Adjustment Layer icon at the bottom of the Layers Palette. From here, choose ‘Hue/Saturation…’ from the menu that appears.
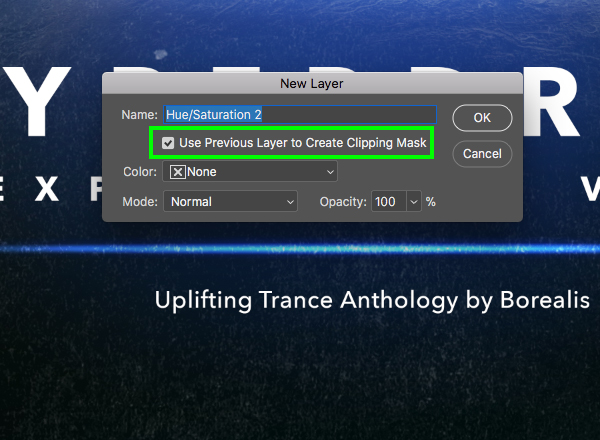
When the next menu appears, check off the box that says ‘Use Previous Layer to Create Clipping Mask’ and then press ‘OK’ to proceed.
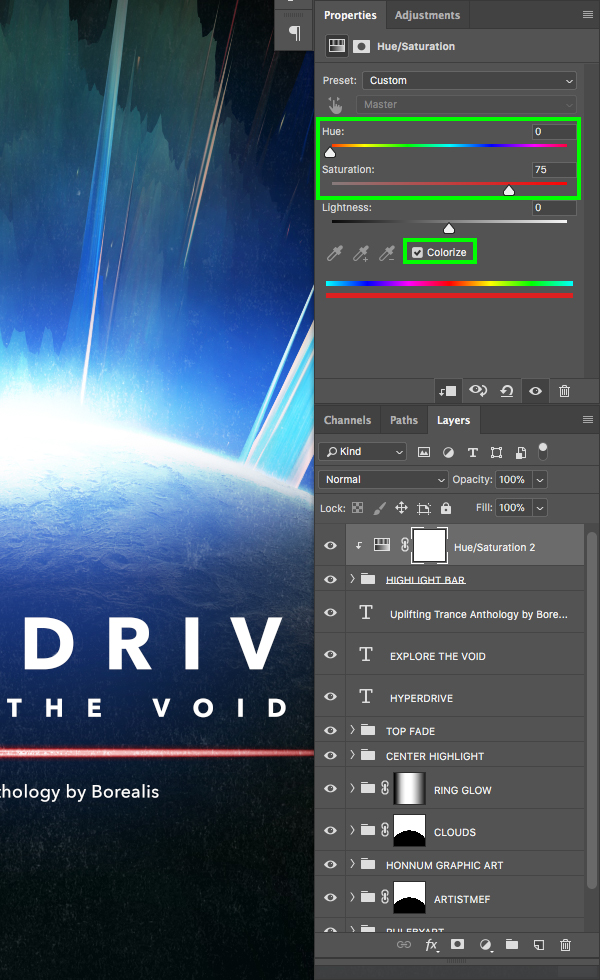
For the properties, check off the ‘Colorize’ box and then move the ‘Hue’ slider all the way to the left, and the ‘Saturation’ slider to about ’75’ as shown below:
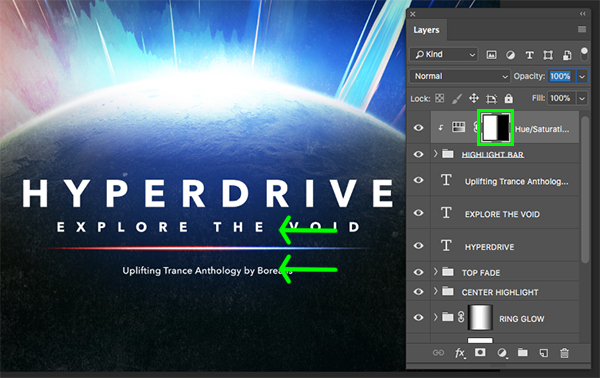
With the ‘HIGHLIGHT BAR’ folder selected, click on the ‘Add layer mask’ icon to add a mask, and then switch back to your Gradient Tool (G). Select a solid black to transparent Linear Gradient, and then click and drag from the right side of the bar in towards the center to mask out the Hue/Saturation effect. Doing this should reveal the original blue color on the right side of the bar as shown in the image below:
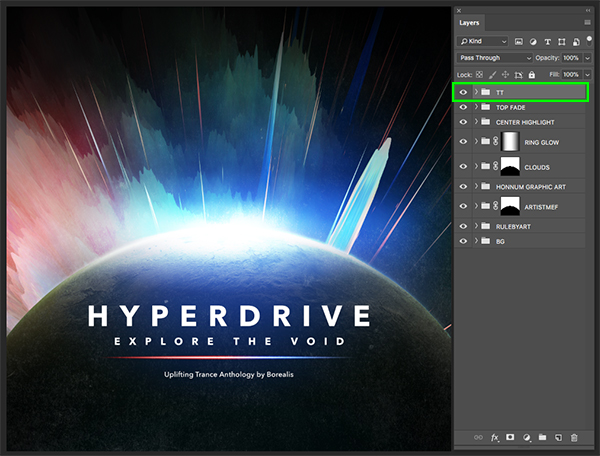
You may want to grab the whole ‘HIGHLIGHT BAR’ folder and then scale it down a bit and make it less narrow using the Free Transform option (Command/Ctrl+T). Once you are happy with the width and positioning of the bar, select the Hue/Saturation Adjustment Layer, hold the Shift key, and then select the ‘HYPERDRIVE’ text layer so all three of your text layers are selected with the ‘HIGHLIGHT BAR’ folder and the attached Adjustment Layer. After that, press Command/Ctrl+G to place these layers into a new folder and rename it ‘TT’ for ‘Title Treatment’. Here I have also double clicked on the ‘Background’ layer to unlock it before I placed it into a folder of it’s own and called it ‘BG’ just to be consistent.
Step 22: Keeping Things Together
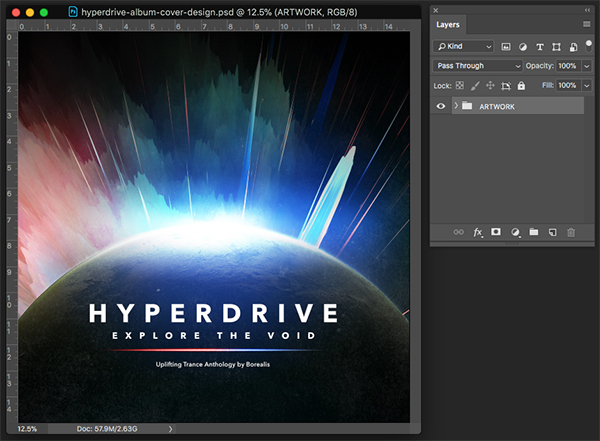
Select the very top layer in your Layers Palette and then hold the Shift key and select the very bottom ‘BG’ layer so all of your layers and folders are selected at the same time. From here, press Command/Ctrl+G to put them all into a folder named ‘ARTWORK’.
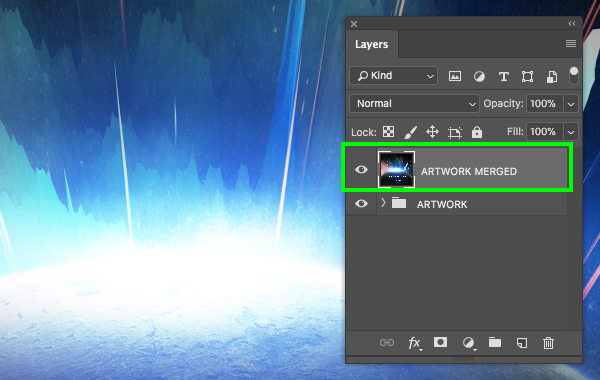
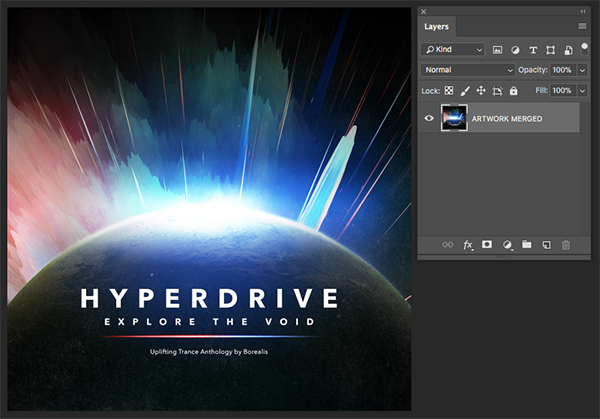
After creating the ‘ARTWORK’ folder, press Command/Ctrl+J to duplicate it, and then Command/Ctrl+E to merge it all together into a single layer. Let’s rename this merged layer ‘ARTWORK MERGED’ as shown below:
Step 23: Placing Our Design in the Mockup
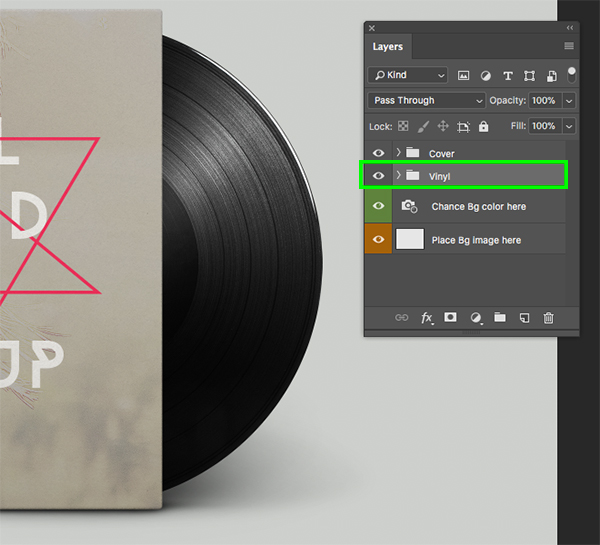
Next, let’s open the vinyl mockup which can be download for free here at Graphic Burger.
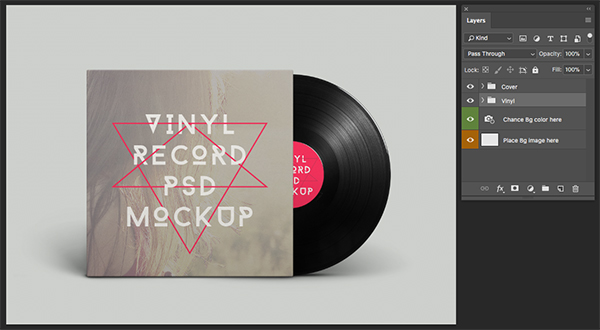
Once you have opened the mockup, select the ‘Vinyl’ folder, hold the Shift key and tap the left arrow until the circular label in the center is concealed.
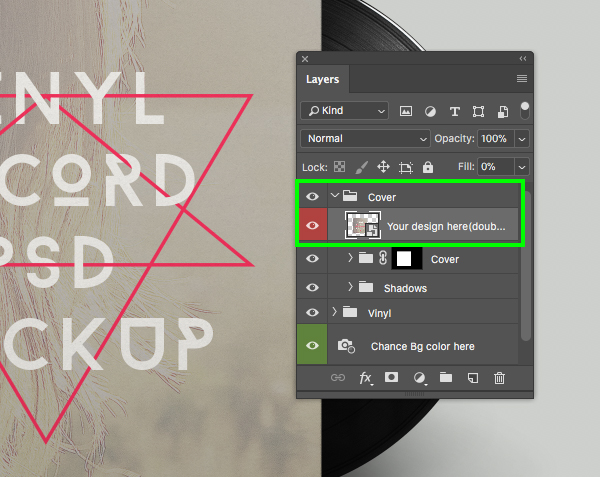
Click the small arrow next to the ‘Cover’ folder to expand it and reveal the layers inside. From here, let’s go ahead and double click on the Smart Object that is highlighted to open the artwork in a new window.
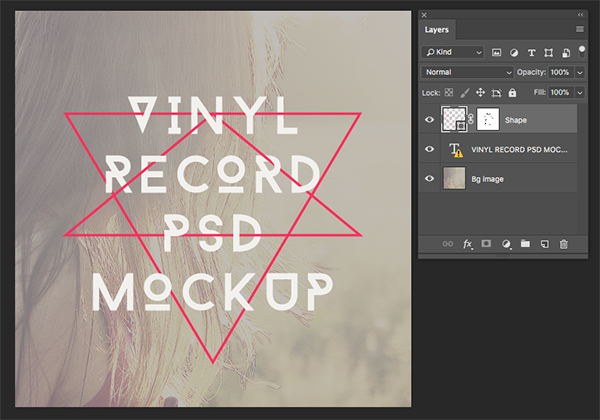
The Smart Object will now open in a new window revealing the layers containing the cover artwork shown below:
We can now grab our ‘ARTWORK MERGED’ layer from our main document and drag and drop it into this Smart Object file. We will need to press Command/Ctrl+T to do a Free Transform and then drag inwards from any of the four corners of the bounding box while holding the Alt/Option+Shift keys to scale it down until it fits perfectly into the square shape. Once you have done that, press Command/Ctrl+S to save the file and then Command/Ctrl+W to close the tab and return to the main mockup PSD file.
Step 24: Finishing Touches
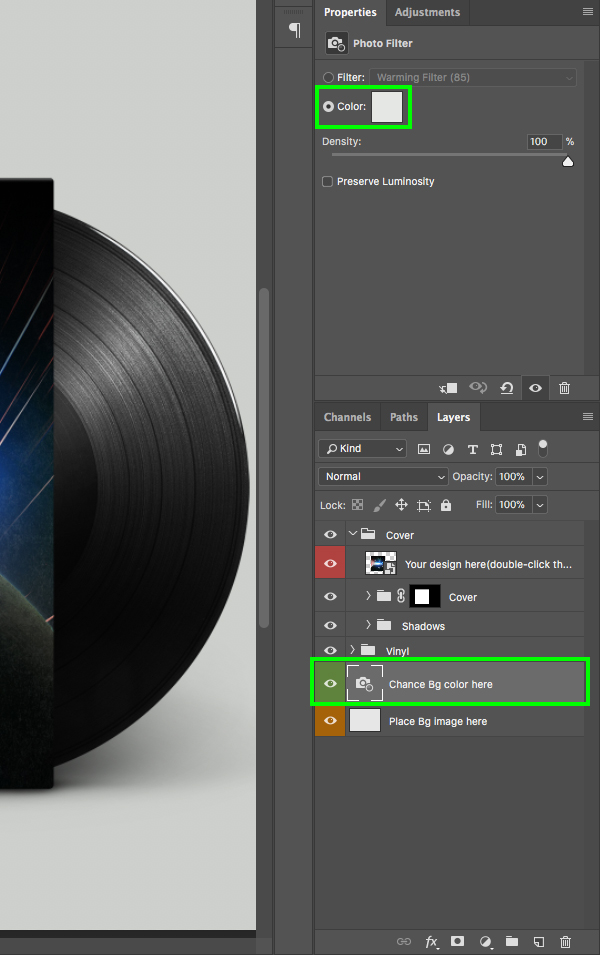
You should now see your artwork applied to the cover of the record, so now we can go ahead and make a few quick adjustments. Click on the layer that says ‘Change Bg color here’ and you should see the settings for the Adjustment Layer in the Properties section. Click on the small color thumbnail to enter a new value for the background color.
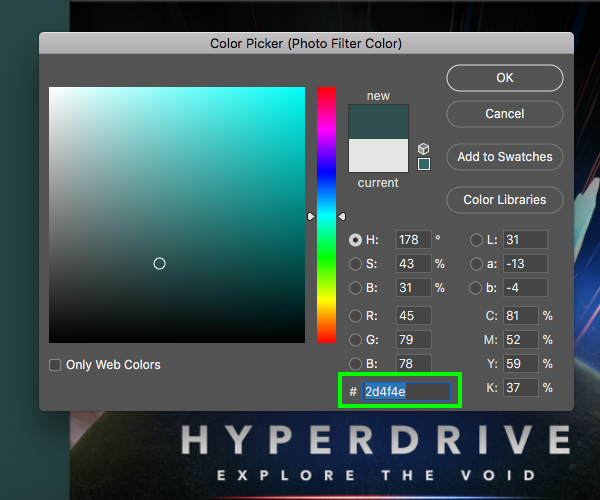
For the background color, let’s use the hex value ‘#2D4F4E’ and then press ‘OK’ to apply the change.
We have now completed our Hyperdrive Album Cover Design! Today we designed our album cover using only a small handful of the vast array of best-selling textures and patterns that are ideal for getting your work noticed! We invite you to discover these high-quality resources from some of the most talented designers in the world with this new collection of textures and patterns that will take your work to the next level.
Remember that whether it’s your outcome for this tutorial or something new you’ve made, we’d love to see your designs on our Facebook page.
Please leave a comment if you have any questions or suggestions. I always look forward to hearing from you!
There’s still time to check out The Diverse Textures and Patterns Collection featuring an extremely diverse collection of popular textures and patterns all for an unbeatable price of $29!









Thank you so very much! This was fun and I am learning a lot.
Bless.
Hey Jennifer,
Thank you so much for commenting- that is truly music to our ears and we are so happy to hear you are finding the tutorials a good learning aid :)
We would love to see what you create if you were keen to share your work with us!
Thank you!
You are so welcome Vessto!
Fantastic collection and options with this great pack and the bonus of the tutorial.
Hey Chris,
Thank you so much for taking the time to leave us such a wonderful comment!
We’re so glad you think so and hope you’ll love working through this one :)
Hi! Agree with previous speaker :-). Just amazing and good. Thank You!
Aww thank you so much Janove, this is so lovely to hear!
We super appreciate you taking the time to echo the awesome feedback :)
Outstanding! Thank you, I learned a lot from this tutorial.
Yay that’s amazing to hear Kirsten!
Thank you so much for leaving us a comment and we are so glad that you have picked up a lot of tips from this tutorial :)