In this tutorial, we will be creating a high end rooftop party flyer design in Photoshop. To do this, we will be using several freebies from The Creative’s Vibrant Artistic Collection including beautifully crafted designs from Every Tuesday, Opia Designs, and Studio Sun. This complete collection is full of stunning artistic resources that will help you nail the aesthetic you are after for your upcoming projects.
For this particular design, we will be combining a versatile and elegant typeface with shimmering textures to create our flyer, which we will then apply to a realistic mockup full of verdant greenery by Mockup Cloud, which was featured in one of our previous bundles. So, if you’re all ready to party it up then let’s fire up Photoshop and get started!
HAVE YOU SEEN OUR YOUTUBE CHANNEL?
Watch the video tutorial below and subscribe to our YouTube channel for regular updates direct to your inbox.
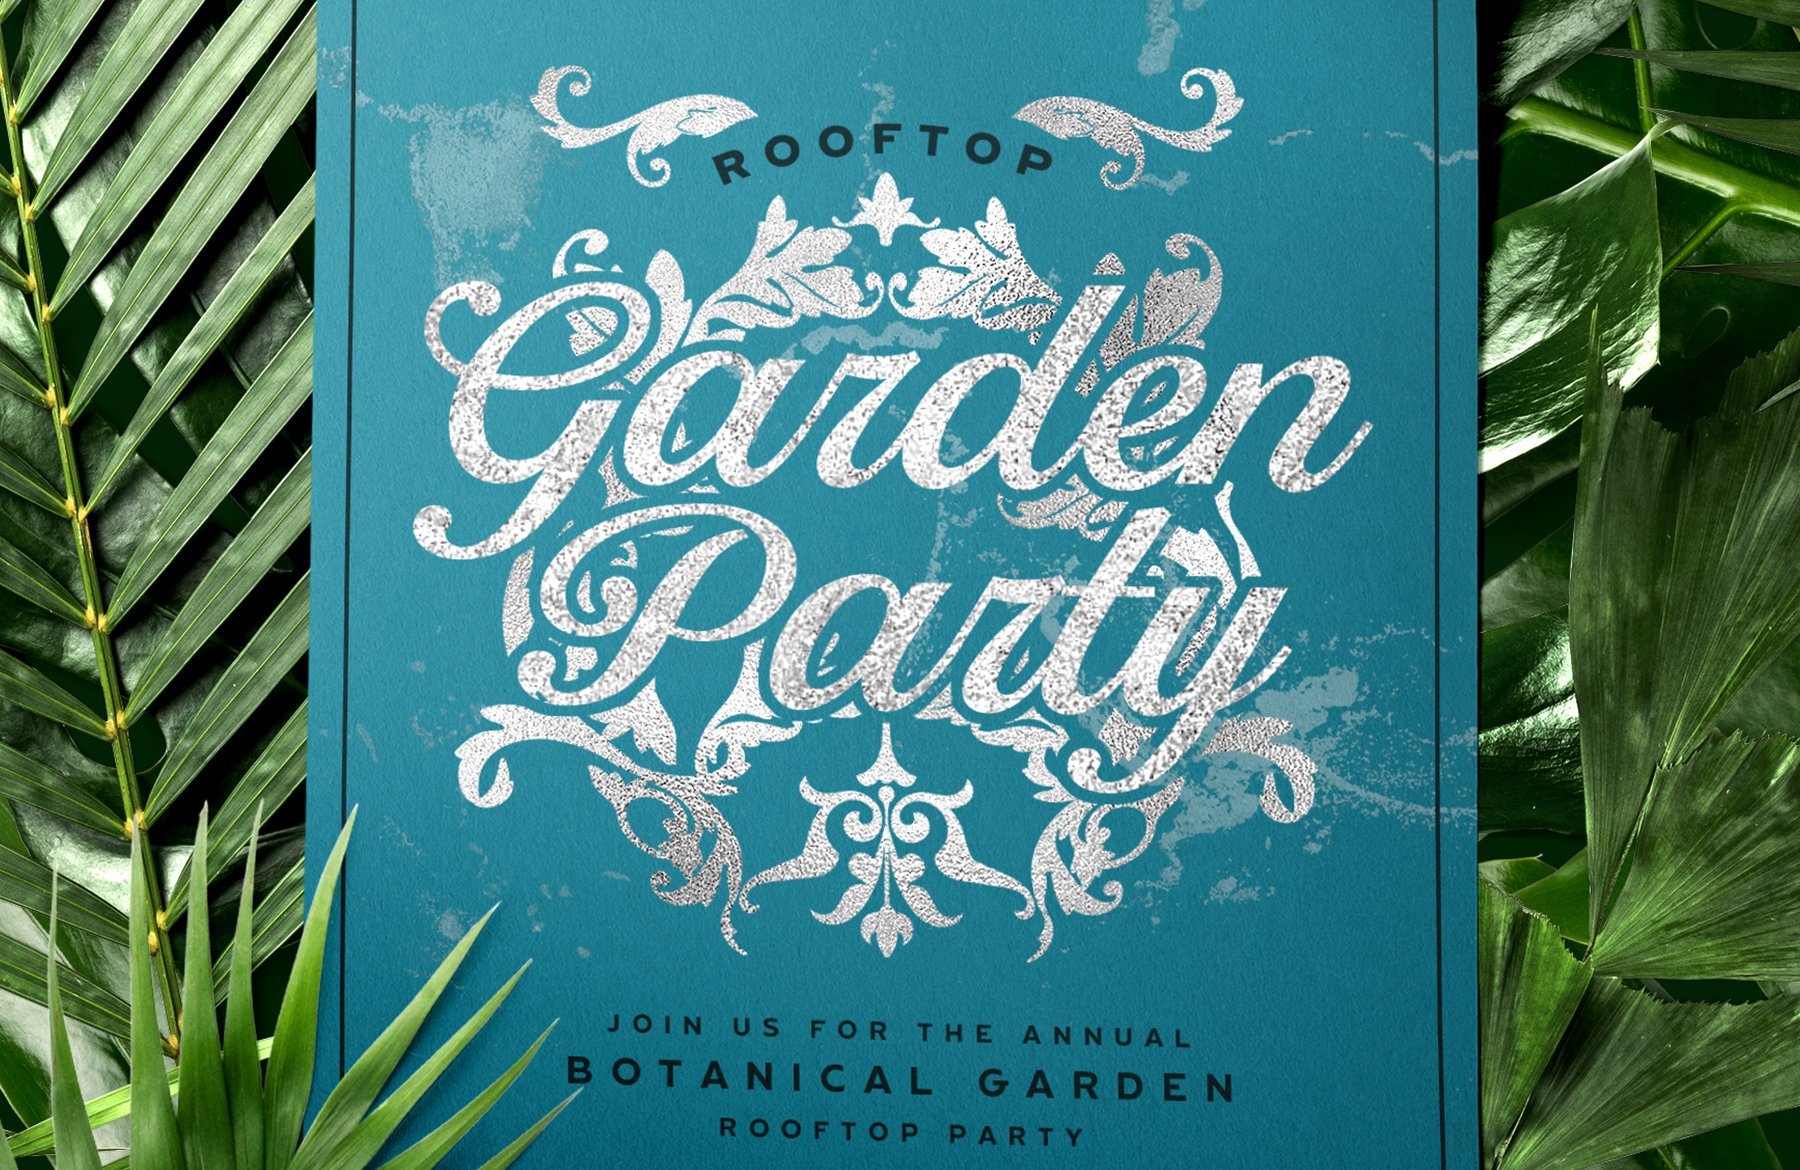
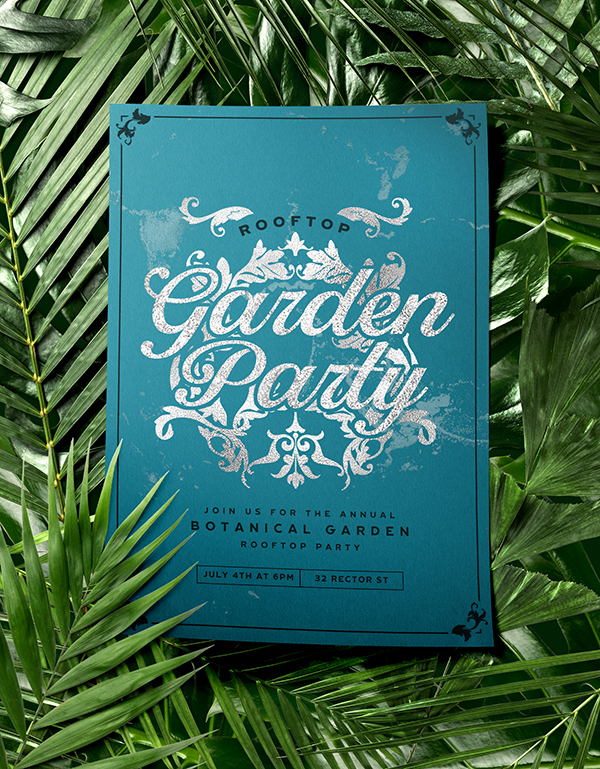
Here’s a look at what we’ll be creating:
Follow along with this tutorial: Download the freebie files
This freebie pack is just a small sample of what you can expect to find in The Creative’s Vibrant Artistic Collection for just $29! The work that each designer has put into creating these resources is evident in the sheer quality of each item and they are available for you, for a limited time only, all at an amazing 99% off the original price!
Step 1: Rooftop Garden Party Flyer Design
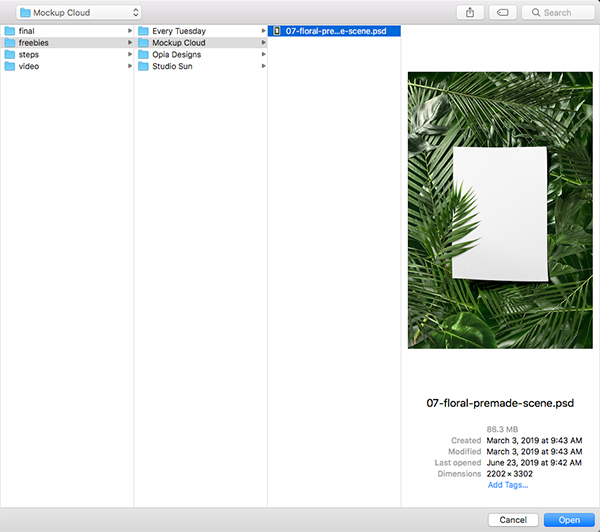
To get started, let’s go to the File menu in Photoshop and choose ‘Open…’. Navigate to the freebies folder for this tutorial and go to the ‘Mockup Cloud’ subfolder before opening ’07-floral-premade-scene.psd’ to open the mockup.
Please note: Unfortunately, we are unable to offer the ‘07-floral-premade-scene’ included with this tutorial. We apologise for any inconvenience this might cause. Alternatively though, you can use any mockups from your own collection or you can use a similar free sample available on Mockup Cloud.
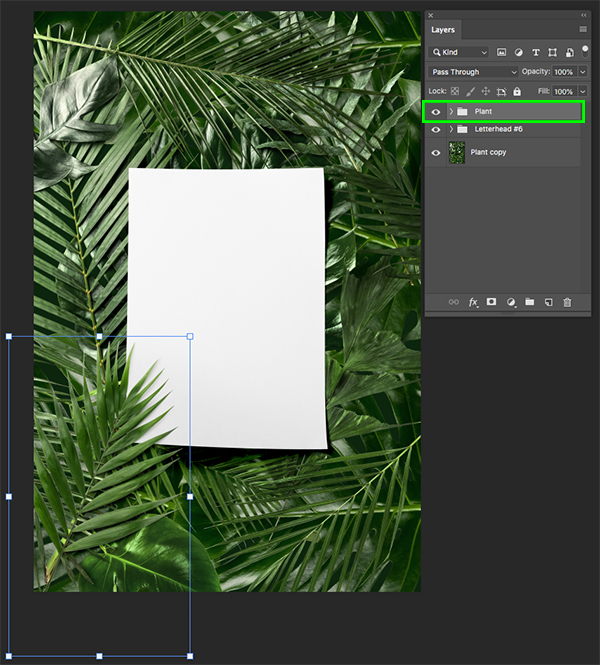
After opening the mockup file, select the ‘Plant’ folder at the top and press ‘Command/Ctrl+T’ to initiate a Free Transform.
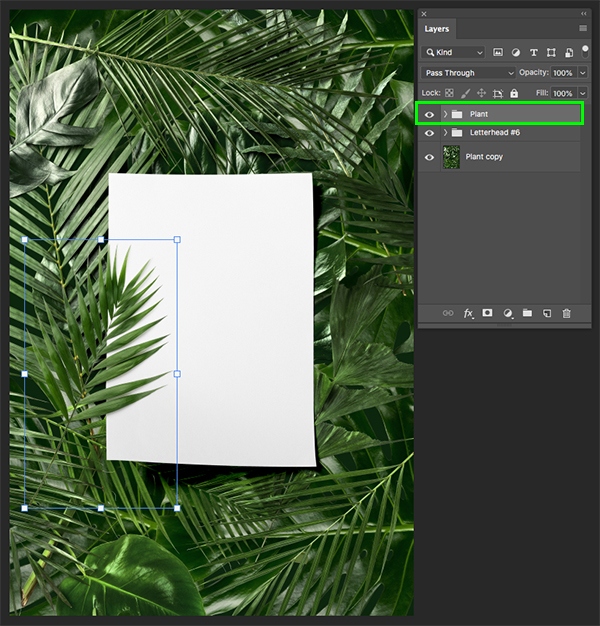
Click and drag outwards from any of the four corners of the bounding box while holding the Alt/Option+Shift keys to scale it up proportionally from the center, and then move it over so that it overlaps the bottom left of the flyer as shown here:
Step 2: Close Crop
Press ‘C’ on the keyboard to switch to the Crop Tool and then drag the top and bottom handles in closer to the center, and then drag either the left or right handle inwards while holding the Alt/Option key to bring it in evenly on both sides. Once we have a nice crop on the flyer, press ‘Return’ on the keyboard to apply the changes.
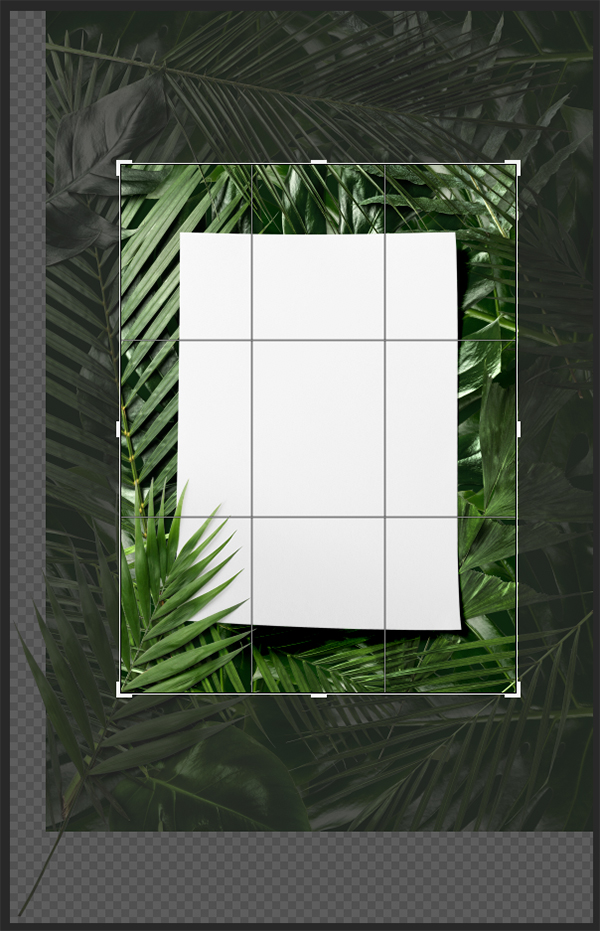
After cropping the image you should have something like this:
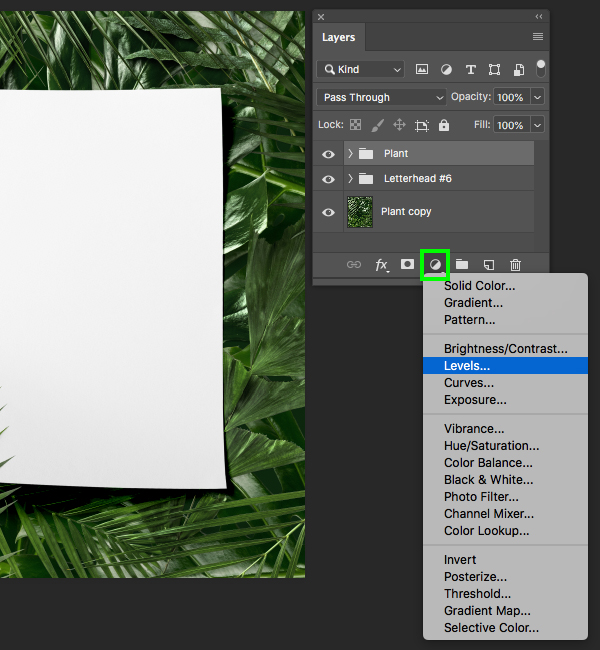
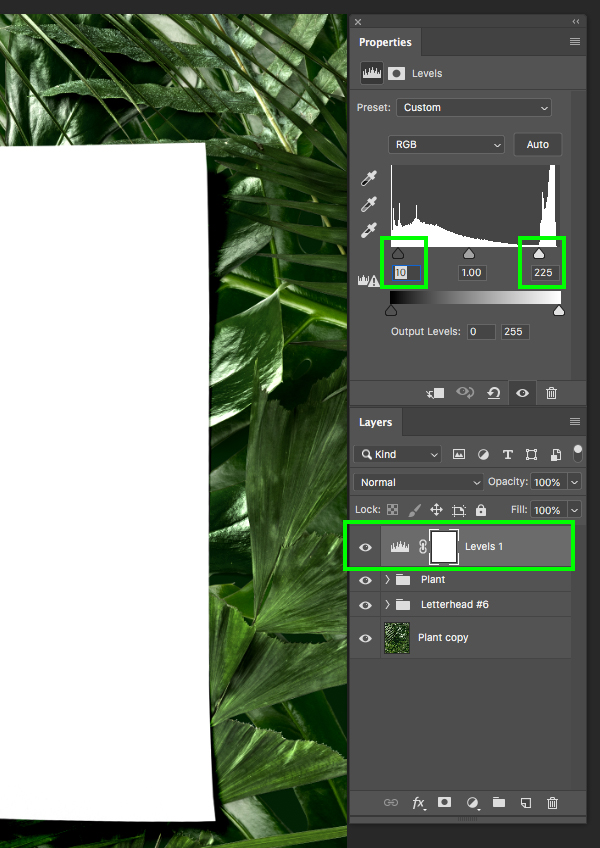
Step 3: Levels Adjustment
With the top ‘Plant’ folder selected, go down to the Adjustment Layer icon and choose ‘Levels…’ from the menu.
In the Properties panel, move the left slider in towards the center so that it’s set to ’10’ and move the right slider in so that it’s set to ‘225’ as shown here:
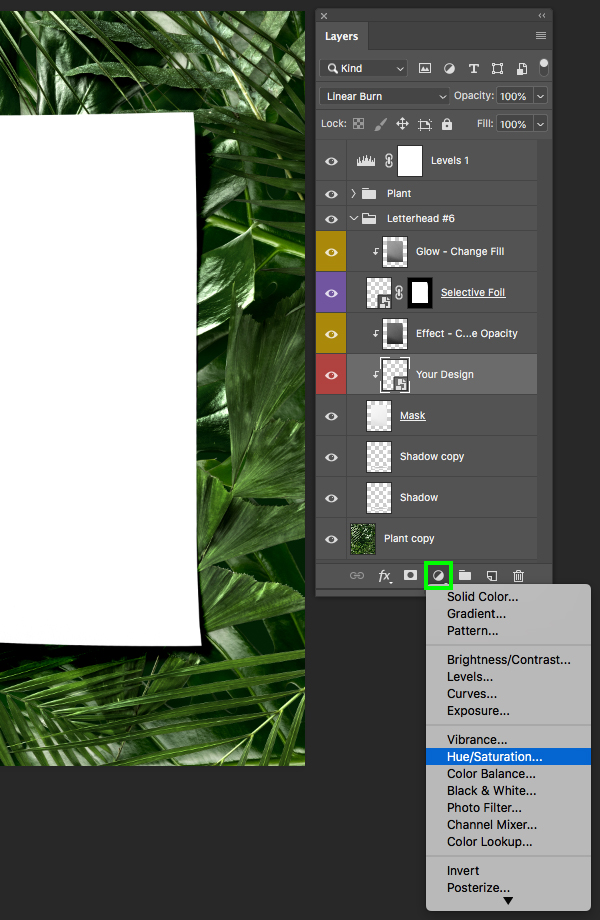
Step 4: Hue/Saturation Adjustment
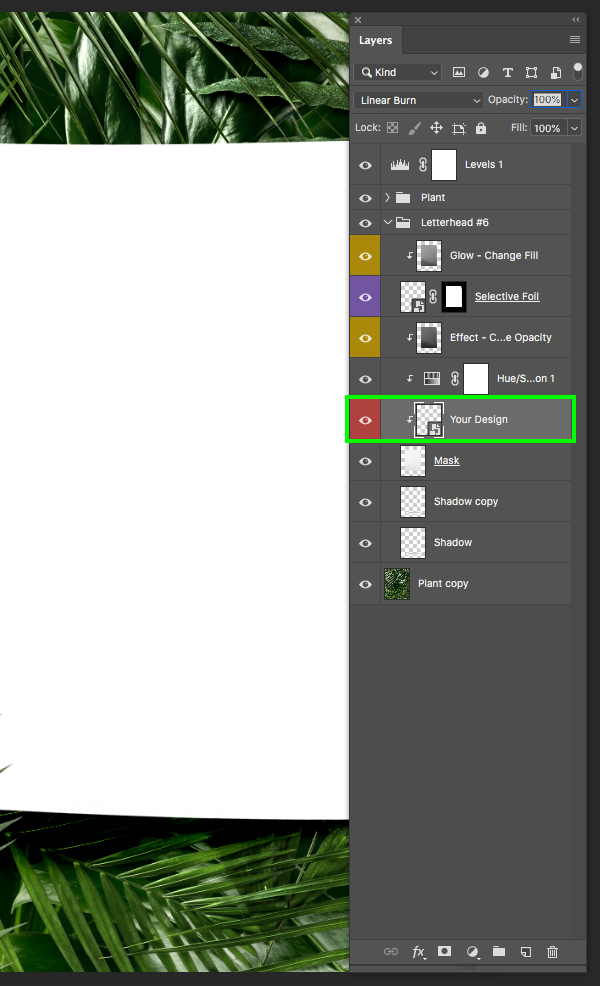
Click on the small arrow next to the ‘Letterhead #6’ folder to reveal the contents and then select the ‘Your Design’ Smart Object layer. From here, go down to the Adjustment Layer icon and choose ‘Hue/Saturation…’ from the dropdown menu.
Your Hue/Saturation Adjustment Layer will now have a Clipping Mask automatically applied to it as it’s sandwiched between the ‘Your Design’ layer and the ‘Effect…’ layer above. Now let’s increase the ‘Saturation’ to about ‘+28’ which will boost the saturation of the flyer (this will be more noticeable later on once we have something other than a solid white background).

Step 5: Into The Smart Object
From here, double click on the ‘Your Design’ Smart Object layer to dive into the layer where we can begin designing our main flyer.
Step 6: Unlocking Positions
Now that we are inside of the main flyer layer, let’s turn on all of the layers inside. To begin, select the ‘Craft Paper’ layer and notice the small lock icon that appears next to it. This icon indicates that the position of the layer is locked, so in order to remove that we need to click on the small cross icon that is highlighted in the image below:
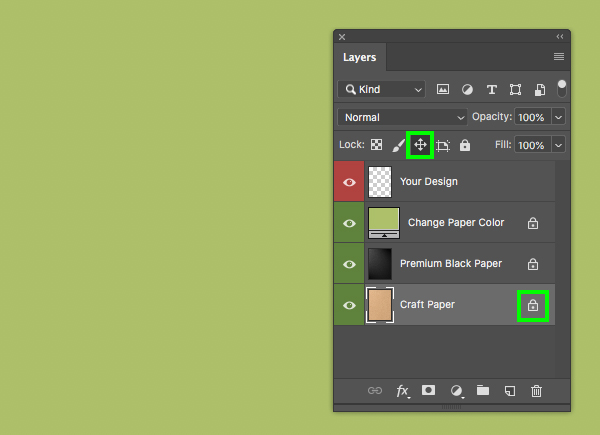
After clicking the icon you will see that the lock has been removed, and from here we will drag the ‘Craft Paper’ layer into the trash bin or press ‘Delete’ to remove it.
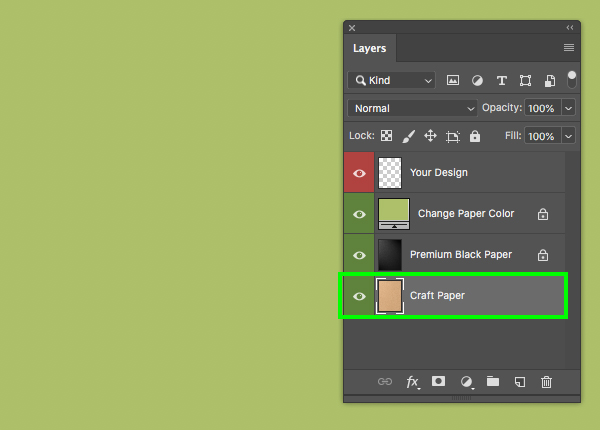
Let’s go ahead and unlock the position for the ‘Premium Black Paper’ layer and then reduce the opacity to about ‘80%’ as shown here:

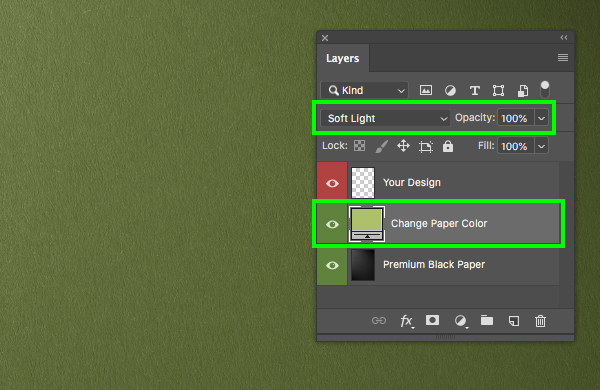
Now remove the position lock on the ‘Change Paper Color’ layer as well and then change the Blend Mode of the layer from ‘Normal’ to ‘Soft Light’ as shown in the image below:
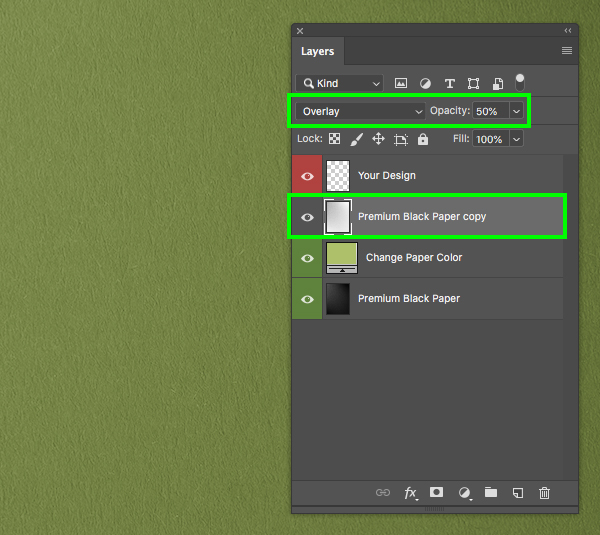
Step 7: Extra Premium
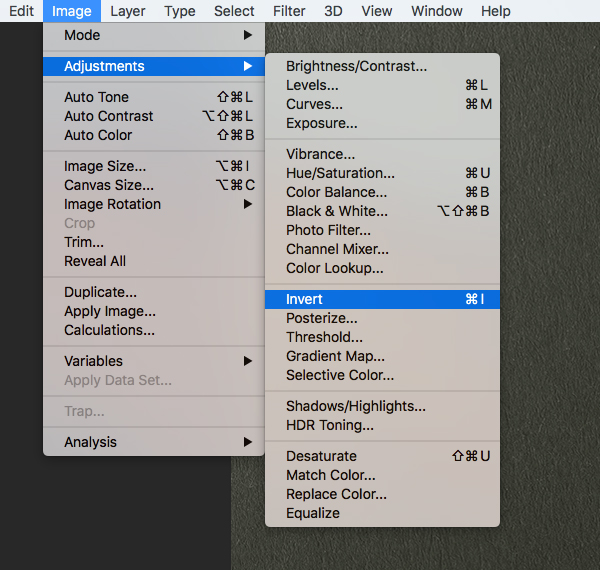
Select the bottom ‘Premium Black Paper’ layer and press Command/Ctrl+J to duplicate it. Drag this layer up so that it sits above the ‘Change Paper Color’ layer as shown below:

With this new copy selected, go to the Image menu and choose ‘Adjustments > Invert’ or press the keyboard shortcut Command/Ctrl+I.
Now that we have inverted the layer so that it’s light instead of dark, change the Blend Mode to ‘Overlay’ and reduce the opacity to ‘50%’ to make it less bright.
Step 8: Paper Color
With the ‘Premium Black Paper copy’ layer selected, click on the Adjustment Layer icon and choose ‘Hue/Saturation…’ from the dropdown.
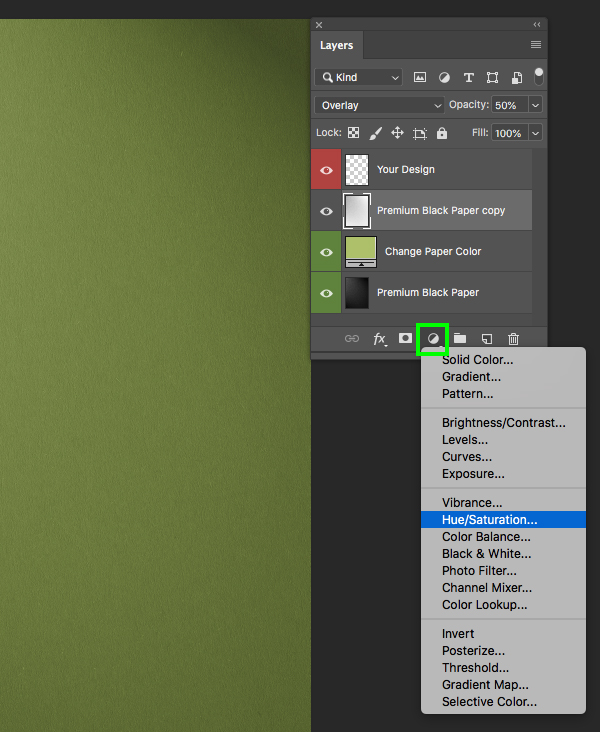
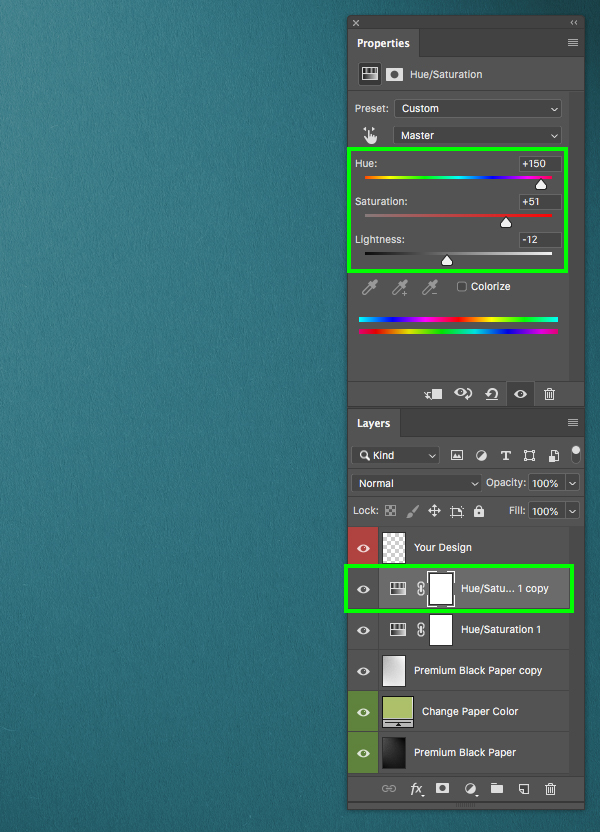
After adding this Adjustment Layer, move the ‘Hue’ slider to ‘-35’ and the ‘Saturation’ slider to ‘-31’ to shift the color.

Press Command/Ctrl+J to duplicate the Hue/Saturation Adjustment Layer and on this new copy we will change the ‘Hue’ value to ‘+150’, the ‘Saturation’ slider to ‘+51’ and the ‘Lightness’ to ‘-12’ as shown below:
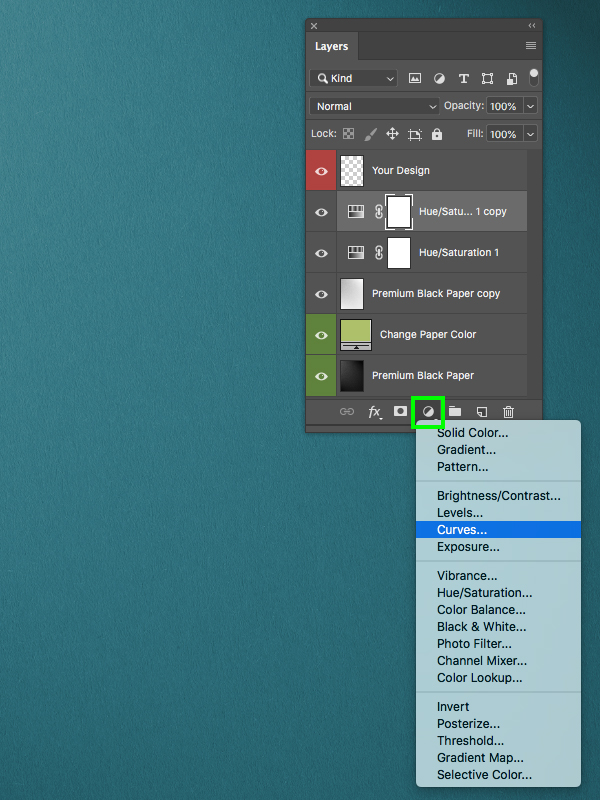
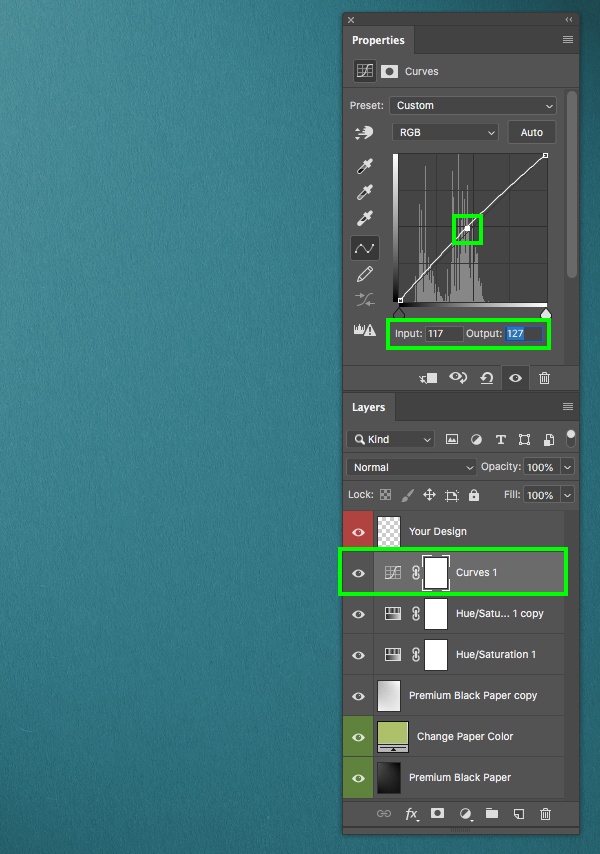
Step 9: Paper Contrast
With the top Hue/Saturation Adjustment Layer selected, return to the Adjustment Layer icon and this time choose ‘Curves…’ from the menu.
In the Properties panel, add a point to the center of the grid and move it slightly up and to the left so that the ‘Input’ is set to ‘117’ and the ‘Output’ is set to ‘127’.
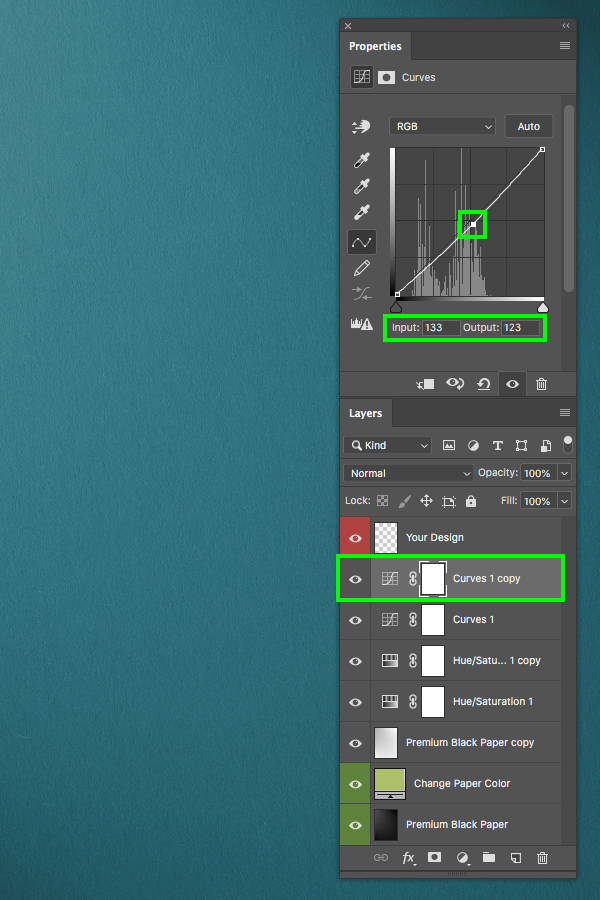
Press Command/Ctrl+J to duplicate this Curves Adjustment and now set the ‘Input’ of this copy to ‘133’ and the ‘Output’ to ‘123’ as shown here:
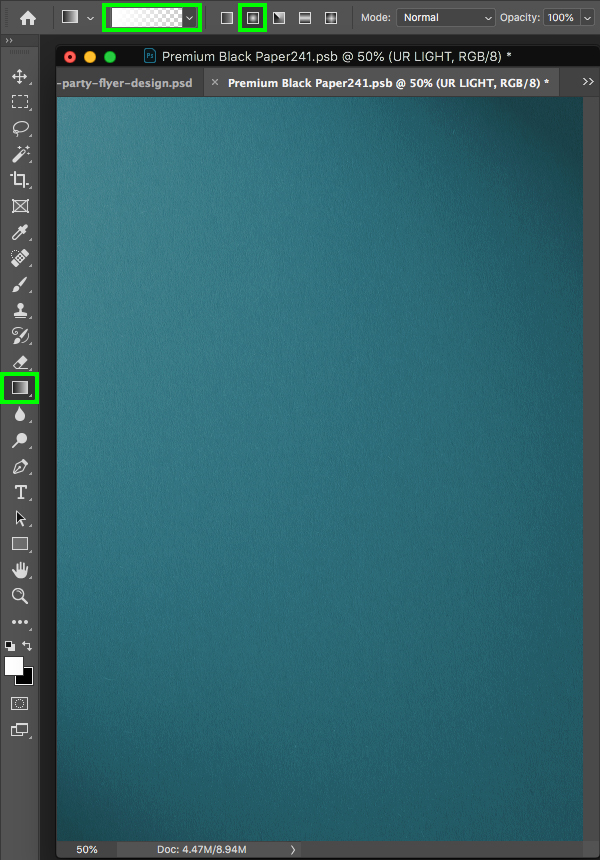
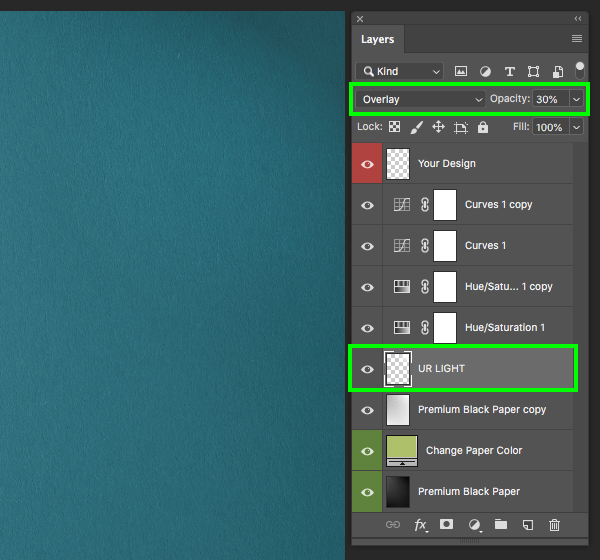
Step 10: Corner Light
Next, press ‘G’ on the keyboard to switch to the Gradient Tool and then make sure that you have a solid white foreground color selected. In the top toolbar, select a white-to-transparent Linear Gradient as highlighted in the image below:
Create a new layer just above the ‘Premium Black Paper copy’ and then click and drag outwards from the center of the canvas to create your gradient. From here, press Command/Ctrl+T to do a Free Transform and then position the gradient in the upper right corner. Here I have changed the name of the layer to ‘UR LIGHT’ for ‘Upper Right Light’.
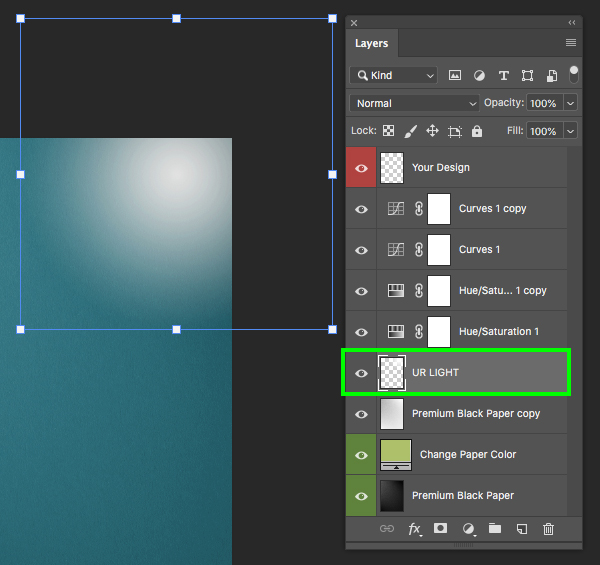
After scaling and positioning the gradient layer, change the Blend Mode to ‘Overlay’ and reduce the opacity to ‘30%’ to help lighten this corner of the layout.
Step 11: Background Group
Now that we have set up our background, let’s select the top Curves Adjustment Layer, hold the Shift key, and then click on the very bottom ‘Premium Black Paper’ layer so all of your layers except for the ‘Your Design’ layer at the top are selected.
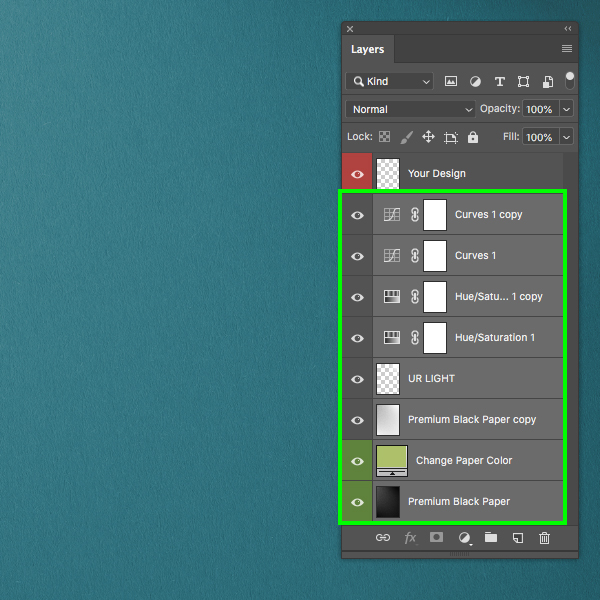
With all of your layers still selected, press Command/Ctrl+G to place them into a new folder and then double click the ‘Group 1’ text to rename the folder ‘BG’ as shown below:
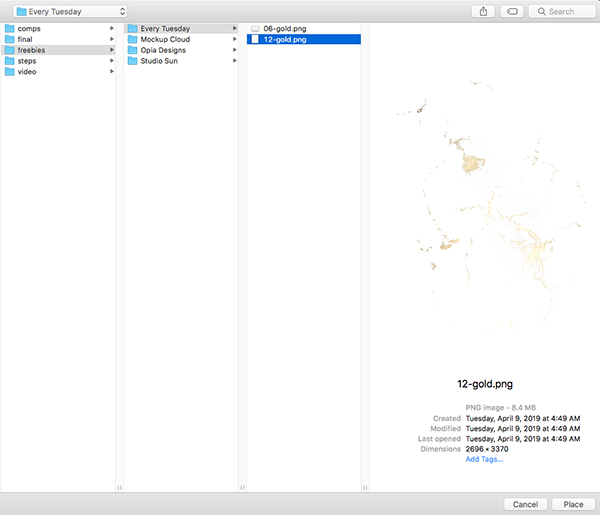
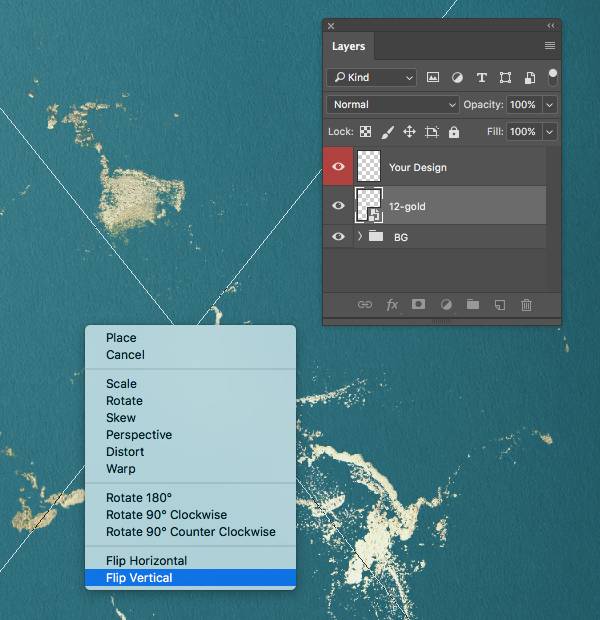
Step 12: Gold Ink 1
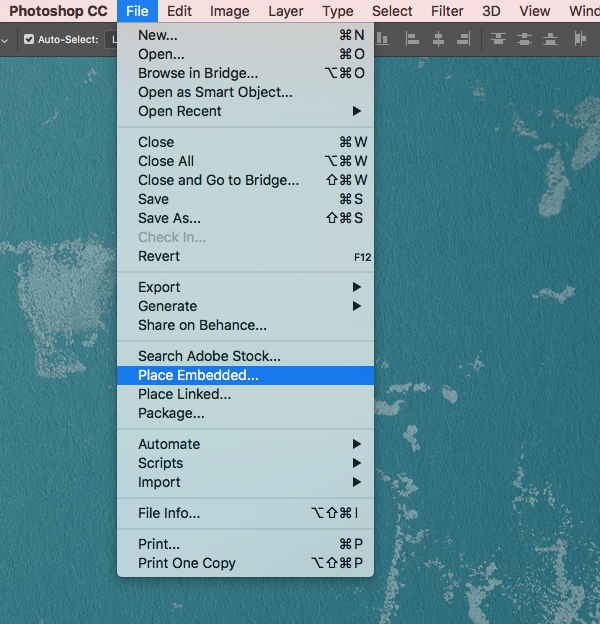
Go to the File menu and choose ‘Place Embedded…’ from the dropdown that appears.

Navigate to the freebies folder and then go into the ‘Every Tuesday’ subfolder and select the ’12-gold.png’ file before choosing ‘Place’ from the lower right.
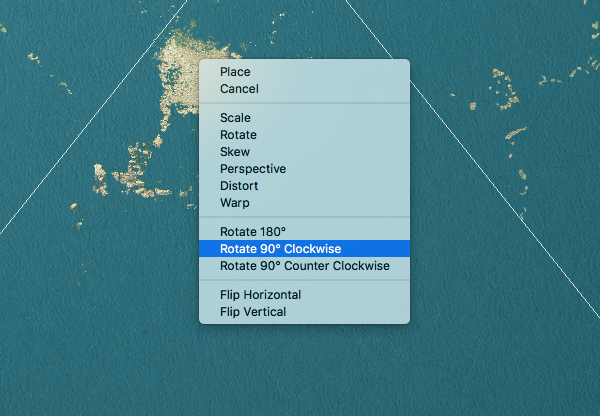
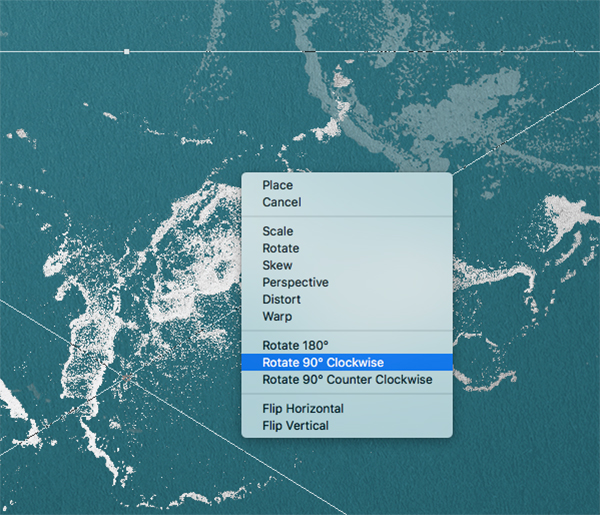
After bringing in your image, hold the Control key and click on the canvas to reveal a dropdown menu where we want to choose ‘Flip Vertical’ as shown here:
Hold the Control key and click once again, this time choosing the ‘Rotate 90º Clockwise’ option.
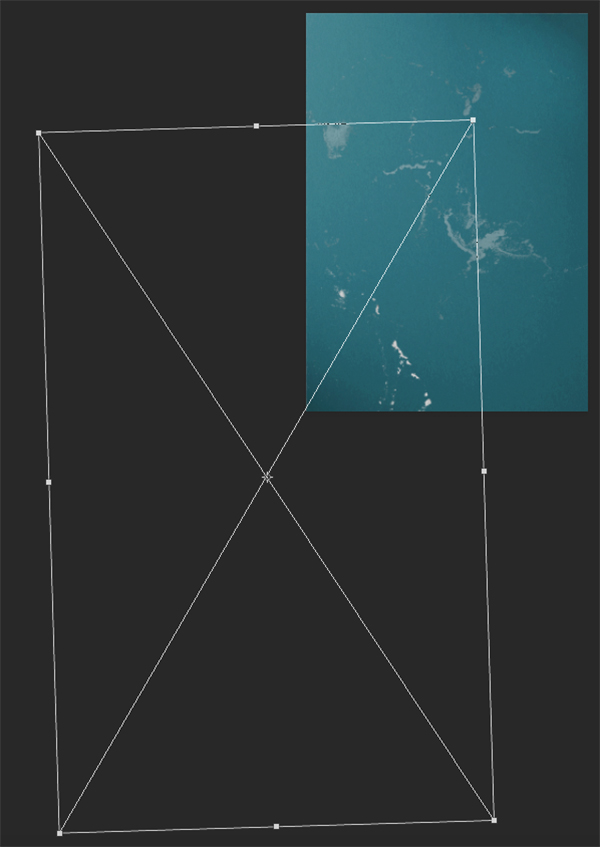
Now hold the Alt/Option+Shift keys and drag outwards from any of the four corners of the bounding box to scale the texture up proportionally from the center until it looks like the image below:
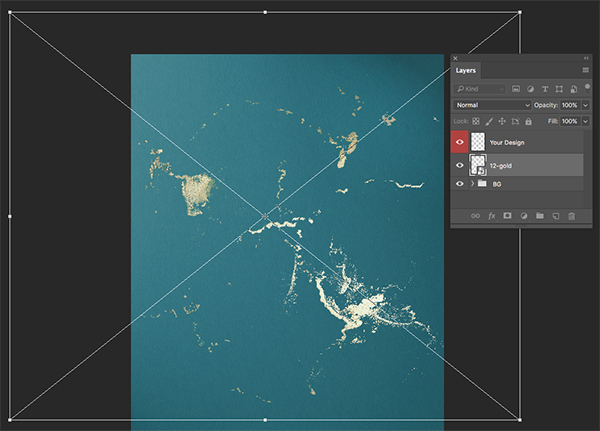
After scaling and positioning the texture, change the Blend Mode of the layer to ‘Overlay’ and reduce the opacity to ‘50%’.

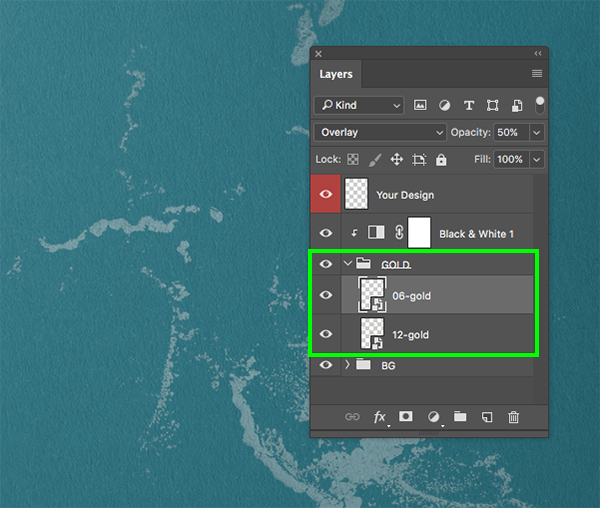
Step 13: Group Adjustment Layers
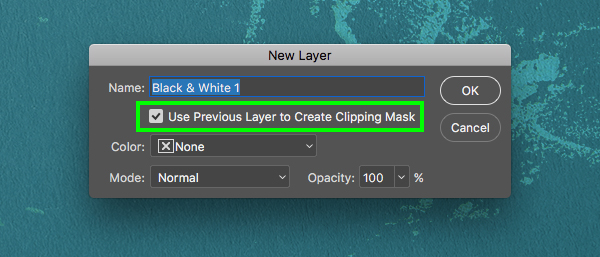
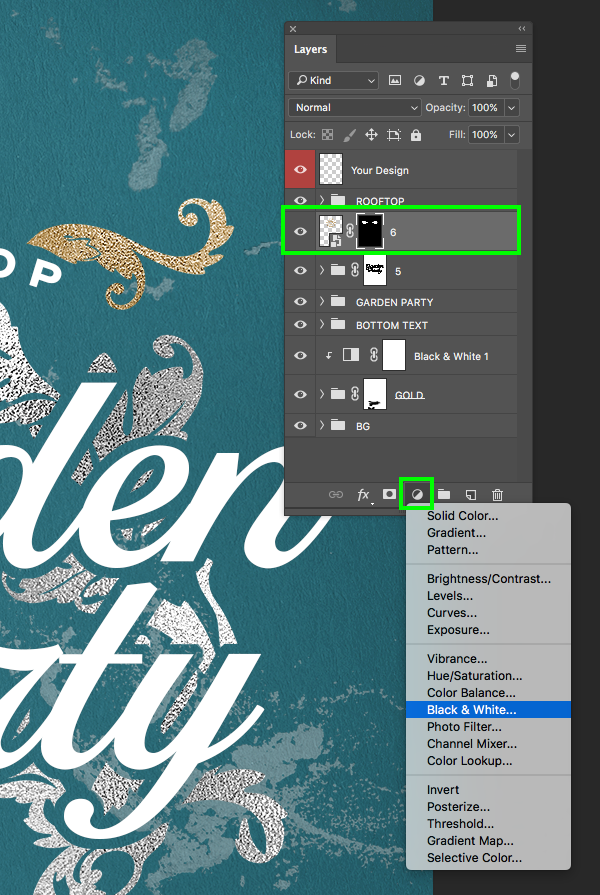
With the gold ink texture Smart Object layer selected, press Command/Ctrl+G to place it into a new folder and double click the ‘Group 1’ text to rename the folder ‘GOLD’ . After that, hold the Alt/Option key and click on the Adjustment Layer icon at the bottom of the Layers Palette and add a ‘Black & White…’ Adjustment Layer.
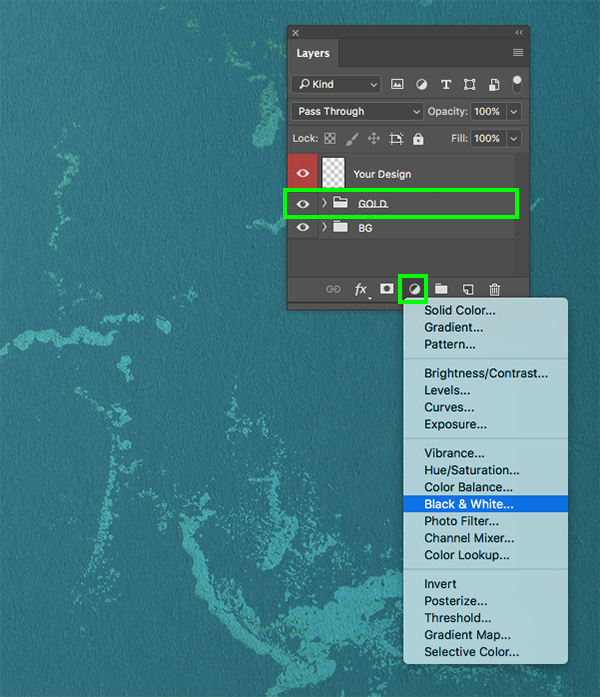
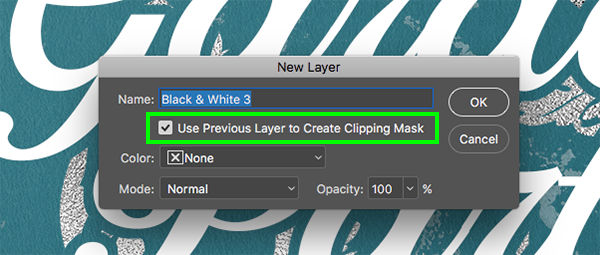
Check off the box that says ‘Use Previous Layer to Create Clipping Mask’ and then click ‘OK’ to continue.
Step 14: Gold Ink 2
Return to the File menu and choose ‘Place Embedded…’ once again.
This time let’s navigate to the ‘Every Tuesday’ subfolder and choose ’06-gold.png’ before choosing ‘Place’ from the bottom right.

After placing the image, hold the Control key and click on it before choosing ‘Rotate 90º Clockwise’ from the dropdown menu that appears.
Hold the Alt/Option+Shift keys and then drag outwards from any of the four corners to scale the texture way up and crop it so that only the top right portion of the texture can be seen in the lower left area of the canvas like this:
Let’s drop this texture above the ’12-gold’ texture and inside of the ‘GOLD’ folder if it’s not already inside.
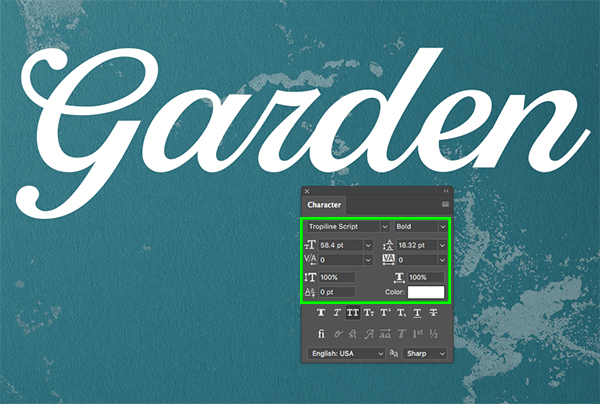
Step 15: Garden Text
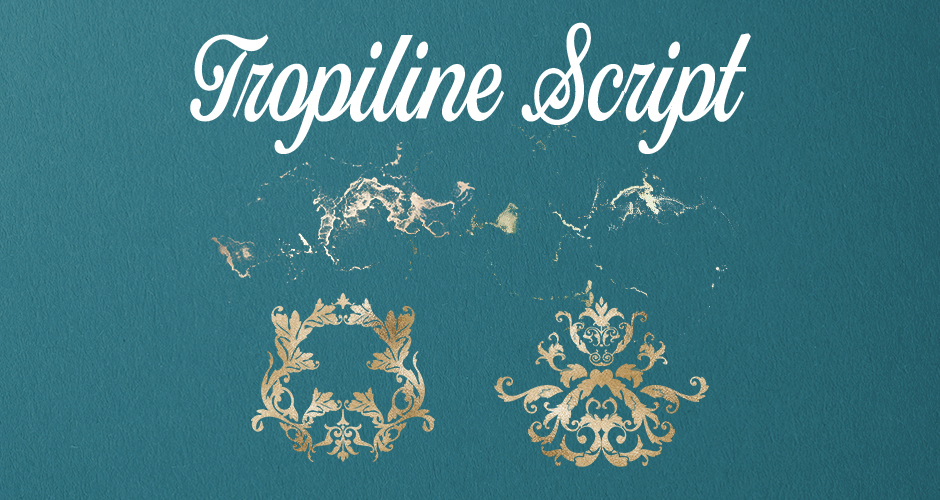
Create a new layer and then press ‘T’ to switch to the Type Tool. Click your cursor and type out the word ‘Garden’ and then open the Character panel if you don’t already see it (this can be found under the Window menu). Select the text and change the typeface to ‘Tropiline Script’ which is a beautiful typeface from Studio Sun. The full design bundle contains a plethora of styles and weights to choose from, but for now we will just be working with the ‘Bold’ style of this font. For the size, let’s go ahead and change it to about ‘58.4 pt’ and leave the fill color set to solid white.
Press Command/Ctrl+J to duplicate the layer and then move it down below the original copy of the word ‘Garden’. Click inside with your Type Tool (T) and change the text to ‘Party’ using the same settings in the Character panel.
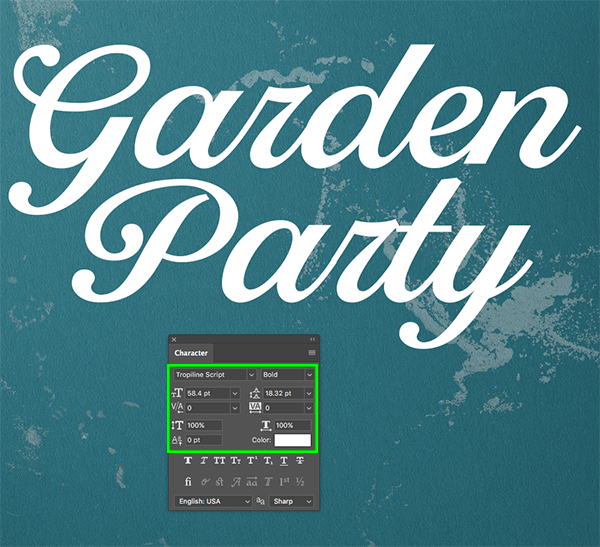
Next, select the top text layer, and then hold the Shift key and select the second one below so that both text layers are selected simultaneously.
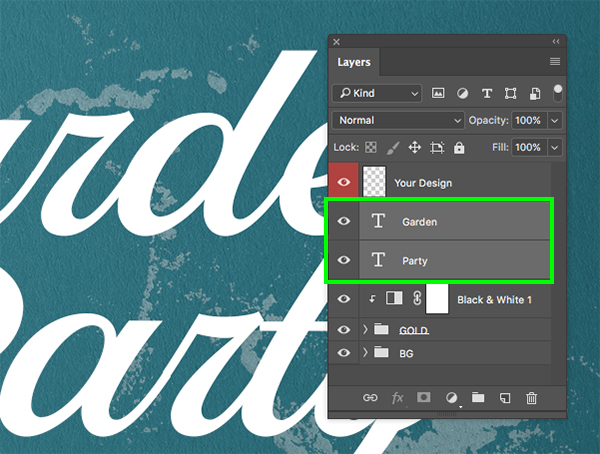
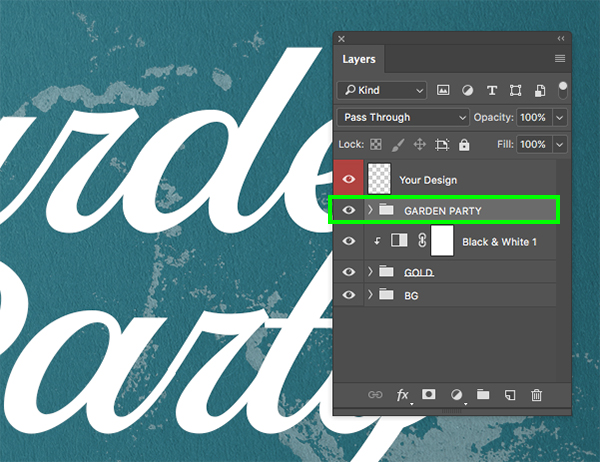
Press Command/Ctrl+G to place these layers into a new folder and then double click the ‘Group 1’ text to rename the folder ‘GARDEN PARTY’.
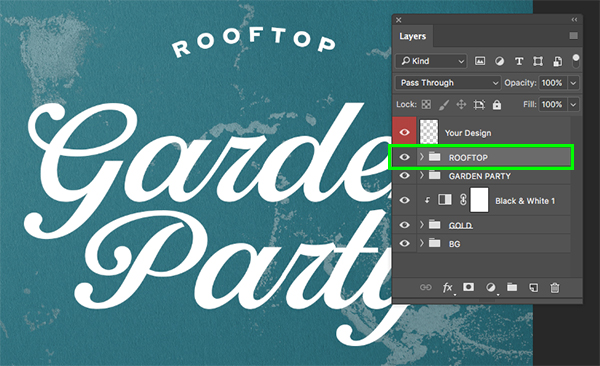
Step 16: Rooftop Text
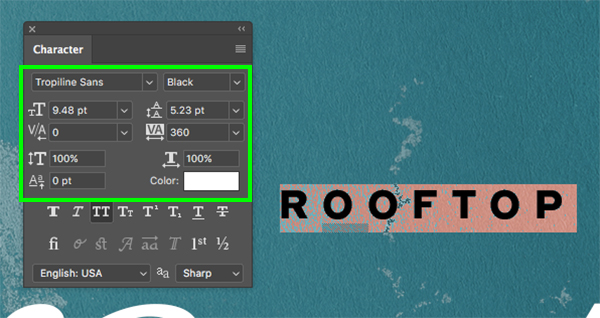
Create another new layer at the top and type out the word ‘ROOFTOP’ in all uppercase letters. For this we want to use a ‘Black’ style of a sans serif typeface. In this case I will be working with the ‘Black’ style of ‘Tropiline Sans’ to show another one of the styles, but if you are following along and don’t have access to this typeface feel free to use any other heavy sans serif such as ‘Avenir’ or ‘Gotham’ as there are a lot of free alternatives that look close. Here let’s change the size of the text to ‘9.5 pt’ and then change the tracking setting to ‘360’ to space out the letters still using a solid white fill.
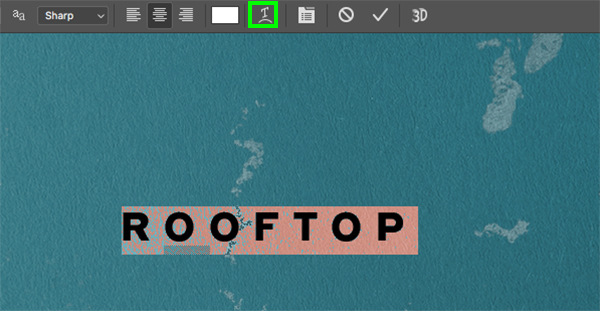
Click inside of the text box and press Command/Ctrl+A to select the whole word, and then click on the small ‘T’ icon in the top toolbar for the ‘Create warped text’ option.
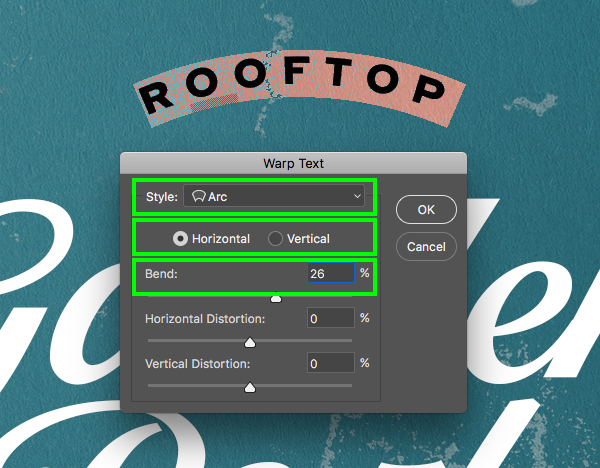
When the dialog box appears, change the ‘Style’ to ‘Arc’, check off the ‘Horizontal’ button, and then apply a ‘Bend’ value of ‘26%’ before pressing ‘Return’ on the keyboard or clicking ‘OK’ to proceed.
With the ‘ROOFTOP’ layer still selected, press Command/Ctrl+G to place it into a new folder and double click on the ‘Group 1’ text to rename the folder ‘ROOFTOP’ as shown here:
Step 17: Bottom Text
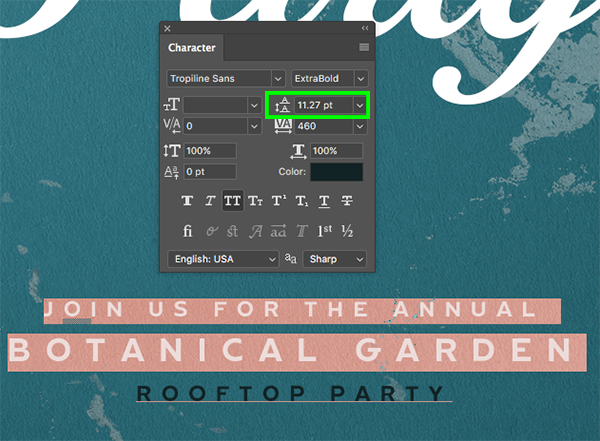
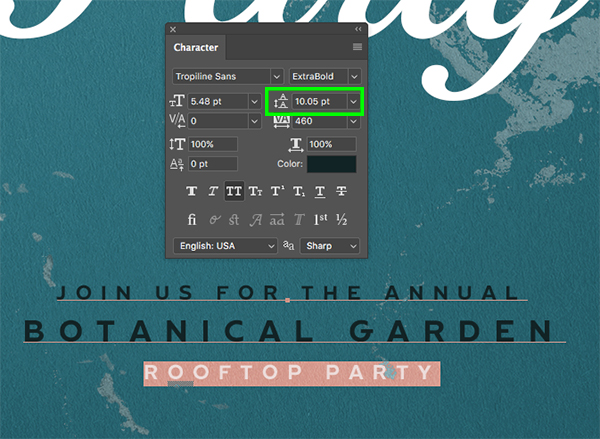
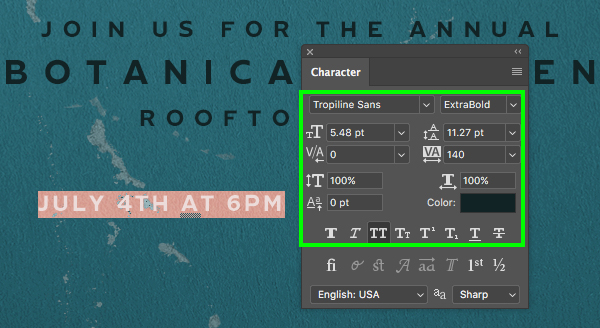
Create a new layer below the ‘Garden Party’ text and click with your Type Tool (T). Type out ‘JOIN US FOR THE ANNUAL’ and then hit return to make a new line. After that, type out ‘BOTANICAL GARDEN’ and then hit return again. On the third line, type out ‘ROOFTOP PARTY’ so you now have three lines of text. Using the cursor, click and drag around the first line and change the size to about ‘5.5 pt’ with a tracking setting of ‘460’ as shown below:
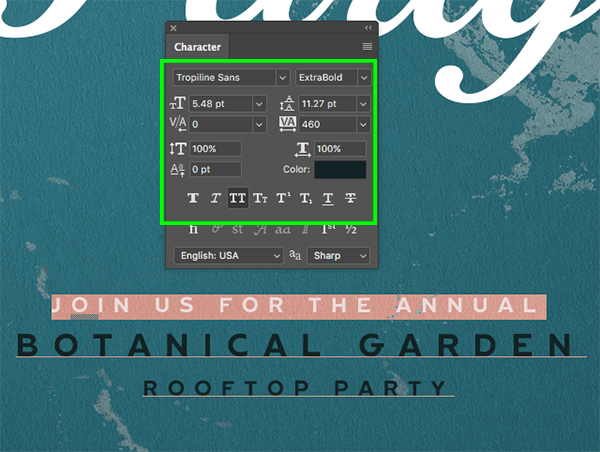
Highlight the second line of text and change the size to about ‘8.22 pt’ and keep the same tracking setting.

Highlight both the first and second lines of text and change the linespacing to ‘11.27 pt’ to control the distance between the first and second lines.
Next, highlight the third line of text and change the linespacing to ‘10.05 pt’ to give us an even amount of spacing (visually) between the lines.
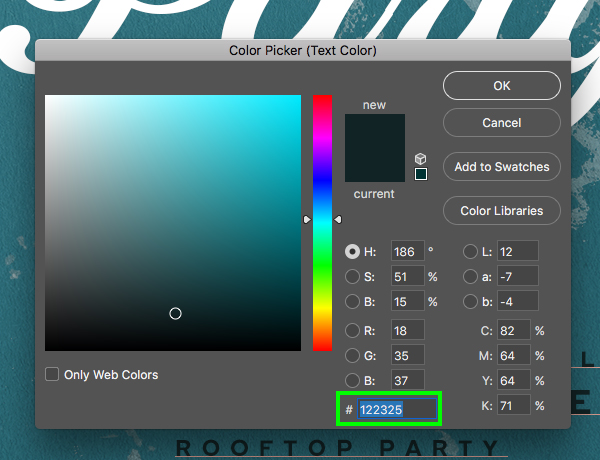
From here, click anywhere inside of the text box and press Command/Ctrl+A to select all three lines and then click on the color swatch and change the fill color to the hex value ‘#122325’ which is a deep bluish green color.
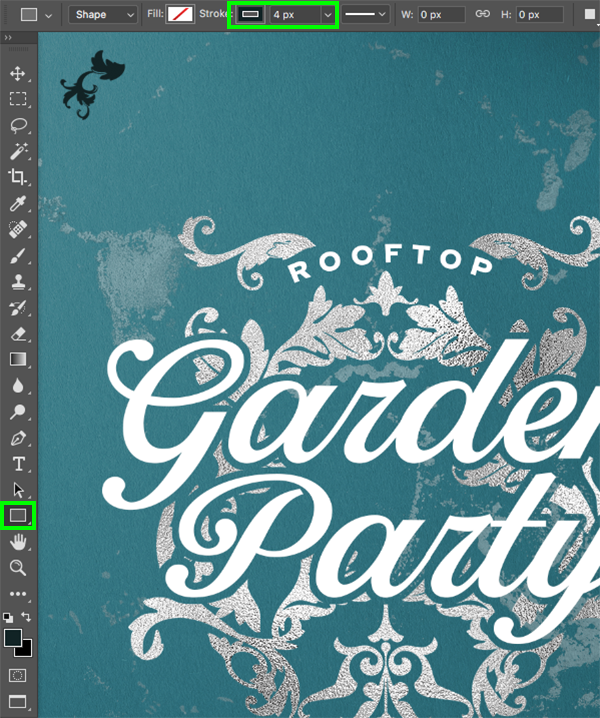
Step 18: Date and Address
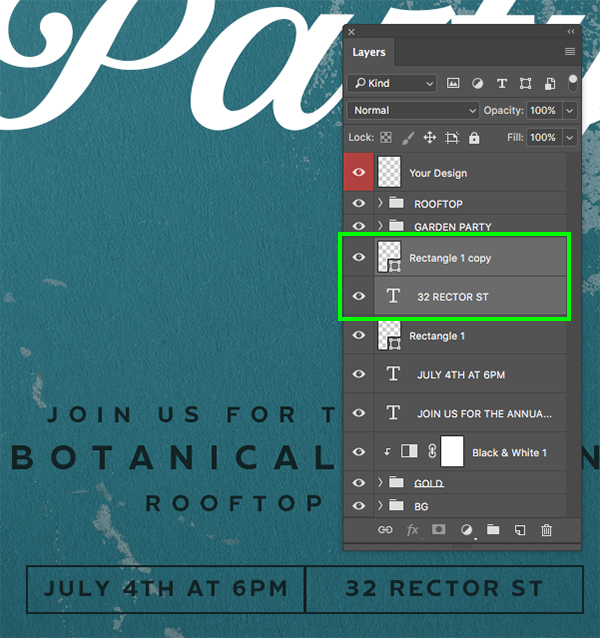
Let’s create a new layer below this text and use the Type Tool (T) to type out ‘JULY 4TH AT 6PM’ using the same sans serif typeface with the same color. Here we want the size of the text to match the smaller text from the previous step – ‘5.5 pt’ or so.
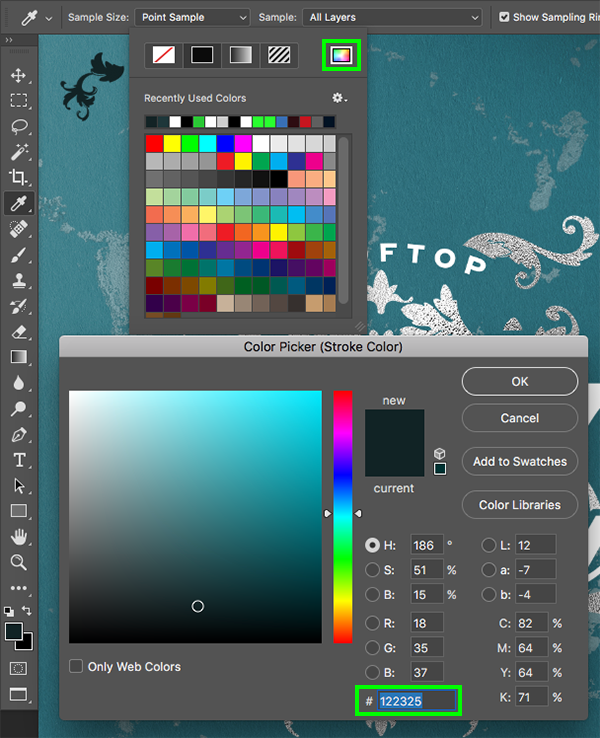
Press the letter ‘U’ to change to the Rectangle Tool and then check the top toolbar to choose a ‘Fill’ of none and a ‘Stroke’ of ‘4px’. From here, click on the stroke color and then on the rainbow color spectrum icon in the upper right corner of the menu that appears.

From here, change the hex value to match our dark blue-green color – ‘#122325’ and then press ‘OK’ to apply the color change.

Now click and drag a stroked rectangle around the text so you end up with something like this:

After that, select both the date and the stroked rectangle layers and press Command/Ctrl+J to duplicate them. Hold the Shift key and the right arrow to slide these over until the boxes are right next to each other. We now want to center both of these text boxes below the text from the previous step. Once you have done that, change the text in the second box to read ’32 RECTOR ST’ as shown below:
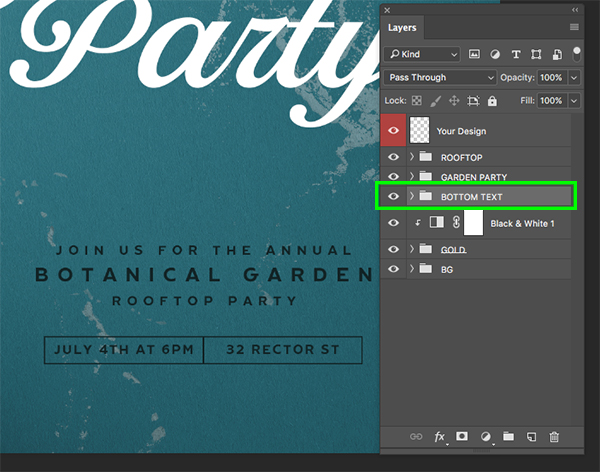
Step 19: Bottom Text Group
Let’s now grab the top rectangle layer, hold the Shift key, and then select the bottom text layer as shown here:
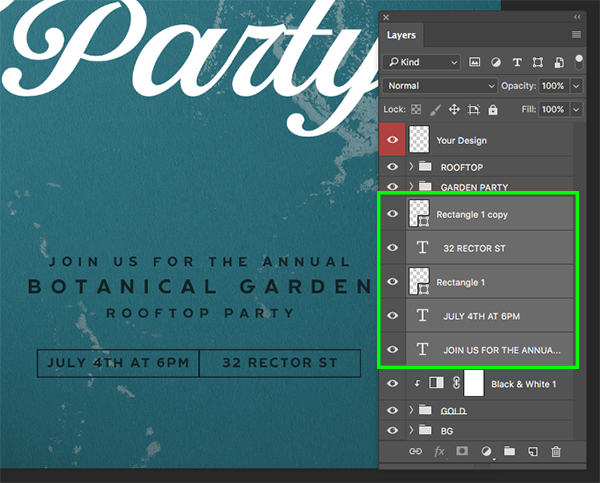
With your layers selected, press Command/Ctrl+G to place them into a new folder and double click the ‘Group 1’ text to rename this folder ‘BOTTOM TEXT’ so that we can keep all of these elements together.
Step 20: Golden Mask
Select the ‘GOLD’ folder layer and then click on the ‘Add layer mask’ icon from the bottom of the Layers Palette to apply a mask to the entire group.

Press ‘B’ to switch to the Brush Tool and then press the number ‘4’ to reduce the opacity of the brush to ‘40%’. After that, hold the left bracket and Shift keys together to soften the edges of the brush. Lastly, make sure that you have a solid black foreground selected as well.
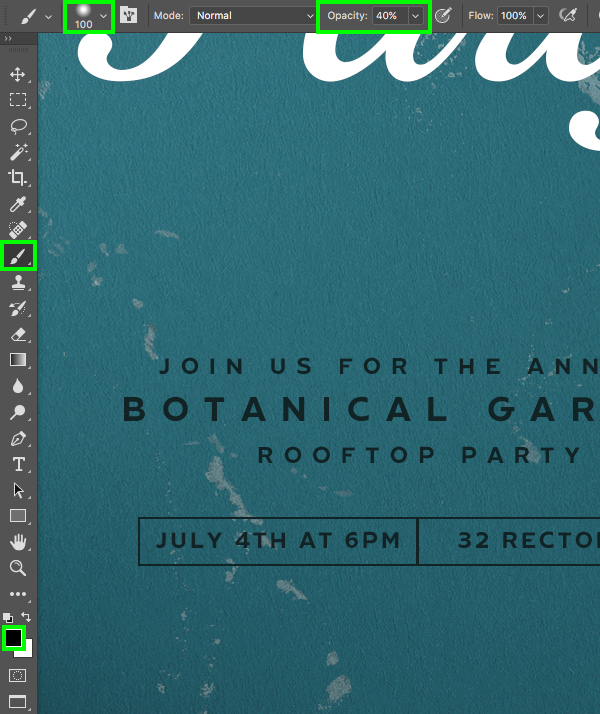
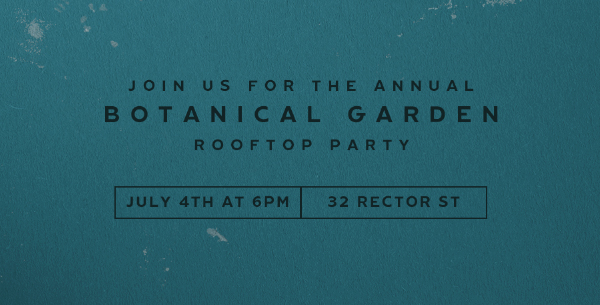
From here, let’s begin brushing over the gold texture that appears behind our bottom text as it interferes a bit with the readability of the text. Once you have cleaned the area up a bit you should have something like the image shown here:
Step 21: Golden Embellishment
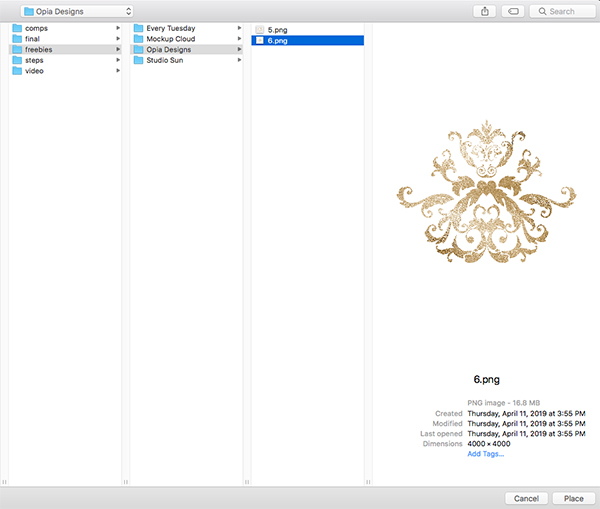
Go to the File menu and choose ‘Place Embedded…’ from the dropdown menu before navigating to the freebies folder and going into the ‘Opia Designs’ subfolder. From here, select ‘5.png’ and then choose ‘Place’ from the lower right corner to bring it into Photoshop.

Scale and position the embellishment on top of the text as shown here:
Step 22: Black & White Adjustment Layer
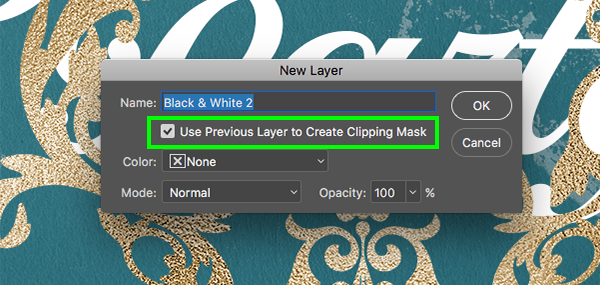
With the ‘5’ Smart Object layer selected, hold the Alt/Option key and click on the Adjustment Layer icon at the bottom of the Layers Palette before choosing ‘Black & White…’ from the menu.
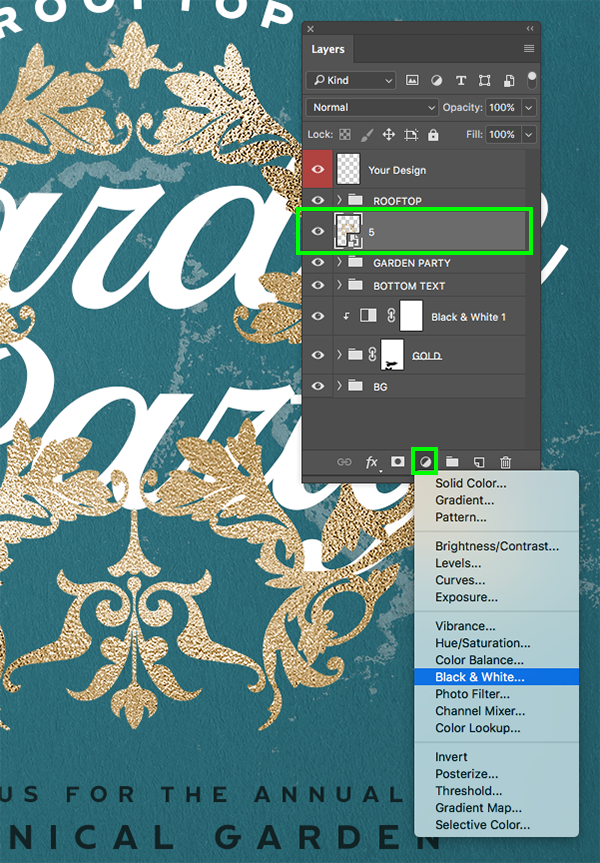
Check off the ‘Use Previous Layer to Create Clipping Mask’ box and then press ‘Return’ or click ‘OK’ to continue.
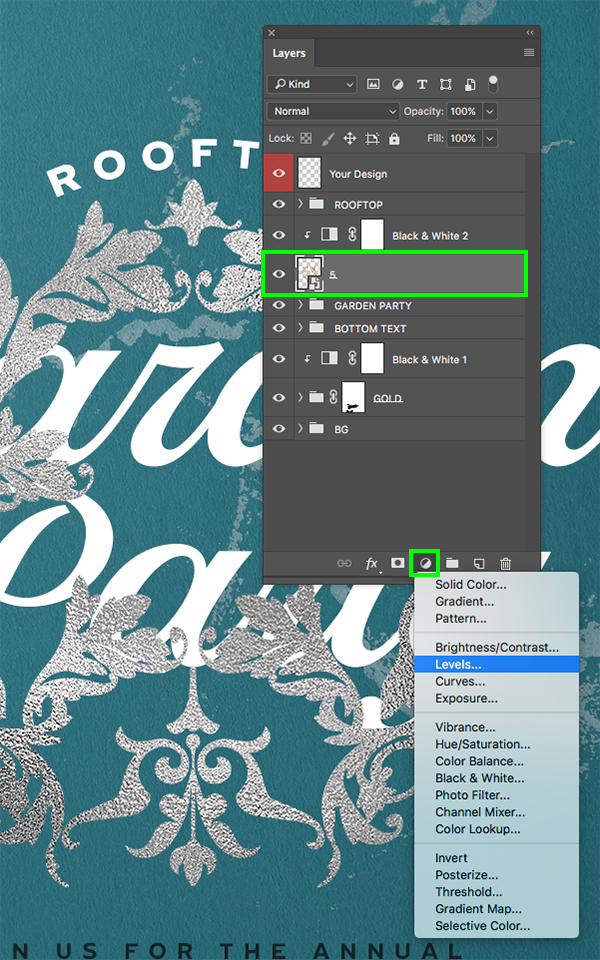
Step 23: Levels Adjustment Layer
With the ‘5’ Smart Object layer selected again, return to the Adjustment Layer icon and this time choose ‘Levels…’ from the list.
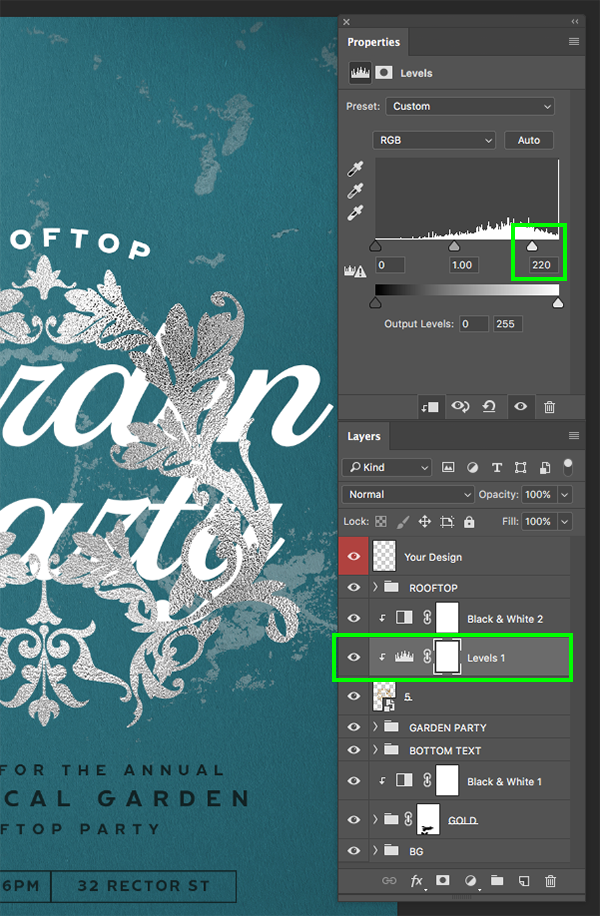
You will now have a Clipping Mask that gets automatically applied to this layer, and in the Properties panel we simply want to move the light colored slider on the right in towards the middle until it’s set to ‘220’ as shown below:
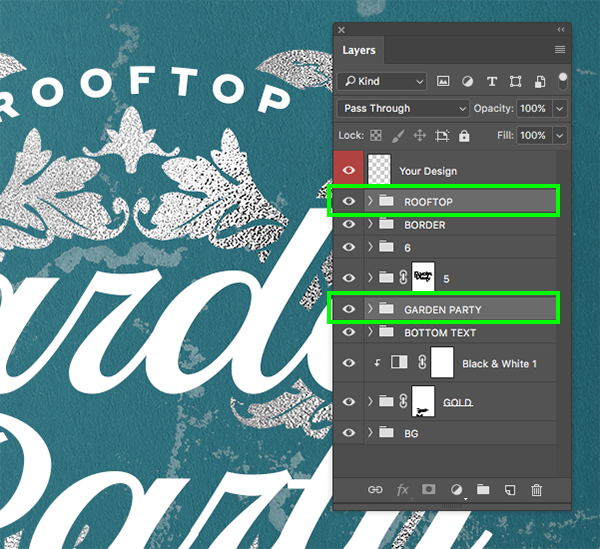
Step 24: Embellishment Group
Select the ‘Black & White 2’ Adjustment Layer, hold the Shift key, and then select the ‘5’ Smart Object layer so all three of your layers are selected at once.
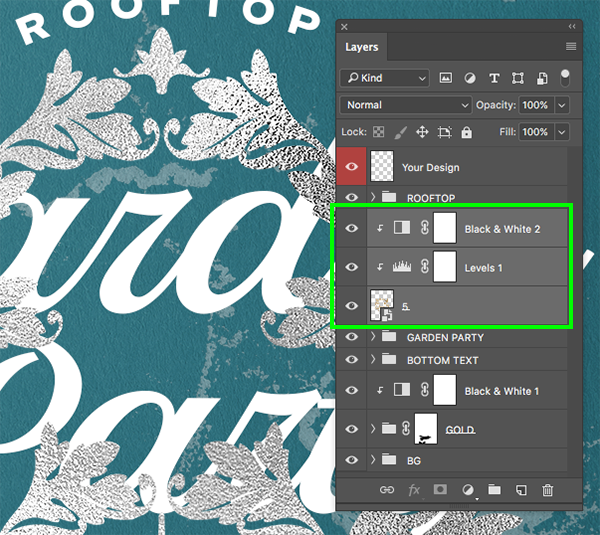
Press Command/Ctrl+G to place these layers into a folder and double click the ‘Group 1’ text to rename the folder ‘5’ as shown in the image below:
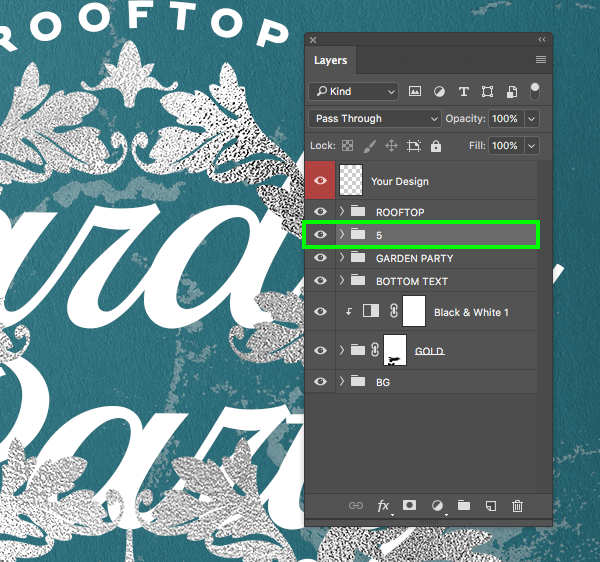
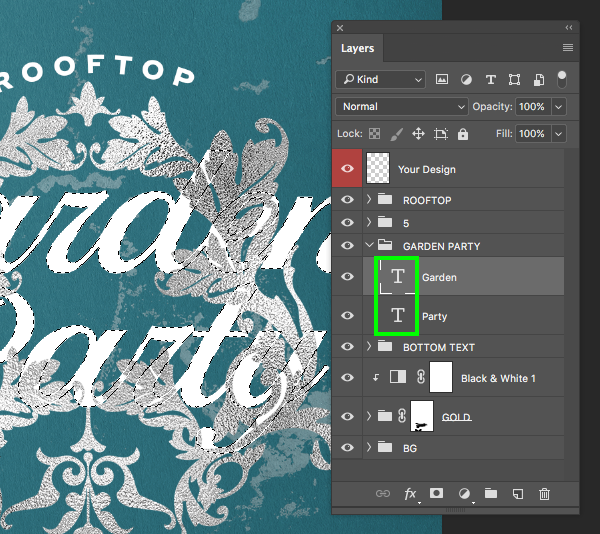
Step 25: Garden Party Knockout
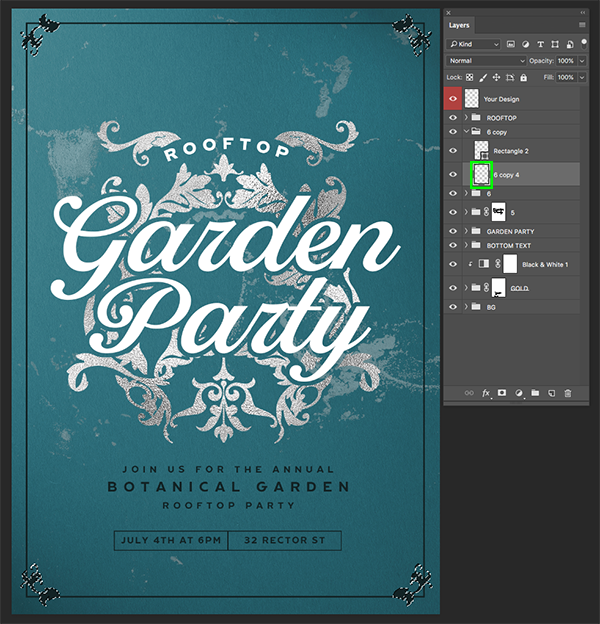
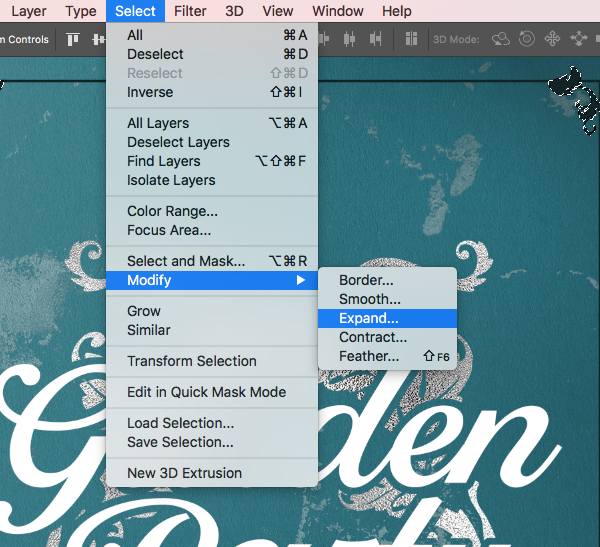
Hold the Command/Ctrl+Shift keys and click on the layer thumbnail icons of both the ‘Garden’ text layer as well as the ‘Party’ text layer so that you have an active selection around both text layers.
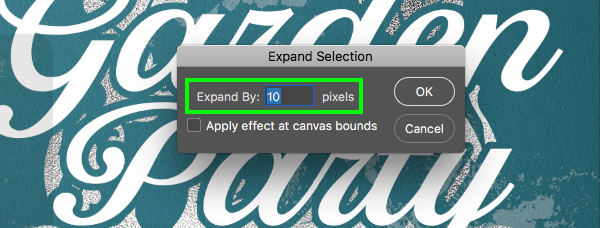
Go to the Select menu and choose ‘Modify > Expand…’ from the dropdown.
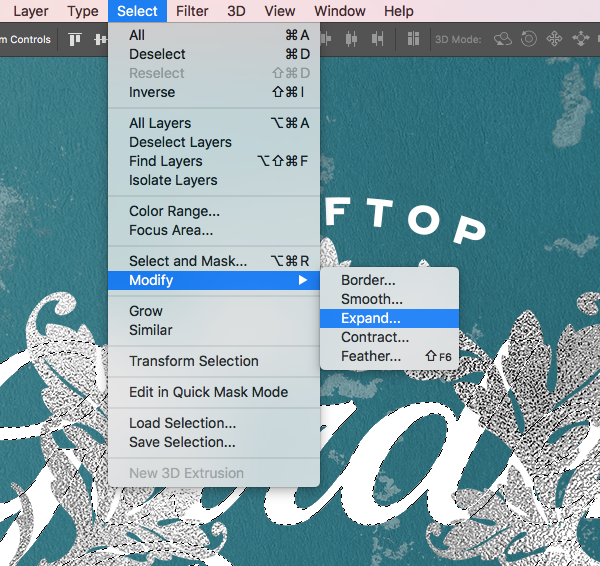
Enter a value of ’10’ and then click ‘OK’ to continue.
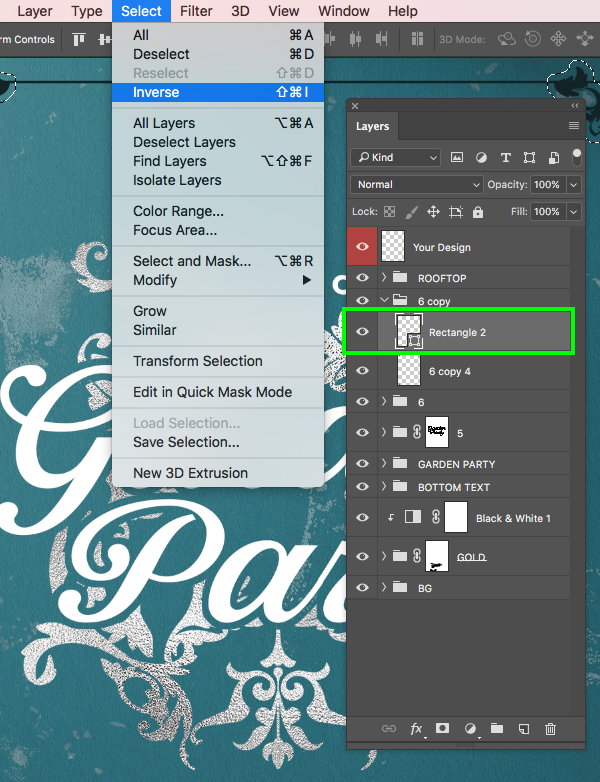
Make sure that the ‘5’ folder is selected and then return to the Select menu and choose ‘Inverse’ to invert the selection. Next, click on the ‘Add layer mask’ icon and you will now see that your text has been knocked out of the embellishment with a bit of padding around the outside as shown below:
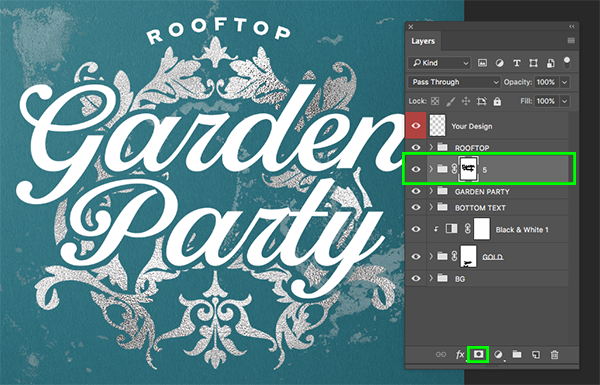
Step 26: Embellishment 2
Go to the File menu and choose ‘Place Embedded…’ once again. Navigate to the ‘Opia Designs’ subfolder and this time choose ‘6.png’ from the list.
Bring in the embellishment and position it like this:

Press ‘L’ to switch to the Lasso Tool and then manually draw a selection around both of the pieces shown in the image below:

After making your selection, click on the ‘Add layer mask’ icon at the bottom of the Layers Palette to leave only the two pieces of the ornament above the curved ‘ROOFTOP’ text.
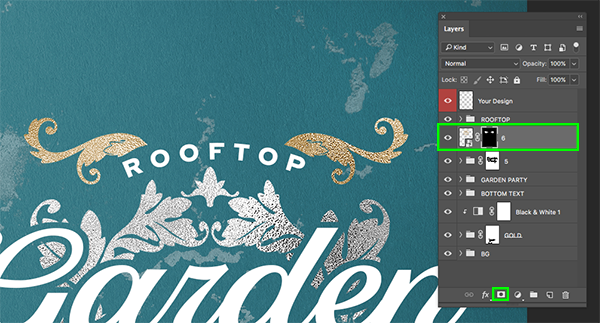
Step 27: Embellishment 2 Adjustments
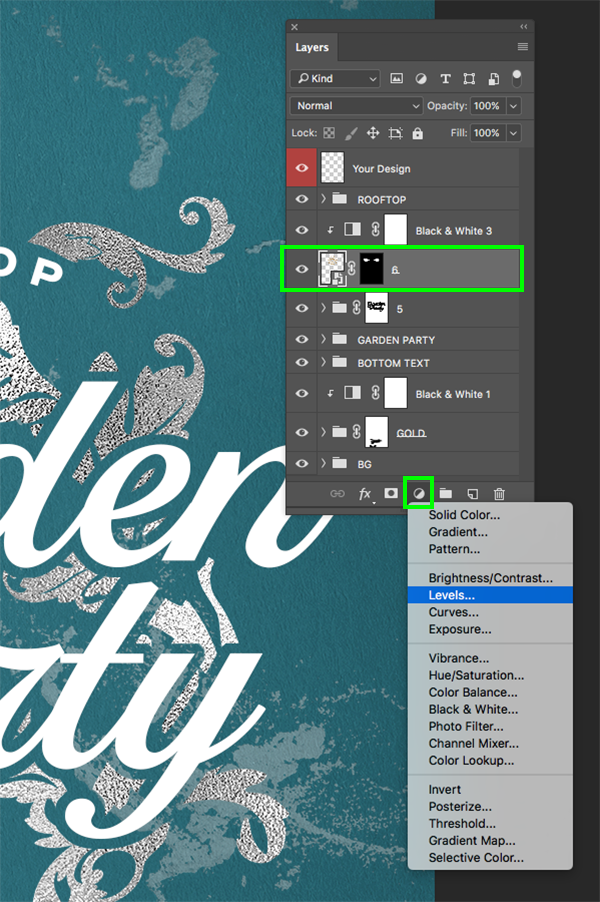
With the ‘6’ Smart Object layer selected, return to the Adjustment Layer icon at the bottom of the Layers Palette and choose ‘Black & White…’ from the menu.
When prompted with the following dialog box, check off the ‘Use Previous Layer to Create Clipping Mask’ option and then press ‘Return’ on the keyboard or click ‘OK’ to continue.
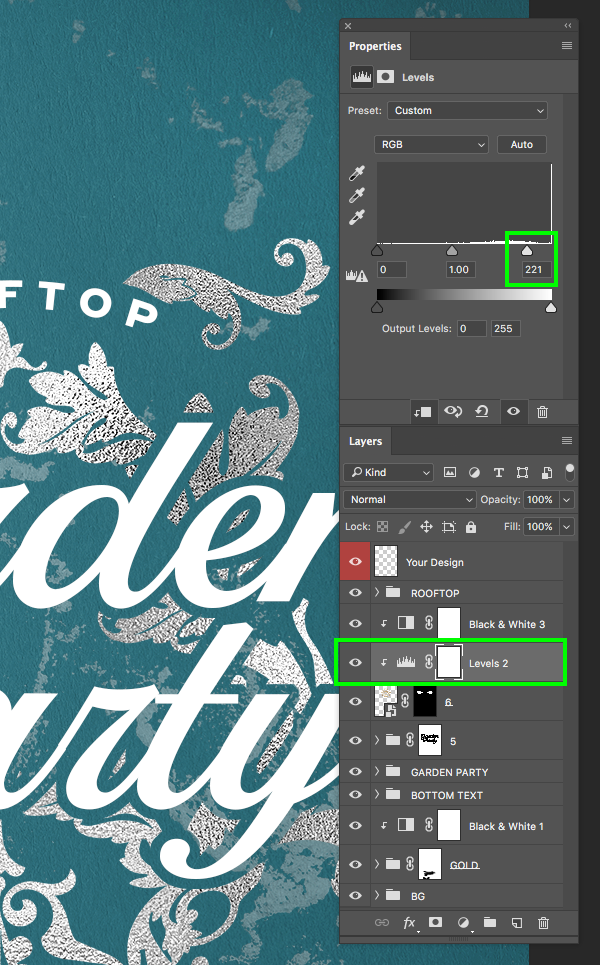
Return to the Adjustment Layer icon at the bottom again, and this time add a ‘Levels…’ Adjustment Layer.
Once we have added this new Adjustment Layer, go to the Properties panel and move the right slider in towards the center so that it’s set to ‘221’ to lighten the texture a bit.
Step 28: Embellishment 2 Group
Select the ‘Black & White 3’ Adjustment Layer, hold the Shift key, and then select the ‘6’ Smart Object layer so all three of these layers are selected at once.
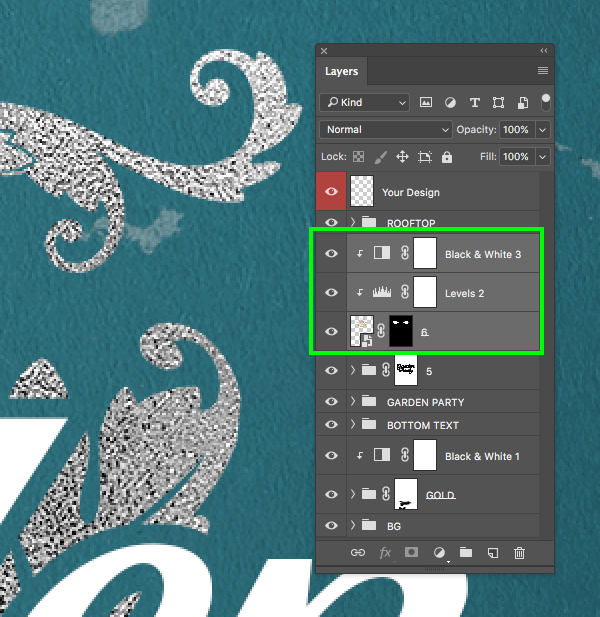
Press Command/Ctrl+G to place these layers into a new folder and then rename it ‘6’ to keep things simple.

Step 29: Embellishment Duplicates
Select the ‘6’ folder and press Command/Ctrl+J to duplicate the group. Once you have done that, go into the folder, hold the Control key, click on the Layer Mask attached to the main Smart Object and then choose ‘Delete Layer Mask’.

Use the Lasso Tool (L) to drag a selection around another piece of the embellishment as shown here:
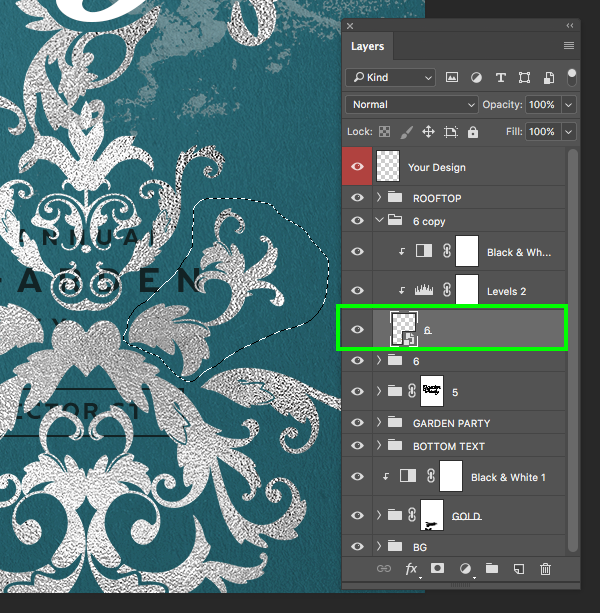
With your selection active, click on the ‘Add layer mask’ icon to apply a new mask to the embellishment.

Step 30: Flat Color Ornament
Double click on the newest ‘6’ Smart Object to open the Layer Style panel and apply a ‘Color Overlay’.

For the fill color use the hex value ‘#122325’ that we used for our darker text earlier.

After applying the effect, reduce the size of the ornament and place it in the lower right corner of the design as shown here:

Step 31: Ornament Flip
Select the ‘6’ Smart Object layer that we just created with the flat color fill and press Command/Ctrl+J to duplicate it. After that, select the new copy and press Command/Ctrl+T before holding the Control key, clicking on the shape and choosing ‘Flip Horizontal’ from the dropdown menu that appears.

Hold the Shift key and slide this new copy over to the lower left corner so you now have one in the bottom corner on each side. Next, select the top copy in your Layers Palette, hold the Shift key, and then select the one directly below it.

Press Command/Ctrl+J to duplicate both copies of the ornaments, and then once again press Command/Ctrl+T to do a Free Transform, hold the Control key, click on the shapes, and this time choose ‘Flip Vertical’ from the dropdown.
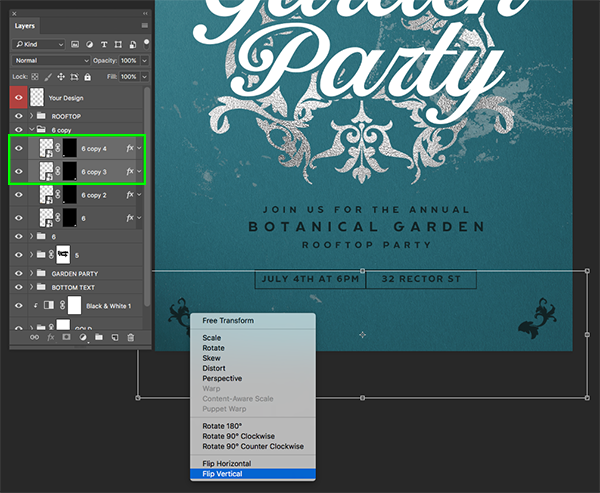
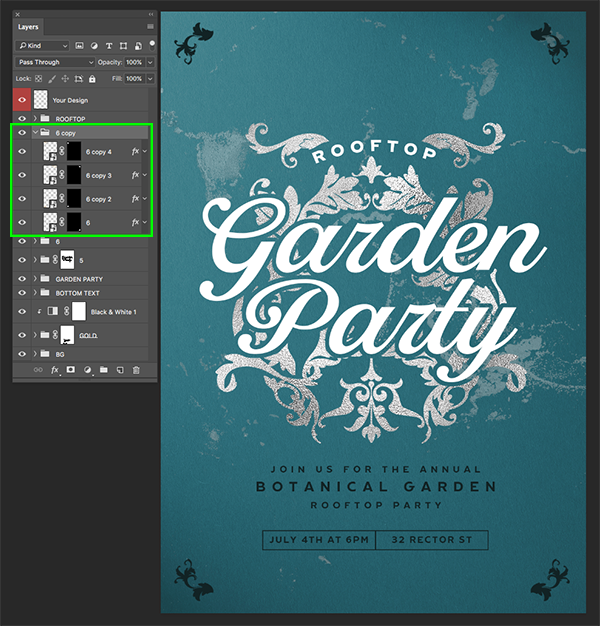
Once again we now want to hold the Shift key and slide these copies to the top of the design so we now have an ornament in all four corners.
Step 32: Thin Border
Press ‘U’ on the keyboard to grab the Rectangle Tool once again and then make sure you have no fill and a stroke of ‘4 px’ selected. After that, click on the stroke color box.
Click on the rainbow color spectrum icon in the upper right corner and from there change the hex value to ‘#122325’ to match the dark bluish green color we have used throughout.
Next, click and drag a large rectangle around the perimeter of the design leaving some room around all four sides like this:
Step 33: Ornament Merging
Select the top copy of the corner ornaments, then hold the Shift key and select the bottom one so all four corner copies are selected at the same time.
Press Command/Ctrl+E to merge all four of these ornaments into a single layer. After that, hold the Command/Ctrl key and click the layer thumbnail icon to activate a selection around all four of the corner ornaments at once.
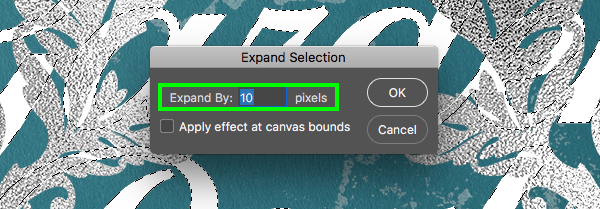
Go to the Select menu and choose ‘Modify > Expand…’ from the dropdown.
Enter a value of ’10’ pixels and then press ‘Return’ on the keyboard or click ‘OK’ to continue.
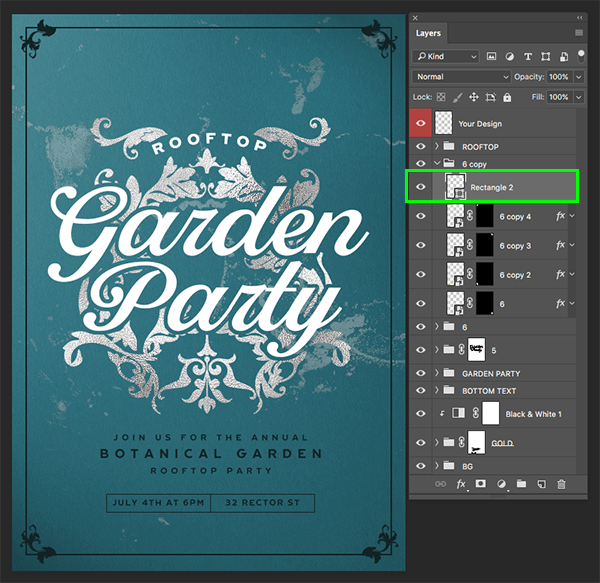
Return to the Select menu and choose ‘Inverse’ from the dropdown to invert the selection and then select the ‘Rectangle 2’ layer which is our thin border around the outside.
With the ‘Rectangle 2’ layer selected, click on the ‘Add layer mask’ icon and you should now see your ornaments knocked out of the thin border with a bit of space in between. Here I have also renamed the folder containing this thin line and merged ornaments to ‘BORDER’.

Step 34: Text Merging
Next, select the ‘ROOFTOP’ folder, then hold the Command/Ctrl key and click on the ‘GARDEN PARTY’ folder so that both of the text folders are selected at the same time.
Press Command/Ctrl+J to duplicate both of the folders above the originals.
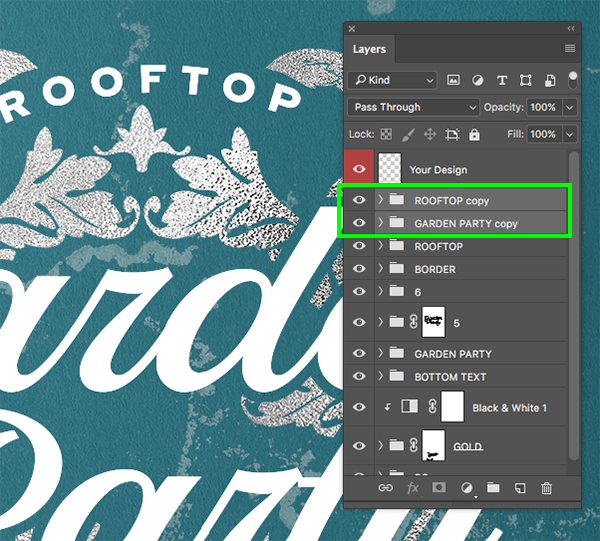
With both of the folders selected, press Command/Ctrl+E to merge them together into a single raster layer. Once you have done that, turn off the visibility of the two original folders.

Step 35: All The Lights
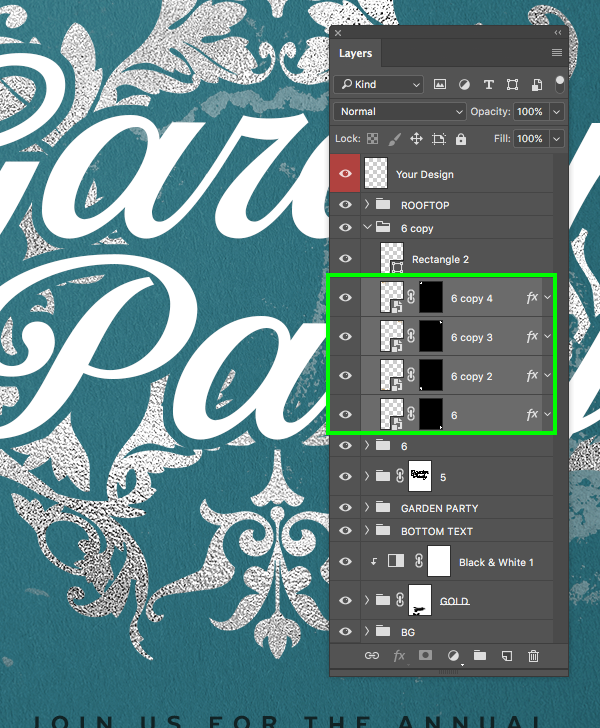
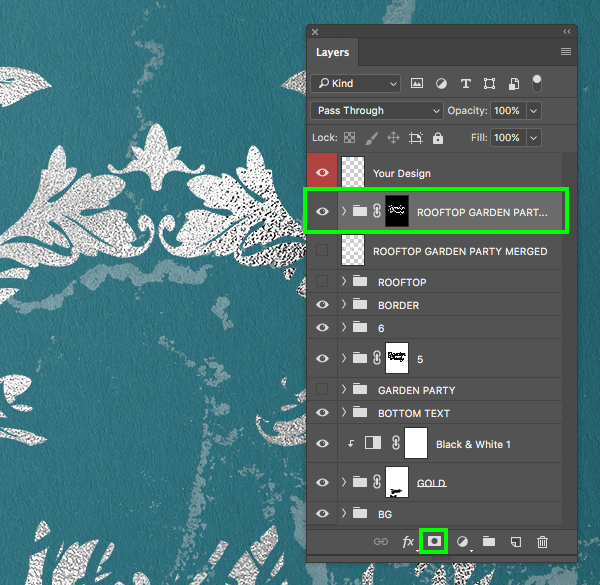
Select the ‘5’ folder that we created earlier and duplicate it by pressing Command/Ctrl+J on the keyboard. Once you have made a copy, hold the Control key and click on the mask before choosing ‘Delete Layer Mask’ to get rid of it.

Move this new copy of the ‘5’ folder to the top of the Layers Palette just above the merged ‘ROOFTOP GARDEN PARTY’ layer. Next, hold the Command/Ctrl key and click on the merged ‘ROOFTOP GARDEN PARTY’ layer thumbnail icon to activate a selection around it.

Turn off the visibility of the merged text layer and then invert your selection. Select the copy of the ‘5’ folder and then click on the ‘Add layer mask’ icon to add a new instance of a mask to the group. We now have a folder where anything we put inside will be confined to the shape of our merged text. Here I have renamed this new folder ‘ROOFTOP GARDEN PARTY MERGED’ as shown below:
Inside of this folder we now have a copy of one of the silver embellishments, so what we are going to do is scale it up by using a Free Transform and dragging outwards from any of the four corners of the bounding box while holding the Shift key to constrain the proportions until we can begin filling in some of the letters.
Select the ‘5’ Smart Object layer, hold the Shift key, and grab both of the Adjustment Layers that are clipped to it, and then duplicate them by pressing Command/Ctrl+J on the keyboard. Once you have create a copy of these three layers, select only the ‘5 copy’ Smart Object and begin to play with the size and rotation of it to continue filling in the ‘ROOFTOP GARDEN PARTY’ text shape.
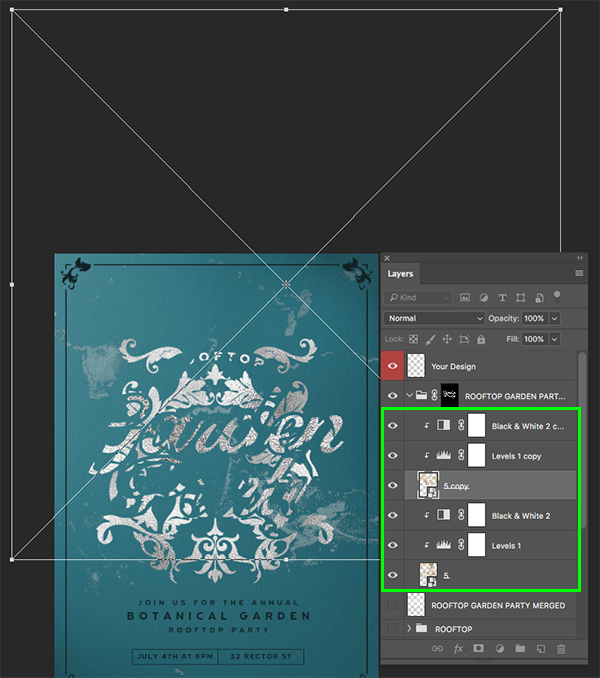
Repeat this process of copying the texture and scaling and rotating it until you have filled in all of the text. When it’s all said and done I have about 12 copies but you can see how the effect takes shape after gradually building the textures on top of one another.
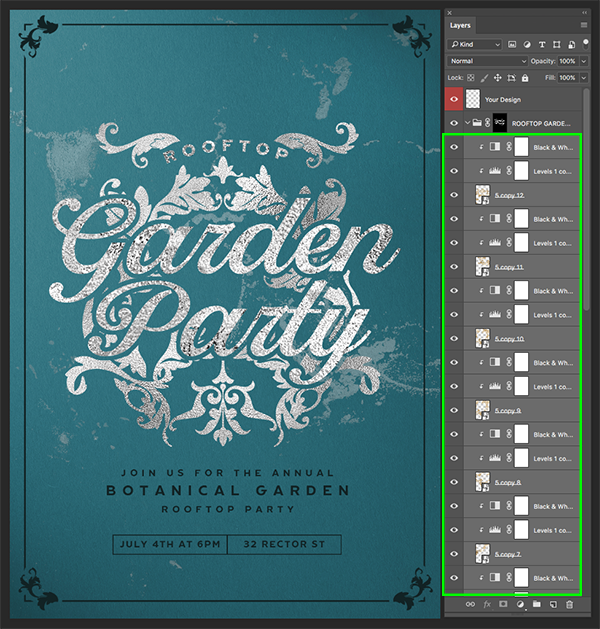
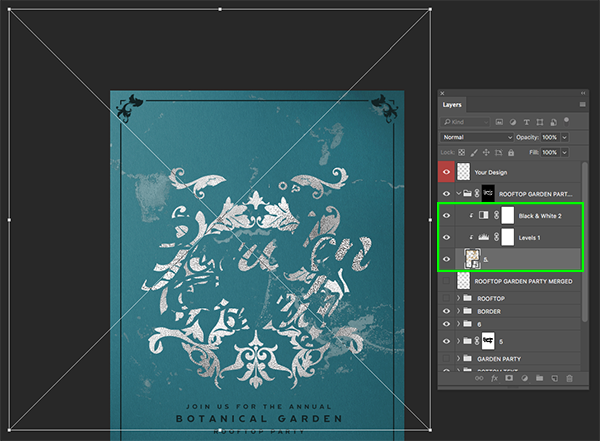
Step 36: Finishing Touches
As you build up the layers of textures to reveal the letters, there may be instances where you are getting pieces of the texture that you don’t want or that actually make it harder to read rather than easier. When this happens all we need to do is add a Layer Mask to the copy of the Smart Object that is causing the issue and then paint over it in black. You can see in the image below that I have circled one of these more problematic areas which I took care of by simply masking it out.

After taking a look at everything I am happy with the way that the ‘Garden Party’ text reads, but the smaller ‘ROOFTOP’ text above it doesn’t look quite right. Here we will try something else so let’s brush over the ‘ROOFTOP’ text on the merged folder with our Layer Mask to hide it.

Instead, turn the visibility back on for the ‘ROOFTOP’ folder that we created earlier on and change the fill color to match the darker bluish-green from any of the corners or darker text. Doing this will help not just with the readability but also tying it together with some of these other elements in the design. Here I have also just moved up the ‘6’ folder slightly to add a bit of breathing room around the text as well. Once you are happy with the way everything looks go ahead and save the file by pressing Command/Ctrl+S and then close the tab by pressing Command/Ctrl+W to return to the main mockup file.

We have now completed our premium Rooftop Garden Party Flyer Design in Photoshop! To create this flyer we have combined a small handful of professional grade textures, a dynamic script font, and a realistic mockup to make our presentation complete. Remember that the ‘Tropiline’ font we have used for the tutorial is just one of many styles from the complete family that is available in this vibrant collection that is about to become your go to secret weapon for creating stunning graphics every time!
Remember that whether it’s your outcome for this tutorial or something new you’ve made, we’d love to see your designs on our Facebook page.
Please leave a comment if you have any questions or suggestions. I always look forward to hearing from you!
There’s still time to check out The Creative’s Vibrant Artistic Collection featuring work from artists such as Lisa Glanz, Set Sail Studios, The Artifex Forge and many more all for an unbeatable price of just $29!
Thank you so-o-o-o much for the tut and the sample!
You are so welcome and thank you for taking the time to leave us a comment :)
Hi,
The Search for “https://dribbble.com/search?q=07-floral-premade-scene” brings “NO RESULT FOUND”. Did I misunderstand something?
Thanks so much for flagging this with us Peter and I am so sorry for any disappointment caused!
This one may have been removed from Dribble so I will double check this with our tutorial team to see if I can locate this one or similar for you!
Step 1: goto mockup folder … doesn’t exist.
I downloaded the files and the structure does not match.
I appreciate that the mockup file is not available, but when I went to dribbble, the suggested file is not found when searched for.
Not starting off on a good foot.
I love having these tutorials available, but the process needs to be reviewed.
Enjoy your weekend. b.
Thanks so much for taking the time to comment Brian and I am really sorry that we were unable to include this mockup in our freebies!
We hope that our community may be able to pick up an alternative mockup file as advised by the designer, however this may have been removed since our tutorial released. My sincerest apologies if this is possibly the case!
I hope that you were still able to pick up some handy design tips in this tutorial Brian, and our apologies again for any disappointment caused. I have raised this with our team for future so thanks so much for your helpful feedback and I hope that you will enjoy all of our tutorials to come!
Hey Brian,
We have just located an alternative freebie for this tutorial, and added in a new note to the page above. So that you can pick this one up directly, I have also attached a link for you below:
https://bit.ly/2Xy2oos
I hope that this helps and that you enjoy taking this one for a spin!
The mock up 07-floral-premade-scene is not on Dribble – or anything like it for that matter. But otherwise, great tutorial. :-)
Hey Joe,
Thanks for commenting and I am really sorry that you are unable to see any similar premade scenes in Dribble for this tutorial. This item may possibly have been removed, so my sincerest apologies if this is possibly the case!
I will definitely flag this with our tutorial team to see if there are any other alternative resources that we feel might work for you!
It’s a shame that the mockup is unavailable as it rather ruins the whole tutorial. :(
We are so sorry for any disappointment caused Andrea!
We hope that our community can still really enjoy taking this tutorial for a spin, and just in case you aren’t already aware, the designer has included a note on the tutorial page to say that you should be able to find a similar free sample on Dribbble by searching for ‘07-floral-premade-scene’, as an alternative so I hope that this helps!
Thanks for the tutorial! It is great to gain new knowledge, well explained, too! However, I sometimes wonder why to apply a specific number when e.g. adjusting levels. (But that´s my thing of always wanting to know “why”.) I don´t think it´s much of a problem that the mockup isn´t available since I wouldn´t copy the exact project but much more try to apply the lesson on my own project. Thanks again!
Hey Tinna,
It is awesome to hear that you really enjoyed picking up some handy new tips in this tutorial! Eric has chosen these specific levels to achieve the effects that he was after in this tutorial, however I hope that you will have fun experimenting with these further, so make this design your own :).
Just in case you haven’t seen already Tinna, we have provided a link to a similar mockup for this tutorial, which you can always check out here: https://bit.ly/2Xy2oos Happy designing, and please do feel free sharing your final results with us- we would love to see what you are working on!