In this tutorial, we will be creating a cinematic movie poster design in Photoshop. To do this we will be using one style of the ‘Versus’ typeface from Latinotype which is part of The Essential, Versatile Font Collection. The fonts in this bundle are meticulously hand-crafted, so, whether you’re working on website design, branding, social media or a poster project, this collection has you covered. In addition to this typeface, we will also be working with a handful of free stock photos from Unsplash and a free movie poster credits template from Studio Binder. We will then be bringing all of these elements together and compositing our image to create an ‘Ultra’ cool poster. So, if you’re all ready to smash some box office records, let’s get started on our feature film poster design in Photoshop!
HAVE YOU SEEN OUR YOUTUBE CHANNEL?
Watch the video tutorial below and subscribe to our YouTube channel for regular updates direct to your inbox.
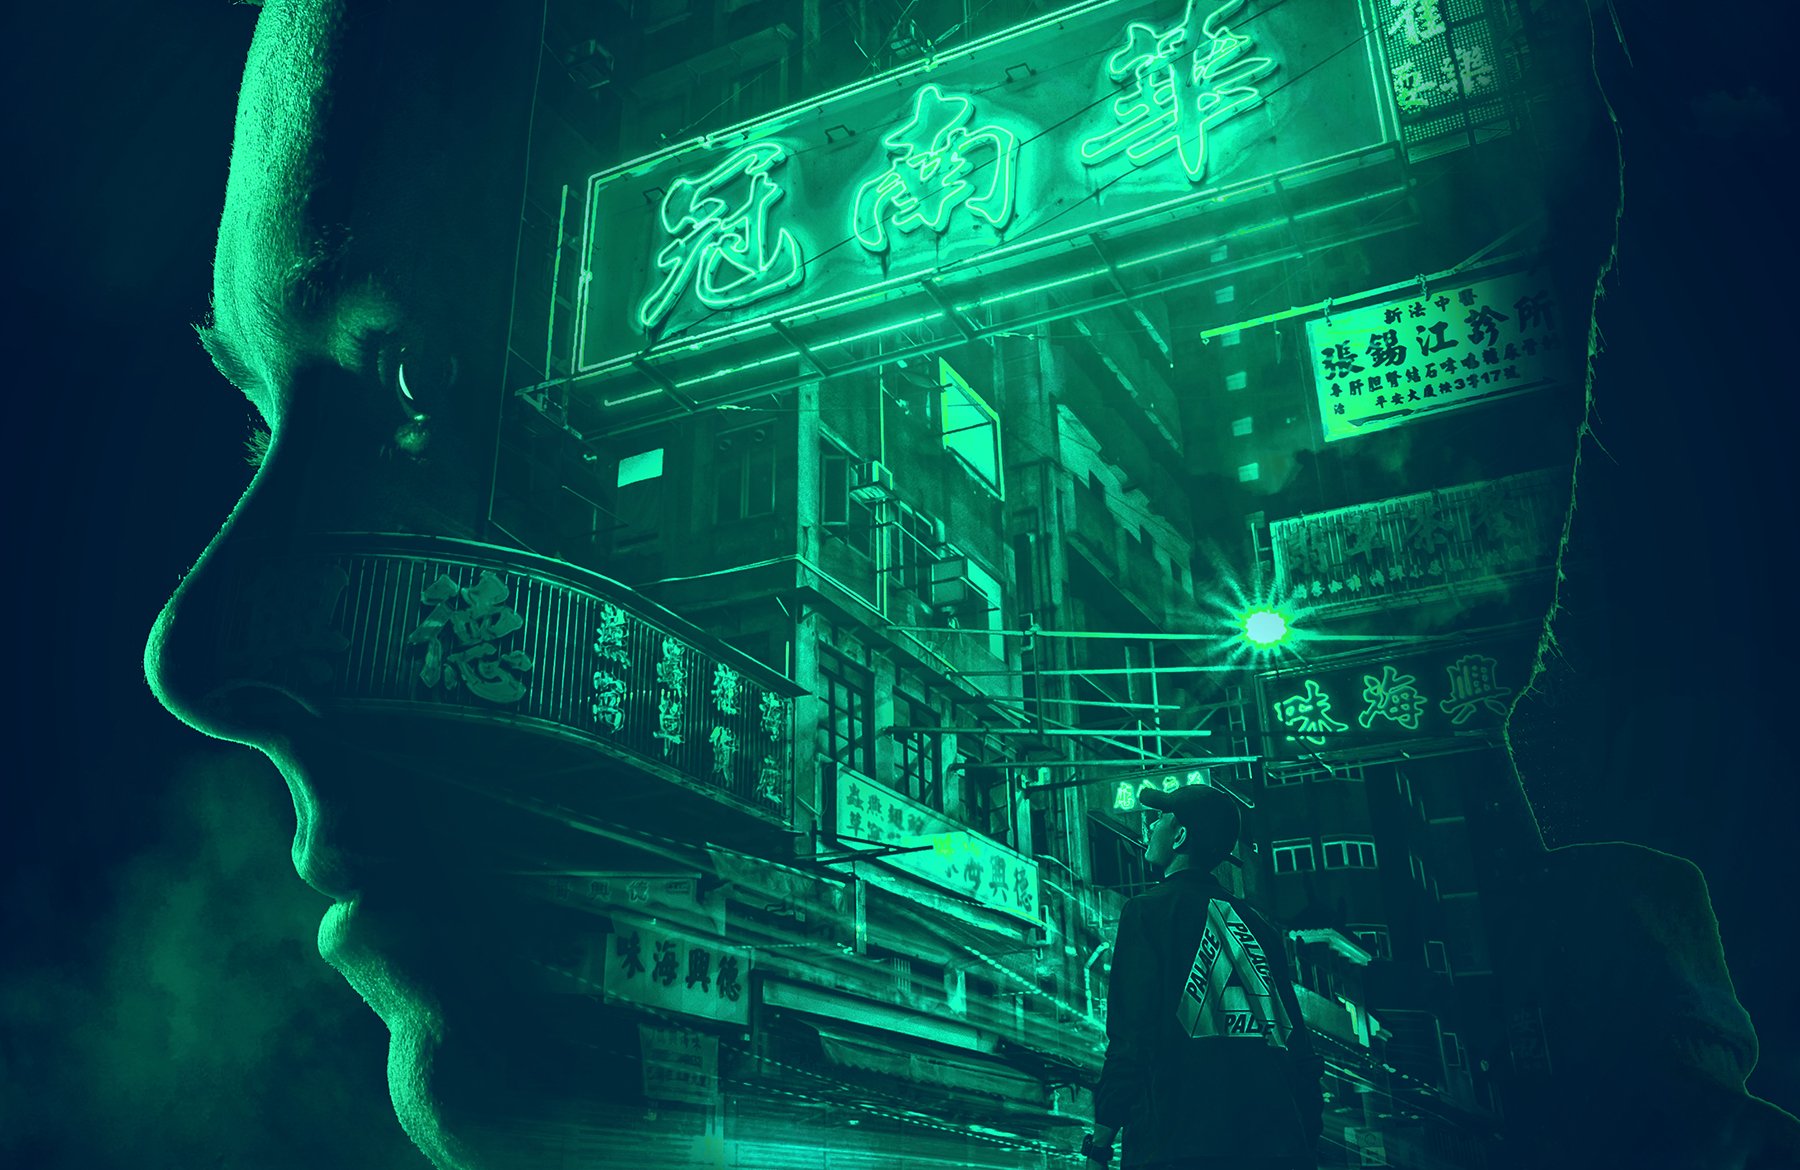
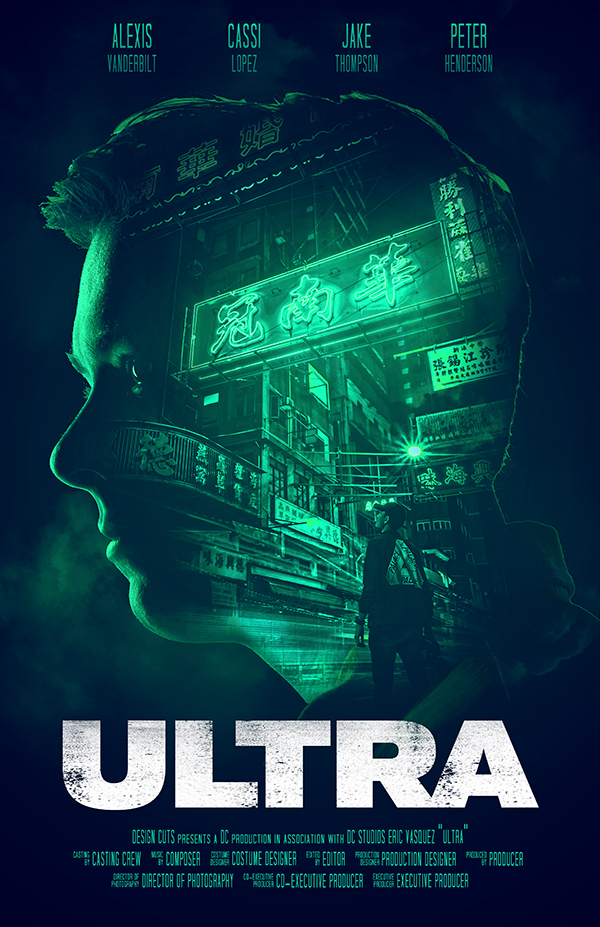
Here’s a look at what we’ll be creating:
Follow along with this tutorial: Download the freebie files
This freebie pack is just a small sample of what you can expect to find in The Essential, Versatile Font Collection for just $29! As with all our bundles, these fonts come with our extended license and at a staggering 98% off, for a limited time only!

Step 1: Ultra Movie Poster Design
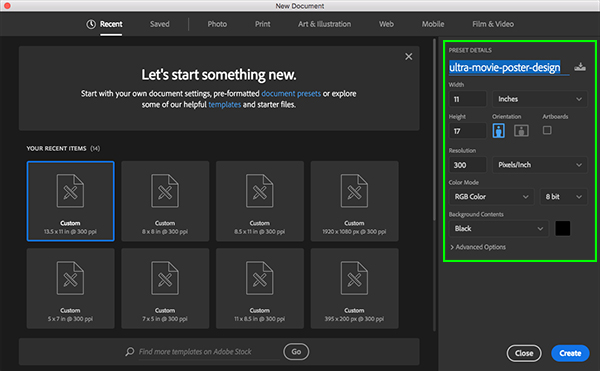
To begin, create a new document and give the file a name – I will be calling this file ‘ultra-movie-poster-design’. Let’s now go ahead and make this ’11’ inches wide by ’17’ inches tall with a ‘Color Mode’ of RGB and a ‘Resolution’ of ‘300’. We don’t need to worry about the other settings for now so once you have made those adjustments click the ‘Create’ button from the lower right to make your new document.
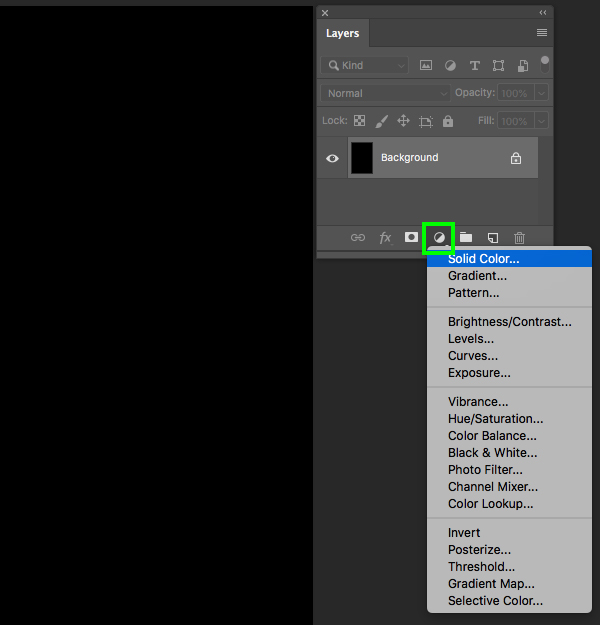
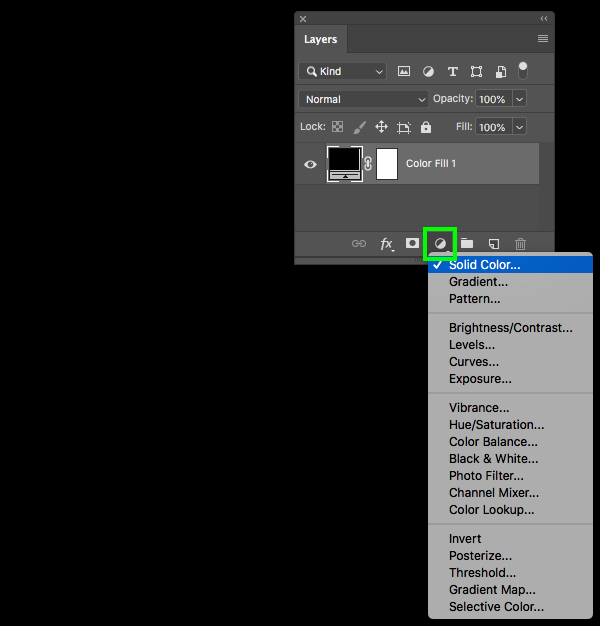
After creating your file you should have one single ‘Background’ layer with a small lock icon next to it. To get started we want to first click the Adjustment Layer icon from the bottom of the Layers Palette and then choose the ‘Solid Color…’ option from the menu that appears.
For the fill color we will be using a solid black – ‘#000000’ and then press ‘Return’ or click ‘OK’ to apply the changes and continue.

Step 2: Burgundy Backdrop
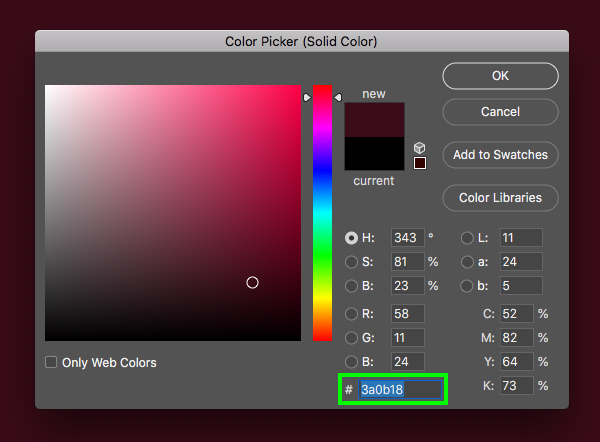
After creating the first ‘Solid Color…’ Adjustment Layer, click and drag the default ‘Background’ layer to the trash bin since we no longer need this layer. Once you’ve done that, return to the Adjustment Layer icon once again and then choose ‘Solid Color…’ again.
This time we will use the hex value ‘#3A0B18’ which is a nice deep burgundy color. After that, click ‘OK’ or press the ‘Return’ key to apply the color changes.
Step 3: Vignette
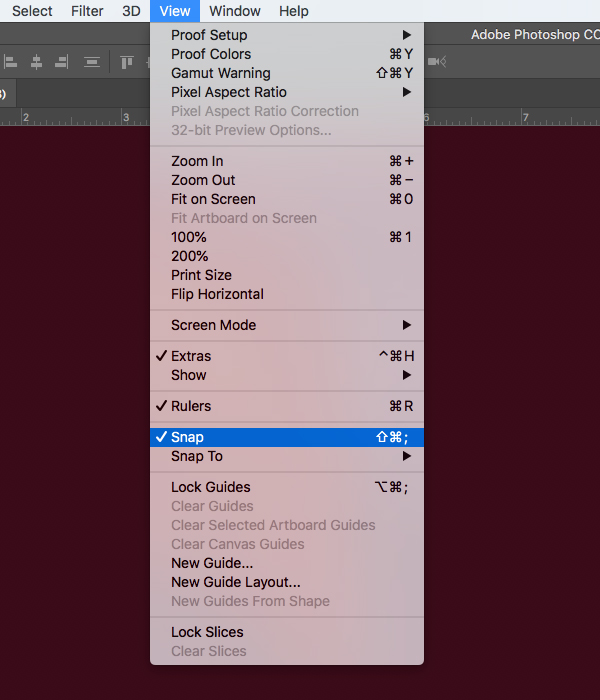
Next, go to the View menu and choose ‘Rulers’ or use the keyboard shortcut Command/Ctrl+R.

After turning those on return to the View menu and make sure that ‘Snap’ is checked off as shown here:
Press ‘D’ on the keyboard to reset your default colors and then make sure that your foreground color is set to solid black. After that, press ‘G’ to switch to the Gradient Tool and make sure you have a solid-to-transparent Radial Gradient selected and then check off the ‘Reverse’ option as shown in the image below:

From here, click and drag a guide from the top ruler down and it should snap into the middle. Repeat this for the rulers on the left to make a guide for the vertical center of the canvas as well. After you’ve done that, select the Layer Mask attached to the burgundy Adjustment Layer and click and drag outwards from the center while your Gradient Tool is still selected. Doing this will create a gradient in the mask so that the dark red color fades from the center outwards to give us a nice vignette effect around the corners. This is a very useful trick to apply anytime you want to keep the focus in the center of a design, but it can also be used for the corners.

Step 4: In The Spotlight
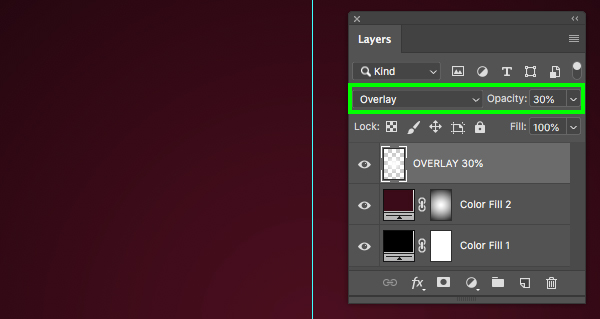
Add a new layer to the top of your Layers Palette and then press the ‘X’ key on the keyboard. Since you reset your default colors in the previous step and had black as your foreground color, tapping the ‘X’ key will toggle these colors resulting in white as your new foreground color. Once white is set to your foreground color, press ‘G’ to switch to the Gradient Tool once again. You should now have a solid-to-transparent Radial Gradient that fades from white to transparent. Before we continue let’s just uncheck the ‘Reverse’ option here so that we have a regular type of gradient.

Next, click and drag from the center of your canvas outwards to create a medium sized white gradient as shown here:
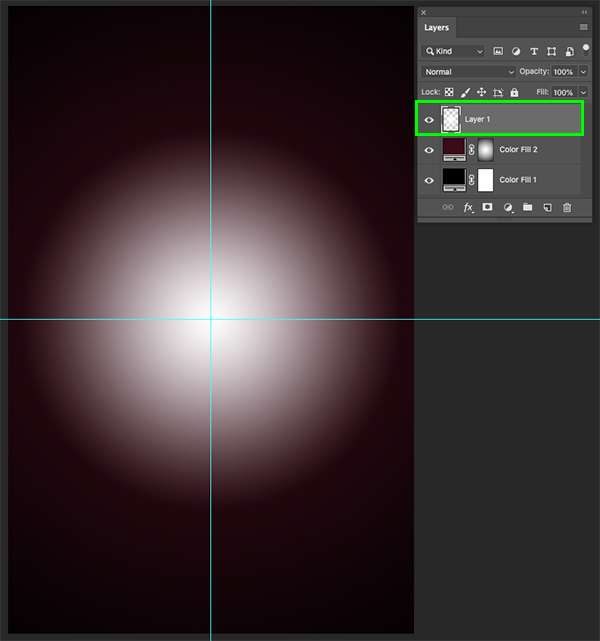
After creating the white gradient in the center of the canvas, press ‘3’ on the keyboard to reduce the ‘Opacity’ of the layer to ‘30%’ and then change the Blend Mode from ‘Normal’ to ‘Overlay’. Doing this will create a nice spotlight in the middle of the image, which is also another great way to add contrast and help lead the viewer’s eye to the center of the design.
Step 5: Extra Contrast
We can now turn off our guides for the moment by going to the View menu and turning off the ‘Extras’. Now let’s darken the background overall just a touch by returning to the Adjustment Layer icon at the bottom of the Layers Palette and choosing the ‘Levels…’ option from the dropdown menu.
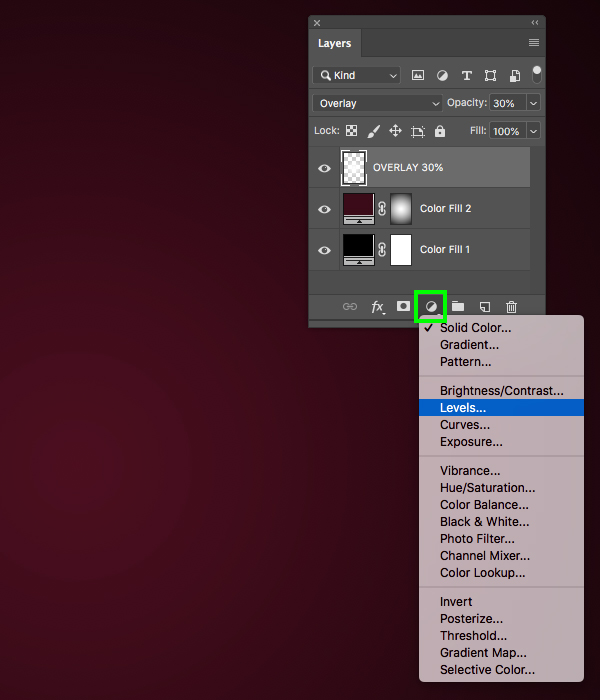
Make sure that the Levels Adjustment Layer is at the top of your Layers Palette and then click and drag the dark grey slider on the left inwards towards the center until it’s set to about ’15’ in order to enhance the contrast of the darker colors.

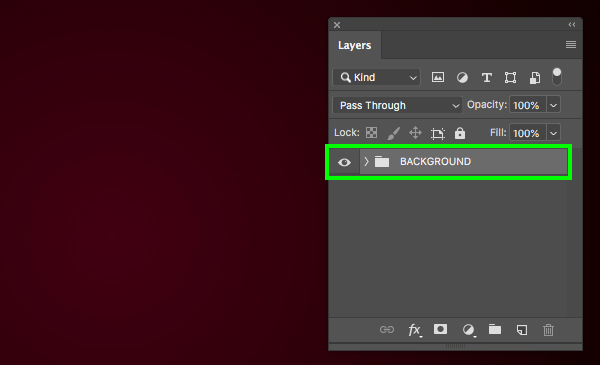
Click on the top layer in your Layers Palette (this should be the Levels) and then hold the Shift key and select the very bottom layer (this should be the solid black Adjustment Layer) so that all of your layers are selected simultaneously.

With all of the layers still selected, press Command/Ctrl+G to place them into a new folder and double click the ‘Group 1’ text to rename the folder ‘BACKGROUND’ or ‘BG’ etc. We may come back to this folder later on in the lesson to add some more atmospheric elements, but for the time being our background is fleshed out enough to continue.
Step 6: Headshot
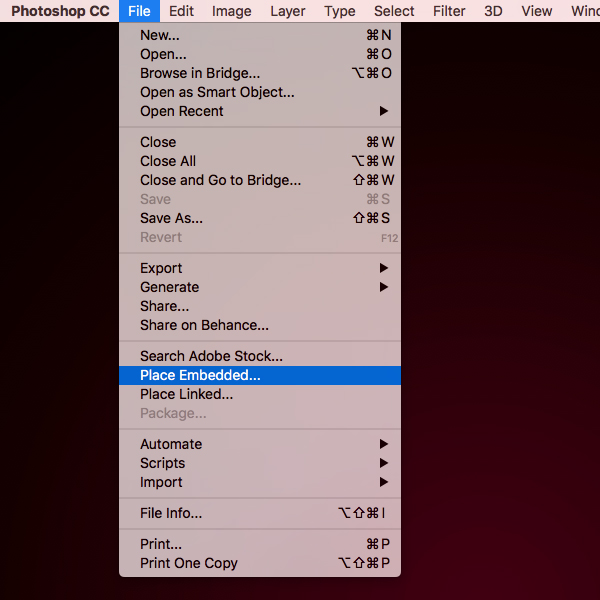
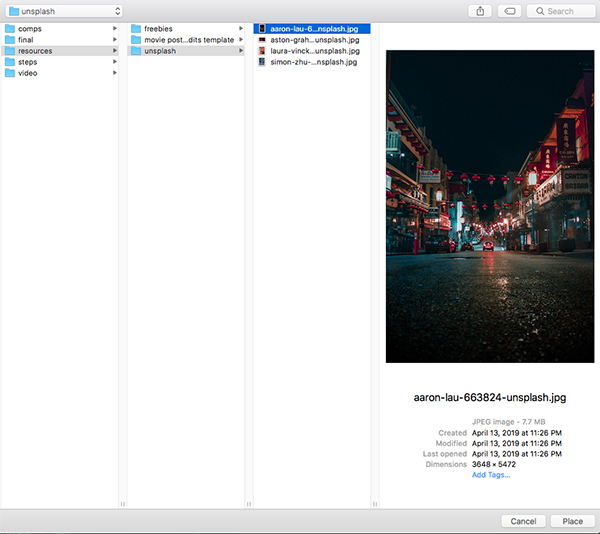
Head over to Unsplash and download the first free stock image and save it. Once you’ve done that, go to the File menu and choose ‘Place Embedded…’ from the dropdown menu.
Next, navigate to the folder where you have saved your first stock image. The image below shows my folder where I’ve saved the stock photo for the tutorial. Once you have selected yours, choose ‘Place’ from the lower right corner to bring it into your document.

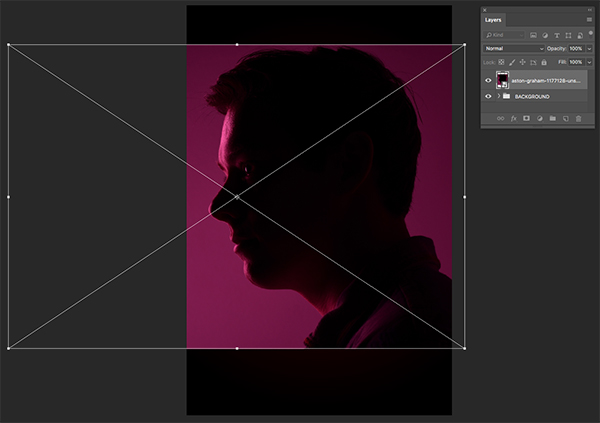
After placing the image, click and drag outwards from any of the four corners of the bounding box while holding the Alt/Option+Shift keys to scale it up proportionally from the center. Use the image below as a rough guide for the size and placement of the image before pressing ‘Return’ on the keyboard to apply the transformation.
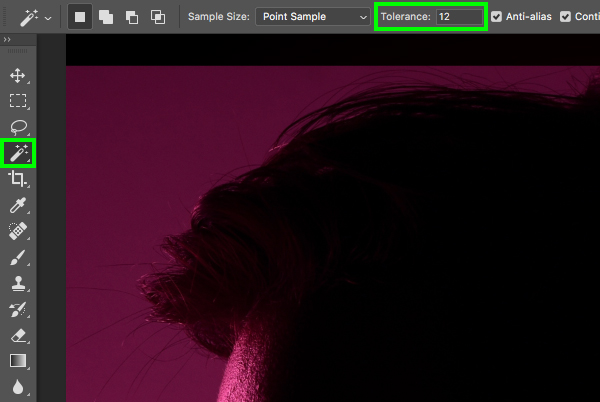
Step 7: Making Your Selection
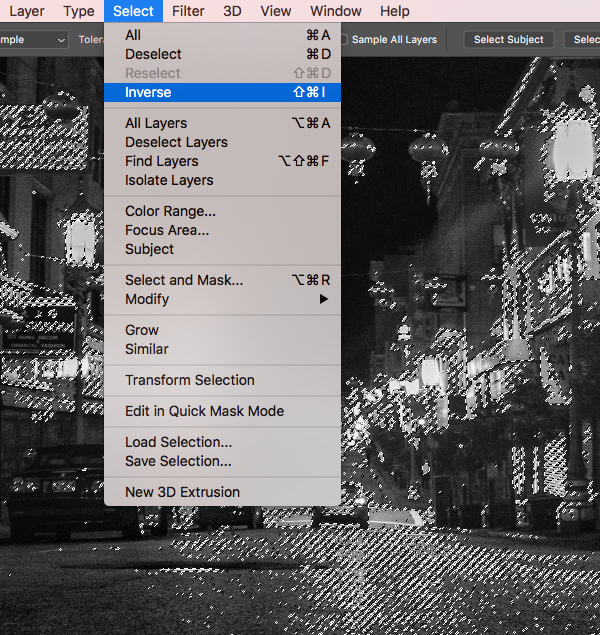
Press ‘W’ on the keyboard to select the Magic Wand Tool and then change the ‘Tolerance’ setting in the top toolbar to ’12’ as shown here:
Click an area of the background to make your first selection, and then hold the Shift key and continue to select areas of the background until you have a nice looking selection like this:
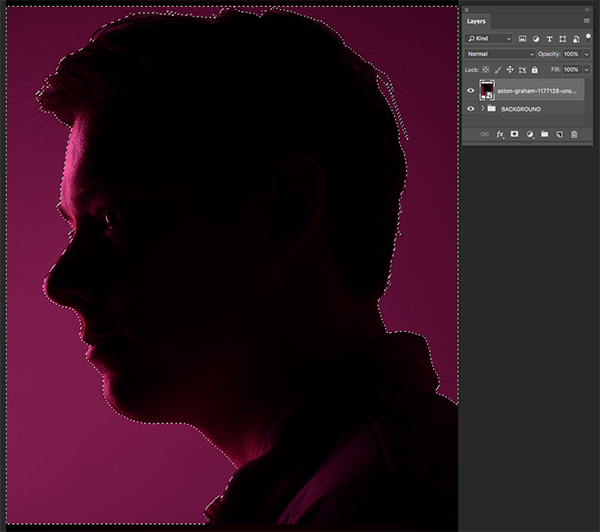
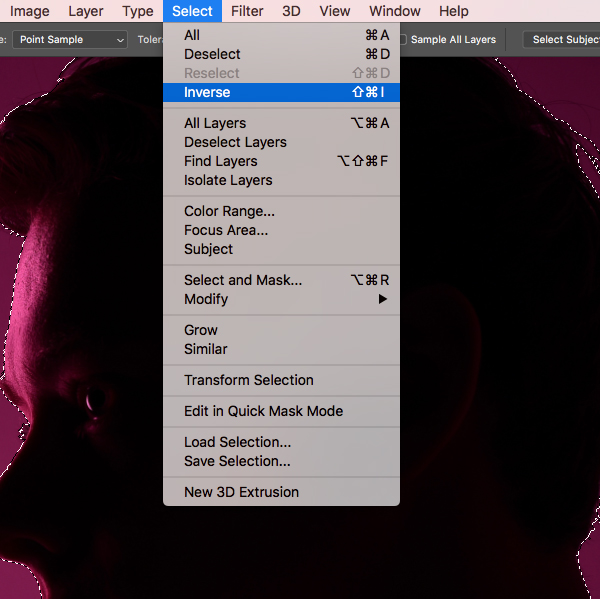
Once you’ve selected the background, go to the Select menu and choose ‘Inverse’ to invert the selection.
From here, simply click on the ‘Add layer mask’ icon at the bottom of the Layers Palette and you should be left with an isolated portrait without the background.
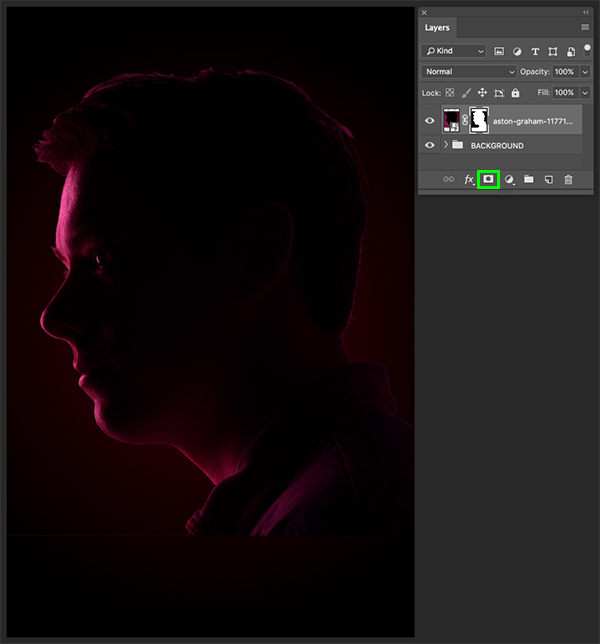
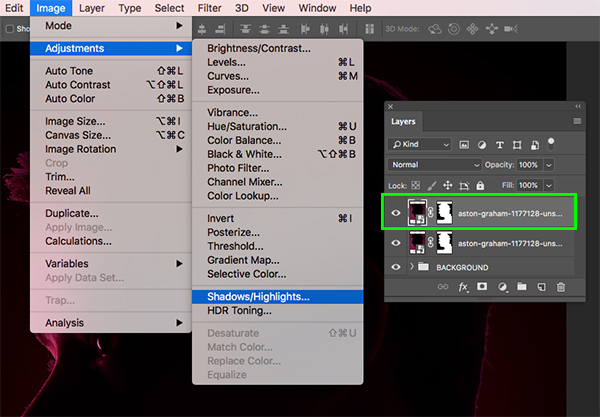
Step 8: Shadows and Highlights
With the isolated portrait image selected in your Layers Palette, press Command/Ctrl+J on the keyboard to duplicate the layer. Select this new copy and then go to the Image menu and choose ‘Adjustments > Shadows/Highlights…’ from the menu.
Apply the following settings when prompted with the ‘Shadows/Highlights’ dialog box and then press ‘Return’ or click ‘OK’ to continue.
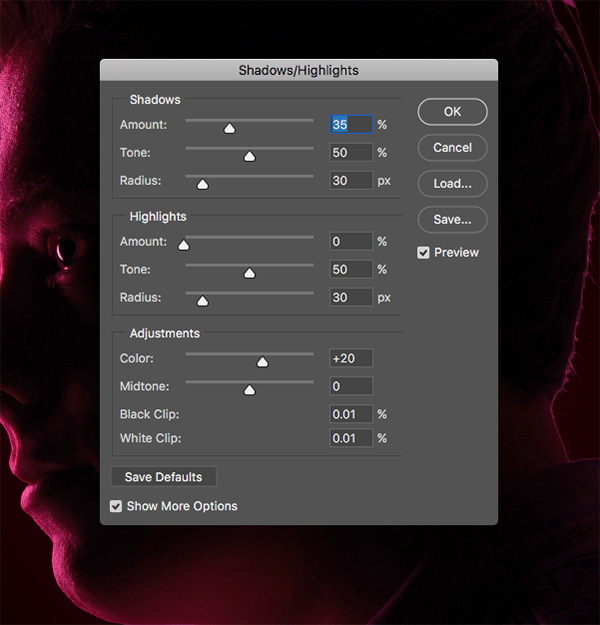
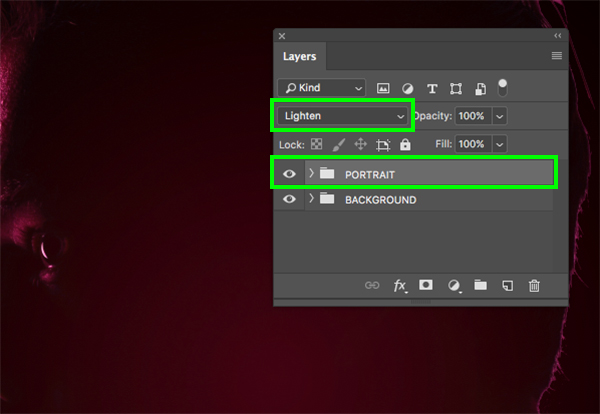
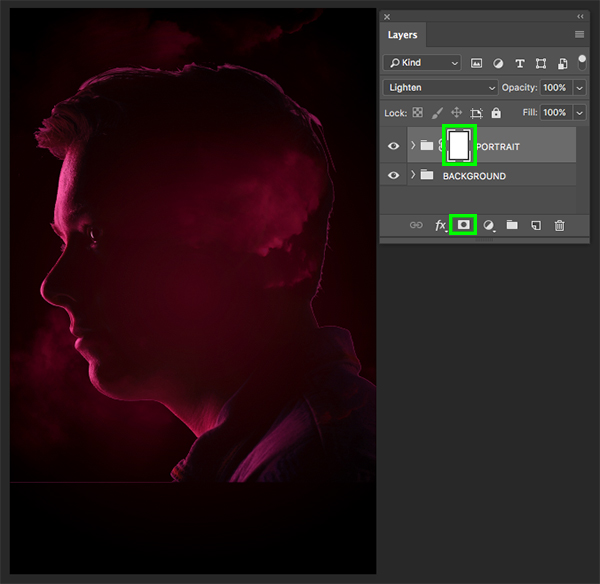
After applying these adjustments you should notice that you now have more detail in this top copy of the portrait. From here, select the top copy, hold the Shift key, and then select the original copy below so that both are selected together.
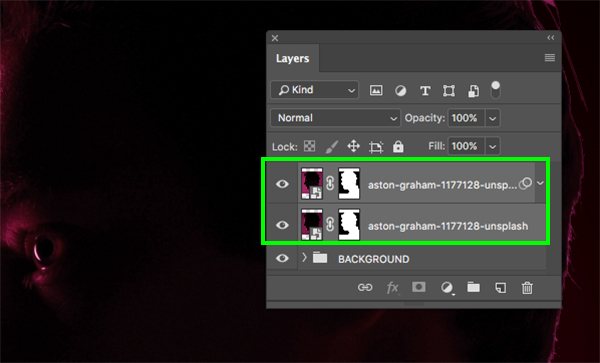
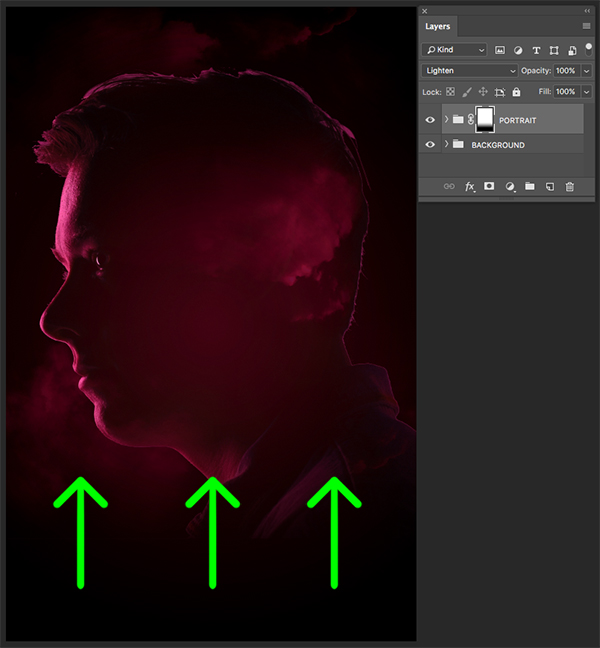
With both copies of the portrait still selected, press Command/Ctrl+G to place them into a new folder and double click the ‘Group 1’ text to rename this folder ‘PORTRAIT’. Once you have done that, change the Blend Mode of the entire folder to ‘Lighten’ as shown in the image below:
Step 9: Cloudy Days
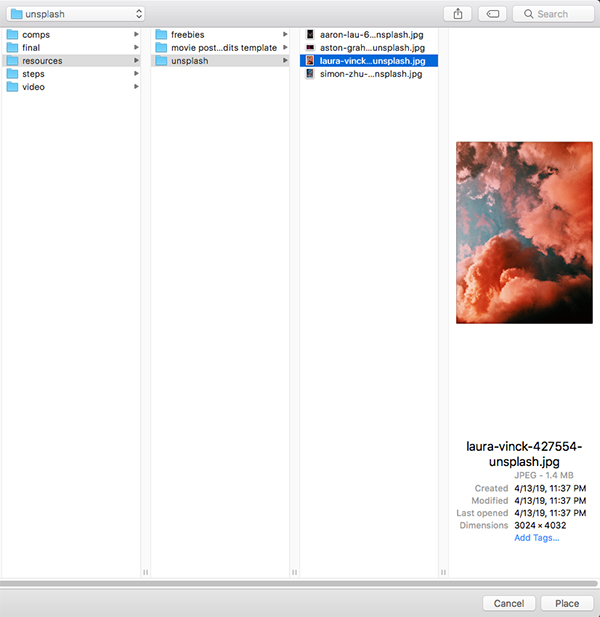
Head over to Unsplash and download the second free stock image and save it in the same folder as the portrait we used earlier on. Once you have done that, return to the File menu in Photoshop and choose ‘Place Embedded…’ once again.
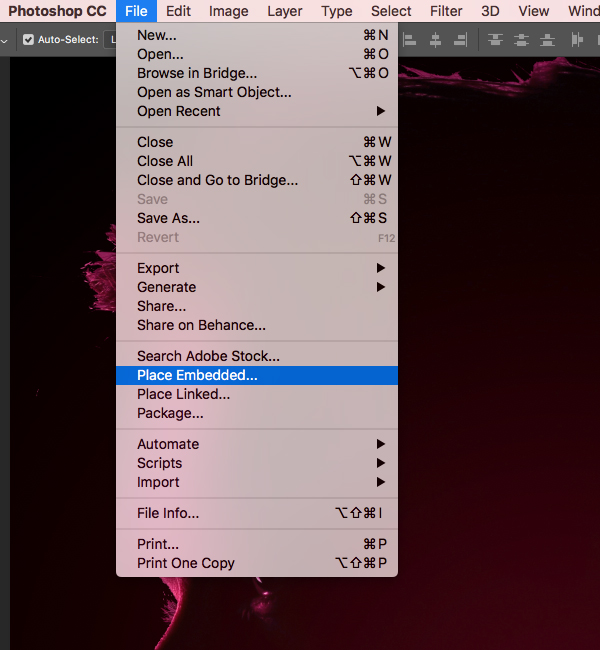
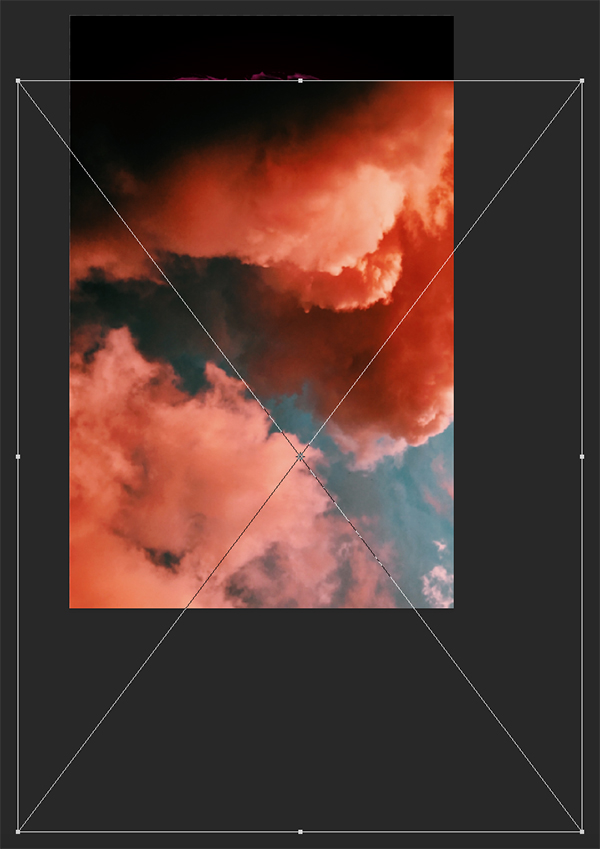
Navigate to the folder and select the cloud image and then choose ‘Place’ from the bottom right to import the image into your document.
After bringing in the image, scale it up and place it like this:
Step 10: Black & White Cloud Adjustment
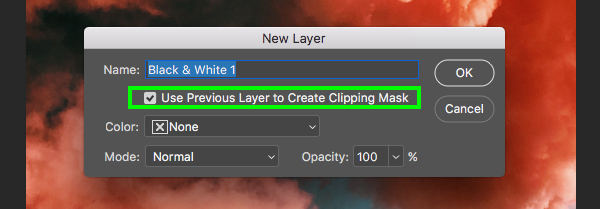
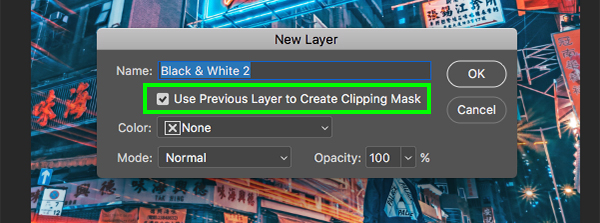
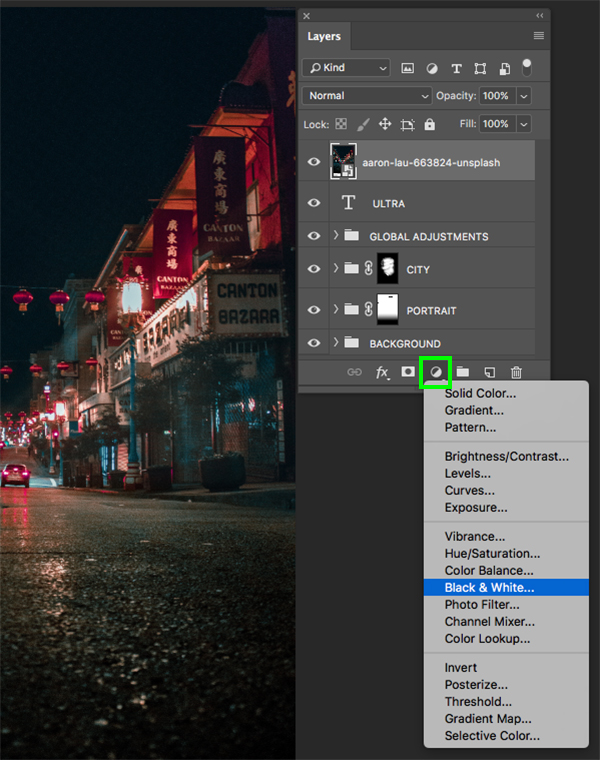
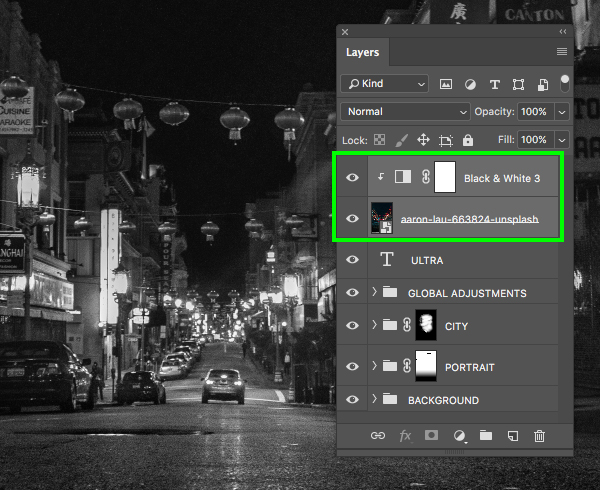
Select the cloud image layer and then hold the Alt/Option key and click the Adjustment Layer icon at the bottom of the Layers Palette before choosing ‘Black & White…’ from the dropdown.
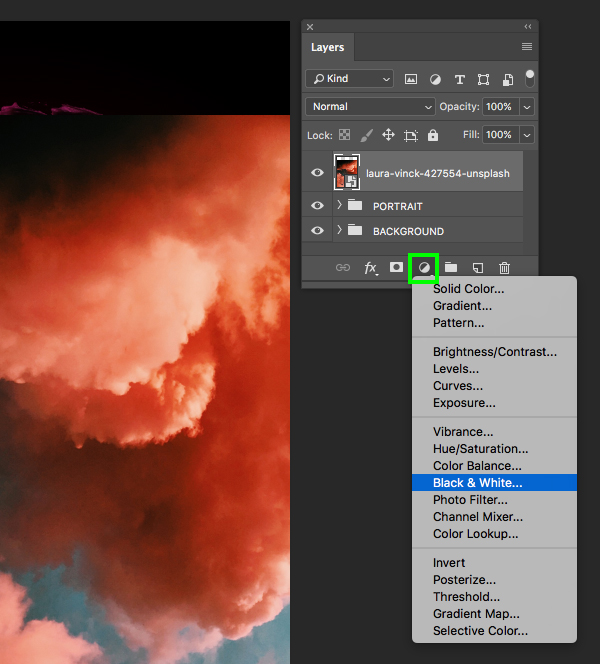
When the ‘New Layer’ dialog box appears, check off the option that says ‘Use Previous Layer to Create Clipping Mask’ and then click ‘OK’ to continue.
Step 11: Cloud Levels
Now that we have a Black & White Adjustment Layer with a Clipping Mask applied to it, let’s select the cloud layer again and then return to the Adjustment Layer icon at the bottom of the Layers Palette. This time, however, we want to choose the ‘Levels…’ option from the dropdown. Note that this time around we don’t need to hold the Alt/Option key when clicking on the Adjustment Layer icon as this next adjustment will automatically have a Clipping Mask applied since it will be placed between our layer and an existing Clipping Mask.

In the Properties panel let’s move the dark gray slider on the left in towards the center to set it to ’43’ and then move the light slider on the right towards the middle until it’s set to ‘219’ as shown below:

Step 12: Cloud Group
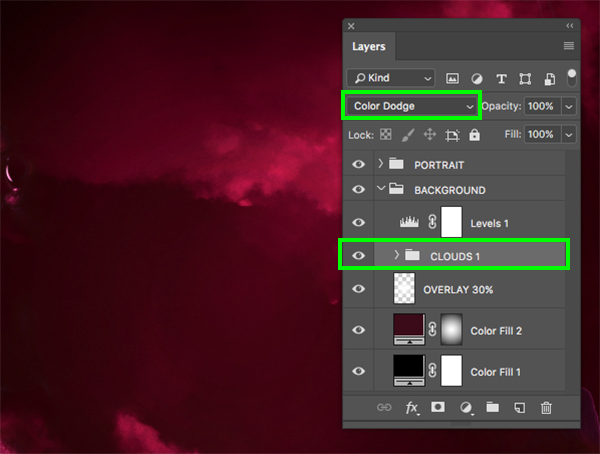
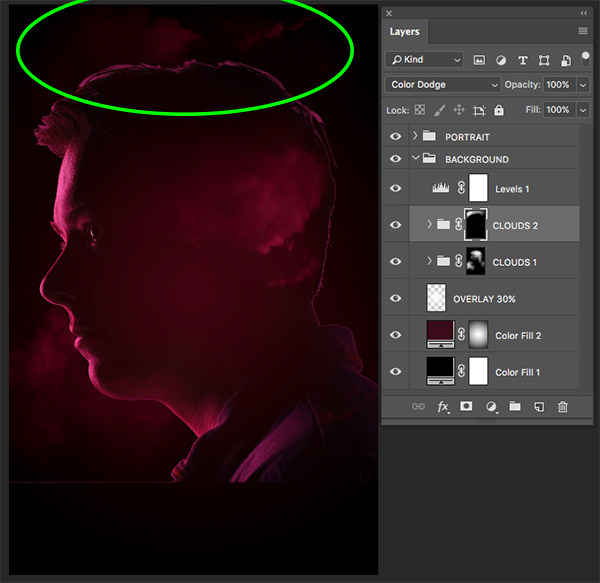
Select the top Black & White Adjustment Layer, then hold the Shift key and select the cloud image so all three of your top layers are selected simultaneously.

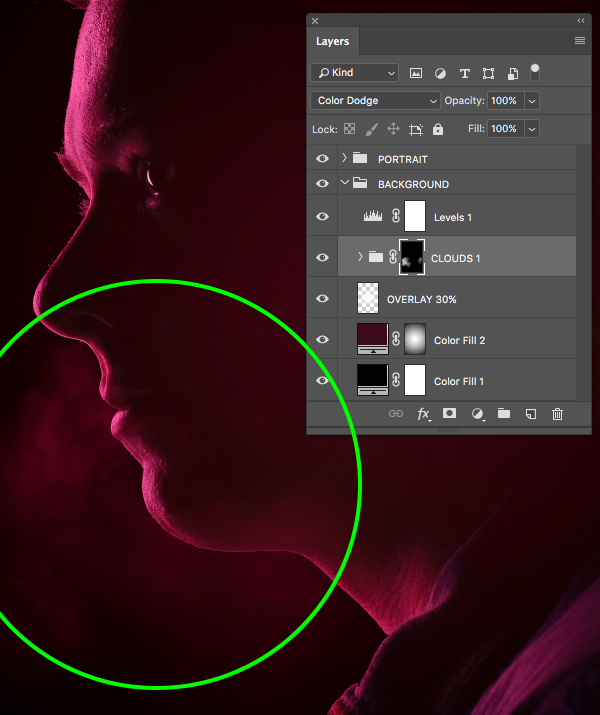
Press Command/Ctrl+G to place these layers into a new folder and double click on the ‘Group 1’ text to rename the folder ‘CLOUDS 1’. After that, change the Blend Mode of the entire folder to ‘Color Dodge’ and then place it inside of the ‘BACKGROUND’ folder, just below the ‘Levels 1’ layer like this:
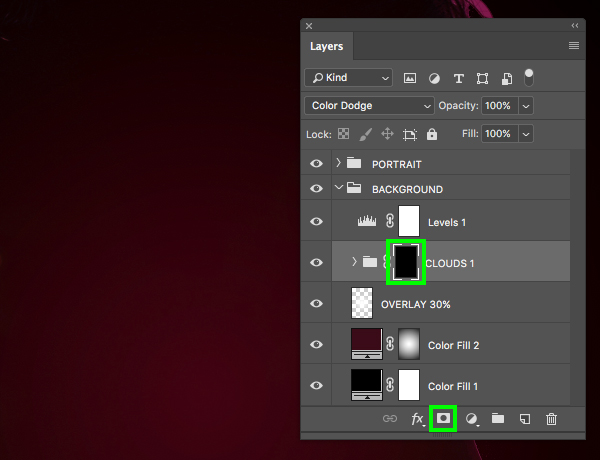
Step 13: Cloud Mask
With the ‘CLOUDS 1’ folder selected, hold the Alt/Option key and click on the ‘Add layer mask’ icon to apply an inverted mask. Doing this will make the entire image disappear, but we will be bringing pieces of it back in where we want.
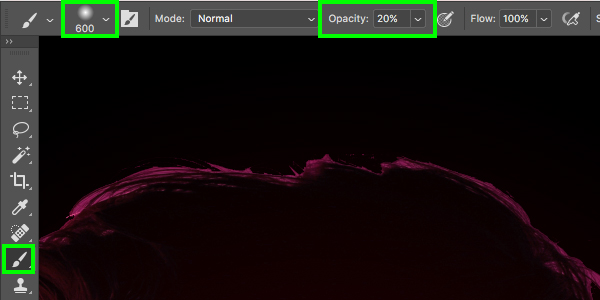
Press ‘B’ on the keyboard to select the Brush Tool and then hold the Shift key and the left bracket keys to change it to a soft edged brush. Let’s also make the size of the brush about ‘600 px’ and then press the number ‘2’ to reduce the ‘Opacity’ to ‘20%’ so that we can gradually bring some of the clouds back in.
Select the inverted layer mask on the ‘CLOUDS 1’ folder and then begin to use the large white brush to bring some of the clouds back in around the mouth, chin, and neck area as highlighted below:
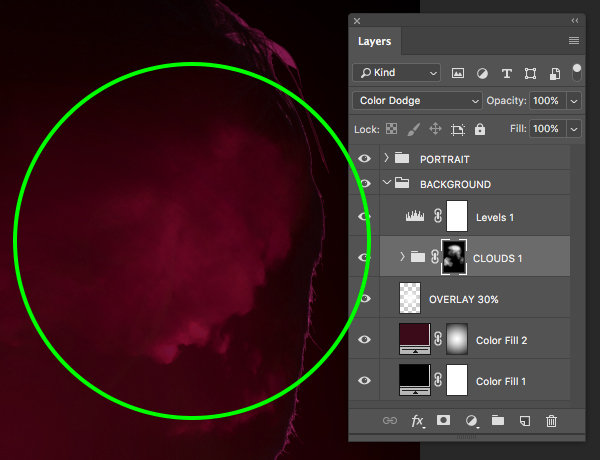
Use the brush sparingly to then bring in some additional clouds towards the top and back of the head like this:
Step 14: Extra Cloudy
Select the ‘CLOUDS 1’ folder and press Command/Ctrl+J to duplicate it. Once you have done that, hold the Control key and click on the mask attached to the newly duplicated folder to reveal a dropdown menu. From this menu, choose the ‘Delete Layer Mask’ option to remove the mask.

Double click the ‘CLOUDS 1’ text and rename this folder ‘CLOUDS 2’.
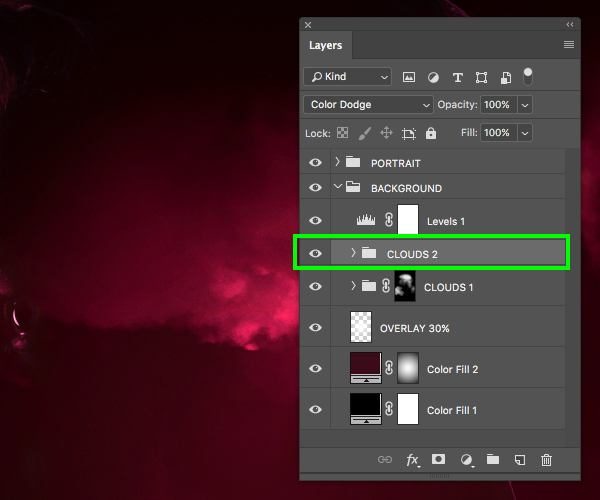
Expand the ‘CLOUDS 2’ folder and then move the main image of the clouds up like this:

Apply a new inverted mask to this folder and then use the same large soft white brush to bring in some clouds along the top of the image as shown in the image below:
Step 15: Faded
Select the main ‘PORTRAIT’ folder and then click the ‘Add layer mask’ icon at the bottom of the Layers Palette to apply a normal mask.
Press ‘G’ to switch to your Gradient Tool and select a solid-to-transparent Linear Gradient that fades from black to transparent.
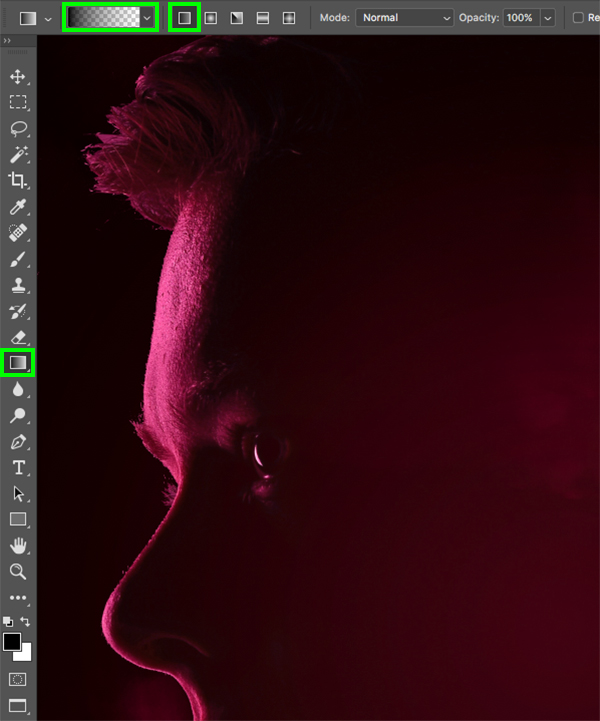
With the mask on the ‘PORTRAIT’ layer selected, click and drag with your Gradient Tool from the bottom of the image upwards a bit to fade the bottom edge of the headshot.
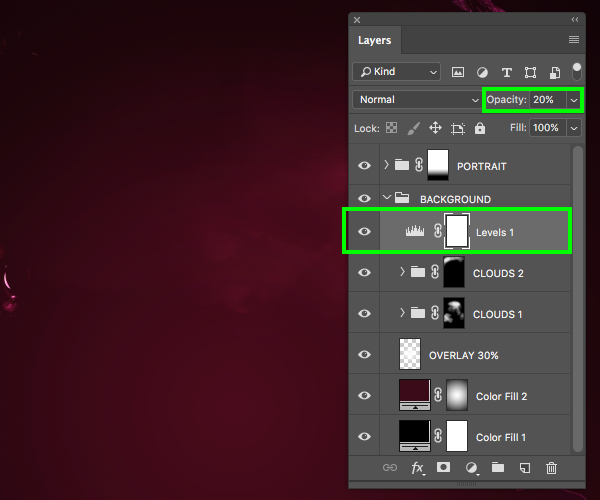
Step 16: Levels Adjustment
Expand the contents of the ‘BACKGROUND’ folder and select the ‘Levels 1’ Adjustment Layer at the top before pressing the number ‘2’ to reduce the ‘Opacity’ of the layer to ‘20%’ to make the contrast a bit lighter over the background.
Step 17: Electric City
Next, head over to Unsplash to grab the next free stock image and save it with the other stock photos. Once you have done that, return to the File menu and choose ‘Place Embedded…’ from the list.
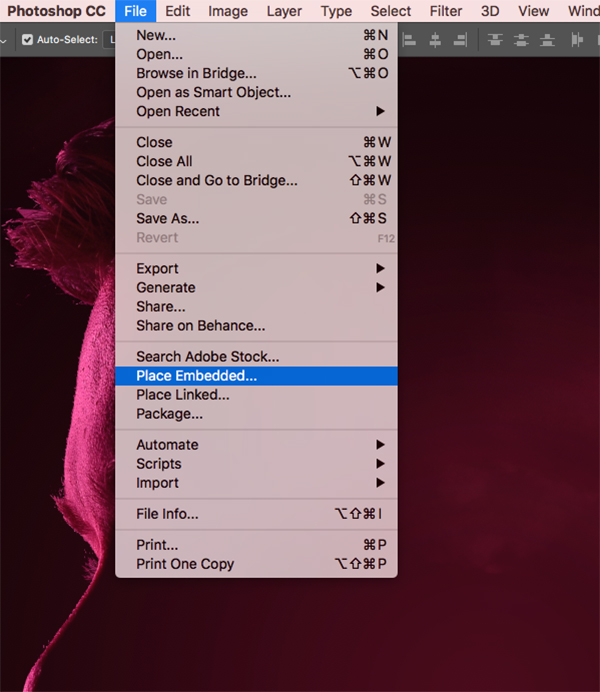
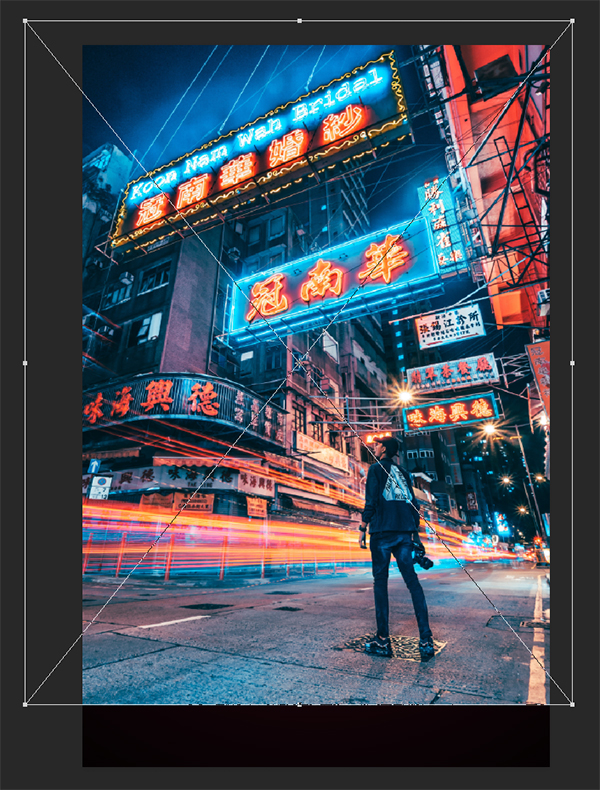
Navigate to the folder where you have saved your stock images and select the city image we just downloaded before choosing ‘Place’ from the bottom right.

After importing the image, scale and position the image like this:
Step 18: City Wash
Select the city image and then hold the Alt/Option key and click the Adjustment Layer icon at the bottom of the Layers Palette. From here, choose the ‘Black & White…’ option from the list.
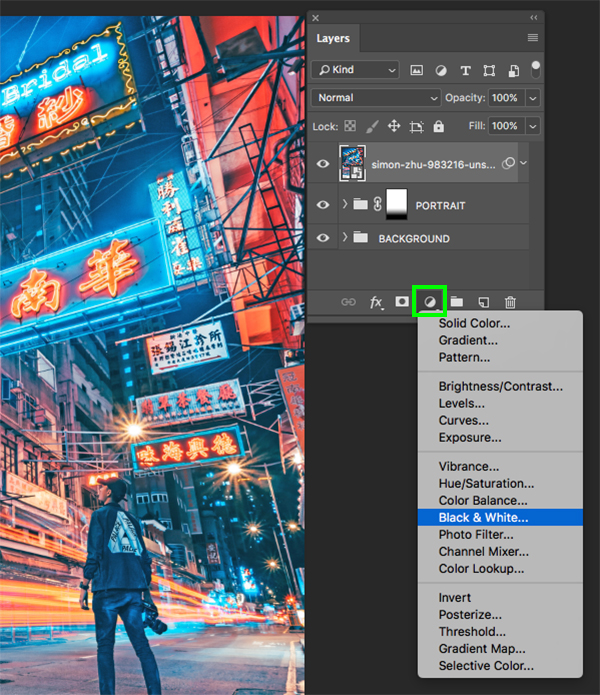
Check off the box that says ‘Use Previous Layer to Create Clipping Mask’ and then click ‘OK’ or press ‘Return’ on the keyboard to continue.
Step 19: City Levels
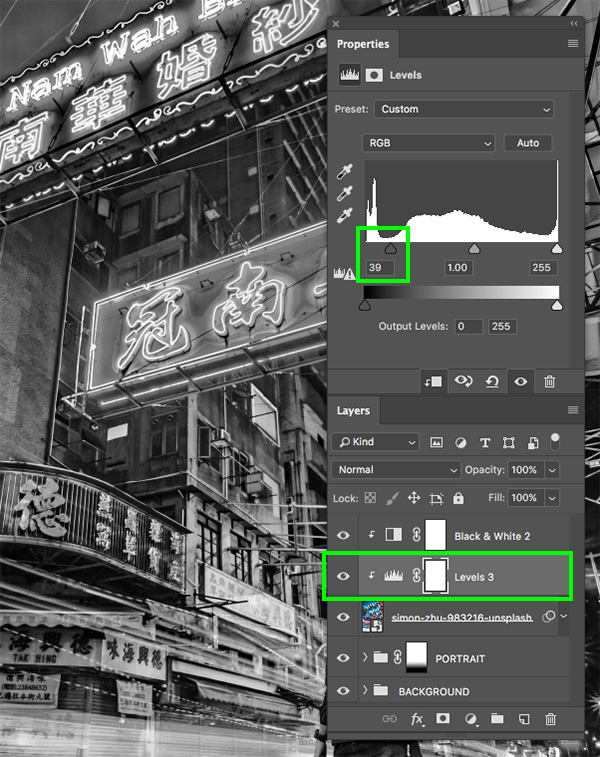
Select the city image again and then click the Adjustment Layer icon, this time choosing ‘Levels…’ from the menu.
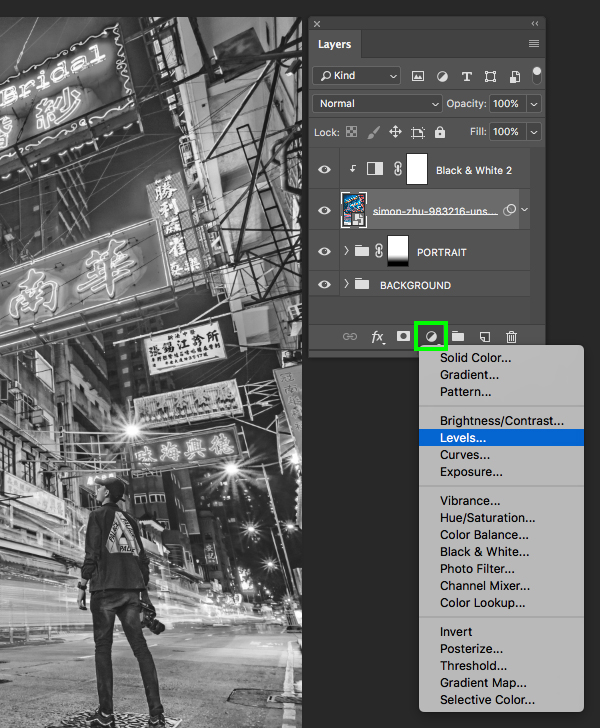
Move the left, gray slider in towards the center until it’s set to about ’39’ to increase the contrast in the image.
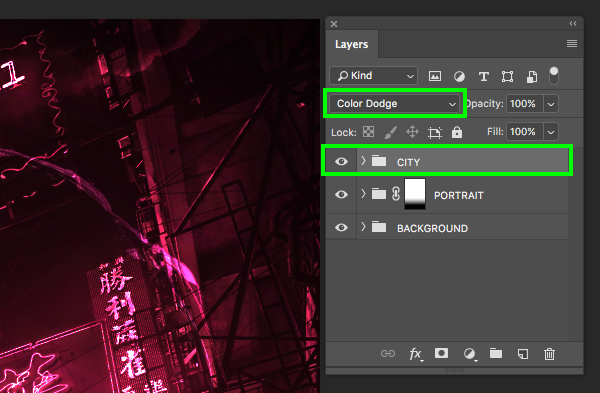
Step 20: City Group
From here select the top ‘Black & White 2’ layer, hold the Shift key, and then click on the main city image so all three layers are selected at the same time.
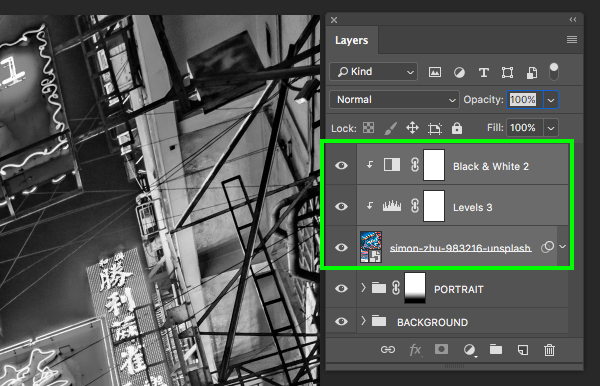
Press Command/Ctrl+G to place these layers into a new folder and then double click the ‘Group 1’ text to change the folder name to ‘CITY’. Once you have done that, let’s also change the Blend Mode of the entire folder to ‘Color Dodge’ as shown here:
Step 21: The Big Reveal
Select the ‘CITY’ folder and then hold the Alt/Option key and click on the ‘Add layer mask’ icon to add an inverted mask similar to what we did earlier with the clouds.
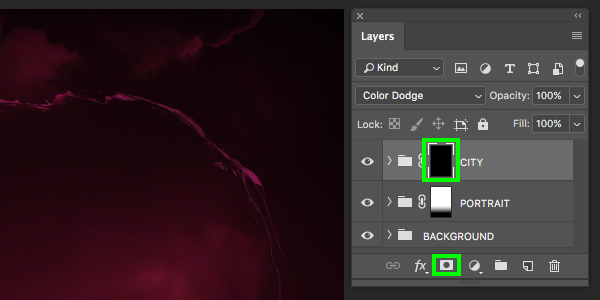
Press ‘B’ to switch over to the Brush Tool and make sure you have a large, soft white brush selected with about ‘20%’ of the opacity and a solid white fill color.
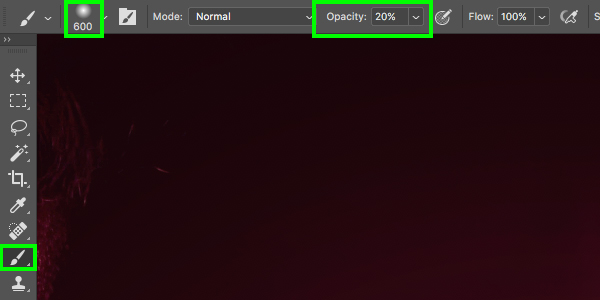
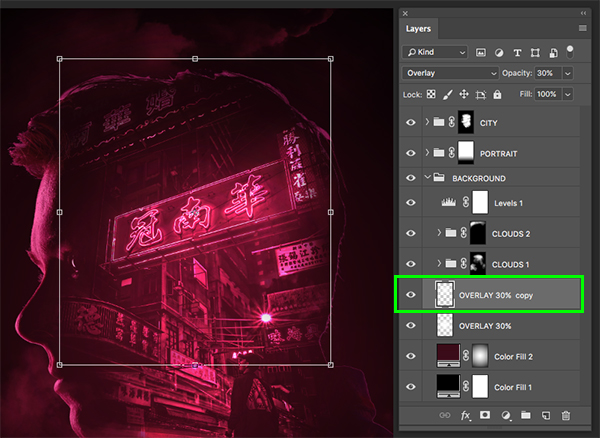
With the inverted mask selected, begin to brush inside of the head of the man to reveal the city image. Start by brushing lightly around the outside and then go over the parts you want to stand out the most a few more times. Here I want to reveal the sign and the man standing in the foreground. If you mess up or want to fade parts of the image out again, simply change your foreground color to black and brush over it with the same brush.
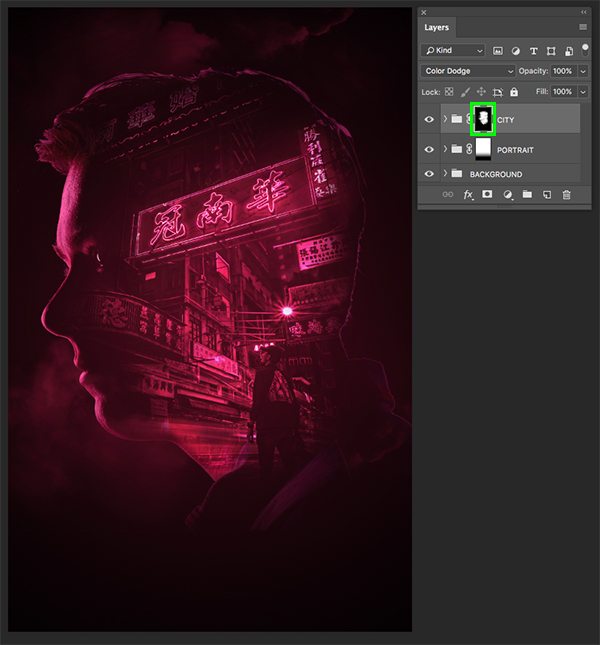
Once you are happy with the parts of the city image that you have revealed, you may wish to brighten certain spots up a bit more to enhance the ‘neon’ type of effect we have going on. To do this, go into the ‘BACKGROUND’ folder, select the ‘OVERLAY 30%’ layer and duplicate it by pressing Command/Ctrl+J on the keyboard. After that, use a Free Transform to scale and reposition the highlight accordingly. Here I have scaled it down a bit and placed it over the sign to brighten it up and push the contrast, but feel free to experiment with these techniques on your own.
Step 22: Overall Levels
Select the ‘CITY’ folder and then select the Adjustment Layer icon at the bottom of the Layers Palette and then choose ‘Levels…’ from the dropdown menu.
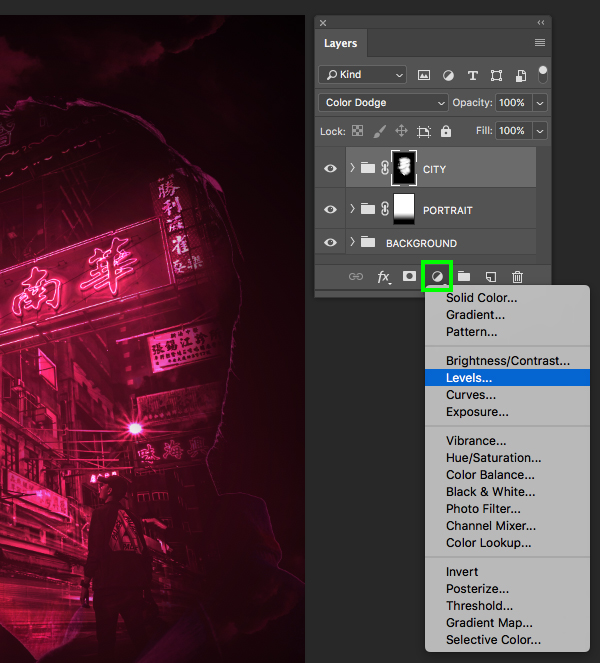
In the Properties panel, move the left slider in towards the center until it’s set to ‘4’ and move the right slider in towards the center until it’s set to ‘248’.

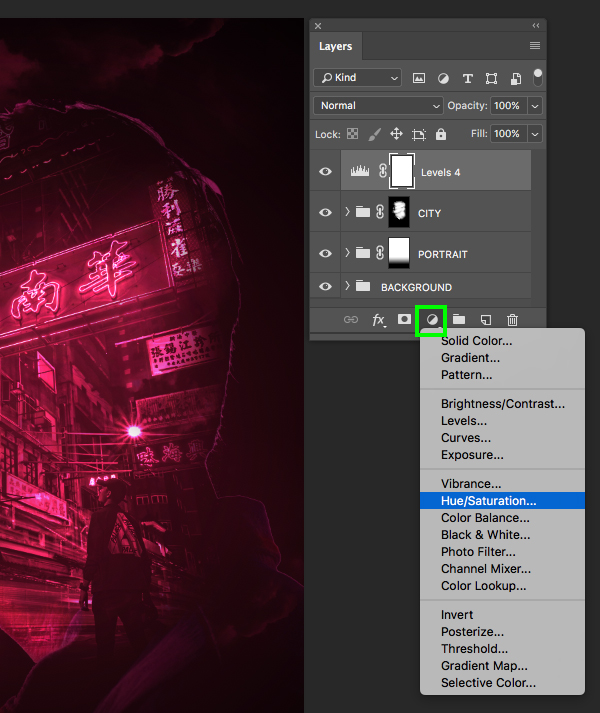
Step 23: Overall Hue/Saturation
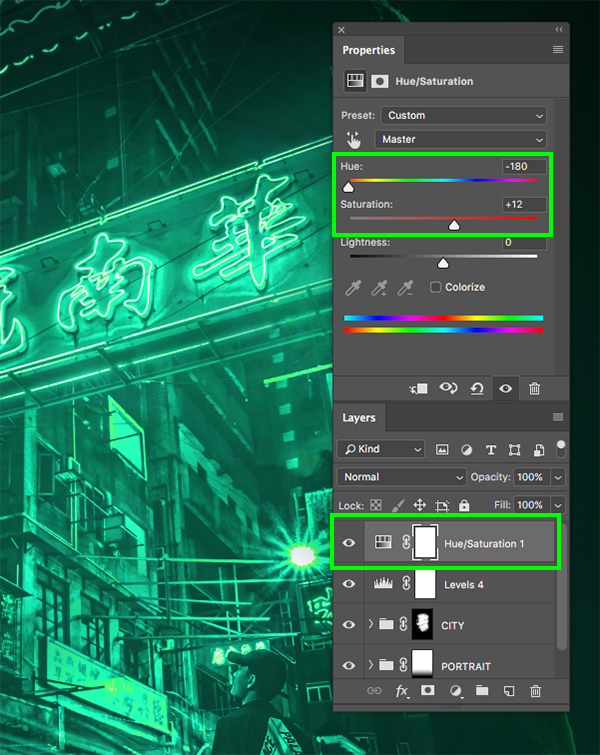
Select the ‘Levels 4’ layer and then click the Adjustment Layer icon at the bottom of the Layers Palette and choose ‘Hue/Saturation…’ from the dropdown menu.
Next, set the ‘Hue’ slider to ‘-180’ and the ‘Saturation’ to ‘+12’ as shown below:
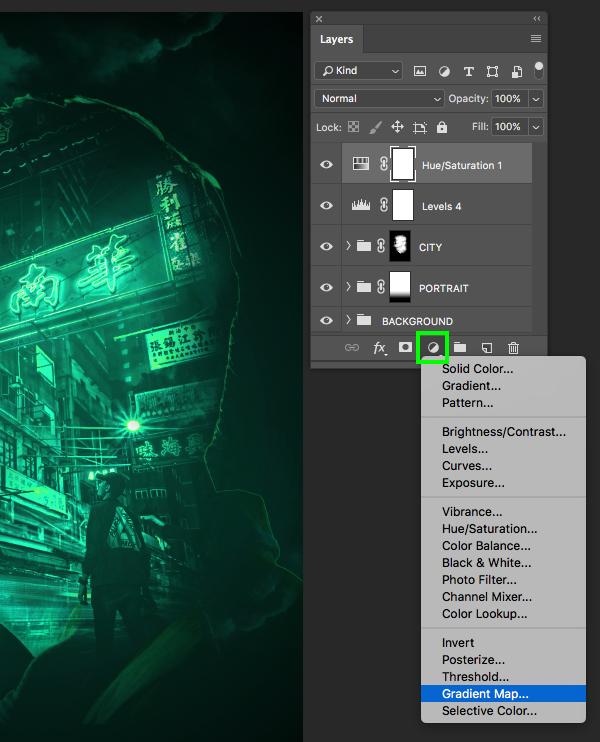
Step 24: Gradient Mapping
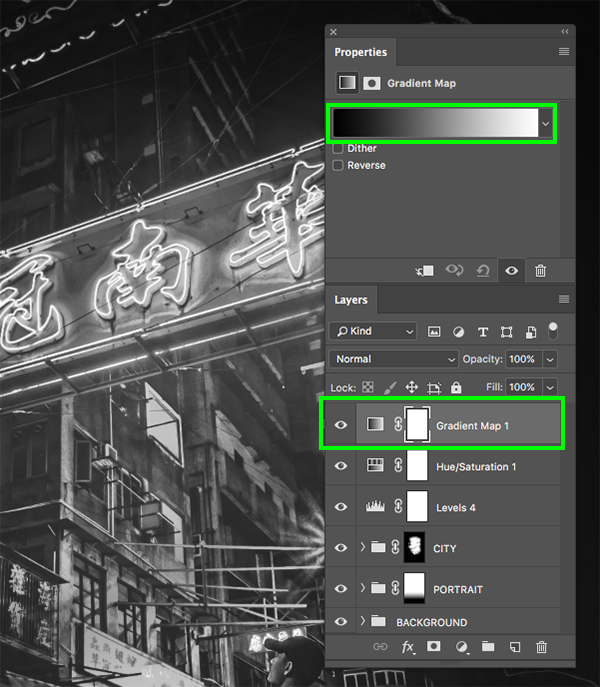
Select the top ‘Hue/Saturation 1’ layer and then click the Adjustment Layer icon once again. This time choose ‘Gradient Map…’ from the dropdown menu.
Once the Gradient Map has been added to the top of your Layers Palette, click on the black to white gradient strip in the Properties panel to modify the colors.
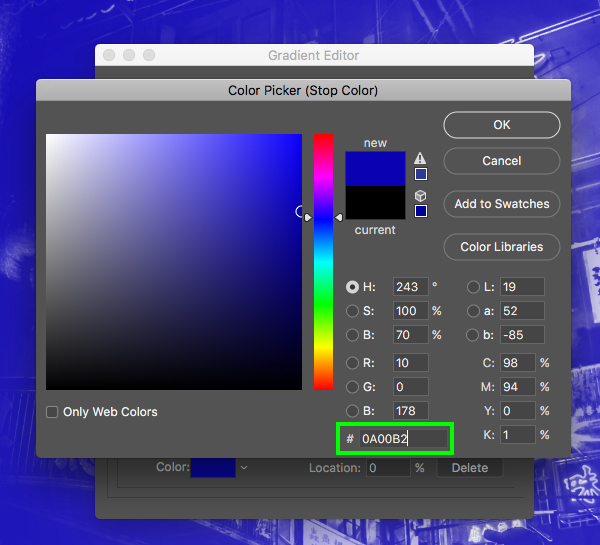
From here, double click on the small black box at the bottom left of the color strip.
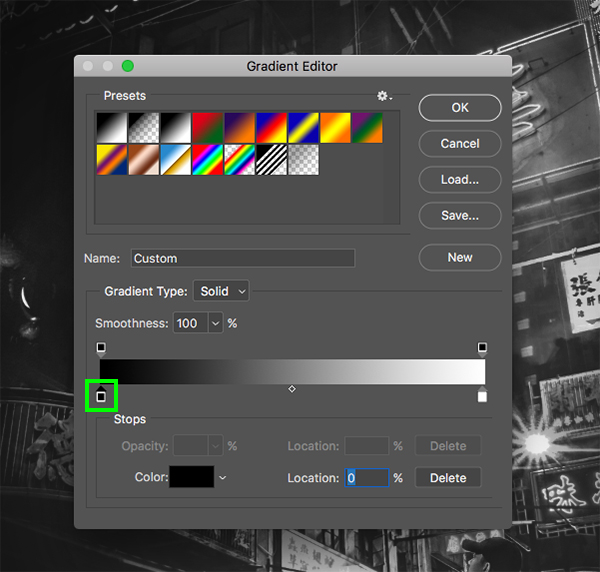
For the hex value enter ‘#0A00B2’ and then press ‘OK’ to apply the changes.
Next, double click the small white box in the lower right part of the color strip.
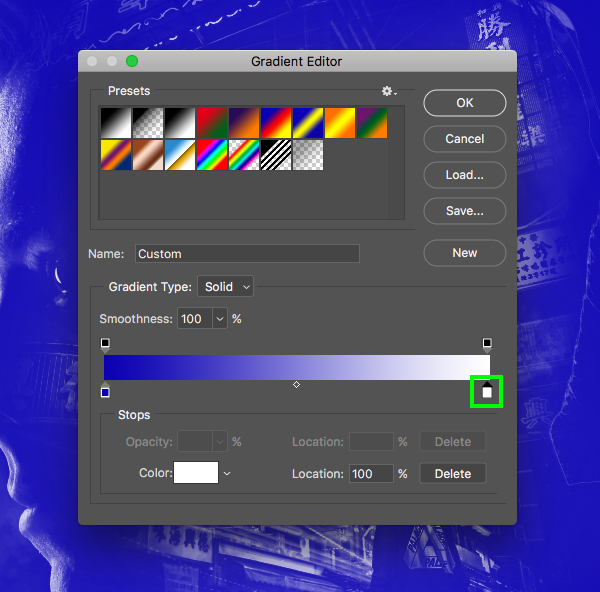
Here we will enter the hex value ‘#00FF84’ and then click ‘OK’ once again to apply the color changes.

In the main Gradient Editor window click ‘OK’ or press ‘Return’ on the keyboard to apply the changes and return to the main document. From here, change the Blend Mode of the Gradient Map layer to ‘Pin Light’ and then press the number ‘4’ to reduce the ‘Opacity’ to ‘40%’ as shown below:

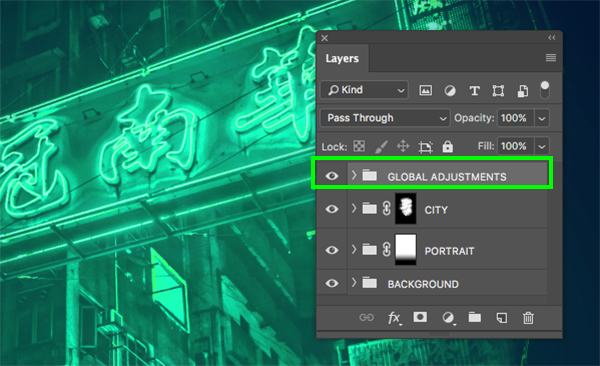
Step 25: Global Adjustments
Select the top ‘Gradient Map 1’ layer, then hold the Shift key and select the ‘Levels 4’ layer so all three of the Adjustment Layers on top are selected at the same time.
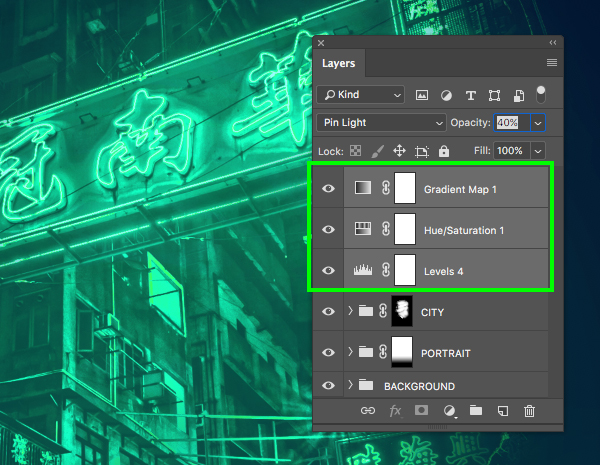
With these three layers still selected, press Command/Ctrl+G to place them into a new folder and then double click on the ‘Group 1’ text and rename the folder ‘GLOBAL ADJUSTMENTS’ since these are the Adjustment Layers that will be affecting everything below them.
Step 26: Versus Typface
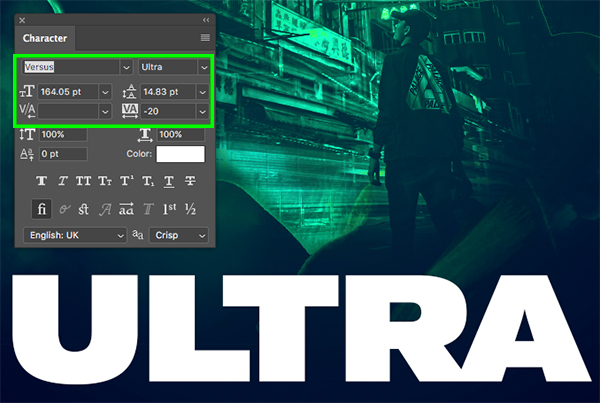
Create a new layer and then press ‘T’ on the keyboard to switch to the Type Tool. Click the cursor near the bottom of the canvas below the main image of the head and type out the word ‘ULTRA’ in all caps. Open the Character panel found under the Window menu and then change the typeface to the freebie for this tutorial which is the ‘Ultra’ style of the ‘Versus’ typeface from Latinotype. For the purposes of this layout we will only be working with this single style, but the full bundle contains several other weights. Once you have changed the typeface, let’s increase the size to about ‘164 pt’ with a tracking setting of ‘-20’ and leave the fill color set to solid white.
Step 27: Gritty Streets
Head over to Unsplash and download the fourth free stock photo and then be sure to save it with the other three images we have used. After that, go to the File menu and choose ‘Place Embedded…’ to select the image and bring it into your document.
After bringing in your stock photo, place it at the top of the Layers Palette. From here, hold the Alt/Option key and click on the Adjustment Layer icon at the bottom of the Layers Palette before choosing ‘Black & White…’ from the dropdown that appears.
Next, check off the box that says ‘Use Previous Layer to Create Clipping Mask’ and then press ‘Return’ or click ‘OK’ to continue.

After applying the Adjustment Layer with Clipping Mask, select the ‘Black & White 3’ layer, hold the Shift key, and then select the image below so that they are both selected at the same time.
With both layers selected, press Command/Ctrl+E to merge them together, and then double click on the layer name and rename it ‘MERGED’ as shown below:

Step 28: Extracting Textures
Now that we have a merged black and white image, we can begin extracting pieces of it to use as a standalone texture. To do this we want to switch back to the Magic Wand Tool (W) and change your ‘Tolerance’ setting to about ’24’. From here, click somewhere towards the bottom of the street in the photo to select some of the gravely texture.
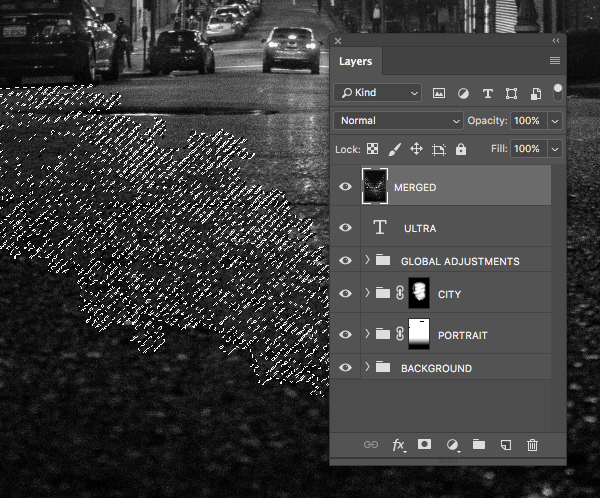
Once you’ve made your initial selection, go to the Select menu and choose ‘Similar’ from the menu. Doing this will select other pixels in the image with the same, or similar values.

Return to the Select menu, and this time choose ‘Inverse’ from the dropdown to invert the selection.
Next, turn off the visibility of the ‘MERGED’ layer and create a new empty layer above it. With your selection still active, make sure you have a solid black foreground color and then press Alt/Option+Delete on the keyboard to fill your selection with solid black.
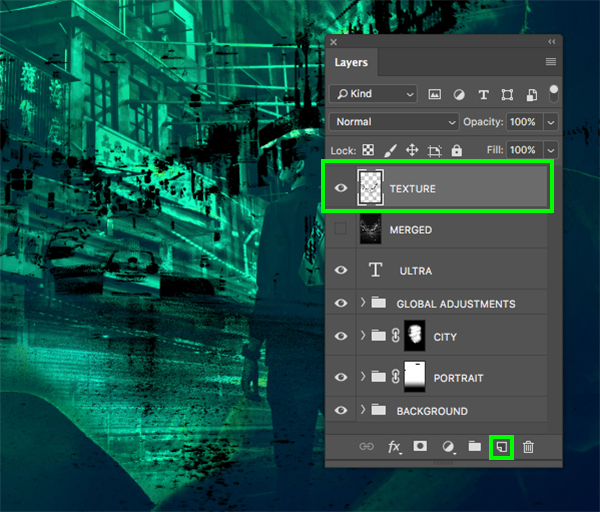
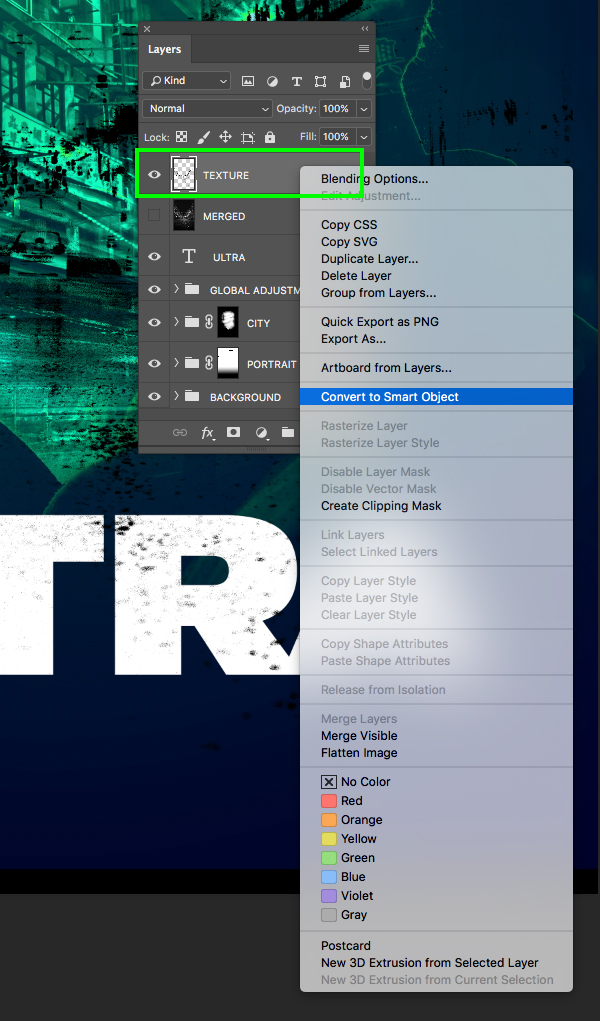
You should now have your texture on it’s own layer so let’s go ahead and rename this layer ‘TEXTURE’. After that, hold the Control key and click on the layer before choosing ‘Convert to Smart Object’ from the menu that appears. Doing this will allow us to transform and resize the texture without any loss in quality.
Just to make sure we have a backup copy before moving on, select the ‘TEXTURE’ Smart Object layer and press Command/Ctrl+J to make a copy of it before turning off the visibility of the original layer beneath.

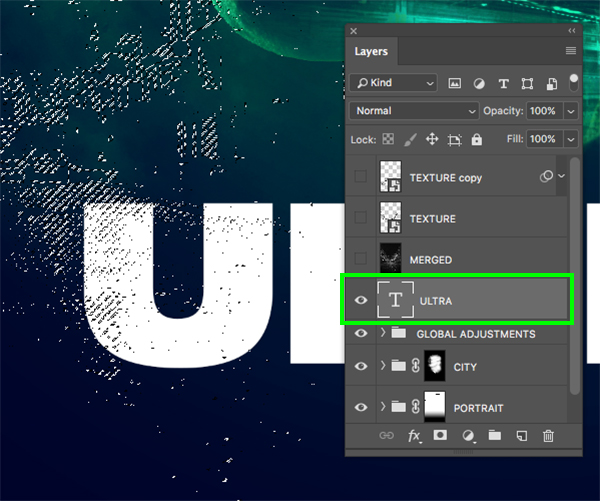
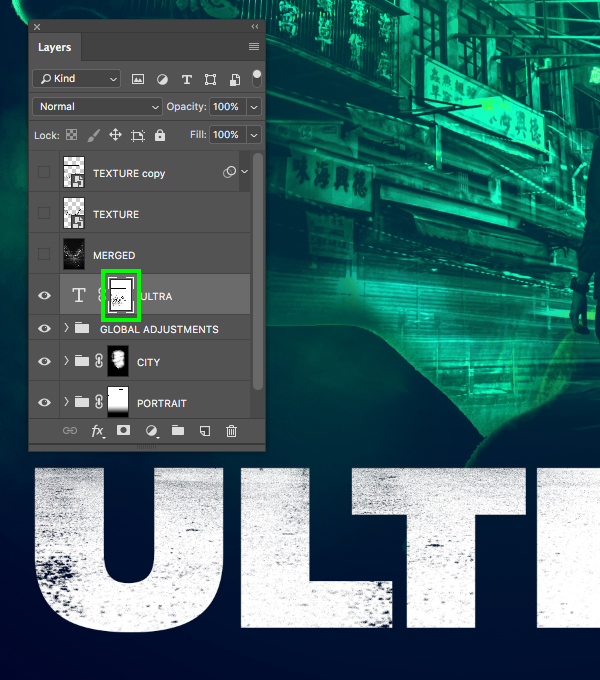
Step 29: Ultra Masking
What we are going to do now is use the ‘TEXTURE copy’ layer to see which parts of the texture we want to appear inside of the white text along the bottom of the poster. Here you can see I have repositioned the texture over the ‘U’ and the ‘L’ to get some of the smaller, grainy pieces of the texture overlapping the letters.
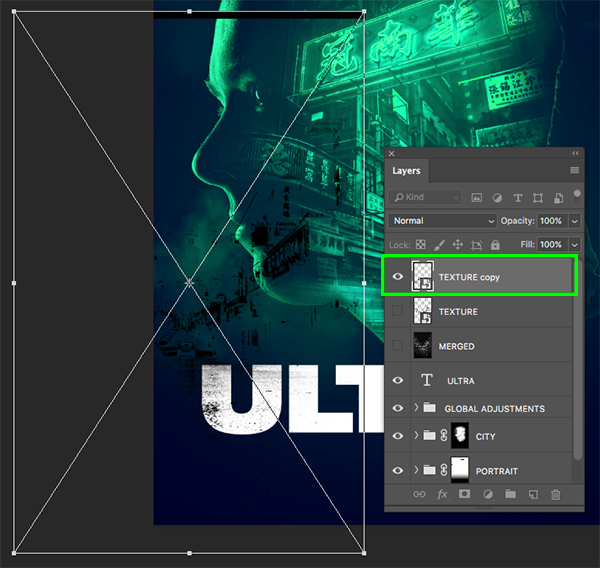
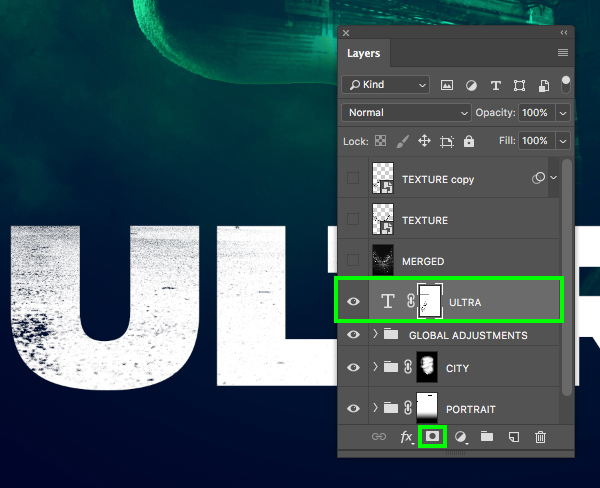
Once you are happy with the size and positioning of the texture over your letters, hold the Command/Ctrl key and click on the layer thumbnail icon of the ‘TEXTURE copy’ layer to activate a selection around the texture.

Turn off the visibility of the ‘TEXTURE copy’ layer and then select the ‘ULTRA’ layer with your text.
With your selection still active and the text layer selected, click on the ‘Add layer mask’ icon at the bottom of the Layers Palette to knock the texture out from the letters.
Step 30: Rinse and Repeat
Turn the visibility of the ‘TEXTURE copy’ layer back on and move it around a bit. Experiment with the size and positioning of the layer to get more interesting parts of the texture overlapping the remaining letters.
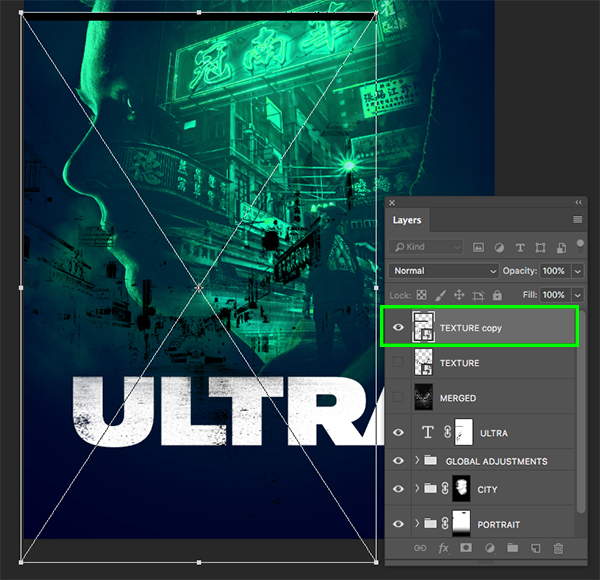
Again, once you are happy with the way the texture looks on the next few letters, hold the Command/Ctrl key and click the layer thumbnail icon of the ‘TEXTURE copy’ layer to activate a selection. After that, remember to turn the visibility of the ‘TEXTURE copy’ layer off to hide it.
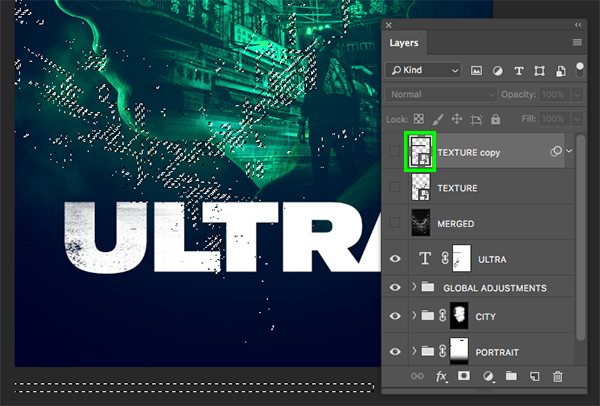
Now, since we already have a mask applied to the type layer we simply want to select the mask, make sure we have a solid black foreground color, and then once again use the keyboard shortcut Alt/Option+Delete to fill the selection with solid black, thus knocking the texture out of the type.
Repeat this process for the last few letters until you are happy with the way that the text is looking. After one or two passes here is my result:

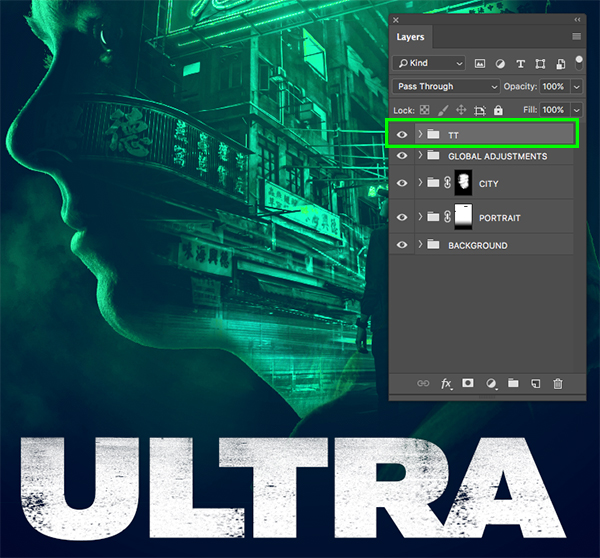
Step 31: Title Treatment
Select the top ‘TEXTURE copy’ layer, hold the Shift key, and then select the ‘ULTRA’ type layer.

With these top four layers selected, press Command/Ctrl+G to place them into a folder and then double click the ‘Group 1’ text and rename this ‘TT’ for ‘Title Treatment’ as shown below:
Step 32: Movie Poster Credits
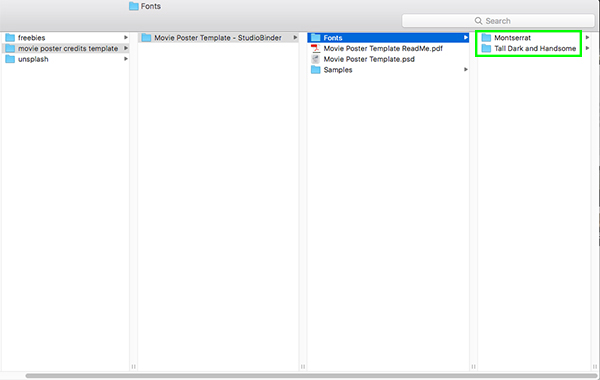
Head on over to Studio Binder and download the free poster template before moving on. Once you download the file you will want to install both of the free typefaces included in the ‘Fonts’ folder as shown below:
Once those typefaces have been installed, let’s go ahead and open the ‘Movie Poster Template.psd’ file.

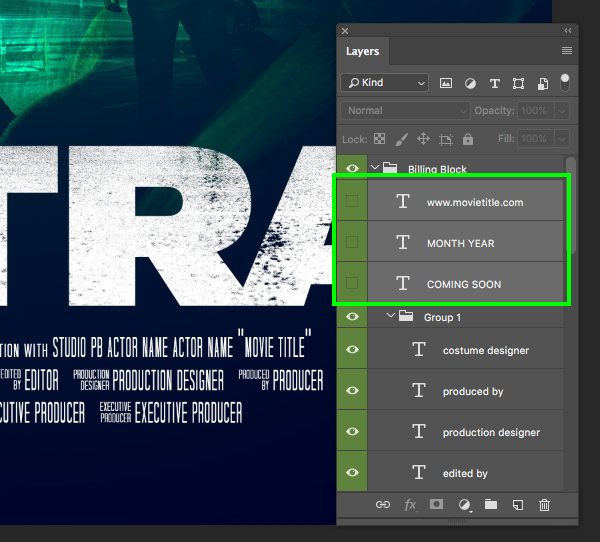
Inside of the file we will start by turning off the top ‘Black Text on White Background’ folder, and instead turn the visibility on for the ‘White Text on Dark Background’ folder. After doing that, go into the ‘Content to Edit’ subfolder and grab the folder called ‘Billing Block’ and drag it into your main document. Let’s use the Free Transform (Command/Ctrl+T) to scale it up by dragging outwards from any of the four corners of the bounding box while holding the Alt/Option+Shift keys, and then place it at the bottom of the layout just below the title.
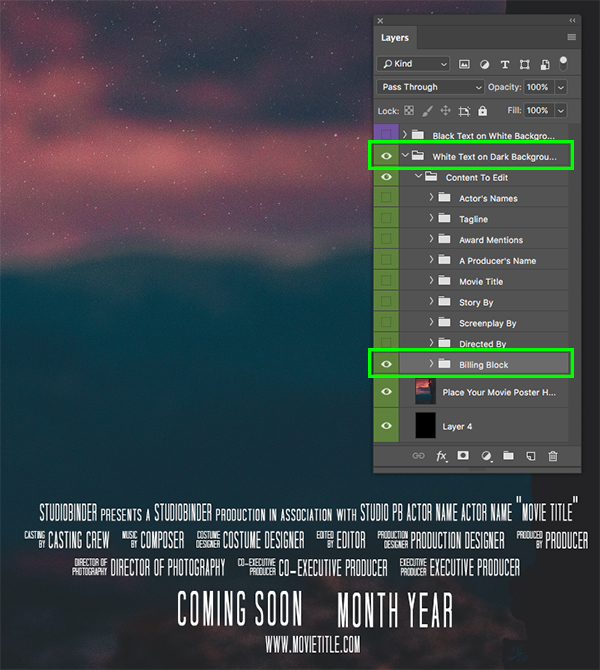
After bringing this folder into your file, expand the contents of the ‘Billing Block’ folder and delete the first three layers highlighted here:
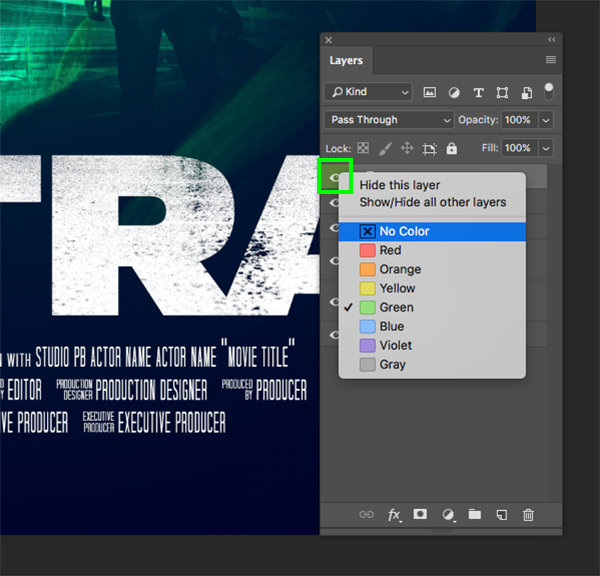
Hold the Control key and click on the eyeball for the ‘Billing Block’ folder and then choose ‘No Color’ to remove the green color label.
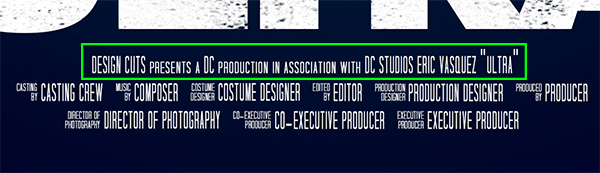
After removing the color label I will just rename the folder in all caps for consistency and move it below the ‘TT’ folder so that it’s in the order in which it appears in our layout.

Step 33: Line Modification
In this step we will just customize the top line a bit by putting in ‘Design Cuts’, ‘DC Studios’, your name, and the title of the film.
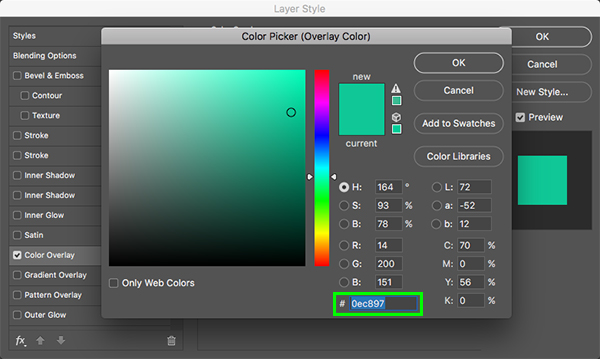
Step 34: Credit Color
Double click the ‘BILLING BLOCK’ folder to open the Layer Style dialog box and then check off the ‘Color Overlay’ option.
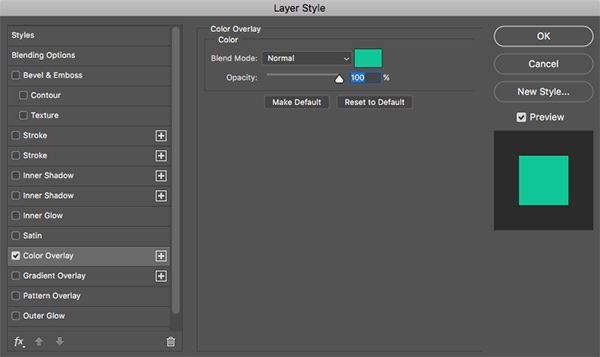
For the fill, let’s use the hex value ‘#0EC897’ and then click ‘OK’ or press ‘Return’ twice on the keyboard to apply the changes and close out of both dialog boxes.
Step 35: Cast Names
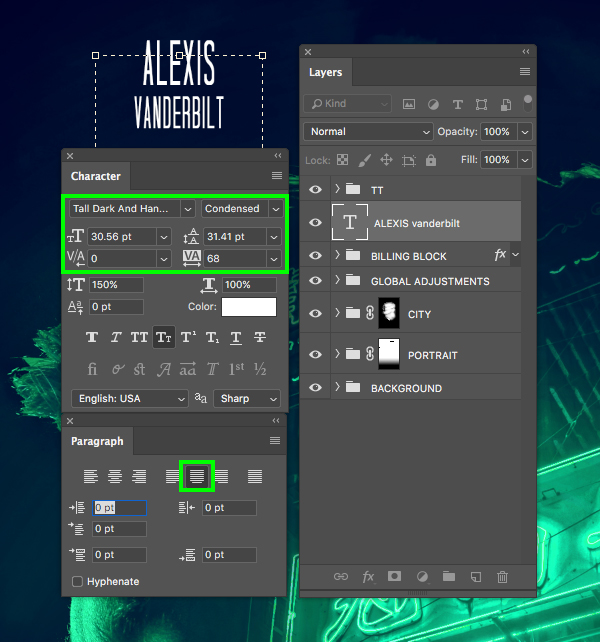
Create a new layer and switch over to the Type Tool (T) and then in the top portion of the layout type out the name ‘ALEXIS’ in all caps, press ‘Return’ to make a line break, and then type out ‘Vanderbilt’ in all lowercase letters. For this we will use the ‘Tall Dark and Handsome’ typeface at ‘30.56 pt’ size with a linespacing setting of ‘31.41 pt’ and tracking of ’68’. Also, open the Paragraph panel (found under the Window menu) and make sure to center the text.
Press Command/Ctrl+J to duplicate the layer and then move it over to the right and replace the text with the name ‘CASSI’ and the second line ‘Lopez’. Here the all lowercase version still remains in caps, but it’s a smaller size than the first line. Do this two more times to create the last two names and space them evenly apart like this:

Once you’ve typed out all of the names select the first one, hold the Shift key, and then select the forth name so they are all selected together.
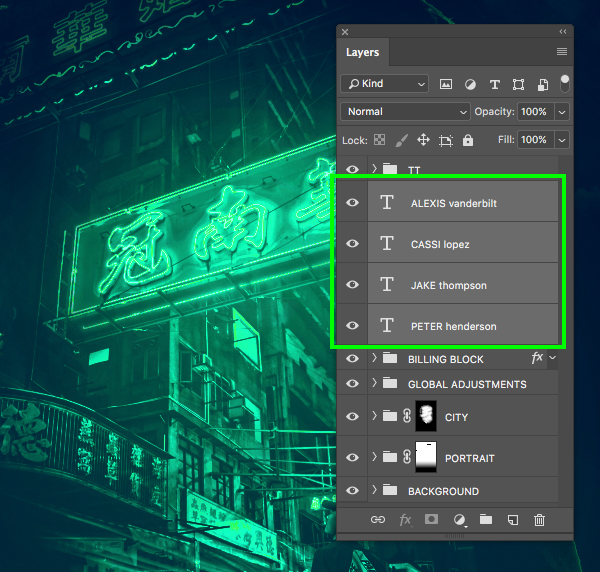
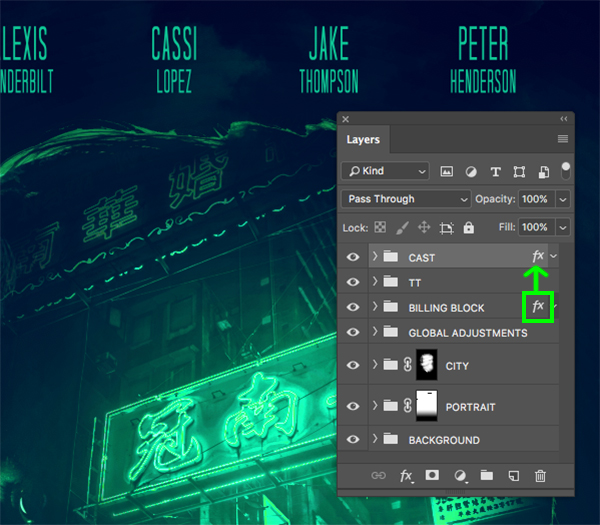
Press Command/Ctrl+G to place the names into a new folder and double click the ‘Group 1’ text to rename this folder ‘CAST’ before moving it to the top of the Layers Palette.
Next, hold the Alt/Option key and click and drag the small ‘fx’ icon from the ‘BILLING BLOCK’ folder onto the ‘CAST’ folder to apply the same Color Overlay.
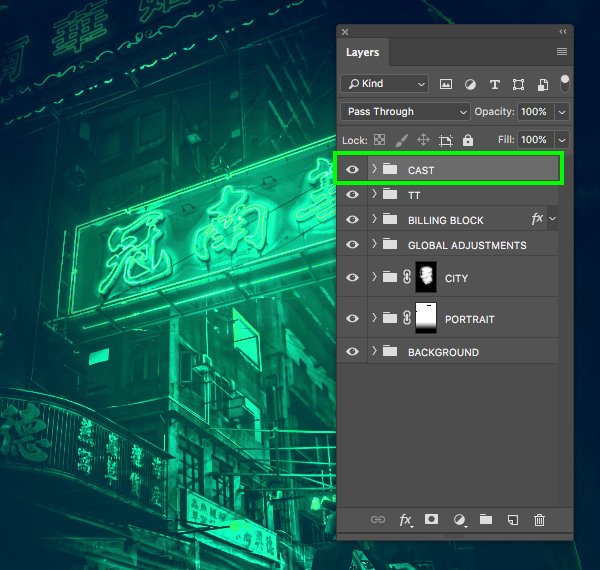
Step 36: Cast Fade
Select the ‘CAST’ folder and then click the ‘Add layer mask’ icon at the bottom of the Layers Palette to apply a mask to the group.
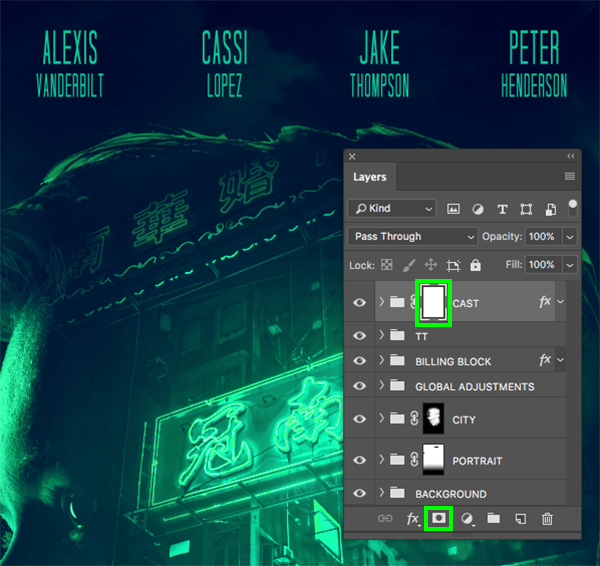
Press ‘G’ to switch to the Gradient Tool and select a Linear Gradient that fades from solid black to transparent as shown here:
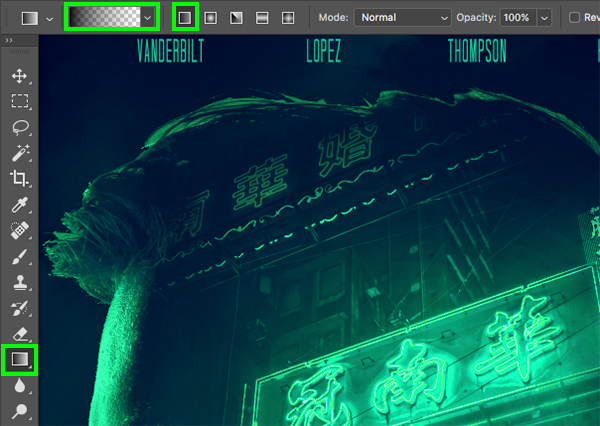
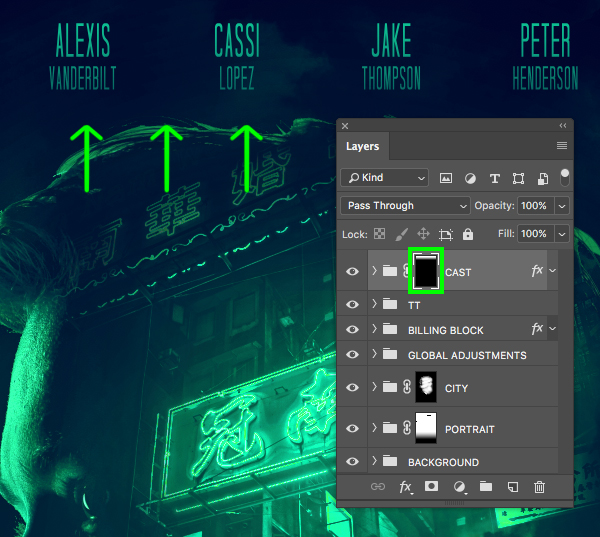
With the mask of the ‘CAST’ folder still active, click and drag from a little below the names upwards to create a nice fade effect. You should now have something like this:
Step 37: Bringing It All Together
At this point let’s select our very top folder in the Layers Palette, hold the Shift key, and then click on the very bottom ‘BACKGROUND’ layer so all of the folders and groups are selected together.
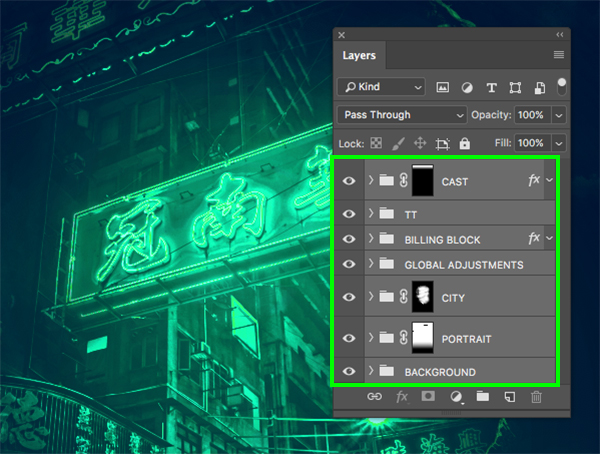
With everything still selected, press Command/Ctrl+G to place all of the elements into a single folder and double click the ‘Group 1’ text to rename this folder ‘ALL LAYERS’.

We have now completed our Ultra Movie Poster Design in Photoshop! To create our film poster we’ve used a single weight from the ‘Versus’ typeface courtesy of Latinotype from The Essential, Versatile Font Collection that we’ve combined with various stock photos to create an epic, cinematic design that uses textures and a fun double exposure type of effect. Remember that the ‘Versus’ font we have used for the tutorial was just one of many styles that are available in the full bundle, and that is just a taste of what you can expect to find in this all new design bundle! This collection will save you plenty of time and money with an amazing selection of beautiful, high-quality, versatile and ready to use fonts!
Remember that whether it’s your outcome for this tutorial or something new you’ve made, we’d love to see your designs on our Facebook page.
Please leave a comment if you have any questions or suggestions. I always look forward to hearing from you!
There’s still time to check out The Essential, Versatile Font Collection featuring many of the top type foundries and designers in the world such as Make Media Co., Laura Worthington, Tobias Saul, Latinotype and many more all for an unbeatable price of just $29!
High-Five to Eric this was fun! And as always learned a couple of new tricks!
Woohoo thanks for your awesome comment Carolyn and we’re so happy to hear that you have picked up some new tricks with this tutorial :).
Thank you for this! I’m completing a graphics design program now and this is great to practice with outside of school. As a new designer your site has been helpful with discovering new and artistic fonts and tutorials that will really make my work pop. Thanks!
Hey Phylicia,
Thanks so much for your comment and it is awesome to hear that you are really enjoying picking up new resources, as well as some handy design tips to use in your own creative projects!
It’s so exciting to hear that you are new to design and we hope that you love checking out more of our deals to come :) Happy designing!
Sir muja is photo ka satup mil sak ta ha kya
Hey Gopal,
Thanks for commenting! All of the freebie stock images that the designer has used within this tutorial are provided in the embedded links within the tutorial.
Rest assured, in case you possibly missed these, you can find them here: https://bit.ly/2VwCM9m https://bit.ly/2IU6rTv https://bit.ly/2OgB1Hp https://bit.ly/2UGZrvp https://bit.ly/2XGalDm
I did it!!! Learned some new techniques. thanks!!
Woohooo that’s awesome to hear Deborah, we hope that you enjoyed it!
Thanks Design Cuts for the awesome tutorial with many takeaways. I will definitely be trying this out.
Aww thanks so much Suresh, that’s so sweet of your to say! I hope that you have great fun trying this tutorial out :)
I don’t see the sample pack files only the font
Thanks so much for your comment Melanie!
This particular tutorial uses Versus Typeface, as a sample of one of the fonts that are currently available in our Essential Versatile Font Collection, which you can access from our Freebies page. The designer has also used free stock images, which you should find in embedded links within the tutorial, so my apologies if you missed these. You can find them here: https://bit.ly/2VwCM9m https://bit.ly/2IU6rTv https://bit.ly/2OgB1Hp https://bit.ly/2UGZrvp https://bit.ly/2XGalDm