WHAT WE’RE CREATING:
Hello Design Cutters! Renee here with an Illustrator-based tutorial for an event that would be near and dear to all of our hearts – a creative group meet-up. We’ll create a clean layout that showcases the surprisingly fun nature of some of the more corporate-style fonts from this week’s bundle.
HAVE YOU SEEN OUR NEW YOUTUBE CHANNEL?
Watch the video tutorial below and subscribe to our new YouTube channel for regular updates direct to your inbox.
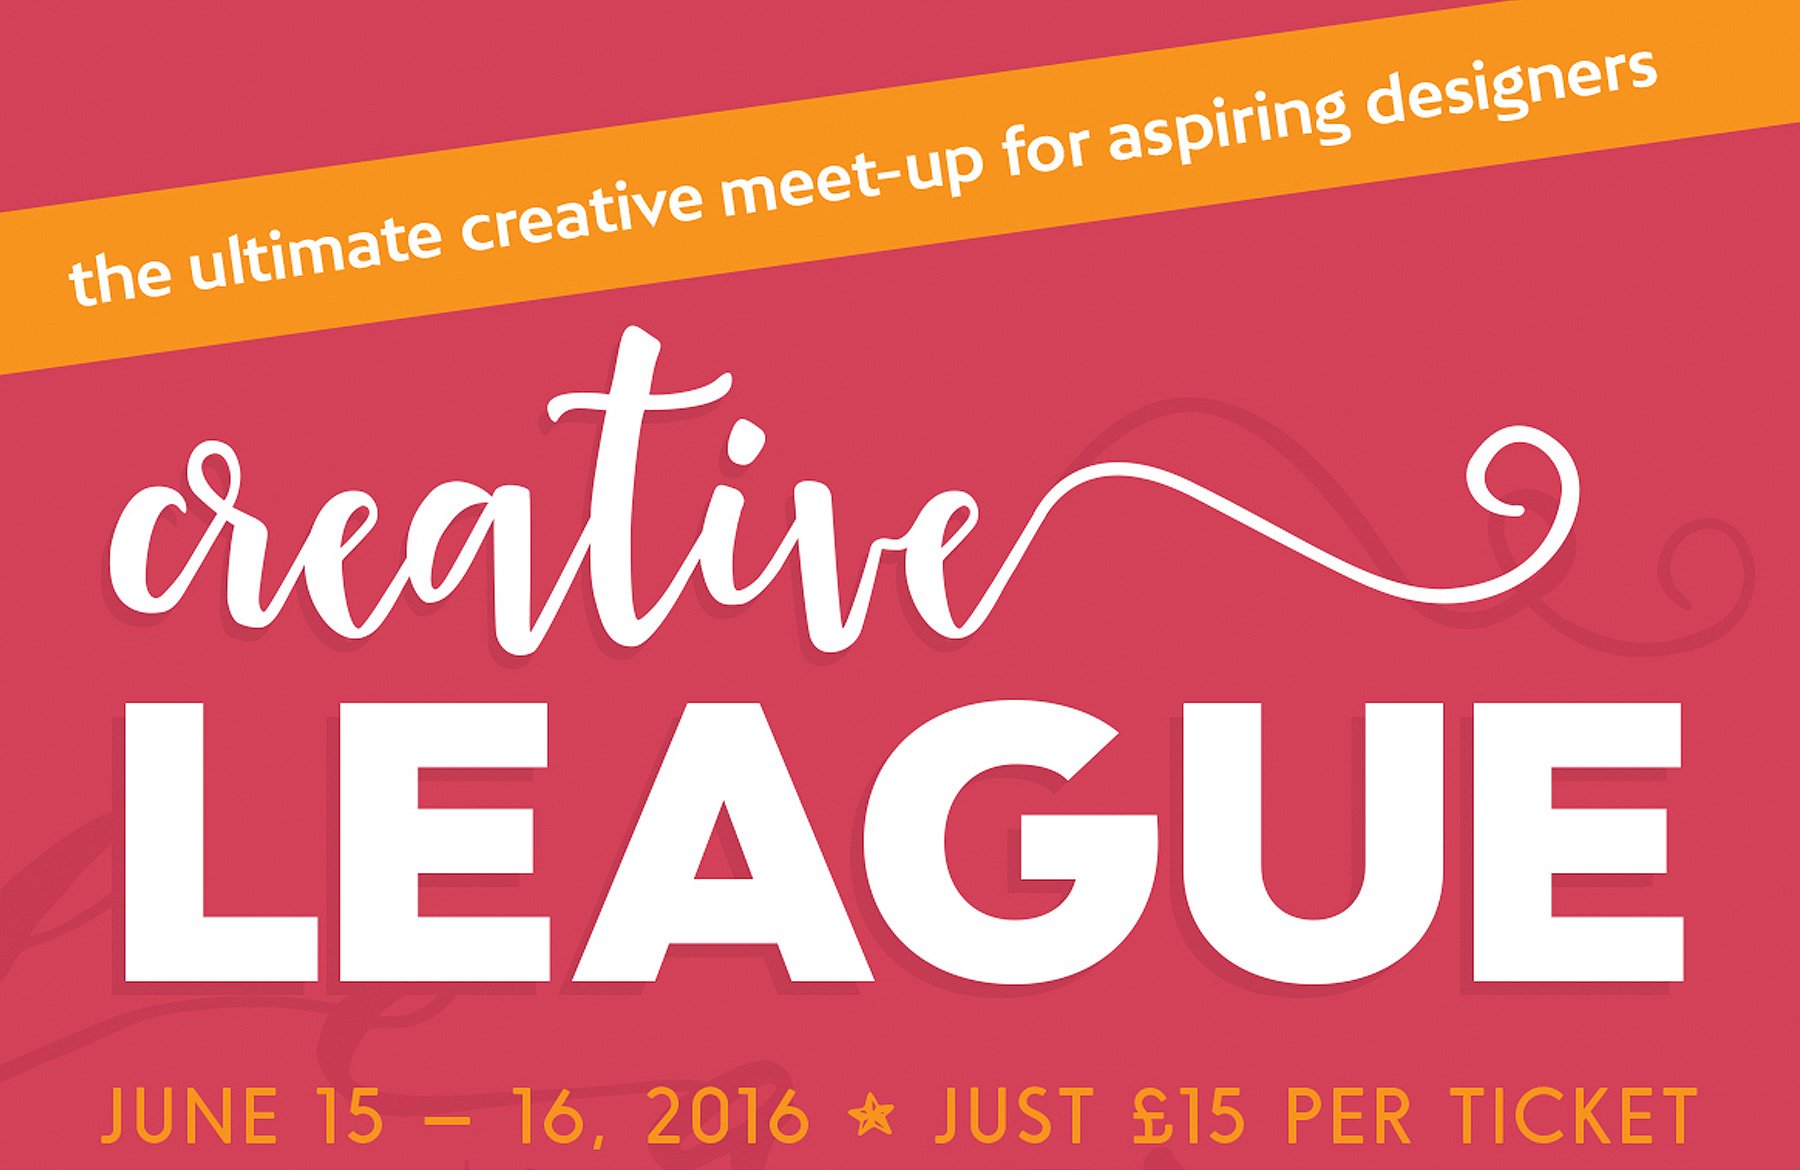
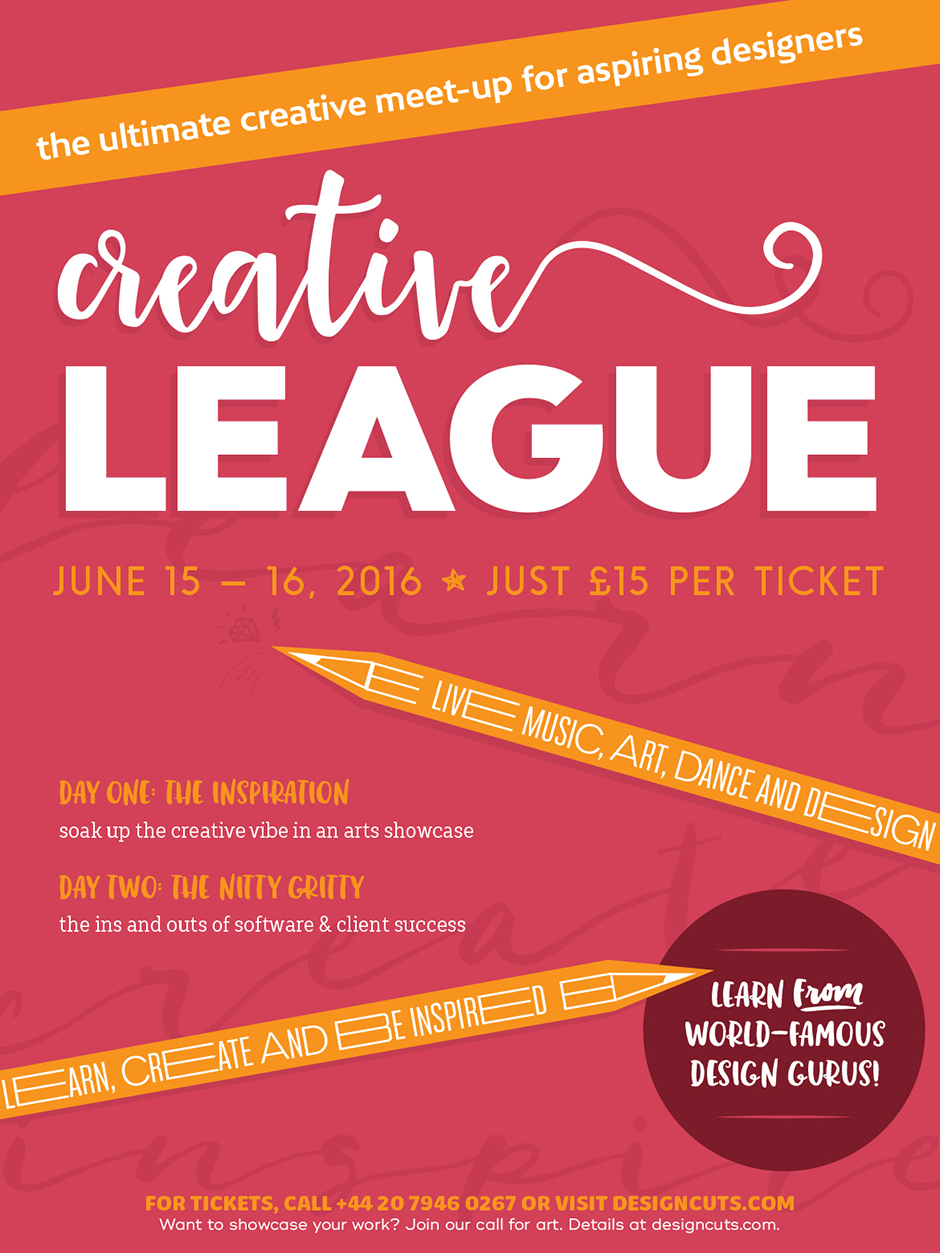
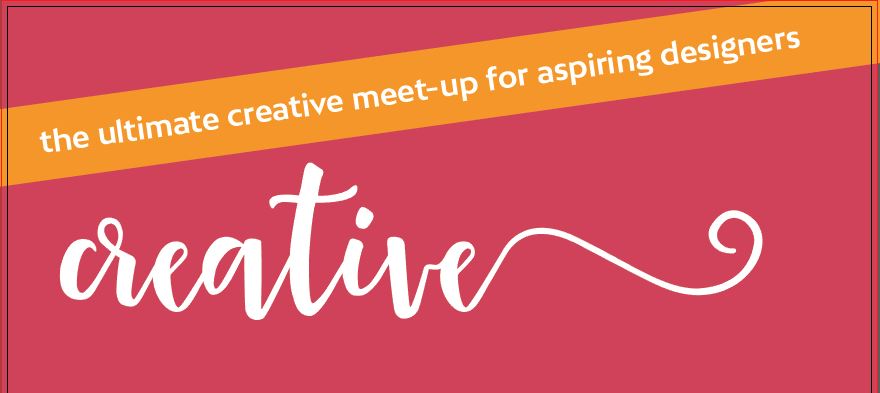
Here’s a look at what we’ll be creating:
Follow along with this tutorial: Download the freebie files
The freebie pack includes ornaments, scribbles and catchwords courtesy of the creative geniuses at Fenotype, Make Media Co. and Set Sail Studios.
This freebie pack is the tiniest taste of the resources available in 20 Exceptional Clean Font Families for just $29 (that’s a whopping 97% off). This collection of 20 font families includes 178 individual clean, exceptional quality fonts from some of the world’s foremost type designers.

Step 1: Background and Color Palette
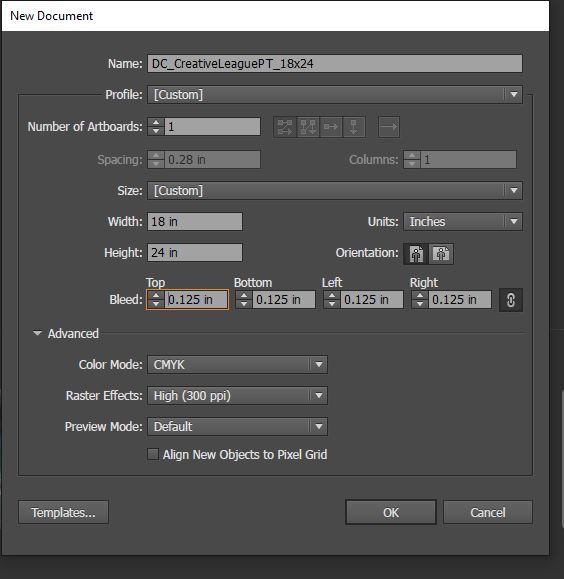
Open Illustrator and go to File > New. In the New Document dialog box, enter a width of 18 inches and a height of 24 inches. Under Bleed, make sure the link icon on the far right is selected (to apply our input to all four sides) and enter a Top bleed of .125 inches.
Why bleed? Bleed is used to allow a margin of error when cutting down a print so no white edges are visible. The piece is printed with a slightly larger area of coverage, then cut down to the desired size. One eighth of an inch (⅛” or .125”) is sufficient for most pieces, but large format pieces or fabric pieces that require additional sewing considerations may require more bleed. Digital-only pieces never need bleed.
Click OK to create the document.
Save your file.
At the bottom of the Layers palette (Window > Layers), double click the name of the layer, Layer 1, and change it to Background.
As I played around with Branding with Type’s Stretch font, it kept reminding me of simple representations of No. 2 pencils.

With that image swirling around in my noggin, I decided to use pencil colors for our meet-up poster – pink from the eraser and an orangey-yellow from the barrel. It also coincides quite nicely with our theme.
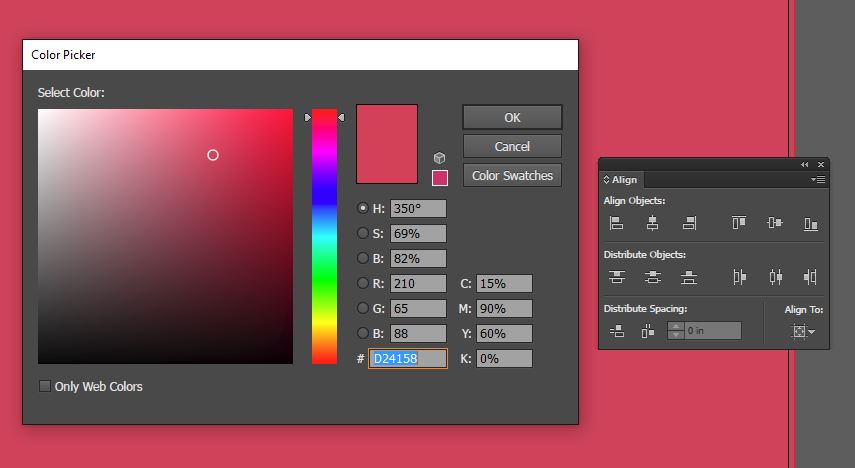
Select the Rectangle Tool (m) Click on the foreground color swatch at the bottom of your toolbar to bring up the Color Picker. In the Color Picker, enter CMYK values of 15/90/60/0. Press Ok.
Open the Swatches palette (Window > Swatches) and click the New Swatch icon. Name the swatch Eraser Pink and click OK.
Click once on the artboard. In the dialog popup box, enter a width of 18.25 inches (18 inches plus .125 inches bleed on each side = 18.25). Enter a height of 24.25 inches. Click OK.
To center the rectangle on the artboard, open your Align palette (Window > Align) and under Align Objects, select the icons for Horizontal Align Center and Vertical Align Center.
Note: If nothing happens when you click the align icons, you may need to change your Align To settings. Click on the arrow just below Align To at the bottom right of the Align palette and select Align to Artboard.
Now we’ll lock this layer. Open the Layers palette and click the space between the eye icon and the layer name. We’ll add to this layer as we get closer to finishing our design, but for now, it will be easier if it’s locked.
Step 2: Header, Title and Footer
In the Layers palette, click the Create New Layer icon. Double click the layer name and change it to Content.
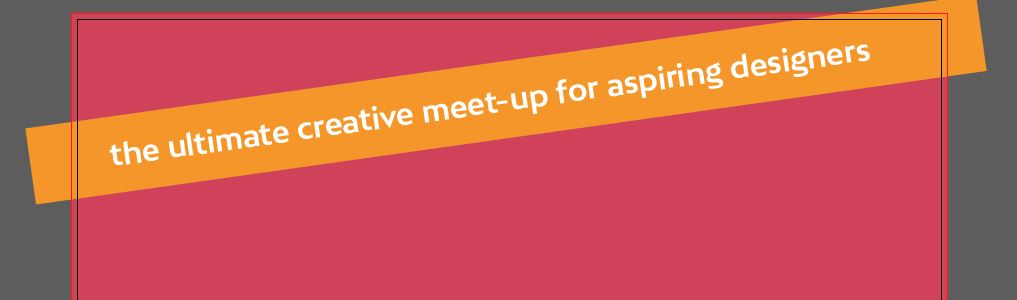
Select your Type Tool (t) and click once on the artboard. Type: the ultimate creative meet-up for aspiring designers.
Open your Character palette (Window > Type > Character). Select the font BW Mitga Bold at 45 pt. Change the Kerning to Optical. This will create a more pleasing visual space between our letters.
In the Swatches palette, select White for the color.

We’ll position this line of copy at the top of the artboard and at a bit of an angle. Open your Transform palette (Window > Transform). Next to Rotate, enter 8 degrees, then use your Selection Tool (v) to drag the copy to the top of the poster.

Now we’ll create a different background for this line of copy. Select your Rectangle Tool and draw a rectangle that reaches all the way across the poster and is tall enough to house the text we just created. My rectangle is 20 inches wide and 1.6 inches tall.
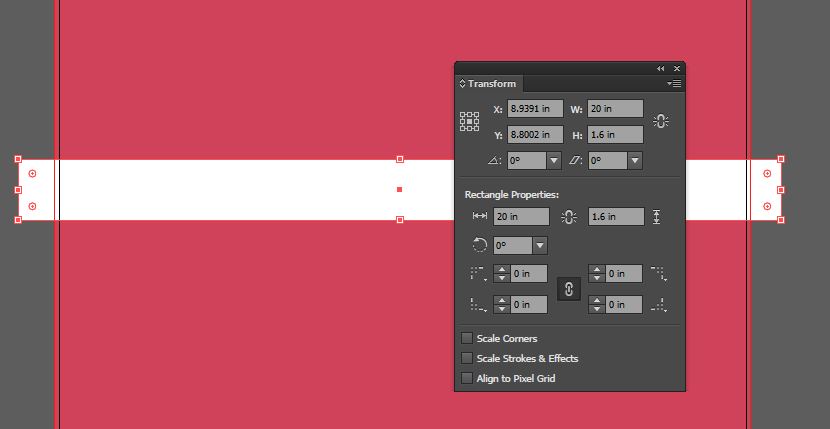
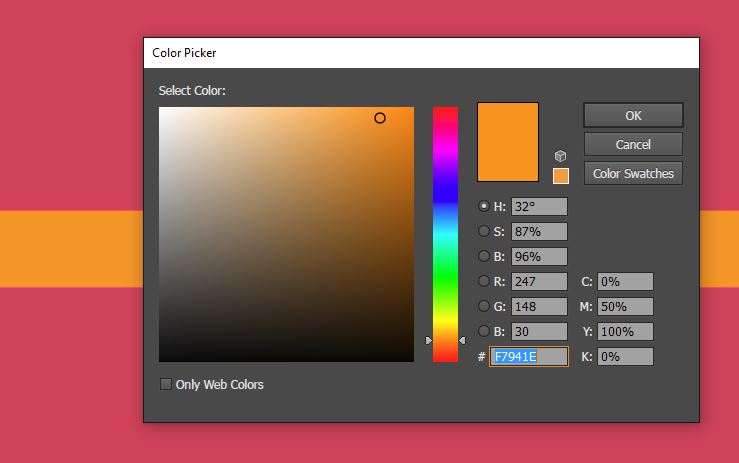
Click on your foreground color swatch at the bottom of the toolbar and in the color picker, enter CMYK values of 0/50/100/0.
In the Swatches palette, click the New Swatch icon and name it Pencil Yellow, then click OK.
In your Transform palette, enter a rotation of 8 degrees, then use your Selection tool to drag the rectangle up to the copy area. To arrange it behind the copy, press cmd + [ (left bracket).
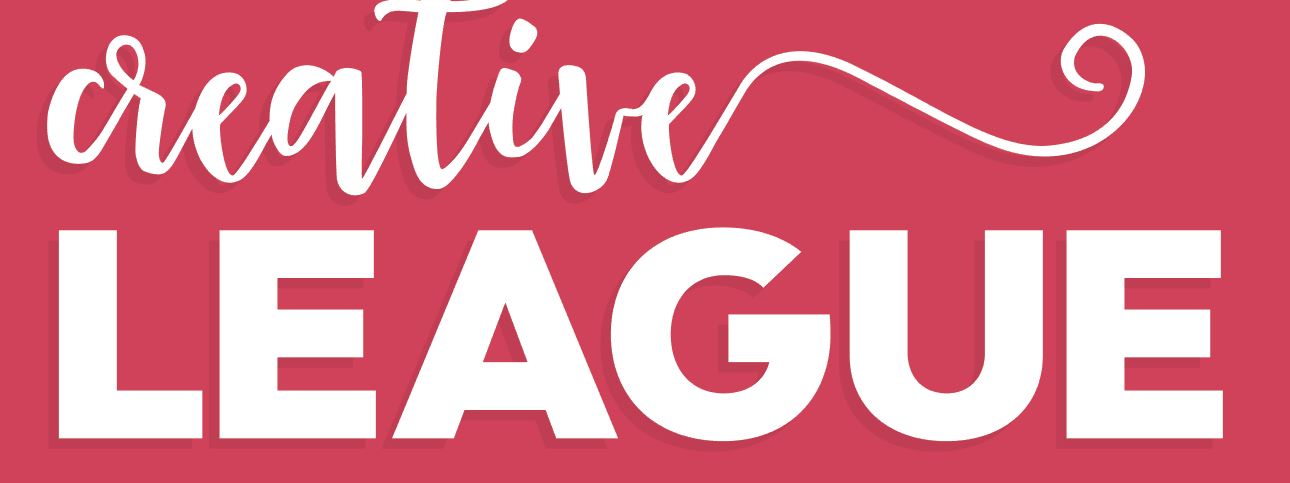
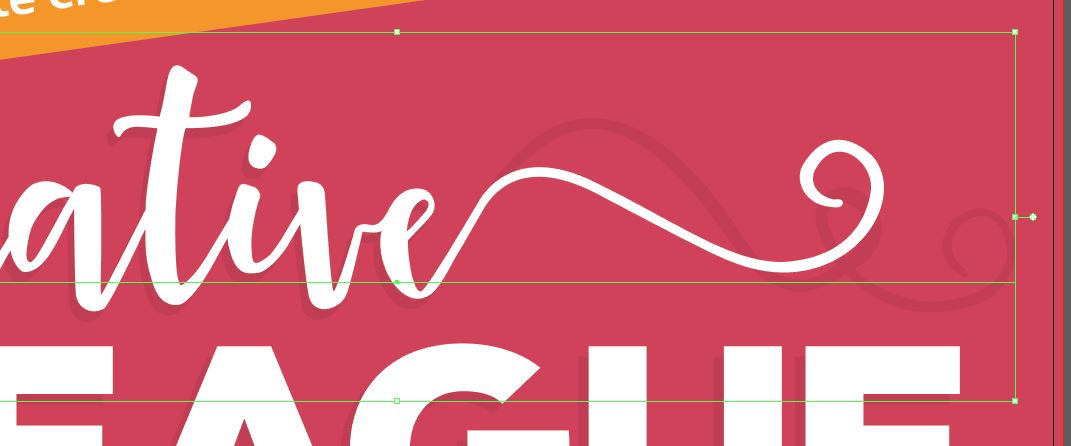
Select your Type tool and click once on the artboard. Type: creative.
Switch over to your Selection Tool so the entire chunk of copy is active. In the Swatches palette, choose White for the color. Open your Character palette and change the font to Tuesday Script Regular at 280 pt. We’ll leave all other settings at their defaults.
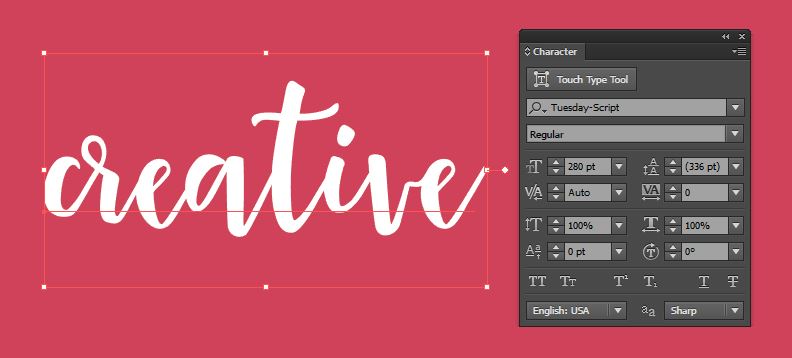
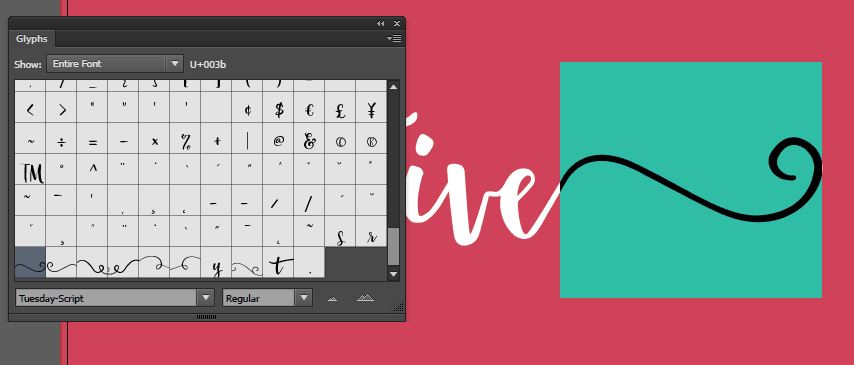
We’ll add a bit of decoration to the end of our word. Select your Type Tool and click once after the last e in creative. Open your Glyphs palette (Window > Type > Glyphs). Scroll down to the very bottom and double click one of the decorative swashes to add it to the end of the word.
Use your Selection Tool to position the word just below the orange bar so that the the top of the t in creative points to the last half of the word creative in the orange bar.
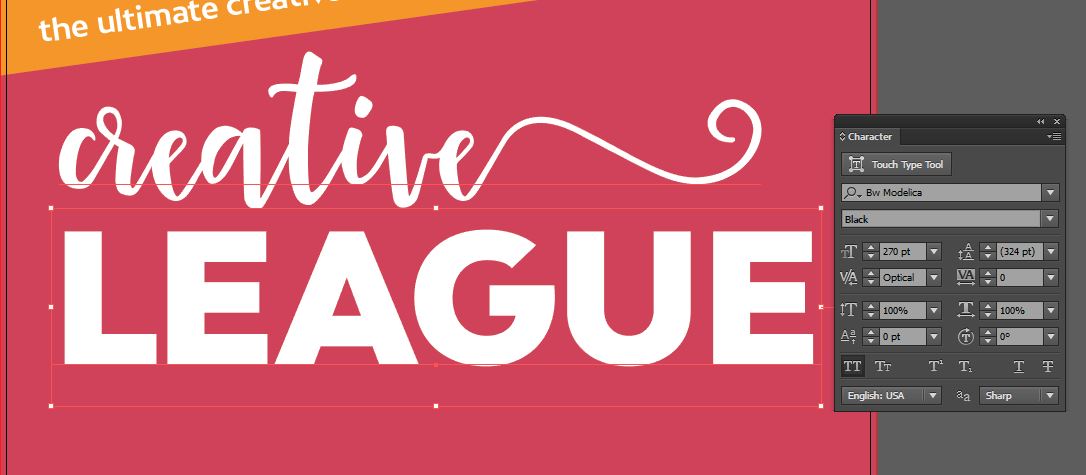
Select your Type tool and click once on the artboard. Type: LEAGUE.
In the Character palette, change the font to BW Modelica Black at 270 pt. Change the Kerning to Optical. In the Swatches palette, change the color to White.
Position the word just below creative and aligned with the left side of it.
Now we’ll clean up the spacing between individual letters just a little bit. Use your Type Tool to select the first E in LEAGUE. In your Character palette, change the Tracking to 20.

Select the U and change the Tracking to -40.

Next, we’ll go ahead and add our important footer information. This will give us a better sense of space when we’re laying out the info in between the title and footer later.
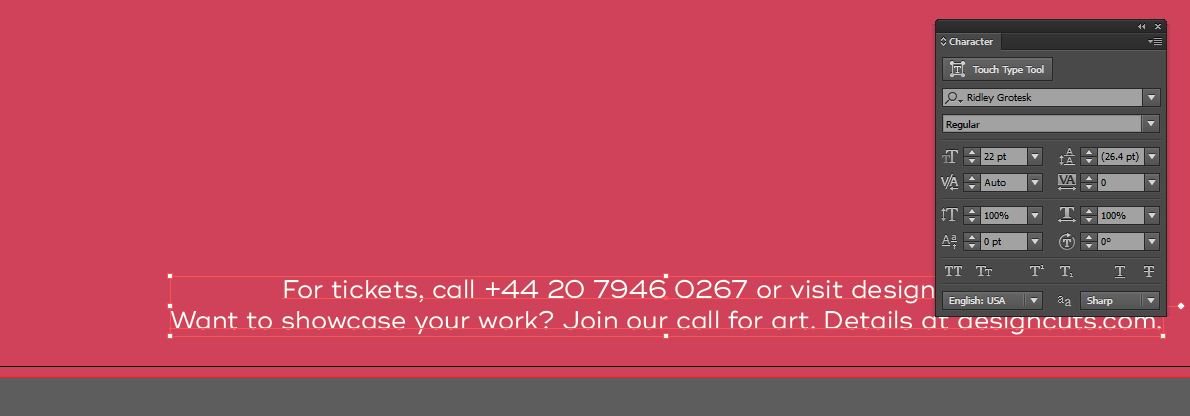
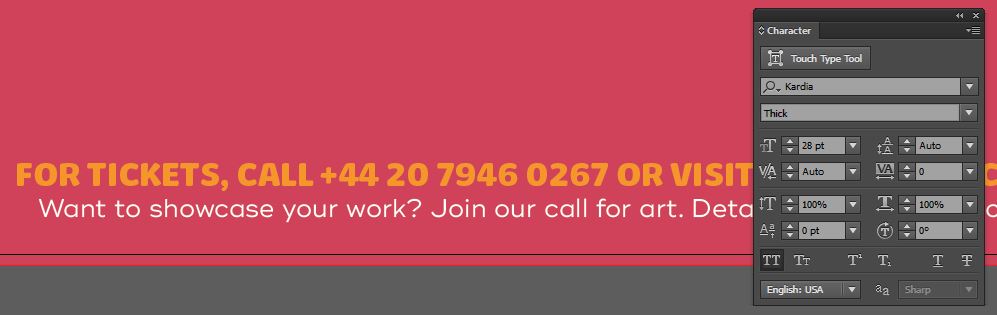
Select your Type Tool and click once at the bottom of the artboard. Type: For tickets, call +44 20 7946 0267 or visit designcuts.com. Press enter to go to the next line, then type: Want to showcase your work? Join our call for art. Details at designcuts.com.
In the Swatches palette, make your foreground color white.
In the Character palette, choose the font Ridley Grotesque Regular at 22 pt. Open your Paragraph palette (Window > Type > Paragraph) and set to Align Center.
Use your Type Tool to select the top line of the copy. In the Swatches palette, choose Pencil Yellow.
In the Character palette, change the font to Kardia Thick at 28 pt. Click on the arrow at the top right of the Character palette and in the flyout menu, choose All Caps.
Lastly for this bit of copy, switch to your main Selection Tool. Position the bottom of the footer about ½” from the bottom of the artboard, then open your Align palette and click the Horizontal Align Center icon.

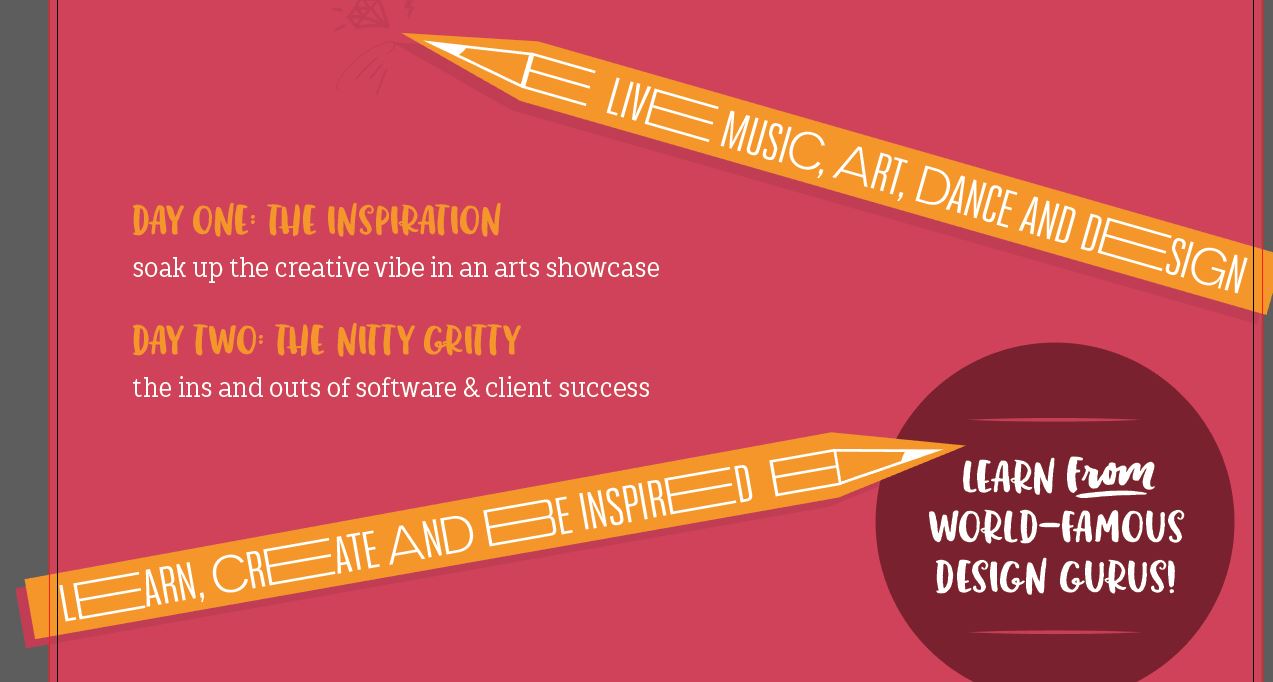
Step 3: Pencils
Let’s get our pencils in here so our color scheme makes sense.
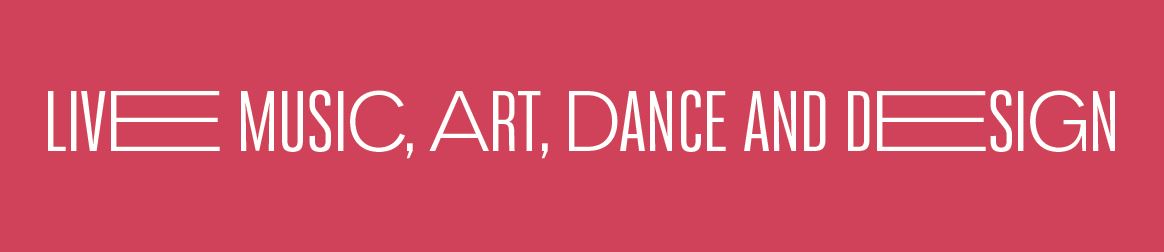
Select your Type Tool and type: LIVE MUSIC, ART, DANCE AND DESIGN.
In your Swatches palette, change the color to White.
In your Character palette, change the font to BW Stretch Regular at 50 pt.

To access the Stylistic Alternates, open your OpenType palette (Windows > Type > OpenType). We want to be choosy about which characters we alternate or it will start to look overdone.
Use your Type Tool to select the first E, in LIVE, and in the OpenType palette, click the icon for Stylistic Alternates (fifth from the left).

Now we’ll just repeat the same process for the C in MUSIC, the A in ART, the D in DANCE and both the E and G in DESIGN.
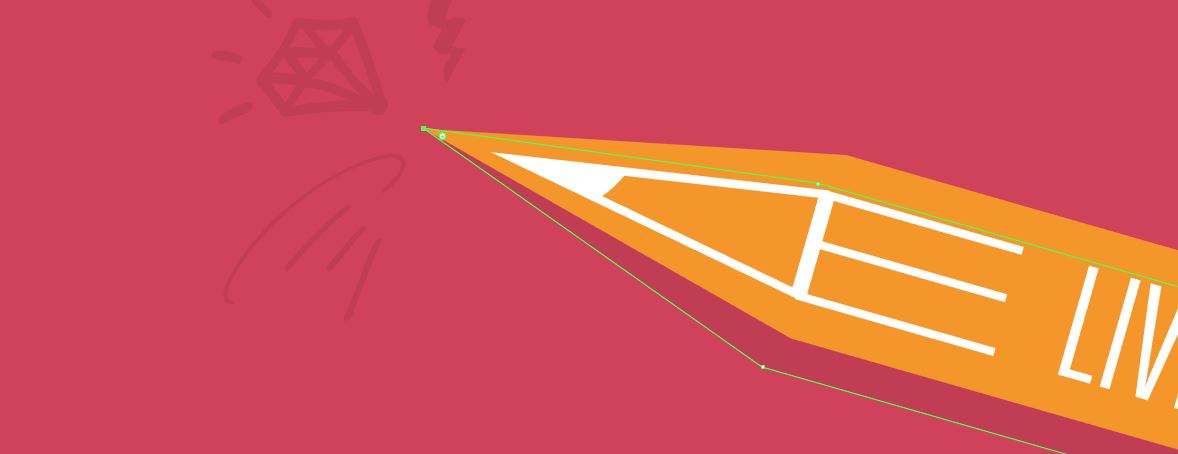
We’ll turn this line of copy into a pencil with just a few extra lines and shapes. First, let’s create the front of our pencil. Use your Type Tool to select either of the stretched Es. Press cmd + c to Copy.
Click once at the beginning of the copy (before LIVE) and press cmd + v to Paste. Then press the spacebar twice so the E doesn’t look like part of the word LIVE.

Now I’ll show you a really simple way to create an isosceles triangle. Select your Rectangle Tool. Hold shift (to maintain aspect ratio so you draw a perfect square) and draw a square on the artboard – any size is fine since we’ll scale it later, but mine is about 1.5 inches square.
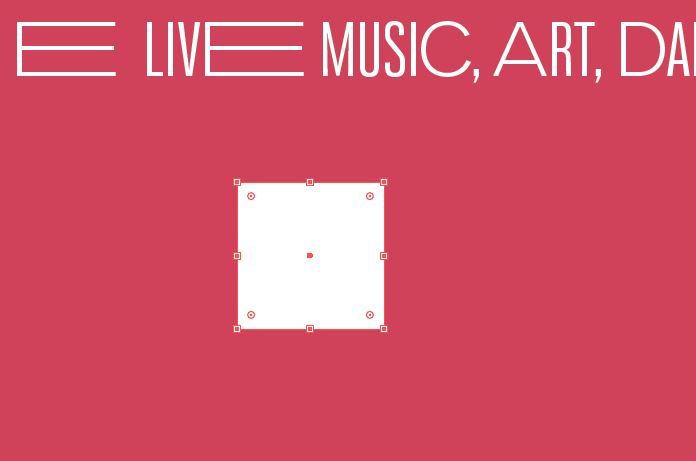
Grab your Selection Tool (v). Hover over any of the corners until you see the curved, double-sided arrow. Hold shift and rotate to the right 45 degrees.
Note: Holding shift while rotating forces the object to rotate at 45 degree increments.
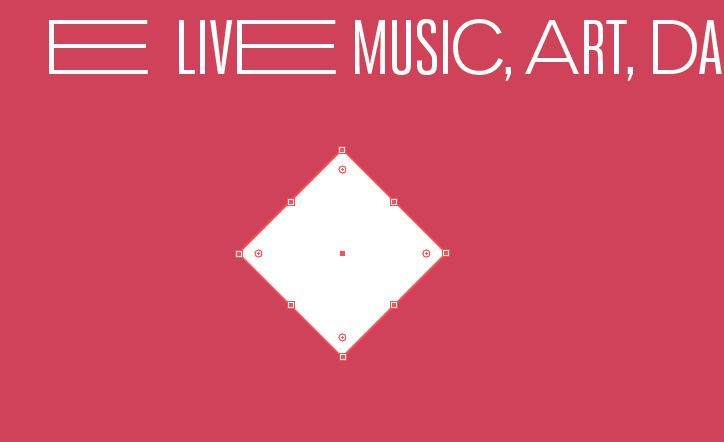
Select your Pen Tool (p) and click once on the point at the bottom of the diamond to delete it, leaving us with an equilateral triangle.
Select your Direct Select Tool (a) and select the top middle point of the triangle. Hold shift and press your up arrow several times to increase the height of the triangle.

To create our pencil lead point, select the Ellipse Tool (L). Hold shift and draw a circle that overlaps the tip of the triangle – about 4 inches in diameter. Position it so it’s a little off center from the triangle.
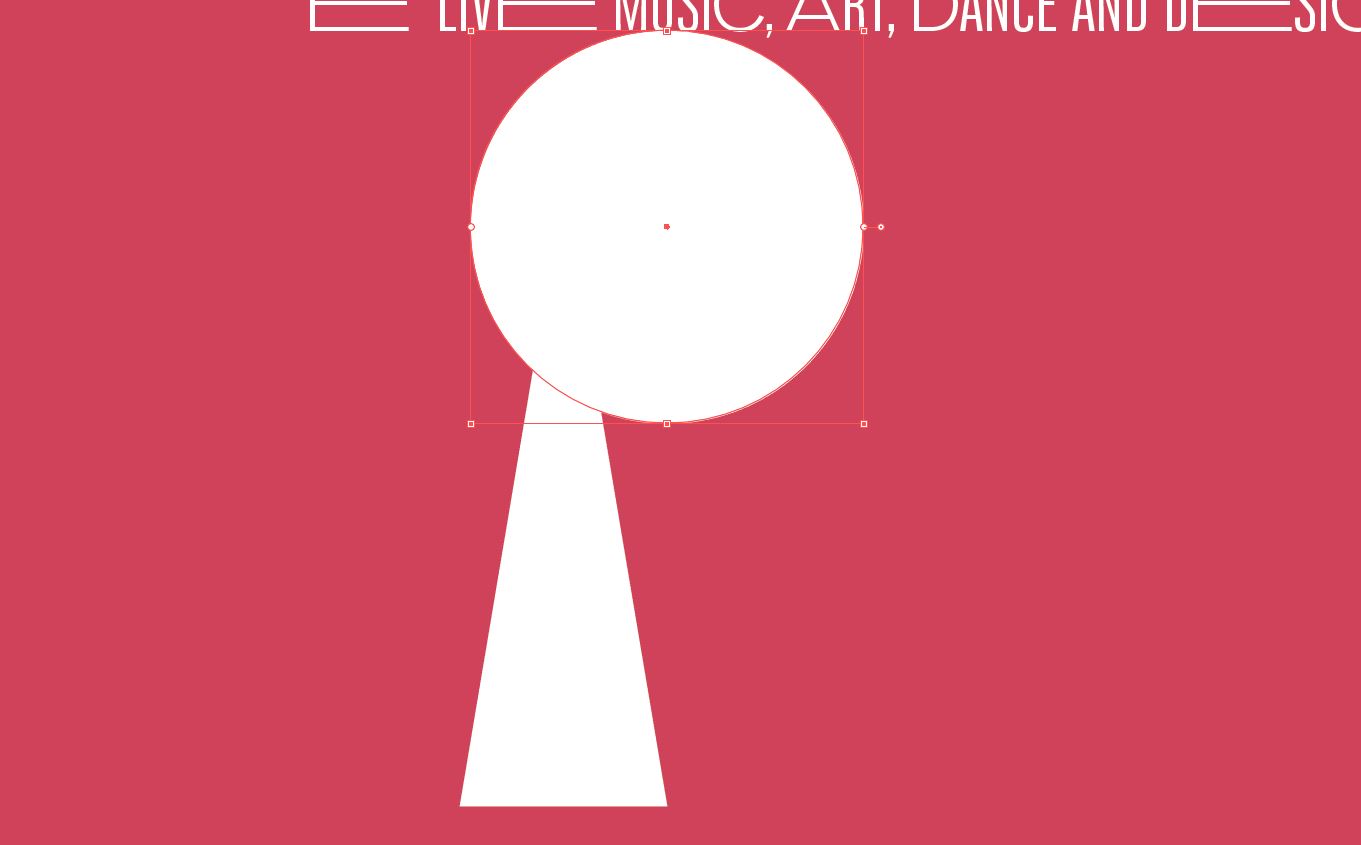
Use your Selection Tool (v) and select the triangle. Press cmd + c to Copy. Now press cmd + f to Paste in Place. With the copy still selected, hold shift and select the circle.
Now that we have both the triangle copy and circle selected, open your Pathfinder palette (Window > Pathfinder) and select the icon for Intersect – it’s the third icon from the left under Shape Modes.

Select your original triangle. Just above the the foreground color swatch at the bottom of the toolbar, you’ll see a curved, double-sided arrow. Click it to swap the fill and stroke colors. In this case, our triangle will now have no fill and a white stroke.

Use your Selection Tool to select both the triangle and the pencil tip. Hold shift and use the corner handle to rotate 90 degrees. Then use the corner handles to scale down until they fit at the beginning of the stretched E on our last line of copy.

Open your Stroke palette (Window > Stroke) and increase the Weight to 3 pt.

Use your Selection Tool to drag across the pencil tip, triangle and copy. Press cmd + g to Group them all together.
For one last bit of fun decoration on the pencil, we’ll add the Pencil Yellow background behind it.
Select your Pen Tool. We’re going to intentionally keep this rough, so don’t worry if things aren’t lined up perfectly. Click once a little to the left of the pencil tip to create our first point.
Next, click just above the spot where the copy begins, then above the end of the copy, below the end of the copy, below the spot where the copy begins, then click again on our first point to close the path.

In your Swatches palette, change the foreground color to Pencil Yellow. Then, press cmd + [ to send the shape behind the pencil group.
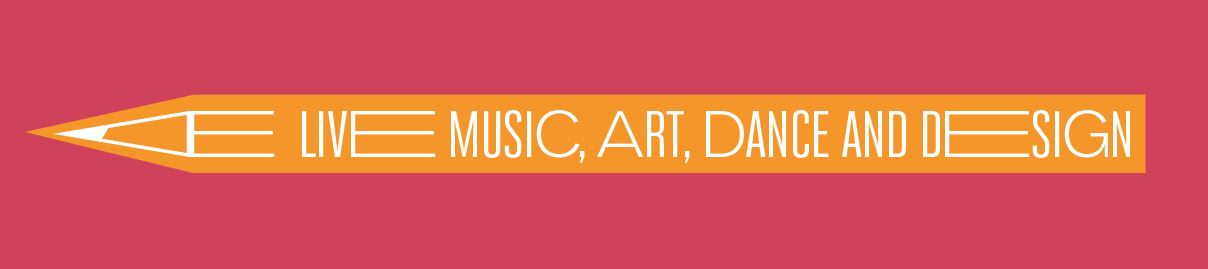
Select both the shape and the pencil group and press cmd + g to Group.
Open your Transform palette and enter a Rotation of -16 degrees, then position the group on the right of artboard, leaving a generous amount of space between it and the event title.
Now we’ll create a second pencil.
Grab your Type Tool. Click once on the artboard and type: LEARN, CREATE AND BE INSPIRED.
The font should already be BW Stretch Regular at 50 pt with Stylistic Alternates turned on. So, we’ll go through and turn off some of the alternates.
Open your OpenType palette. Use your Type Tool to select the A in LEARN and click the Stylistic Alternates icon to turn it off. Repeat for the ATE in the last half of CREATE, the E in BE and the D in INSPIRED.
Select your Selection Tool, then change the foreground color to White in the Swatches palette.

Use your Type Tool to select the stretched E in LEARN and press cmd + c to Copy. Place your cursor at the end of the sentence (after INSPIRED), press the spacebar twice, then press cmd + v to Paste the E.

This time, we can copy the pointed pencil end we’ve already created. Use your Group Selection Tool (the white arrow with a plus sign that’s accessible on the flyout menu of the Direct Selection Tool) to select the lead tip and triangle from the first pencil. Press cmd + c to Copy, then cmd + v to Paste.
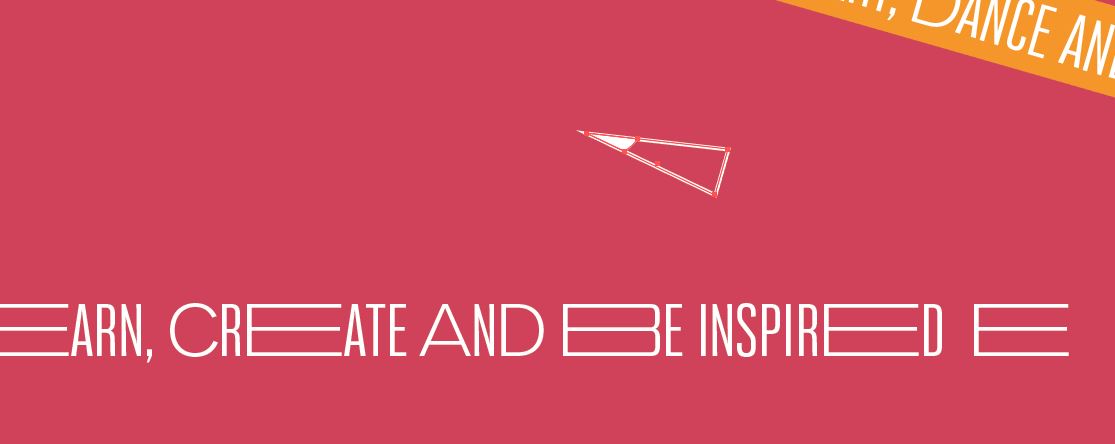
With your main Selection Tool, use the corner handles to rotate the pencil end to the right and position at the end of our most recent sentence.

Select all three pieces (lead tip, triangle and copy) and press cmd + g to Group.
Select your Pen tool and repeat the process of outlining the copy with a Pencil Yellow shape. When you’re done, press cmd + [ to send the shape behind the copy.
Alternatively, you could copy and reposition the shape we drew for the first pencil, but I want them to both look slightly different.

Select the most recent pencil group and the newest shape, then press cmd + g to Group.
In your Transform palette, enter a Rotation of 10 degrees. Position the pencil on the left side of the artboard, about midway between the first pencil and the footer.

Step 4: Supporting Copy
Use your Type Tool to click once on the artboard below the event title and type: June 15 – 16, 2016 Just £15 Per Ticket. Note that there are four spaces between the date and the ticket info. We’ll use this space to add an ornament after we format our copy.
Change the color to Pencil Yellow and in your Character palette, change the font to Odudo Soft Regular at 54 pt. Change Kerning to Optical and the Tracking to 75.
Use your Align palette to Horizontal Align Center below the event title.

Navigate to the FenoType freebie folder and open HMSGilbert_Star. Use your Selection Tool to select the star and press cmd + c to Copy. Close the star file.
In the main poster layout, press cmd + v to Paste. In the Swatches palette, change the fill color to Pencil Yellow.
Hold shift and use the corner handles to reduce the size until it fits comfortably in the space between the date and ticket info.
Note: If you’ve purchased the font bundle, the star is a lowercase g in HMS Gilbert Ornaments.

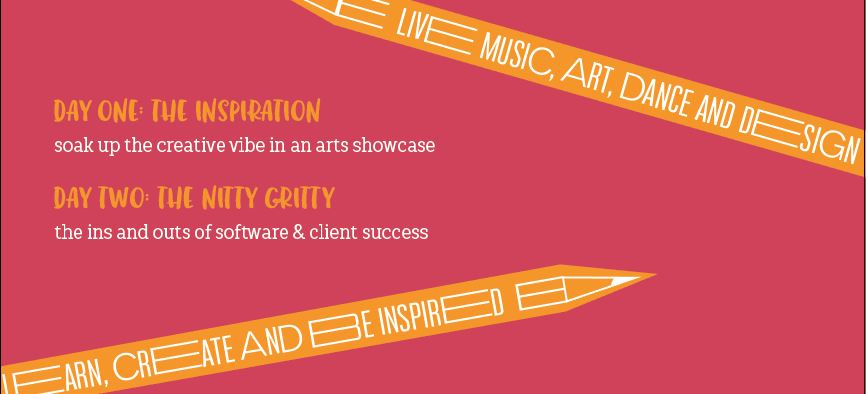
With your Type Tool, click once on the artboard, toward the left side between the two pencils. Type: Day One: The Inspiration (line break)
soak up the creative vibe in an arts showcase (line break)
Day Two: The Nitty Gritty (line break)
the ins and outs of software & client success
Change the fill color to white and the font to TT Slabs Condensed Regular at 30 pt.
In your Paragraph palette, select Align Left.
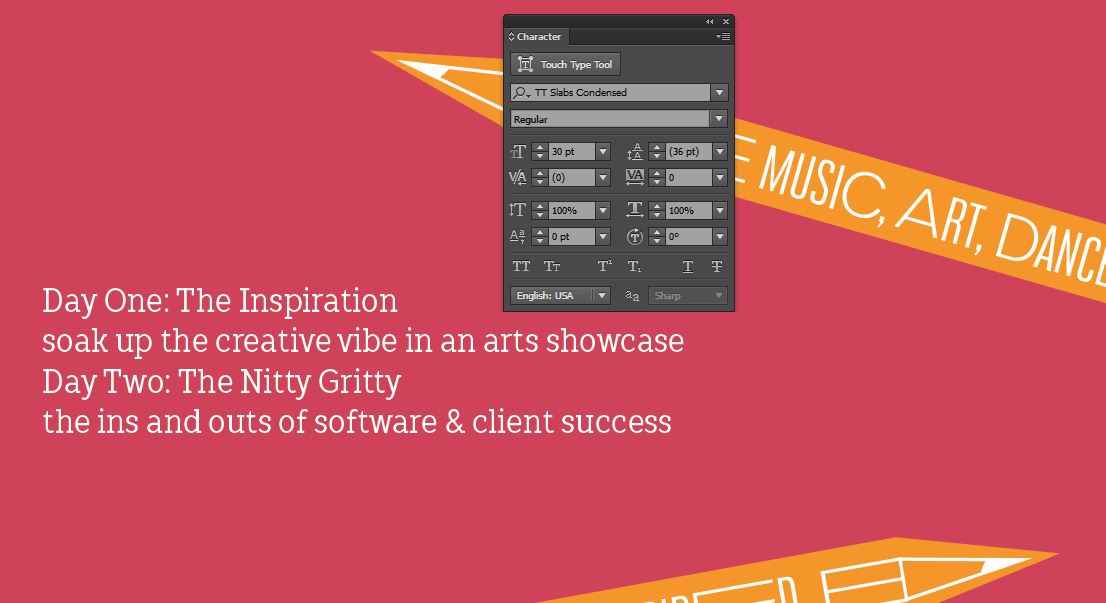
Use your Type Tool to select just the top line (Day One…). Change the color to Pencil Yellow and the font to Ink Bandits Sans Regular at 50 pt. In the flyout menu at the top right of the Character palette, choose All Caps.
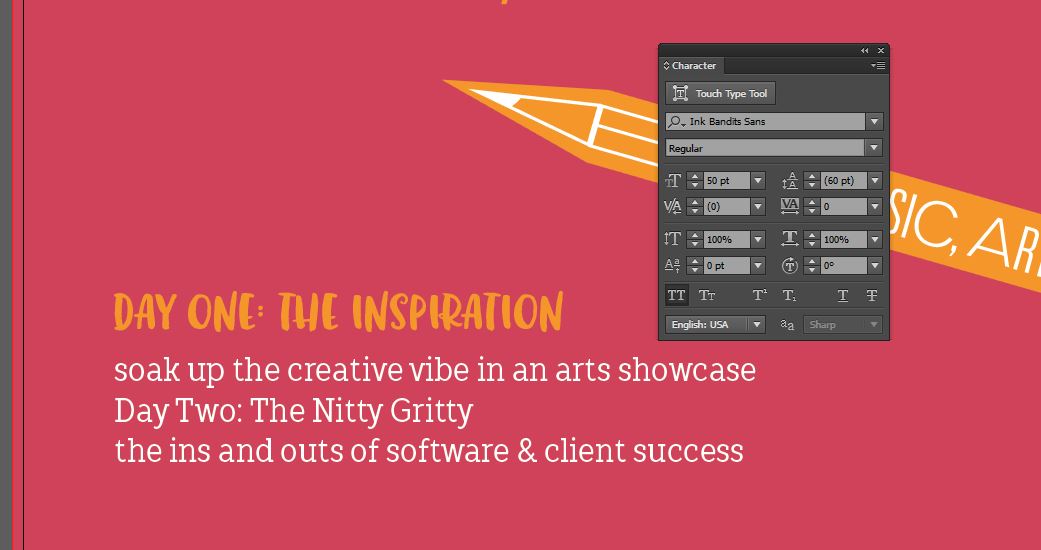
Use your Type Tool to select the Day Two line, then select your Eyedropper Tool in the toolbar and sample the Day One line to copy the formatting.
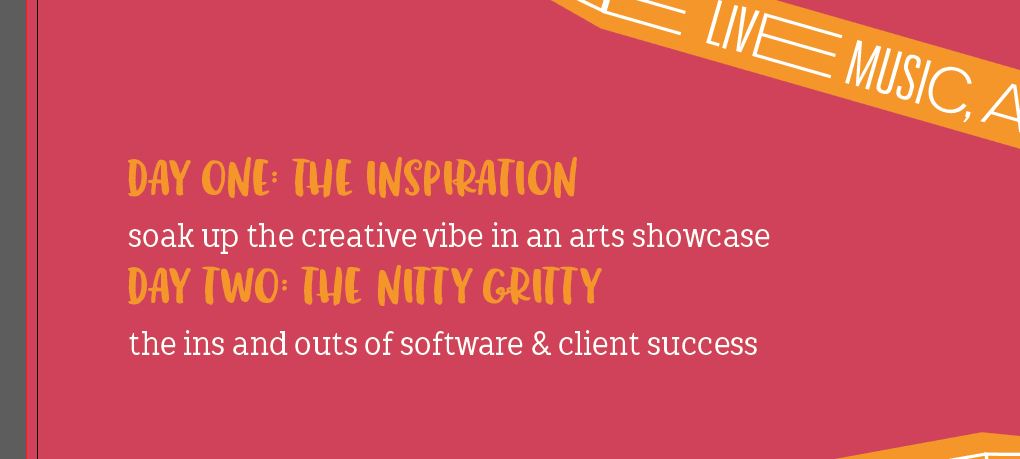
Now we’ll just adjust our vertical spacing. With the Day Two line still selected, change the Leading to 94 pt. You can either do this in the Character palette or by holding the option key and pressing the down arrow several times.
Select your Ellipse Tool. Click once on the artboard. In the popup dialog box, enter a width and height of 5.4 inches. Position in the bottom right corner of the artboard, just covering the top of the bottom pencil.
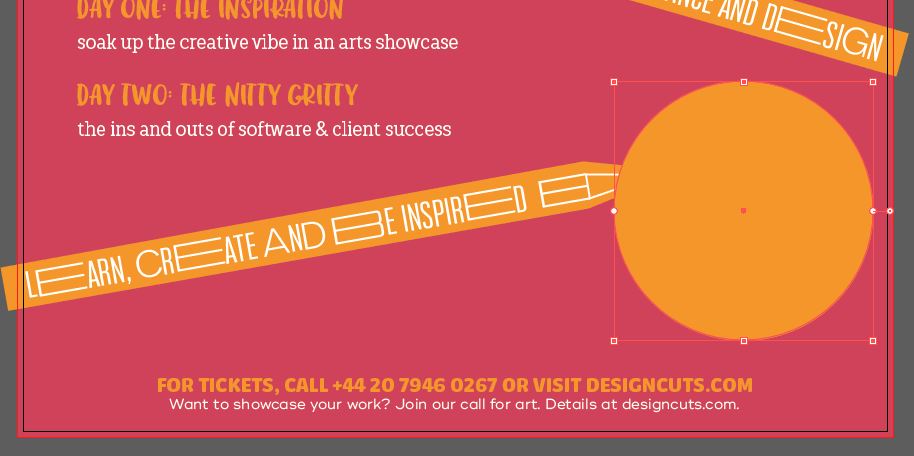
Click on the color swatch at the bottom of the toolbar and enter a CMYK value of 40/100/85/30.

Press cmd + [ several times until the circle falls behind the pencil.
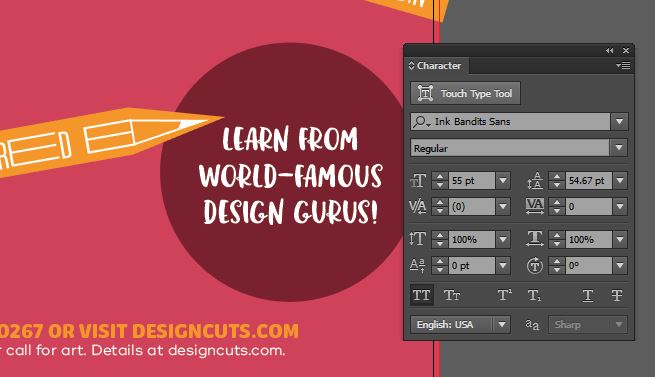
Select your Type Tool and click in the circle and type: Learn from (line break) world-famous (line break) design gurus!
Change the fill color to White and the font to Ink Bandits Sans at 55 pt. In the flyout menu at the top right of the Character palette, turn on All Caps.
Position in the middle of the circle.
We’re going to substitute the word “from” with a catchword from the Ink Bandits Extras.
Navigate to the Make Media Co. folder in the freebies files and open InkBandits_From. Select the catchword and press cmd + c to Copy, then close the file. In the main poster layout, press cmd + v to Paste.
Note: If you’ve purchased the font bundle, the catchword is a capital M in Ink Bandits Extras.
To make a spot for our catchword, we’ll hide the current “from”. Use your Type Tool to select the word “from” in the text. Select your Eyedropper Tool in the toolbar and use it to sample the red color of the circle.
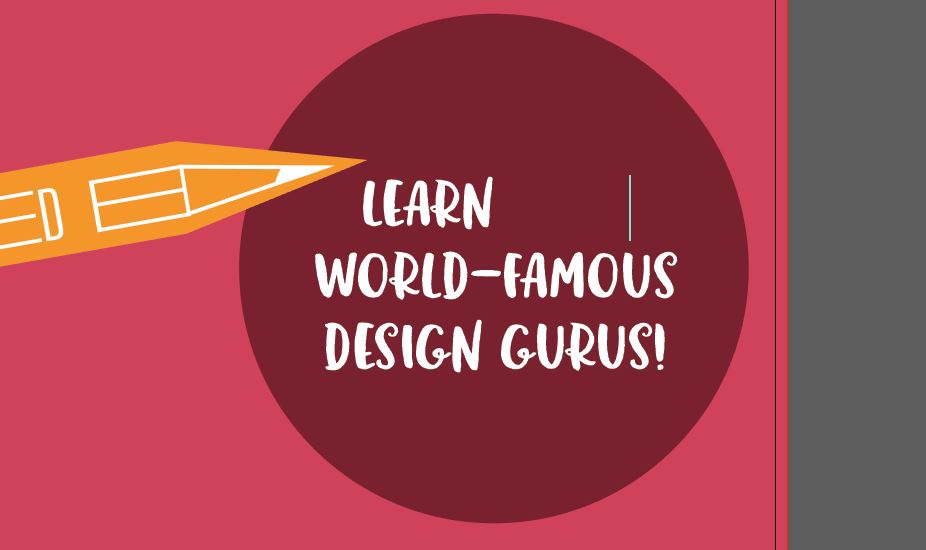
Use your Selection tool to select the catchword. Change the fill color to white, then hold shift and use the corner handles to reduce the scale until it’s about the same size as the text in the red circle. Position over the blank area we created.

Let’s frame our words with a couple of simple lines.
Select your Pen Tool. Click once above the L in Learn, then hold shift and click again above the m in the From catchword.
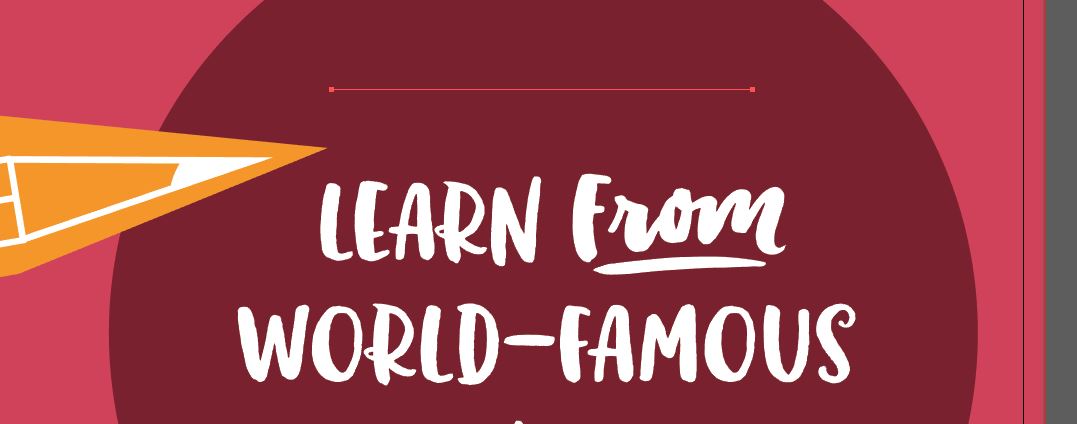
Open your Swatches palette and change the Fill color to None.
Open your Color palette and click on the Stroke icon in the top left of the palette. Enter CMYK values of 15/90/60/5.
Back in the Swatches palette, click the New Swatch icon and name the new color Dark Pink.
Open your Stroke palette and increase the Weight to 4 pt. Next to Profile, choose Width Profile 1.
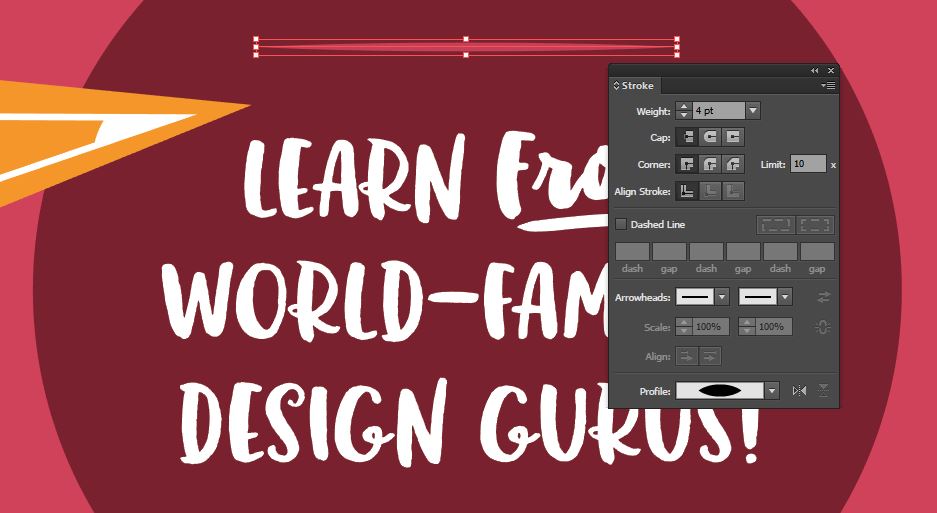
Select your main Selection Tool. Hold shift + opt and drag down on the line to create a copy. Drag the copy below the text.

Step 5: Decorative Details
In the Layers palette, create a new layer and name it Decoration. Drag the layer below the Content layer (but above the Background layer).
Use your Selection Tool while holding shift to select both parts of the title – creative and LEAGUE. Press cmd + c to Copy.
Lock the Content layer by clicking on the space between the eye icon and the layer name in the Layers palette.
Select the Decoration layer. Press cmd + v to Paste.
In your Swatches palette, change the fill color to Dark Pink. Our copied text is still hidden behind the original, so you won’t see anything just yet. With both pieces of the title still selected, hold shift and press the left arrow key and down arrow key on your keyboard.
Grab your Type Tool and select just the ornamental swash at the end of creative. Open the Glyphs palette and select a slightly different swash.
Let’s give our top pencil some subtle background scribbles.
In the freebies folders, find FenoType’s HMSGilbert_LightningBolt and all three shapes from the Set Sail Studios Crystal Sky Doodle Pack – a squiggle, three lines and a diamond. Open each file and copy the vector freebie by selecting it and pressing cmd + c, then paste it into the main poster layout file using cmd + v.
After pasting them in, select all four vectors and change their fill color to Dark Pink. I’m going to randomly size and rotate each so that they form a bit of an explosive shape off the end of the top pencil. Have fun placing the shapes wherever you want them!

In the Layers palette, unlock the Content layer. Use your Group Selection Tool (the white arrow with a plus sign) while holding shift to select the yellow pencil shapes. Press cmd + c to Copy. Lock the Content layer.
Select the Decoration layer and press cmd + f to Paste in Place.

In the Swatches palette, change the fill color to Dark Pink. Now hold shift and press the down arrow on your keyboard, then the left arrow.
To make the shadow look a little better on the top pencil, we’ll bring the tip of the shadow together with the tip of the original pencil.
Select your Direct Selection Tool (a). Click once on the point at the sharp point of the pencil shadow, then drag the point to the same spot that the sharp point of the pencil ends.
Since the shadow for our bottom pencil falls below the red circle, we don’t need to add any adjustments.
Select your Type Tool and click once on the artboard. Type: learn.
Change the fill color to Dark Pink and the font to Blush Regular at 655 pt.

In the Transform palette, enter a rotation of -12 degrees. Position the word so the end of the word sits just above the top pencil.

Use your Selection Tool and hold opt, then click on “learn” and drag down to copy it.
Use your Type Tool to select the copy and replace “learn” with “create”.
In the Transform palette, enter a Rotation of 22 degrees. I’m also going to reduce the font size in the Character palette to 555 pt so we can see the entire word. Position it just above the bottom pencil.

Select your Type Tool and click once on the artboard and type: inspire. Select your Eyedropper Tool and sample the word “create” to copy the format.
Open your Character palette and reduce the font size to 455 pt. Position at the bottom of the artboard, skimming the top of the footer.

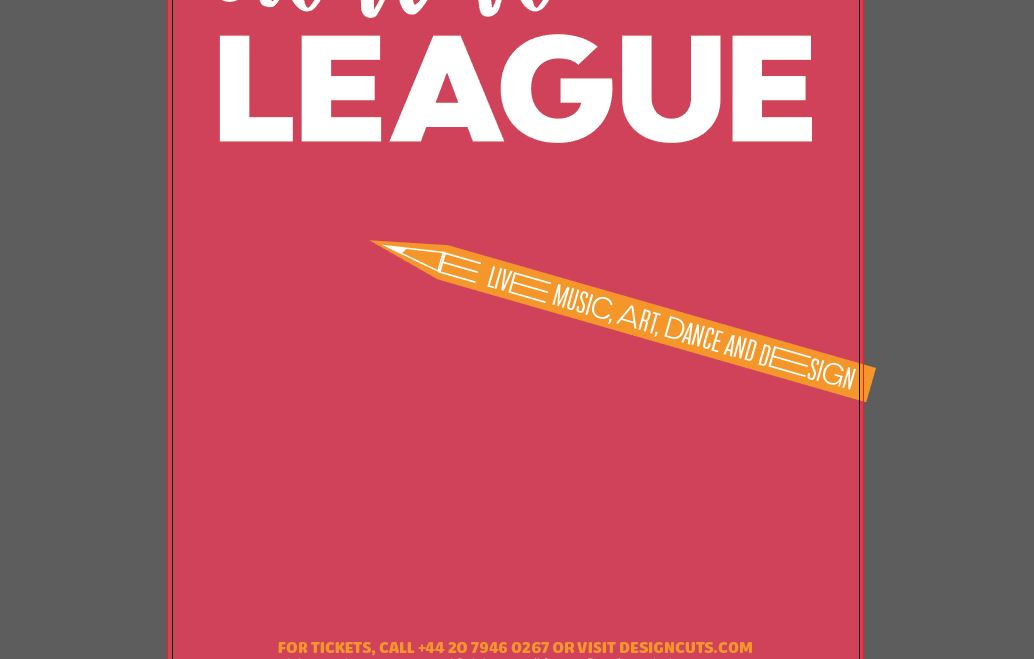
And we’re done! We have a clean, type-based poster ready for a creative group meet-up.

Remember that whether it’s your outcome for this tutorial or something new you’ve made, we’d love to see your designs on our Facebook page.
Please leave a comment if you have any questions or suggestions. I always look forward to hearing from you!
And there’s still time to check out 20 Exceptional Clean Font Families to add a ton of high-quality fonts from world-class type foundries to your collection.

Where’s the font for the word creative as shown in the tutorial?
Hey Jamil,
Thanks so much for getting in touch. I can certainly help you with your query.
I am so sorry for any confusion caused – unfortunately the fonts are not featured in the freebie pack that come with this tutorial. They are fonts featured in the 20 Exceptional Clean Font Families bundle and have been used as examples of how to apply them to your creative projects. I apologise again for any confusion caused!
If you were interested in purchasing this font, please do let me know and I will happily assist you with this :)
This is so cool design, am really rocking with Illustrator now! Cause I joined in Graphic Design here!
Actually am a Photoshop Guy but I started my course with Illustrator(which I can learn something new in the very little time)!
In this context all of these freebies+ tutorials are really taking me towards perfection!
It happened like whenever I hear Illustrator I’ll think to come to DesignCuts!
Thank You So Much for all these!
Truly
Pranaytony
behance.net/pranaytony
Hey Pranaytony,
Thank you so much for your incredibly kind feedback! It’s so great that these tutorials are helping you learn some new tips & tricks for working in Illustrator!
Thanks again for your kind words, Pranaytony! If there is ever anything I could help you with please do let me know. I’m always happy to help!
Happy Designing :)
Thank you so much. I am definitely an aspiring designer so this is doubly perfect for me heheheh
But seriously, thank you. I am learning so much from your tutorials!
That is fantastic news, Claudia! I am so pleased to hear that you are learning loads of new tips & tricks with our tutorials :)
If you do have any questions or queries I can help with, please do let me know. I am always happy to lend a hand!