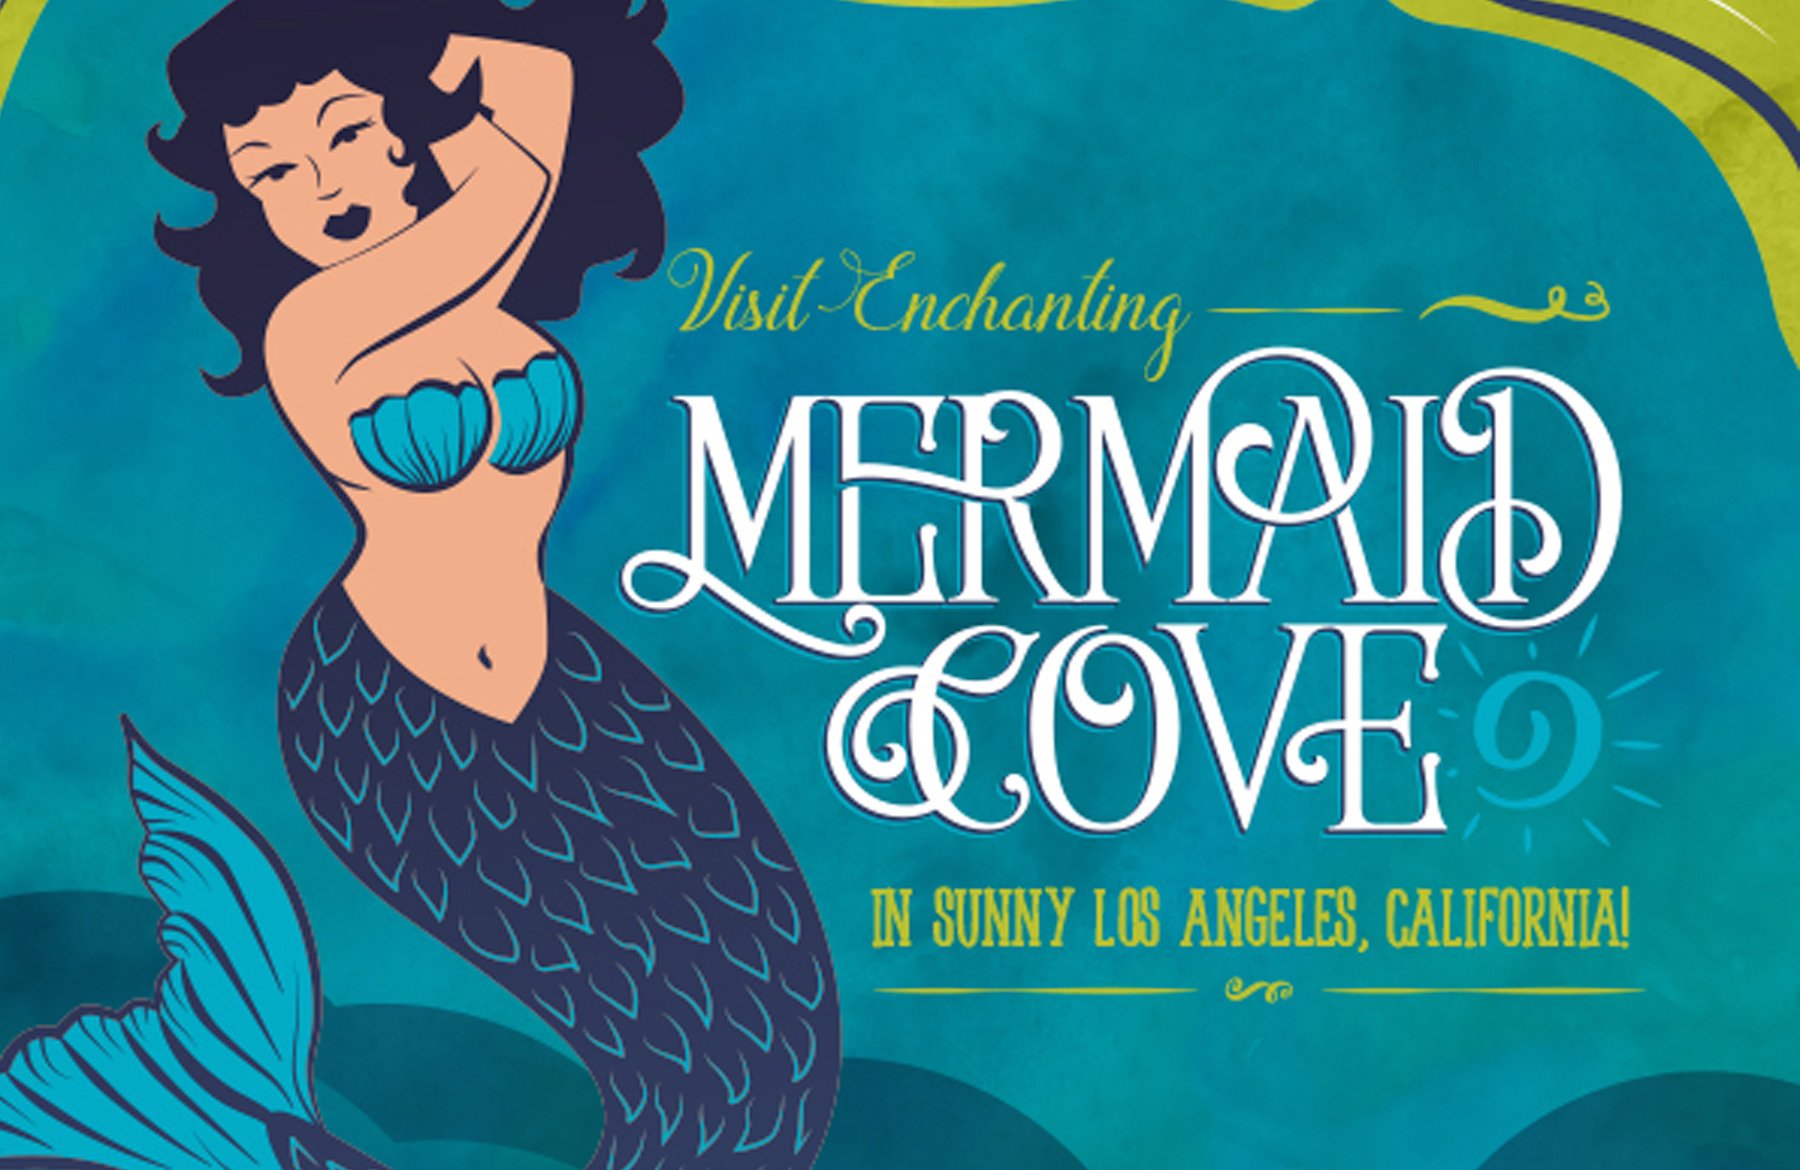
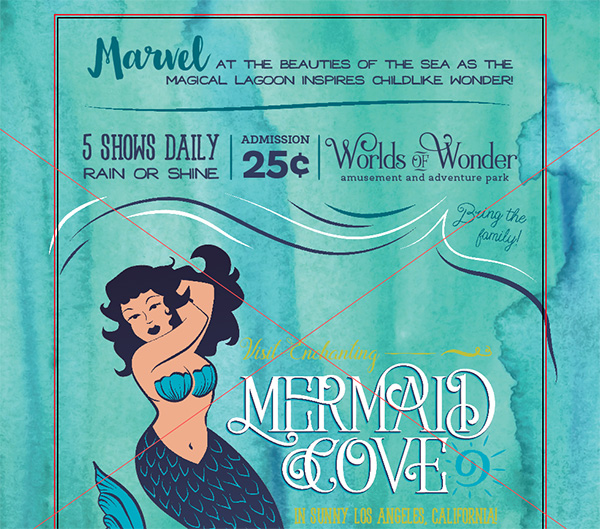
WHAT WE’RE CREATING:
Hello Design Cutters! Renee here with an all new Illustrator tutorial and some fun freebies, including a mermaid drawing I whipped up just for you guys! We’ll be creating a poster for an amusement park attraction in the style of old Disneyland ads.

Follow along with this tutorial: Download the freebies
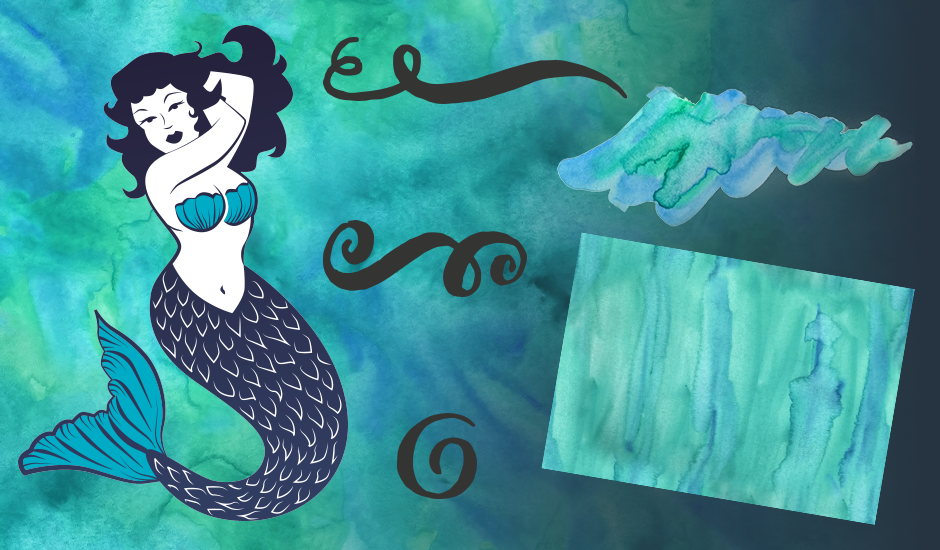
This week’s freebie pack includes the aforementioned mermaid illustration, some beautiful ornaments from Cultivated Minds and a few textures from Nicky Laatz.
This freebie pack is a small sample of the bonus resources available in The Font Geek’s Go-To Bundle for just $29 (that’s 98% off). As advertised, this bundle is a font geek’s dream! It’s packed full of 200+ individual fonts from 20 trendsetting font families.
INSPIRATION
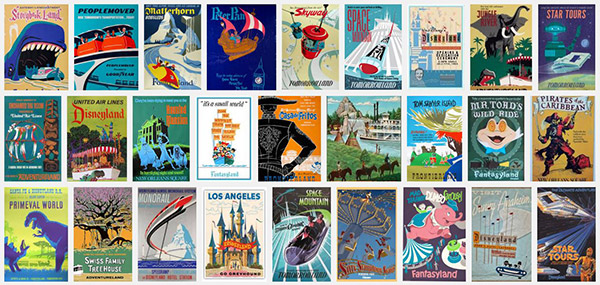
A quick search for vintage Disneyland posters pulls up a wealth of inspiration. They all feature bold colors, mostly-flat illustrations and straightforward concepts that spotlight the attraction’s primary feature.
Step 1:
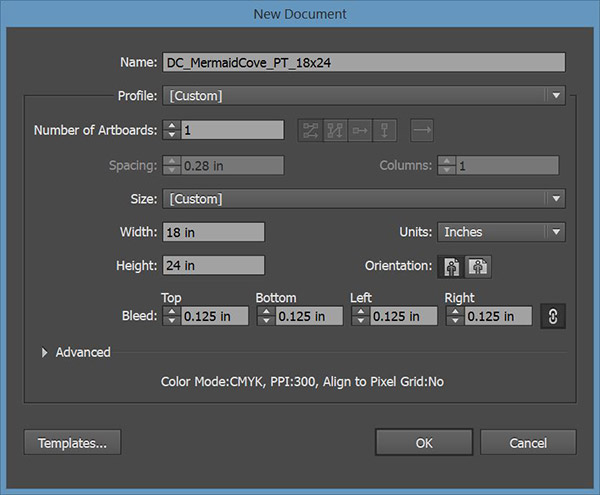
Open Illustrator and go to File > New. In the New Document dialog box, enter a width of 18 inches and height of 24 inches. If your pop-up is showing something other than inches, you can change it to inches in the dropdown box next to Units.
I’m also going to add ⅛” bleed. When machine cutting a poster, there will always be some slight variance to where the cut falls. So, to make sure there aren’t any white edges showing, we add bleed. That way, the cutting machine has an allowable margin of error. On most pieces, ⅛” will suffice. Large format projects or pieces that require the addition of hardware (like banners) may sometimes require more. It’s always best to check with your print provider. Bleed also provides that same margin of error if you’re hand-cutting a piece.
To convert the fraction ⅛ to decimals for Illustrator, divide 1 by 8. That gives us one eighth of 1” which is .125”. With that information in the dialog box, click OK.
Save your file.
We’ll start by creating some color swatches in our Swatches palette. This way, we can easily reuse the same colors over and over.
Our attraction is going to be named Mermaid Cove, so I’m using blues, teals and greens to suggest water (mermaid) and greenery (cove).
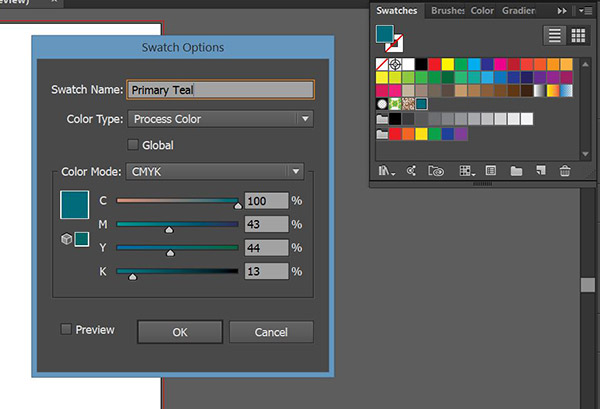
Open your Swatches palette (Window > Swatches) and click on the New Swatch icon that sits just to the left of the trashcan icon. In the pop-up box, name the swatch Primary Teal and change the CMYK values to 100/43/44/13.
Repeat this exact same swatch creation process, but use the following names and values:
Dark Blue 100/100/70/30
Primary Blue 100/95/59/0
Bright Teal 100/0/25/0
Chartreuse 32/12/100/0
We’ll use a couple of variations on the primary teal later, but this takes care of our main color palette.
Let’s start on our background. Open your Layers palette (Window > Layers) and double click on Layer 1. Rename the layer Background.
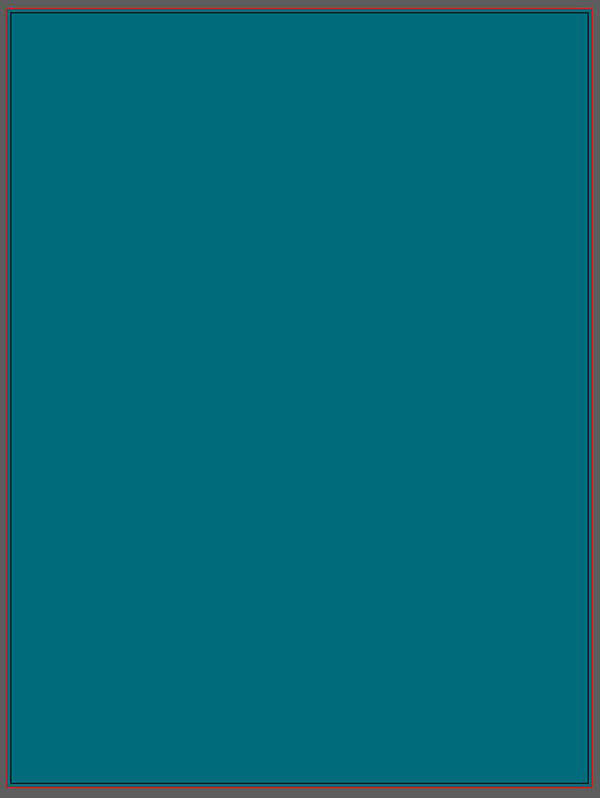
Select your Rectangle tool (m) and click once on the artboard to bring up the Rectangle dialog box. Our poster is 18” x 24”, but we want our background color to extend out to the edge of the bleed, so we’ll need to add .125” for each side. Adding .125” on the left plus .125” on the right gives us an additional .25” to include. So, our rectangle size should be 18.25” wide by 24.25” high.

Click OK. In your Swatches palette, click on the Primary Teal swatch to change the fill color of the rectangle. Then, open your Align palette (Window > Align). Under Align To: make sure Align to Artboard is selected. Then under Align Objects, click on Horizontal Align Center, the middle icon in the first group of icons. Next, click on Vertical Align Center, the middle icon in the second group of icons. This will perfectly center our teal rectangle on the artboard.
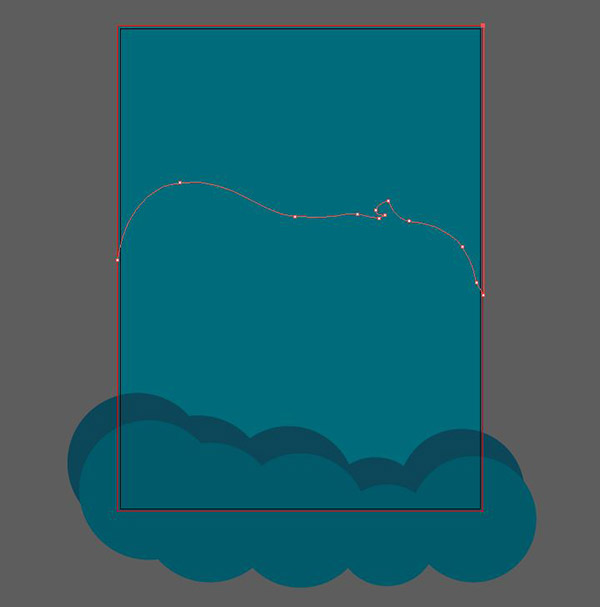
Next, we’ll create a shape that gives the impression of a seafloor and provides some interest at the bottom of the piece.
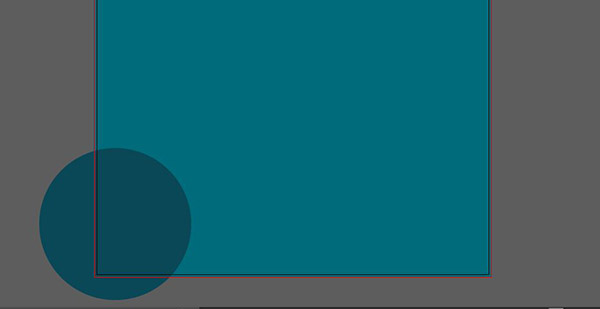
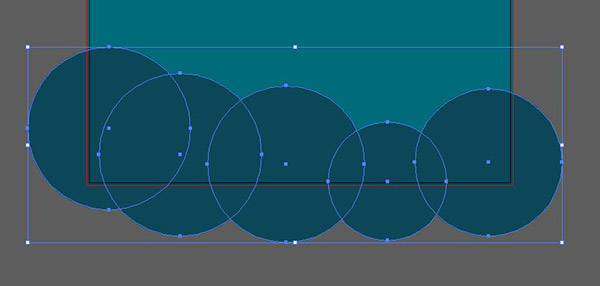
Select your Ellipse tool (L). We’re going to draw a series of circles and connect them together to form a rough shape. You can either click once on the artboard to bring up the Ellipse dialog box and enter about 7” for the width and height, or freehand the circle by clicking and dragging out the circle shape. A perfect circle can be achieved by holding down shift while dragging out.
Place your circle in the lower left hand corner of the artboard. Open your Color palette (Window > Color) and enter a CMYK value of 100/72/57/21.
We’ll copy this circle several times for our additional elements to form our final shape. Hold down the Option (or Alt on PC) key and click on the circle and drag to the side. This will make a copy.
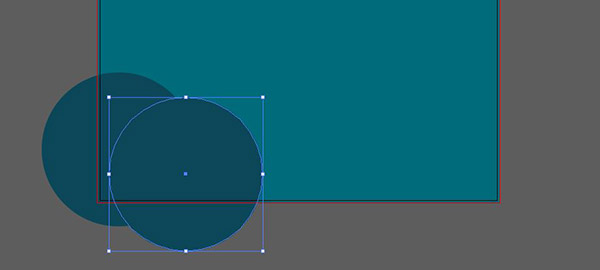
Repeat 3 or 4 times and vary the placement of the circles. To vary the size (which I did on a couple), select the circle you want to alter and hold down Shift while dragging the corner handles to increase or decrease size. Holding Shift maintains the aspect ratio so the circle shape doesn’t change.
My final group of circles reaches across the bottom in a fairly random arrangement:
As a final step for this shape, I’m going to merge the circles into one big blob. Open your Pathfinder palette (Window > Pathfinder). Select all of your circles by holding shift as you click on each. In the Pathfinder palette under Shape Modes, choose the first icon, Unite.
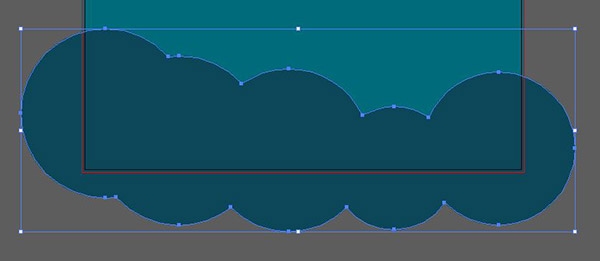
Copy the shape by holding opt/alt and dragging down and to the right a bit. Change the color of this copy to 100/57/51/17.
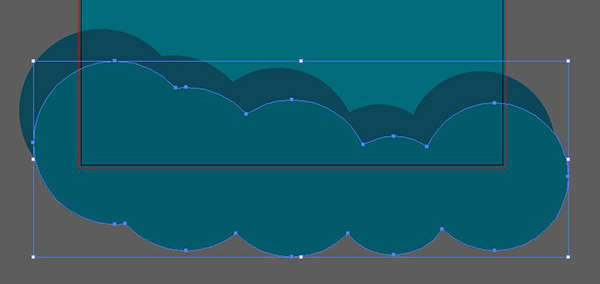
We’ll add some texture over our watery layer, but I’m going to wait until the end so the placed texture files don’t bog down the computer every time we save the file (which you should do often – just hit cmd/ctrl + s).
Lock the Background layer by opening your Layers palette (Window > Layer) and clicking the space just to the right of the eye symbol (left of the layer name).
Step 2:
In your Layers palette, click on the Create New Layer icon just to the left of the trashcan icon. The new layer will be named Layer 2 by default. Double click on Layer 2 and rename it Greenery.
We’re going to make the top ⅓ section of our poster green to give us a nice contrasting area for our copy. It will also provide a framing effect for the blue area at the bottom where we’ll add our mermaid.
The nice part is that we don’t need to be very precise or neat. We’re going to create random, flowing shape. Select your Pen tool (p). The pen tool can be a bit tricky at first, but it will become completely invaluable once you get the hang of it.
We’ll start by clicking once on the far left of the artboard, about a third of the way down, to create our first anchor point. For the second point, we’ll move up considerably and to the right. Click and drag this time. Dragging will allow you to alter the curve of the anchor point.
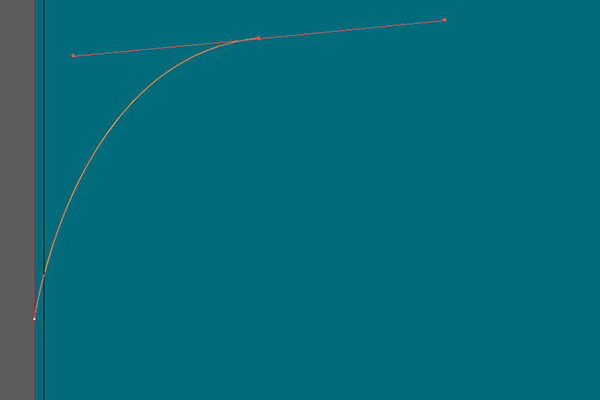
Continue adding points and dragging out to create a curvy line. The key to a good shape is to use as few points as possible to get the shape you want. Allow the curved points to do the work for you. Here’s a look at my final line:
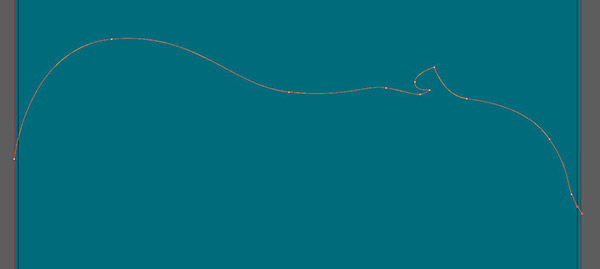
Now we’ll close this up into a filled shape by adding our last two points. To create a straight line between points, hold down Shift while adding an anchor point. So, hold down shift and click in the top right corner of the artboard on the bleed edge.
Continue to hold down shift and click on the top left corner at the edge of the bleed, then close the path by clicking on the very first anchor point we made. In your Swatches palette, change the color to Chartreuse.
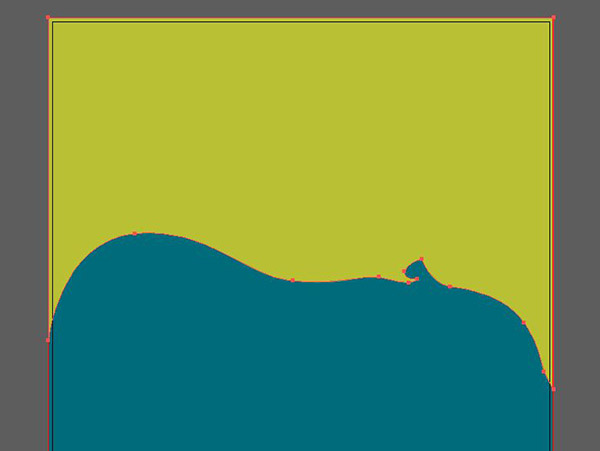
To create a framing effect and give us a nice spot for a copyright notice, we’ll add a couple of little green areas at the bottom of the artboard. Use your Pen tool (p) again to create an irregular shape in each bottom corner of the artboard. The one on the left will need to be a little bigger to accommodate our copyright info later.

Lock the layer by clicking on the space to the right of the eye symbol on the Layers palette.
Step 3:
Now we’ll add some copy. Create a new layer and name it Copy. Let’s start with our copyright info. I noticed that a lot of old posters use Roman numerals for their copyright date. I think it’s a cool idea that would look great on this poster.
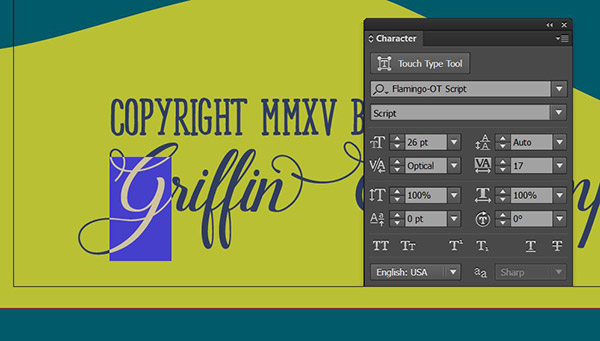
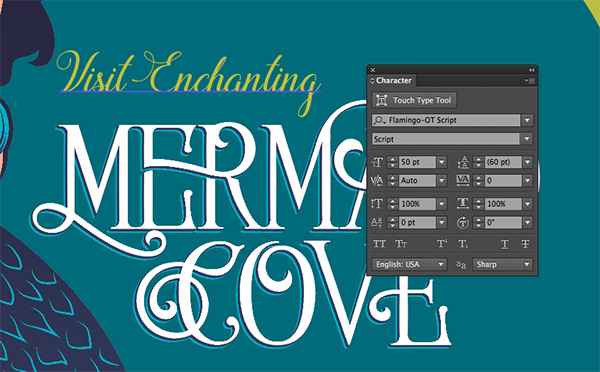
Select your Type tool (t) and click once on the artboard in the bottom left corner on the green area. Type: Copyright MMXV By. Open your Character palette (Window > Type > Character) and change the font to Spirited Serif Bold and the size to 24 pt.

Now we’ll add the name of the company that holds the copyright. Our fictional company will be Griffin & Company. At the end of your existing copy, hit enter to insert a line break. Then type: Griffin&Company (no spaces). In your Character palette, change the font to 26 pt Flamingo Script.
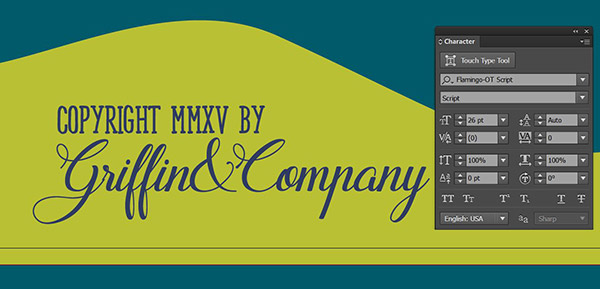
Flamingo has some fantastic alternates that can be accessed in the Glyphs palette. Go to Type > Glyphs. On the top of the Glyphs palette where it says Show, click the dropdown box and select Alternates for Current Selection.
Use your Type tool to highlight the ampersand. In the Glyphs palette, you’ll see 3 options for ampersands. Double click the third, most ornate one. Then highlight the y at the end of Company and double click the last alternate in the Glyphs palette.

Let’s also change the n at the end of Griffin so it has a little flourish we can connect with the ampersand. Select the n with your type tool and choose the alternate with the big swoosh up at the end.

Now we’ll just adjust the letterspacing, or tracking, to make sure everything connects nicely.
Notice that the G and r in Griffin look a bit jagged where they connect. Select the G with your Type tool, then open your Character palette. In Tracking (the VA with a double ended arrow under it), hit the up arrow until the connection between the letters is seamless, at about 17.
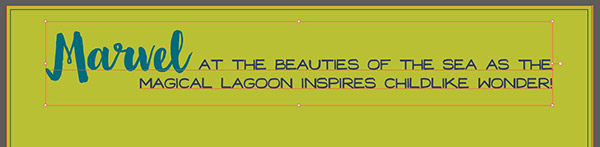
Now we’ll create a new line of text at the very top of the poster. Use your Type tool and type: Marvel at the beauties of the sea as the magical lagoon inspires childlike wonder!
Open your Paragraph palette (Window > Type > Paragraph) and select Align Right. Then open your Character palette and change the font to Spirited Sans at a size of 48 pt and leading of 42 pt. Change the color to Primary Blue.
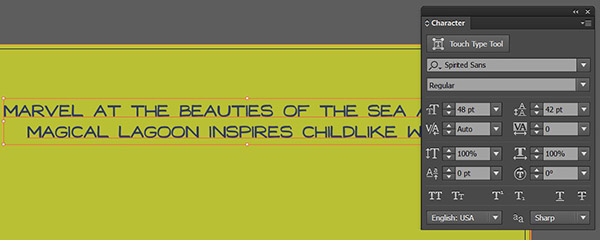
Use your Type tool to select Marvel and change the color to Primary Teal. Then in your Character palette, change the font to Wanderlust Gold Pro at 122 pt.

Finally, select the capital M in Marvel and open your Glyphs palette. Choose the last alternate M. To position the sentence in the center of the poster, select your Arrow tool, then open your Align palette and choose Horizontal Align Center.
Next, we’ll add 3 columns of information that span the width of the poster. Start on the left side and type: 5 SHOWS DAILY. In the Character palette, change the font to Spirited Serif Bold at 108 pt and the color to Primary Blue.

Directly under that, add: Rain or Shine. Change the font to Spirited Sans at 60 pt.

For the second, middle column, type: Admission. In your Character palette, change the font to Newslab Bold at about 31 pt. Now, access the fly-out menu on the Character palette by clicking on the small arrow on the top right of the palette. Select All Caps.
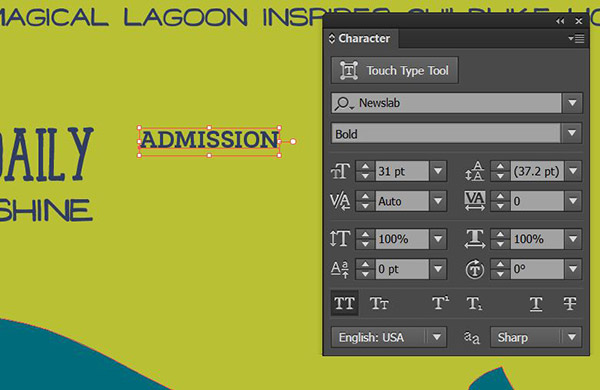
Directly under that, type 25¢. To access the cent sign on a Mac, type opt+4. On a PC, you’ll have to open the Glyph palette and double click the cent sign. Set the font to Newslab Black and the size to 105 pt.

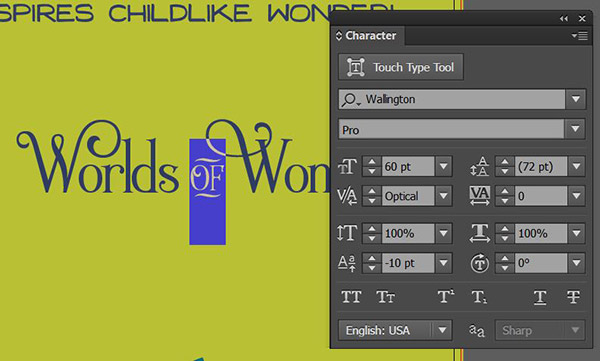
In our last column, type: Worlds of Wonder. Set the font to Wallington Pro at 70 pt. Now we’ll switch out for some alternates. Open your Glyphs palette.
We’ll change both of the Ws at the beginning of Worlds and Wonder to the following:

We’re also going to replace “of” with an ornamental version. Select “of” and in your Glyphs palette next to Show, click on the dropdown and choose Entire Font. Scroll down through all of the alternates until you see various ornamental versions for “of”. Select the first one by double clicking on it.

As you can see, the “of” and the W in Wonder are overlapping in a way that isn’t very pleasing. Select the “of” and open your Character palette. Change the size to 60 pt. On the bottom left of the palette, you’ll see the option to Set the Baseline Shift. Hit the down arrow until you are at about -10.
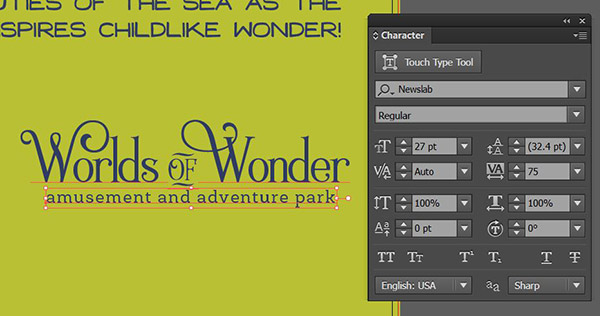
Centered directly under Worlds of Wonder, add: amusement and adventure park. In your Character palette, change the font to Newslab Regular at 27 pt and increase the Tracking to 75.
Let’s create a little separation between the columns by adding dividing lines. Select the Line Segment Tool (/). Click at the top of the space between the first two columns and drag down to draw a line.

In your Swatches palette, change the stroke color to Primary Teal. Then open your Strokes palette (Window > Stroke) and increase the Weight to 4 pt.

With the line still selected, hold down opt/alt + shift and click on the line, then drag to the right. This will create a copy. Drag it to the space between the second and third columns.
Finally, select all of the text in the columns and the 2 lines. Group them together by hitting cmd/ctrl + g (or go to Object > Group). Then open your Align palette and select Horizontal Align Center.

Let’s also add a dividing line between the top copy and the columns. We’ll use a handy pen tool trick to get a smooth curved line.
Select your Pen tool (p) and click once to place a point halfway between the top copy and the columns, aligned with the left side of the copy. Hold down shift and click to add a second point on the right side of the copy. This gives us a straight line.
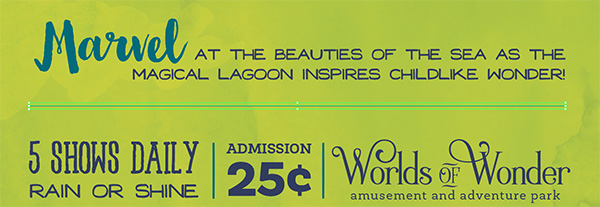
Now click in the middle of the line to add a point. Switch to the Anchor Point tool by holding opt/alt (only while the Pen tool is selected), then click on the new point and drag to alter the curve of the anchor point. This should create a smooth shape.

Change the stroke color of the line to Primary Teal. Then, open your Stroke palette (Window > Stroke). Change the Weight to 10 pt. At the bottom of the panel, change the Profile to Width Profile 1, the first option after Uniform.
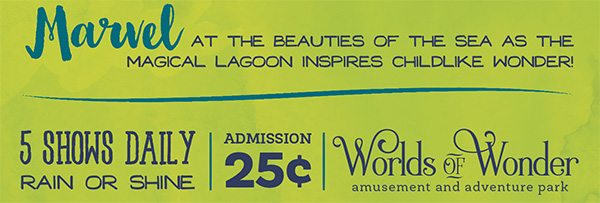
We’ll frame out the edges of our green section by adding some rough curved lines that follow the basic edge shape with our Pen tool. Each will be of varying weight between 6 pt and 15 pt. You’ll also want to alternate colors between white, Primary Blue and Primary Teal. These are all drawn rather haphazardly. The key, as before, is to only use as many points as necessary to achieve your shape and let the curves of the anchor points do the hard work. What will really bring these to life will be applying Width Profile 1 in the Stroke palette after you draw out your shape.

For our final bit of copy, we’ll add a little something to fill the empty spot on the right under “Wonder”.
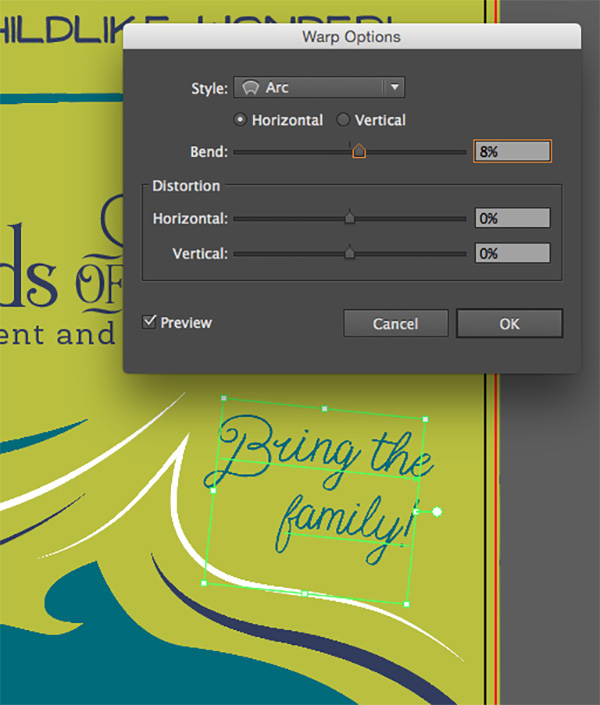
Use your Type tool and enter: Bring the family! Add a line break after “the” so “family” falls to a second line. In your Character palette, change the font to Spirited Script Regular at 48 pt. Change the color to Primary Teal.

I rotated it to the right just slightly by hovering over the corner handle until the rotate symbol appears (a rounded, double-ended arrow), then clicking and rotating. Lastly, I’ll add a very slight Arc effect. With your selection still in place, go to Effect > Warp > Arc. Enter 8% for the Bend and click OK.
Lock the Copy layer in the Layers palette.
Step 4:
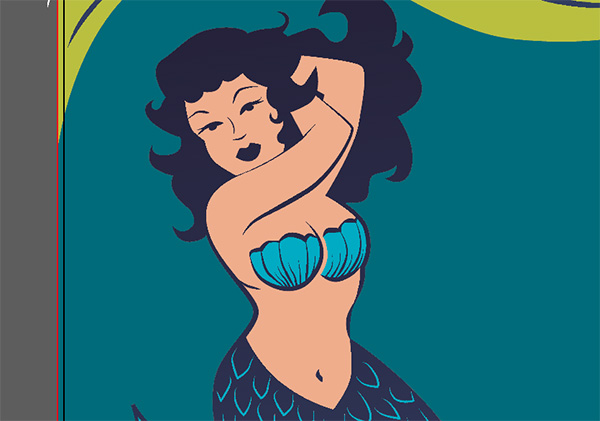
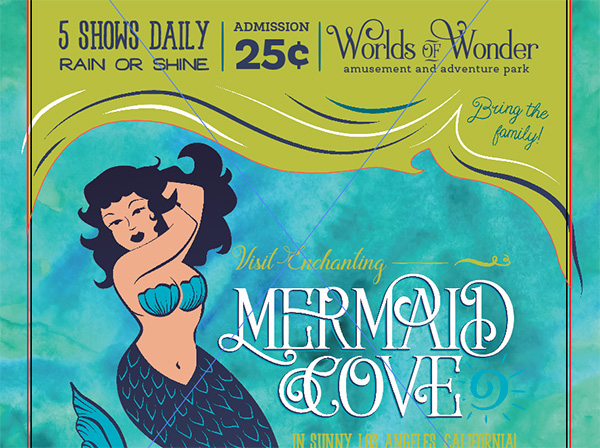
Now we’re on to our main mermaid image and logo!
In your Layers palette, create a new layer and name it Logo.
Open the freebies vector file. Select the mermaid and copy by pressing cmd/ctrl + c. Then paste it into the poster on the Logo layer. Drag the corner handles out while holding shift to proportionally enlarge her until she fills the teal area on the left.

Now we’re going to give her some color. Press Z to select your Zoom tool and zoom in to one of her edges (or press cmd/ctrl + the plus sign to zoom in). On your toolbar, select the Group Selection tool. It’s the white arrow with a little plus sign next to it. Use the Group Selection tool to select only the outer edge of the mermaid. It’s important to select the edge. Selecting the filled areas will result in a different selection.

Copy the selection by hitting cmd/ctrl + c, then paste in place by hitting cmd/ctrl + shift + v. This place the selection on top. Open your Color palette (Window > Color) and change the color to a bold skin tone. I went with 0/35/43/4.

We’ll send this behind our original mermaid illustration by pressing cmd/ctrl + shift + ] (or going to Object > Arrange > Send to Back).
Next, we’ll create our Mermaid Cove logo using Wallington, an awesome font with amazingly fun alternates. Use your Text tool to type MERMAID in Wallington Pro at 146 pt in white.
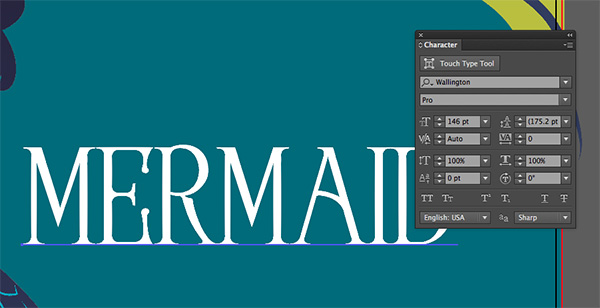
Open your Glyphs palette and next to Show, choose Alternates for Current Selection. Select the first M in Mermaid. Replace with this alternate M by double clicking on the one you want.
One of the things I love about this font is that it has alternates for letter combinations. Select the ER in Mermaid. Choose Entire Font next to Show in the Glyphs palette. Scroll down until you see the letter combinations and double click the combined ER.
Repeat this process for the MA.

Switch back to Show Alternates for Current Selection in your Glyphs palette and select the last D in Mermaid. Select the third alternate D.

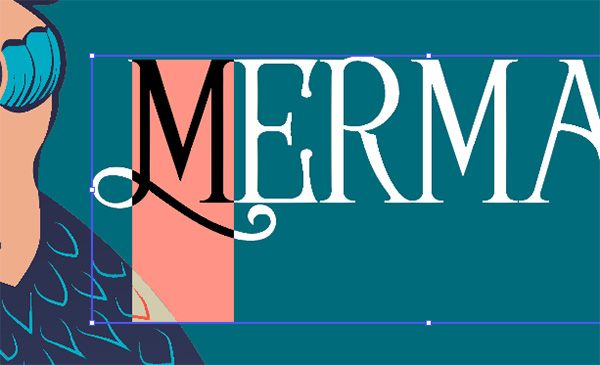
Copy Mermaid by selecting your Arrow tool (v) and holding opt/alt while clicking and dragging down. Switch to your Type tool (t) and replace the copied Mermaid with COVE, then position it so it sits directly under Mermaid in the space between the M and D ornaments.
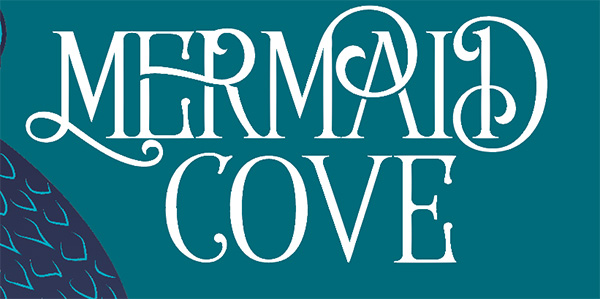
Select the C and use your Glyphs palette to replace it with the extra ornamental alternate.
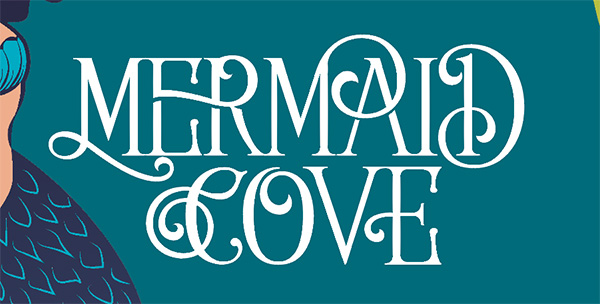
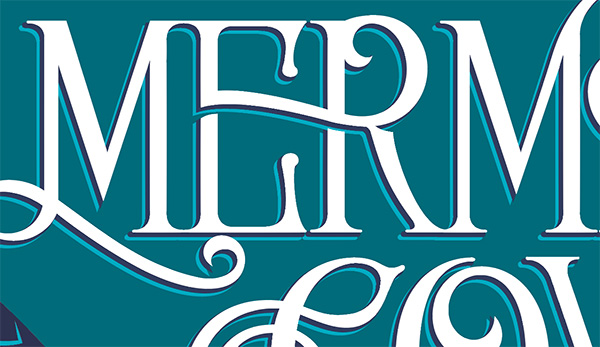
To make Mermaid Cove really stand out, let’s add some color offset behind it. Select both Mermaid and Cove. Hit cmd/ctrl + shift + o to outline the text. Then, press cmd/ctrl + g to Group them.
With this selection in place, go to Object > Transform > Move. In the pop-up dialog box, enter a Horizontal Position of -.03 inches and a Vertical Position of .03 inches. This moves our copy down and to the left slightly. Click Copy.
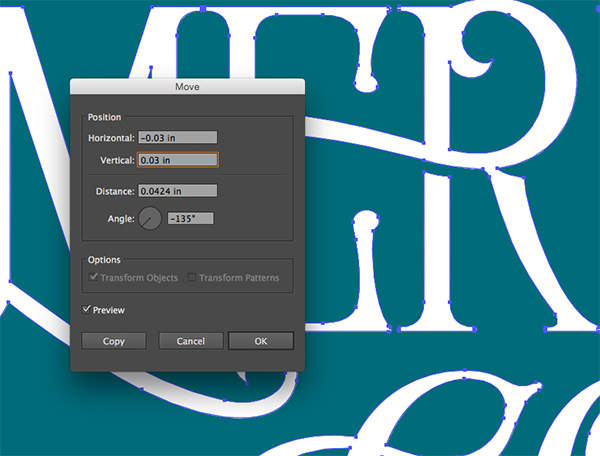
Change the fill color to Primary Blue, then change the stroke color to Primary Blue. Open your Stroke palette and increase the weight to 2 pt, then press cmd/ctrl + [ to send it behind the white text.
With the blue text still selected, go to Object > Transform > Move again. Our previous settings will already be in place, so just hit Copy. Change the fill and stroke of the copy to Bright Teal, then hit cmd/ctrl + [ to send it behind the Primary Blue text.

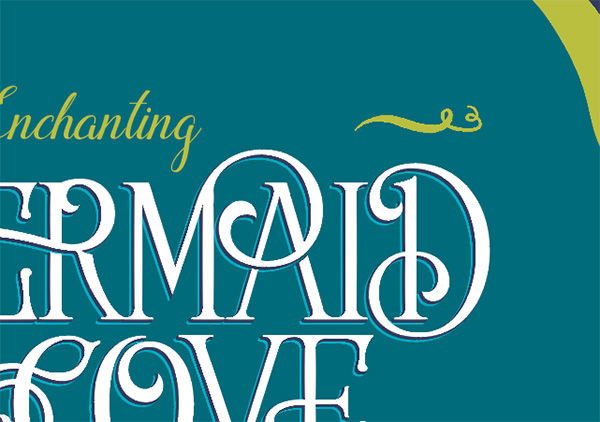
Switch to your Type tool and add: Visit Enchanting. In your Character palette, change the font to Flamingo Script (so pretty!) at 50 pt. Change the color to Chartreuse. Position it so it sits at the top left of Mermaid and the “g” fits nicely into the space above the second M in Mermaid.
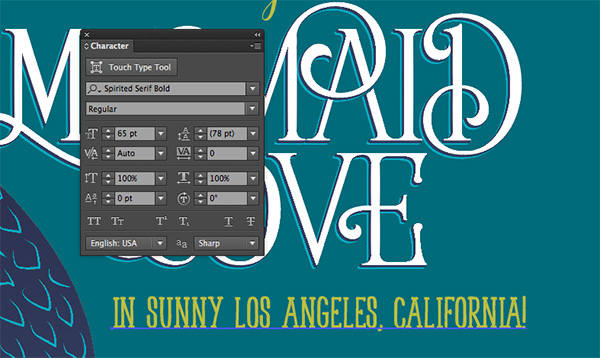
Under Mermaid Cove, add: In Sunny Los Angeles, California! Change the color to Chartreuse and the font to 65 pt Spirited Serif Bold. Position so that the end of the sentence lines up with the right side of the D in Mermaid.
In your freebies vector file, copy ornament 1. Paste it into the poster and go to Object > Transform > Reflect. In the dialog box, choose Vertical and click OK. Position above the D in Mermaid and change the color to Chartreuse.
Now copy ornament 2 from the freebies vector file and place in the poster. Position it about halfway under the Sunny Los Angeles line of text. Change the color to Chartreuse.
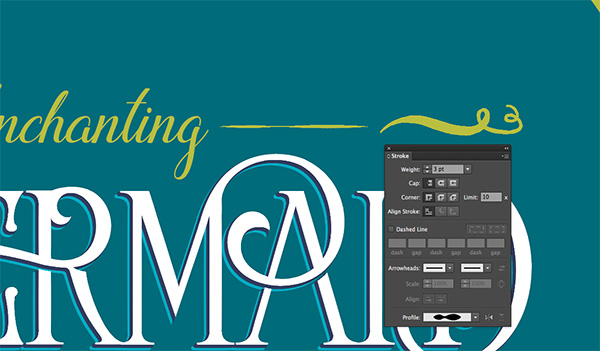
We’ll add a couple of lines to connect our ornaments with the copy. Select your Line Segment tool (/) and click and draw a line between Enchanting and Ornament 1. Change the stroke color to Chartreuse. Open your Stroke palette and change the weight to 3 pt and the Profile to Width Profile 2.
We’ll use the exact same style of lines on either side of the ornament below Sunny Los Angeles. Use your line segment tool to draw a line from below “In” to Ornament 2. Apply the same Profile in the Stroke palette (Width Profile 2).

Copy the line by selecting your Arrow tool (v) and holding down opt/alt + shift while clicking and dragging to the right. Drag the copy to the right side of the ornament.

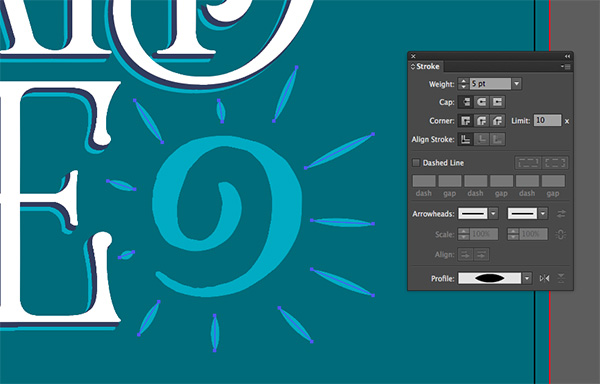
Copy Ornament 3 from the freebies vector file and place into the poster. Change the color to Bright Teal and position the ornament at the end of Cove.
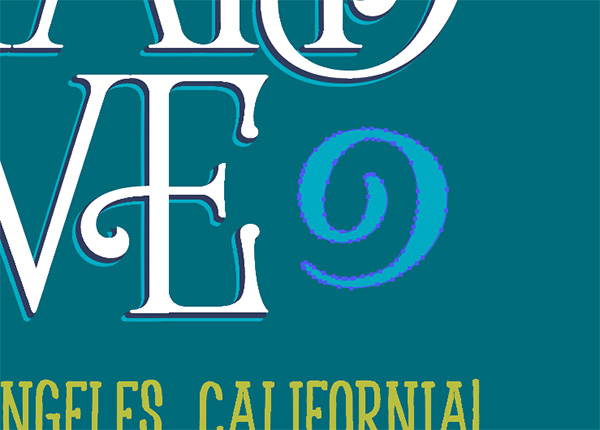
Ornament 3 is going to represent a sun in our logo, so our last step for the logo is to add some lines around it to represent sun rays. Use your Pen tool to draw a few individual lines around the ornament, making sure to leave a little space between the lines and the E in Cove. Change the stroke color to Bright Teal. In your Stroke palette, change the width to 5 pt and the Profile to Width Profile 1.
Step 5:
Almost done! Let’s add a little texture.
Lock your Logo layer in the Layers palette.
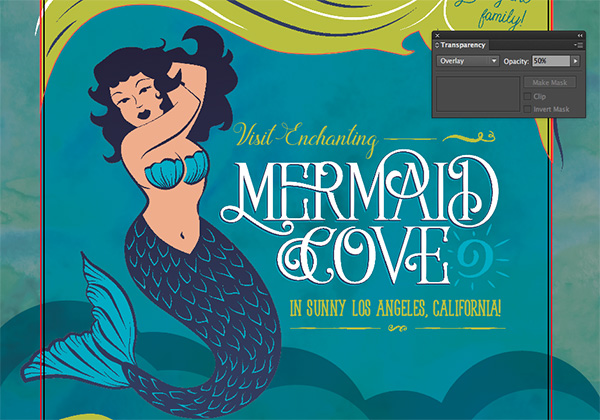
Select your Background layer and unlock it. Go to File > Place and navigate to the Freebies folder. Select starfish.jpg and click Place.
Click once on the artboard to place the image. Then open your Align palette and click the icons for Horizontal Align Center and Vertical Align Center.
Open your Transparency palette (Window > Transparency) and change the Blending Mode to Overlay and the Opacity to 50%.
Lock the Background layer.
Select the Greenery layer and unlock it. Go to File > Place and select bluemonday.jpg, then hit Place. Click once on the artboard to place the image. Again, open your Align palette and use Horizontal Align Center and Vertical Align Center to center the image on the artboard.
Open your Transparency palette and change the Blending Mode to Luminosity and Opacity to 50%.
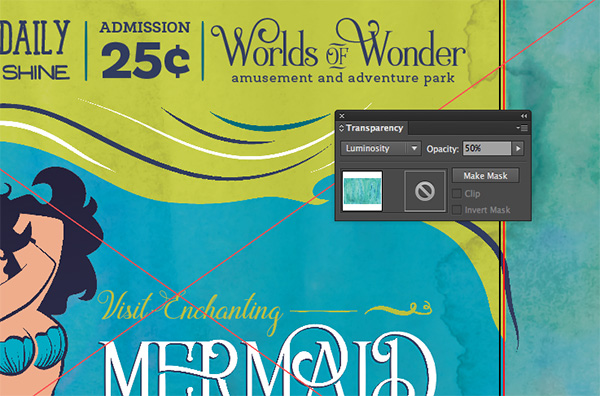
For our final step, we’ll mask the greenery texture. With the texture still selected, press cmd/ctrl + shift + [ to send it to the back (or go to Object > Arrange > Send to Back). Now that it’s out of the way, use your Arrow tool to select the large chartreuse section at the top, plus the 2 small sections at the bottom. Copy by pressing cmd/ctrl + c.
Paste in place by hitting cmd/ctrl + shift + v (or go to Edit > Paste in Place).
To get the three separate pieces to act together as one mask, we’ll need to create a compound path. To do that, go to Object > Compound Path > Make (or hit cmd/ctrl + 8). You won’t see a visible difference, but it makes all the difference once we actually mask our texture.
With your compound path still selected, hold shift to also select the bluemonday texture. Press cmd/ctrl + 7 or go to Object > Clipping Mask > Make. Now our texture is only showing in the chartreuse areas.
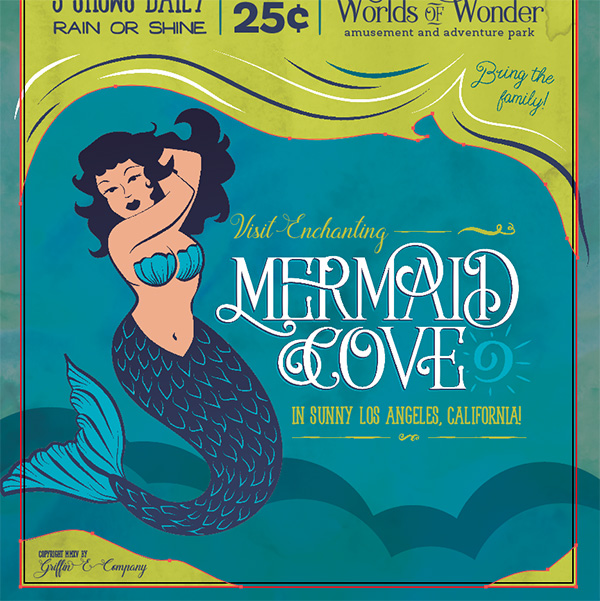
We are officially mermaid whisperers!
I don’t know about you guys, but I’m ready to see the mermaid show.
Remember that we’d love to see your designs on our Facebook page too.
Please leave a comment if you have any questions or suggestions. Show me your mermaid love!
Be sure to check out The Font Geek’s Go-To Bundle, which is expiring soon. It includes 200+ amazing fonts within 20 best-selling font families, all for 98% off.
It was fun playing with the mermaid;) I also love Wallington Pro. I did something different by combining a few of your freebie downloads and created a card and timeline cover. Thanks for the great tutorials.
A sweet, fun piece Renee ;-)
Hey Simon,
Thanks for leaving us a comment!
I totally agree with you here- Renee has done a great job on this one :).
This is great! I really think I’m going to enjoy working with Wallington Pro. Love the letter combinations!
Isn’t it amazing?! I love that font. I had so much fun finding gorgeous letter combinations.
Hey Chris,
Thank you so much for your comment and for your kind words about Renee’s tutorial. She did a great job and I’m pleased you like the look of Wellington Pro!
I’m a big fan of your “Love and Hate” post on your Deviantart page! Great font combinations and use of Pitstop, awesome work! If you ever wanted to share more of your designs please do get in touch, we would love to take a look!
Thanks again, Chris! If there is ever anything I could assist you with please do get in touch. I’m always happy to help!