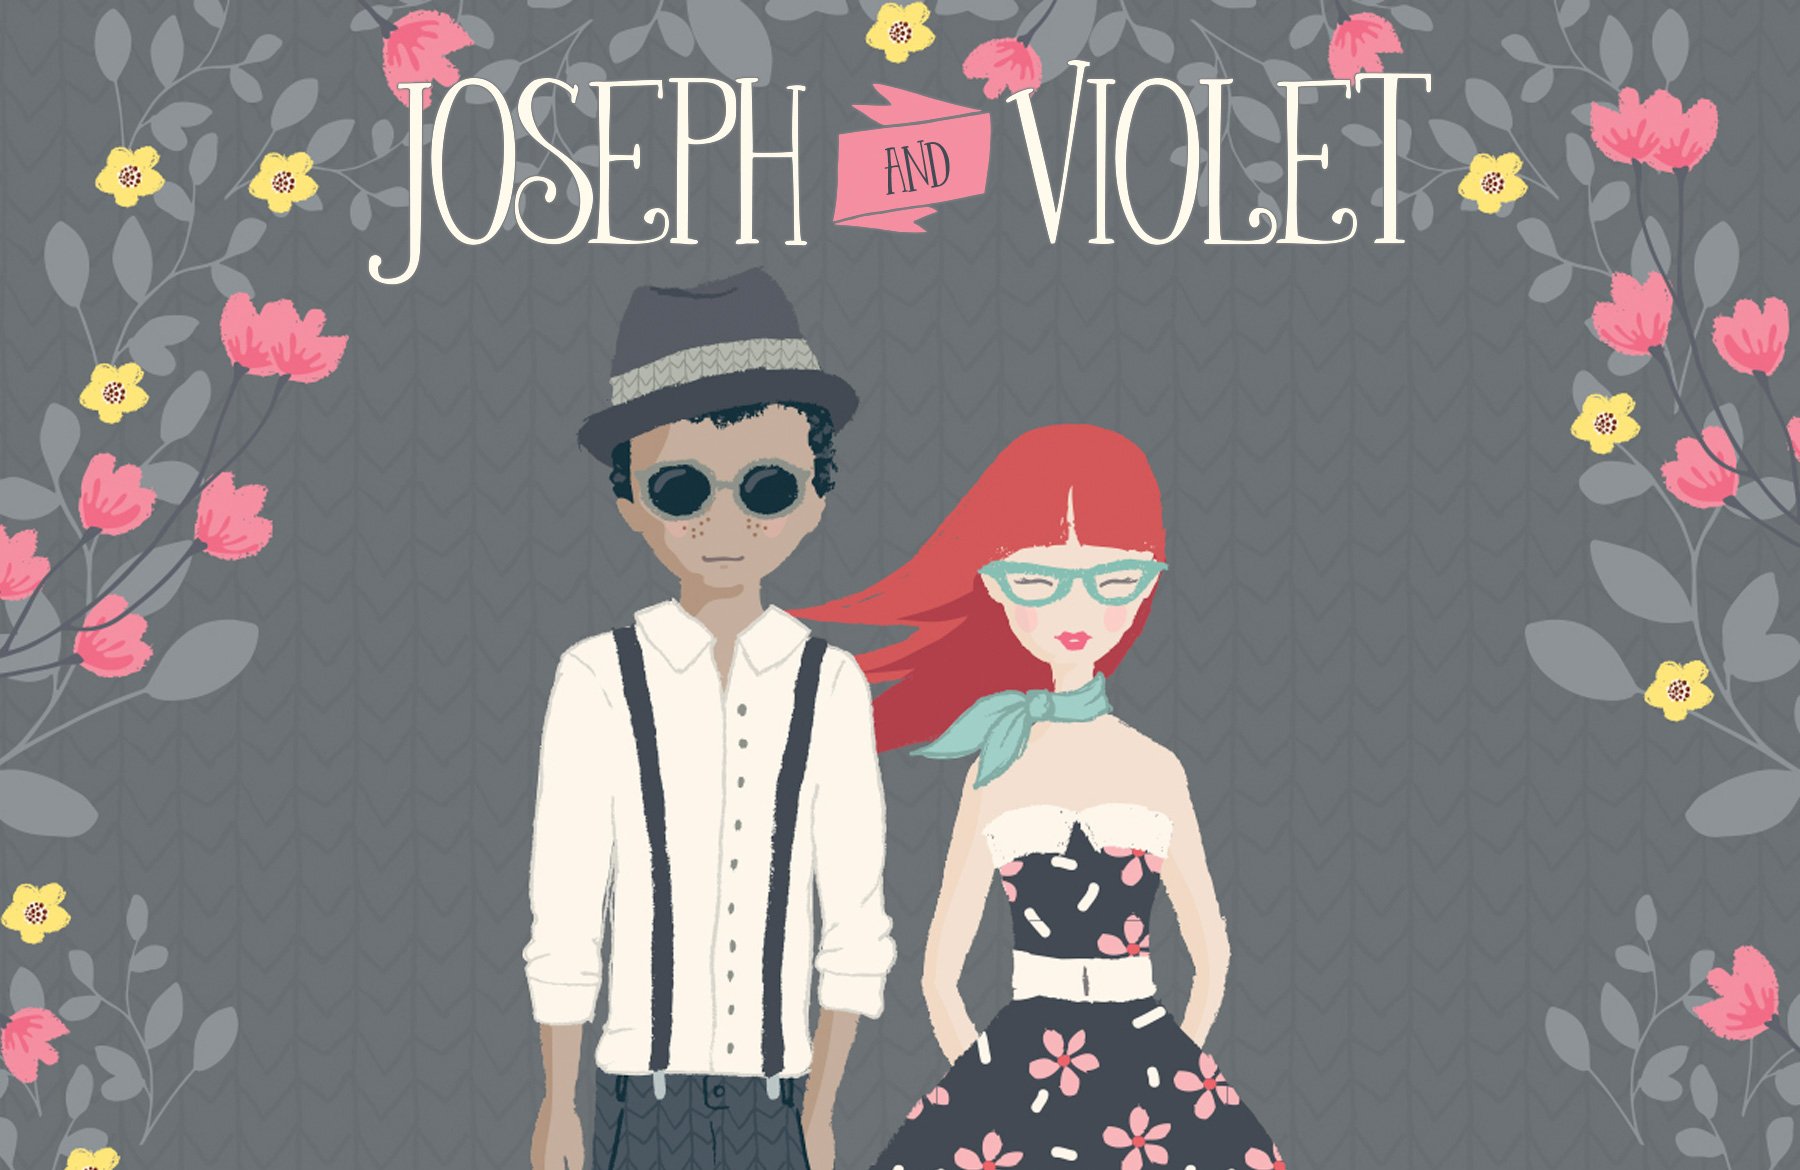
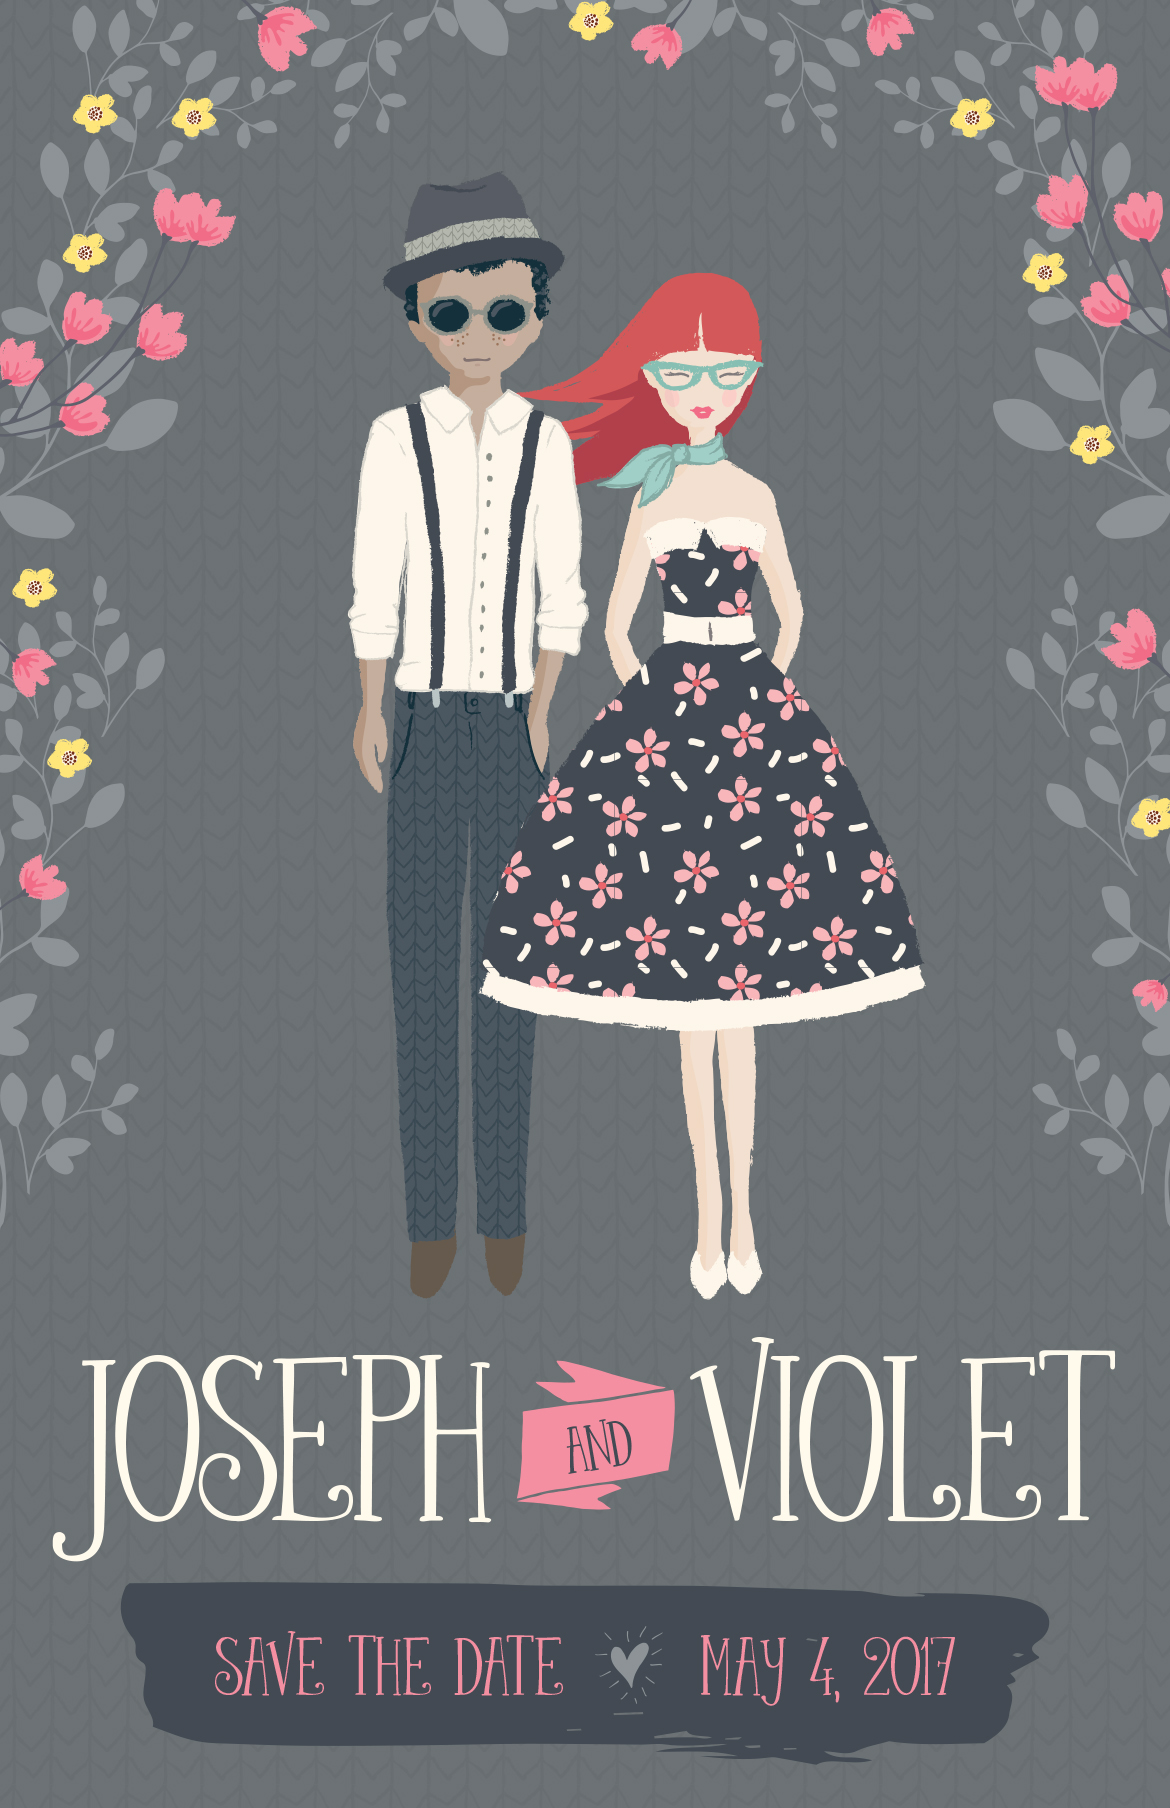
WHAT WE’RE CREATING:
Hello Design Cutters! Renee back with an Illustrator-based tutorial for a sweet Save-the -Date card. We’ll create our layout utilizing a character creator and some cute hand-drawn supporting elements while using basic Illustrator techniques.
HAVE YOU SEEN OUR NEW YOUTUBE CHANNEL?
Watch the video tutorial below and subscribe to our new YouTube channel for regular updates direct to your inbox.
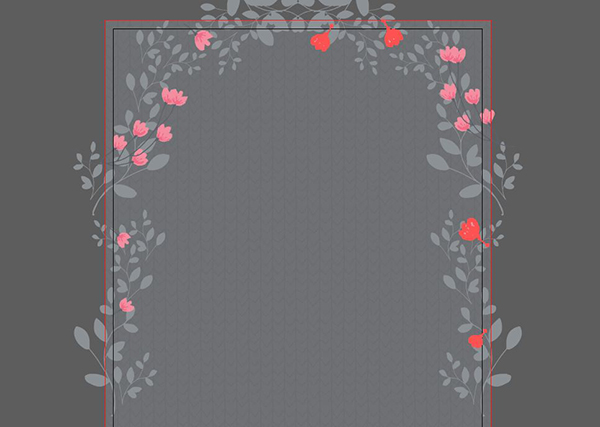
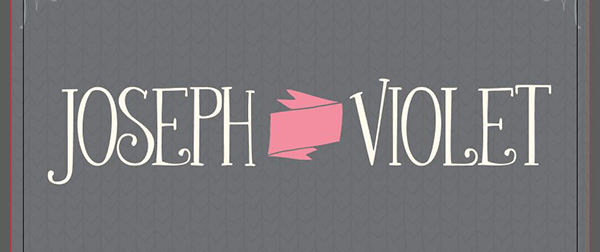
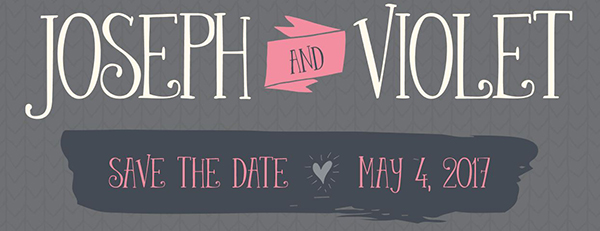
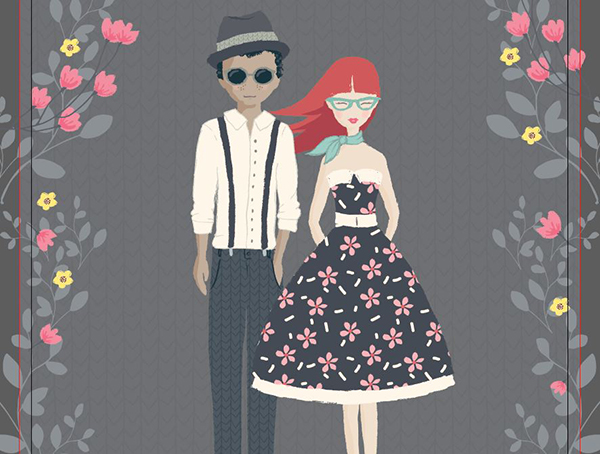
Here’s a look at what we’ll be creating:
Follow along with this tutorial: Download the freebie files
The freebie pack includes character drawings, ornaments, banners and floral elements courtesy of designers Lisa Glanz, The Pen and Brush as well as Type and Graphics Lab.
This freebie pack is just a small sample of the resources available in The Extensive Vector Elements Collection for just $29 (that’s an unbelievable 99% off). This huge collection of best-selling vector elements is the best way for you to work faster and smarter in your creative projects.
Step 1: Background
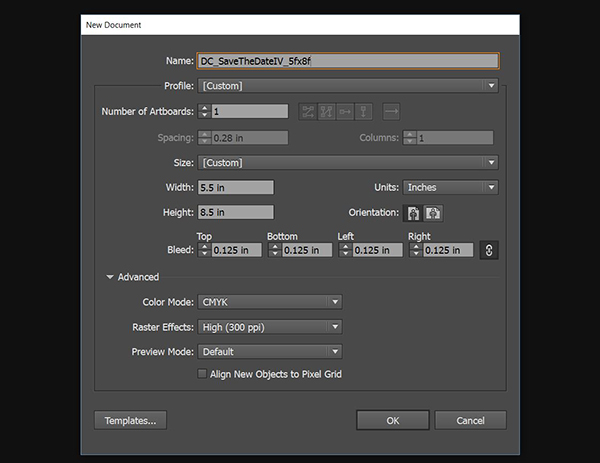
Open Illustrator and go to File > New. In the New Document dialog box, enter a width of 5.5 inches and a height of 8.5 inches. Under Bleed, make sure the link icon on the far right is selected (to apply our input to all four sides) and enter a Top bleed of .125 inches.
Why bleed? Bleed is used to allow a margin of error when cutting down a print so no white edges are visible. The piece is printed with a slightly larger area of coverage, then cut down to the desired size. One eighth of an inch (⅛” or .125”) is sufficient for most pieces, but large format pieces or fabric pieces that require additional sewing considerations may require more bleed. Digital-only pieces never need bleed.
Click OK to create the document.
Save your file.
At the bottom of the Layers palette (Window > Layers), double click the name of the layer, Layer 1, and change it to Background.
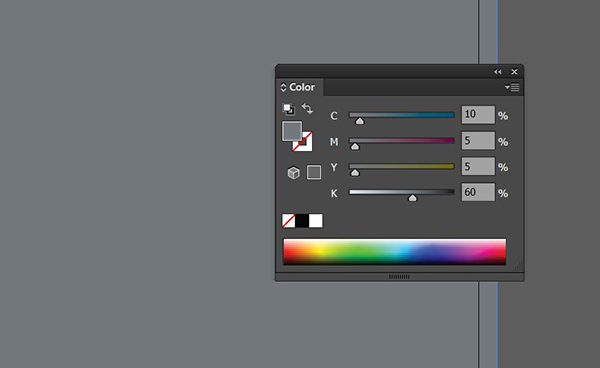
Select the Rectangle Tool (m) Click on the foreground color swatch at the bottom of your toolbar to bring up the Color Picker. In the Color Picker, enter CMYK values of 10/5/5/60. Press Ok.
Open the Swatches palette (Window > Swatches) and click the New Swatch icon. Name the swatch Wedding Gray and click OK.
Click once on the artboard. In the dialog popup box, enter a width of 5.75 inches (5.5 inches plus .125 inches bleed on each side = 5.75). Enter a height of 8.75 inches. Click OK.
To center the rectangle on the artboard, open your Align palette (Window > Align) and under Align Objects, select the icons for Horizontal Align Center and Vertical Align Center.
Note: If nothing happens when you click the align icons, you may need to change your Align To settings. Click on the arrow just below Align To at the bottom right of the Align palette and select Align to Artboard.
In the freebies folder, navigate to Lisa Glanz’s Geometric Pattern. Open the file in Illustrator. With your Selection tool (v), select the patterned square on the artboard. Press cmd + c to Copy, then cmd + w to Close that file.
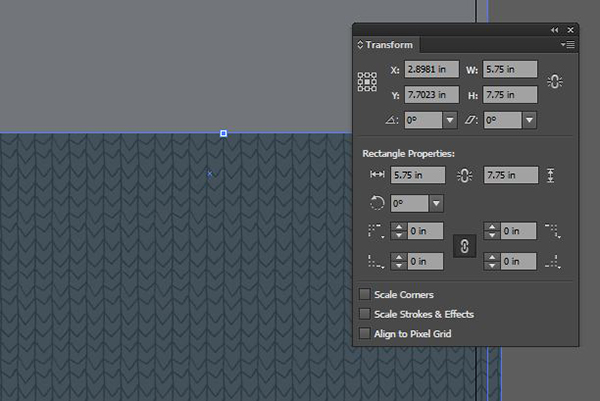
Back in the main layout, press cmd + v to Paste. At the top of the artboard, or in your Transform palette (Window > Transform), change the width to 5.75 inches and the height to 8.75 inches. Make sure to unclick the link icon if it’s currently on so your proportions aren’t constrained.
In your Align palette, under Align Objects, select the icons for Horizontal Align Center and Vertical Align Center.
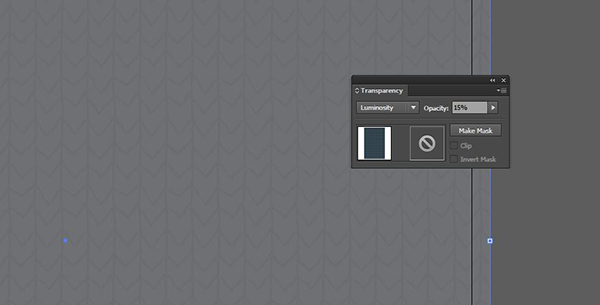
In the Transparency palette (Window > Transparency), change the Blend Mode to Luminosity and the Opacity to 15%.
Now we’ll lock this layer. Open the Layers palette and click the space between the eye icon and the layer name.
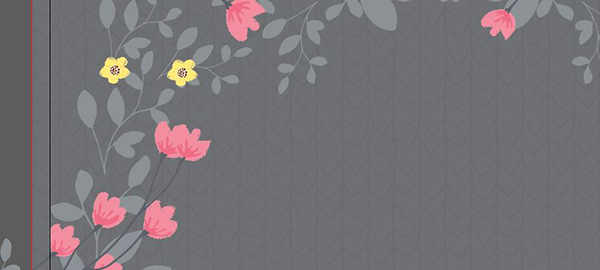
Step 2: Floral Elements
In the Layers palette, click the Create New Layer icon. Double click the layer name and change it to Florals.
In the Lisa Glanz freebies folder, open the Floral Elements file. Select the cream branches element and press cmd + c to Copy. Go back to your main layout and press cmd + v to Paste.
Open your Color palette and change the CMYK values to 10/5/5/45.

With the branch still selected, go to Object > Transform > Scale and enter a Uniform scale of 65%. Click OK.

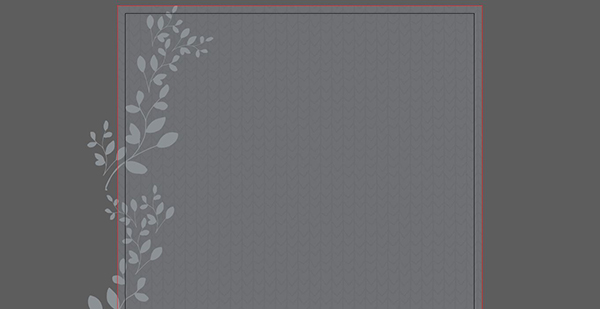
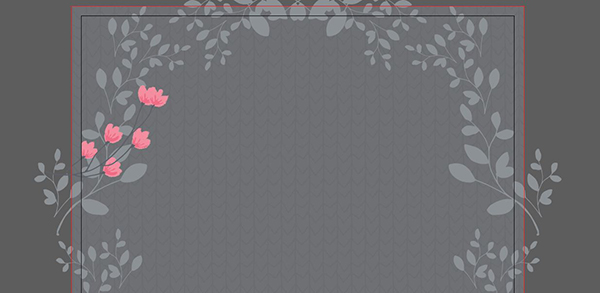
Position the branch so it’s bleeding off the left side of the artboard and vertically centered.

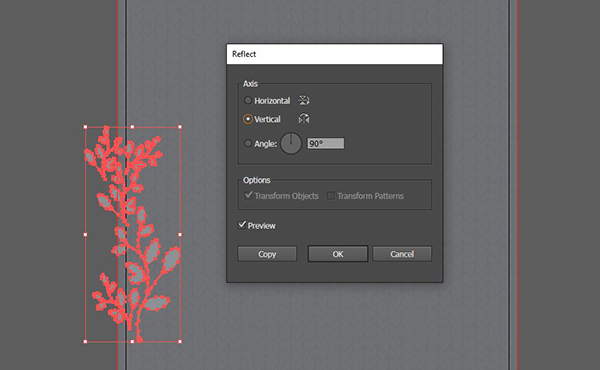
With the branch selected, go to Object > Transform > Reflect. Select Vertical and hit Copy.
Drag the reflected copy to the top left corner of the artboard, then go to Object > Transform > Rotate and enter -30 degrees.
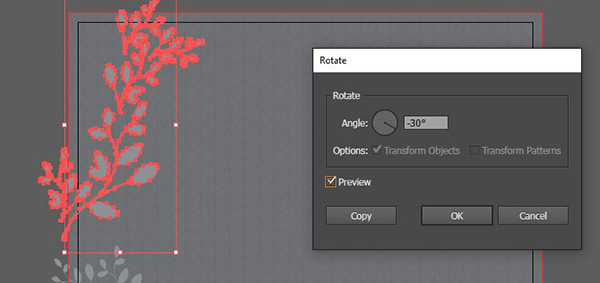
Position so it starts to form a framed shape around the outside of the card.
Use your Selection tool to select the first branch. Hold opt and drag up to create a copy. Hover over the corner handle of the copy until you see the curved, double sided arrow. Click and rotate left 115 degrees – newer versions of Illustrator will give you the degrees as you move your mouse. (Alternatively, you could go to Object > Transform > Rotate and enter 115 degrees there.)
Position in the top middle of the artboard so the left edge of the leaves almost touch the top right of the reflected copy we made earlier.
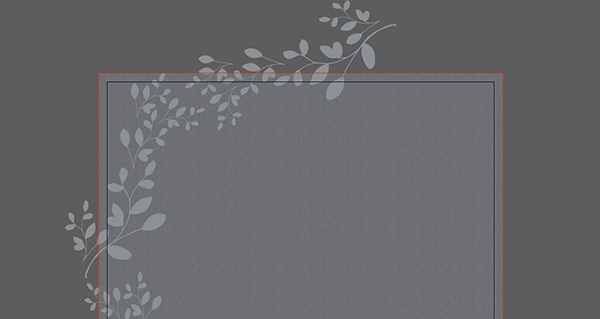
Hold shift and use your Selection tool to select all three branches. With all three selected, go to Object > Transform > Reflect. Choose Vertical and click Copy.
Hold shift and use your mouse to drag the copied branches to the right until they’re in the same relative position as the original branches, on the right side of the artboard.
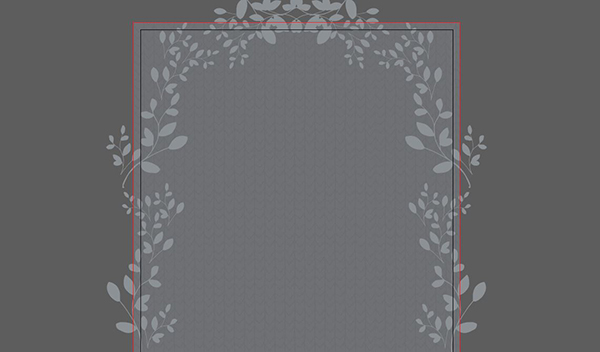
Back in the Lisa Glanz Floral Elements file, select the branch with several pink flowers. Copy it and paste it into the main layout file.
Go to Object > Transform > Scale and enter a Uniform scale of 75%. Press OK.

Use the corner handles to rotate about 60 degrees to the right. Position on the left of the artboard over the reflected gray branch.
With the pink flower branch selected, go to Object > Transform > Reflect. Choose Vertical and hit Copy.
Drag the copy to the right side of the artboard. Position a little higher than the flowers on the left side and add a little extra rotation to the right – about -20 degrees. We want to give a more natural look that isn’t an exact duplicate of the left side.
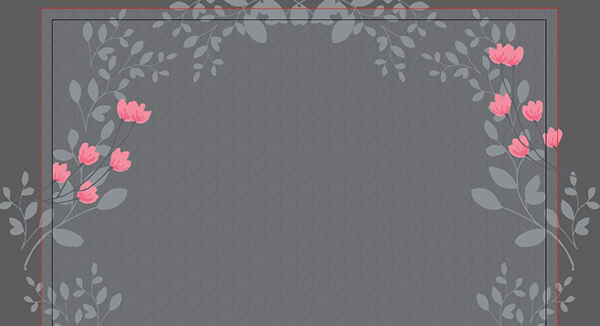
Go back to the Lisa Glanz Floral Elements file and copy the single pink flower. Paste it into the main layout.
We’ll sprinkle a few of these individual pink flowers on either side of the frame.
With the flower selected, hold shift (to maintain aspect ratio) and use the corner handles to reduce the scale to about 80% of its current size. Then use the corner handles to rotate about 65 degrees and position the flower at the top left of the artboard.

With the flower still selected, hold option, then click and drag down to create a copy.
Position the copy below the large bunch of pink flowers on the left side and use the corner handles to reduce its size to about 80% again.
Use the option + drag technique to create another copy. Rotate this one about 75 degrees and place it below the last one.
Continue duplicating, scaling and rotating 3-4 more flowers for the right side. Here’s where I put mine:
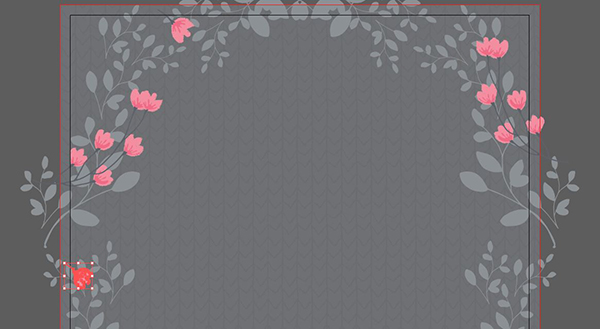
Go to the Lisa Glanz Floral Elements file one last time and copy the yellow flower. You can close the file now (cmd + w).
Paste the yellow flower into the main layout. With the yellow flower selected, go to Object > Transform > Scale and enter a Uniform scale of 30%. Press OK.

We’ll place this little guy in the top left corner.

Hold option, then click and drag out to make a copy. Position the copy to the right of the first yellow flower.
Now we’ll make 3 more copies and sprinkle them throughout the branches on the left side.

Repeat this process for the right side – add one flower to the top and 4 more on the right side.

And that’s our floral frame! Now lock the Florals layer and we’ll add some text.
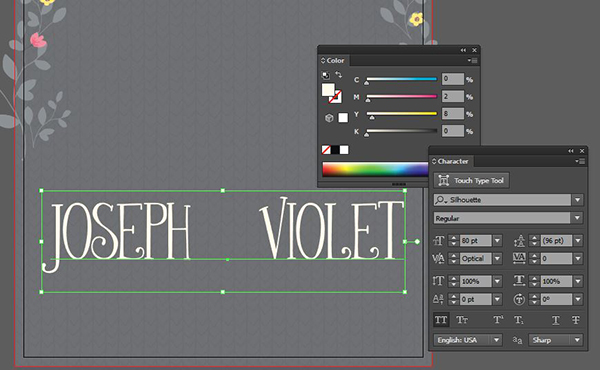
Step 3: Text
In the Layers palette, create a new layer and name it Text.
Select your Type Tool (t), click once on the artboard and type: JOSEPH VIOLET.
Include 3 or 4 spaces between the names.
In your Color palette, change the color to 0/2/8/0.
In your Character palette, change the font to a whimsical, hand drawn font like Silhouette by Anastasia Dimitriadi. Increase the size so the words are large enough to fit almost edge-to-edge, in this case 80 pt.
In the freebies folder, navigate to the banner file from The Pen and Brush. Copy the banner and paste it into the main layout.
With the banner selected, use the Eyedropper tool (i) to sample the predominant pink in the flowers (0/55/19/0).

Go to Object > Transform > Scale and enter a Uniform scale of 35%. Press OK.
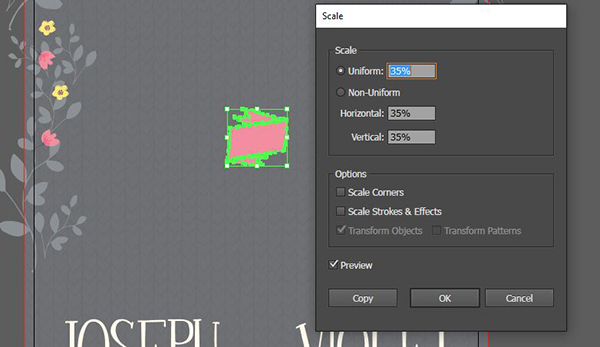
Position the banner between Joseph and Violet.
Now select your Pen tool (p). Click once on the bottom left side of the banner and again on the upper right side to create a path for text.

In the toolbar, click on the Text tool icon and hold until you see the flyout menu. In the flyout menu, choose the Type on a Path tool.
Click once directly on the path we’ve just created. Type: AND.
It will be too big to see at this point. In the toolbar, select your Selection tool. Open your Character palette and change the font to the same one you used for Joseph and Violet. Reduce the font size until you can see the word – for me it’s Silhouette at 22 pt.
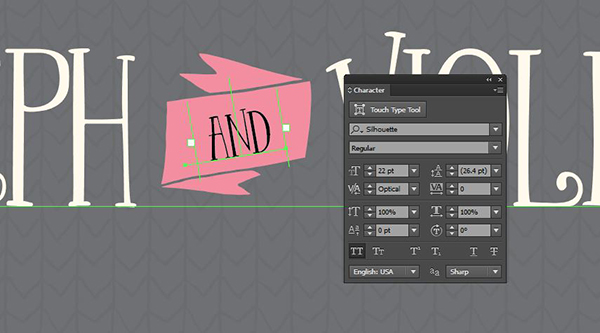
If your text isn’t centered on the path, you may need to adjust the left and right bounds. Use your Direct Selection tool (a) to drag the edges as needed.

Select your regular Text tool again. Click once on the artboard under Joseph and Violet and type: SAVE THE DATE MAY 4, 2017
Again, leave 3-4 spaces between the two sections of text.
In the Character palette, use the same font as everything previously. Make the size a little larger than the AND – with Silhouette, I’m using 28 pt.

In The Pen and Brush freebies folder, open the Doodle Heart file. Copy the heart and paste it into the main layout.
Go to Object > Transform > Scale and enter a Uniform scale of 15%. Press OK. Position in the open space between Save the Date and the date.

Use the Eyedropper tool to sample the color of the gray branches.

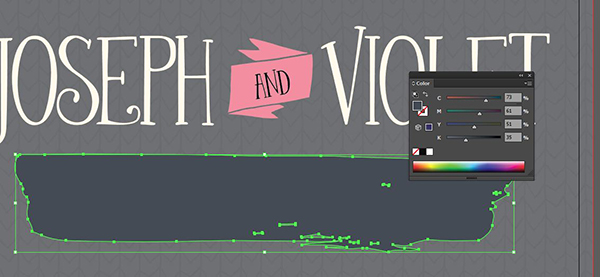
Now navigate the Type and Graphics Lab freebie folder and open the Banner file. Copy the banner and paste it into the main layout.
Normally, I’m staunchly against stretching any element. In this case, the nature of this element will let us stretch it without compromising the quality.
Drag the banner down until it’s over the Save the Date section and centered on the artboard. Use the corner handles to drag out the left and right sides until they’re almost as wide as Joseph and Violet.

In the Color palette, change the CMYK build to 73/61/51/35.
To send the banner behind the text and doodle heart, press cmd + left bracket ([) twice.

Use your Selection tool to select the SAVE THE DATE text line, then switch to your Eyedropper tool and sample the pink from the banner between Joseph and Violet.
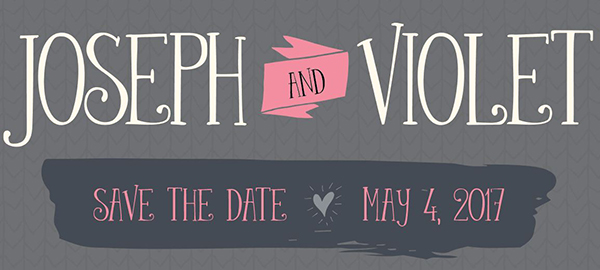
Then select the AND text and use the Eyedropper to sample the blue from the banner under SAVE THE DATE.
In the Layers palette, lock the Text layer.
Step 4: Characters
To see the full Character Creator in action, check out the video above. The instructions below will follow the process using the pre-made characters in the freebie pack.
In the Layers palette, create a new layer and name it Characters.
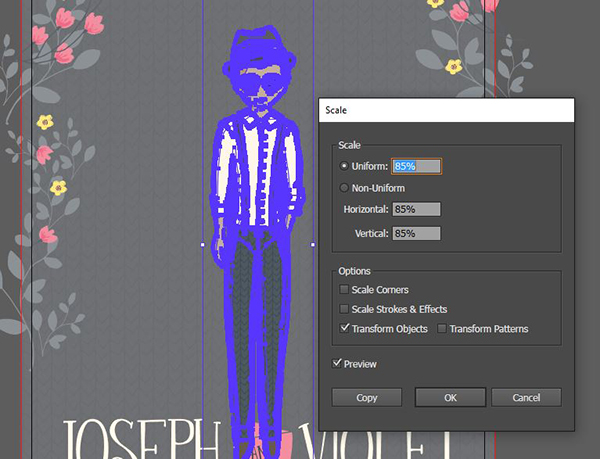
In the freebie folder, open Lisa Glanz’s Portrait Man file. Press cmd + a to Select All, then cmd + c to Copy. In the main layout file, press cmd + v to Paste.
With the little dude still selected, go to Object > Transform > Scale and enter a Uniform scale of 85%. Press OK.
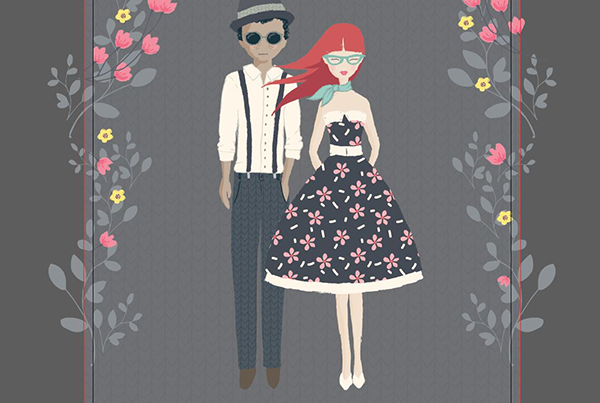
Position him in the open area and just left of center.
Now open the Portrait Woman file. Copy, then Paste her into the main layout file.
Again, go to Object > Transform > Scale and enter a Uniform scale of 85%.

Position the woman to the right of the man so that their feet line up and she’s slightly overlapping him with her dress and hair.
We don’t want to cover our guy with hair, so we’ll send the hair back behind. Use your Selection tool and drag across the top of the woman – across the hair, face, glasses, scarf and body above the dress (but not the dress).
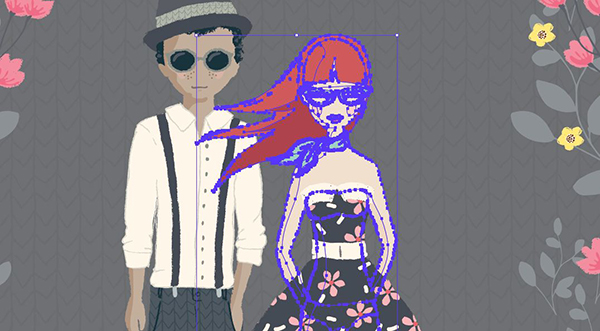
Press cmd + [ to send those pieces back.
Lock the Characters layer.
And we’re done with the front! How cute are these guys?
Step 5: Back
Depending on how you plan on sending your Save-the-Date card, you may need to reserve the back for mailing info (if it’s a postcard) or additional details. Otherwise, you have an awesome color palette and selection of patterns that would complement the piece beautifully. I’m going to go with a simple, solid pink background.

In the Layers palette, create a new layer and name it Back.
At the top of the artboard, click on Document Setup. In the dialog box that opens, click the button on the top right that says Edit Artboards.
You’ll now have a dashed line around the current artboard. Hold opt + shift, then click and drag to the right to duplicate the current artboard.

In the toolbar, select the Rectangle tool (m). Draw a rectangle that covers the entire second artboard, including the bleed. Then use the Eyedropper tool to sample the pink in the AND banner.
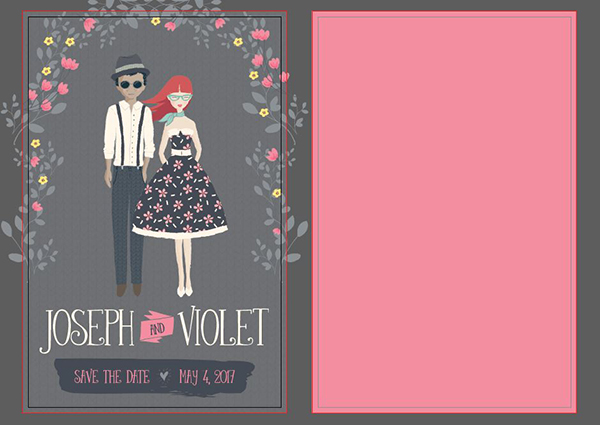
And we’re done! We have an adorable Save-The-Date card using tons of hand drawn patterns, florals and characters.
Remember that whether it’s your outcome for this tutorial or something new you’ve made, we’d love to see your designs on our Facebook page.
Please leave a comment if you have any questions or suggestions. I always look forward to hearing from you!
And there’s still time to check out The Extensive Vector Elements Collection to add a vast collection of incredible vectors to your design library.

I’m using Adobe Illustrator CC and can’t seem to get the background to fill like the tutorial shows. It is the software that I’m using or is there a specific tool that you are supposed to click first. (I’m a total newbie with this program.)
Hey Rachel,
Thank you so much for trying on this tutorial! I’m really sorry your having some trouble. Rest assured, I am on the case! I have sent you an email to get some more information from you and help get you back up and running again.
I hope it helps, and please don’t hesitate to contact me should you have any other questions. I’m always happy to help!
Help!
In regards to the geometric pattern, when I change the height and width, it simply stretches out the pattern. It does not looking anything like in the tutorial :( Am I doing something wrong?
Thanks in advance!
Hey Dayana,
Thanks so much for getting in touch!
I am so sorry that you are experiencing some issues, rest assured I can definitely help you with this- I have just popped you over an email to get some more information from you :)
I am having the same issue as Dayana and Rachel. Copying the geometric pattern to my file and resizing it does not create the pattern.
Hey Veronica,
Thank you for leaving us a comment!
I am so sorry to hear this. Rest assured I can help and I have just sent you over an email now, to get some more information from you :)
I am having the same issue as Dayana and Veronica. It’s not the same as in the tutorial.
I need some help, please.
Thank you.
Hey Nguyen,
Oh I am so sorry to hear this! I’ve just emailed you to get some more information on this :)
Thanks for the great tut, my daughter is 37 and just got engaged, this will come in handy… Have a question though, this is probably something I really should know, but don’t for sure… How does one get rid/hide the flowers hanging off the edge… I know about bleed but if I’m just creating a digital file and I don’t want to ‘see’ what’s hanging off the edge.. Thanks
PS – I use CS4
Hey Judee,
Thanks for getting in touch and thank you for your kind words! It’s great to hear this will come in handy for your daughter’s Save-The-Date card designs (a huge congratulations to her! :) ).
I can certainly assist you with your query! I’ve just sent you a quick email to get some more information from you and help you with this :)
Yay for tutorials! I have learned so much from them. Thank you!
That is great to hear, Claudia! Thank you so much for your kind words :)
Hello Renee!
This is very nice especially that ‘Character Creator’ is super fun!
By continuously watching your tuts, I am happy with using ‘Ai’!
Thanks for this help Renee & DC!
Truly
Pranaytony
behance.net/pranaytony
That is so great to hear, Praynaytony! It’s awesome that Renee’s tutorials have really helped you out in learning some new tricks in Illustrator :)
Thanks again for your incredibly kind words and your support, we really appreciate it!