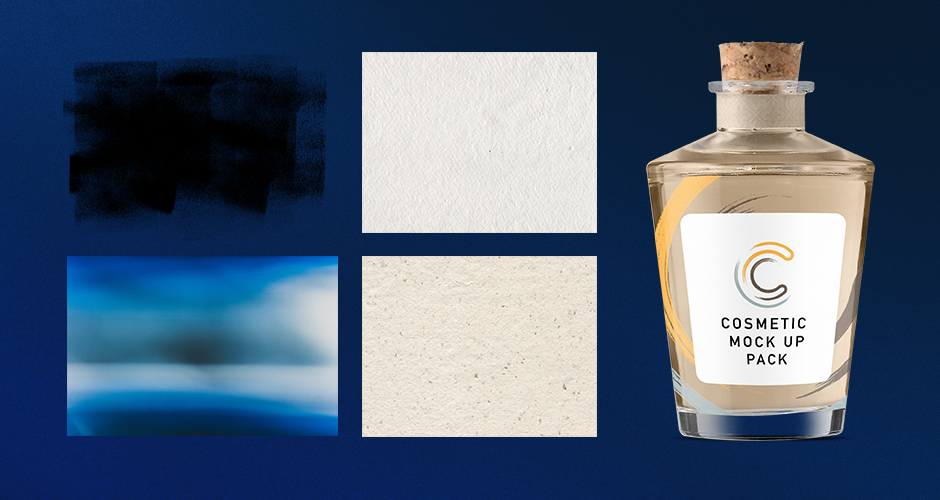
In this tutorial we will be creating a packaging design mockup for Pure Health cosmetics. To do this we will be working with a small handful of elements from The Designer’s Textures and Patterns Collection with some beautiful textures from Greta Ivy, Melanie Helena, and Pixel Sauce. We will also be working with a realistic cosmetic bottle mockup courtesy of Mockup Zone from the Design Cuts Marketplace! On top of that we will also have a couple of free typefaces and a stock photo to incorporate into our design. If you are all ready to make a splash then let’s jump in to Photoshop and get started!
Please note: Unfortunately, we are unable to offer a video guide for this tutorial. We would like to apologise for any inconvenience this may cause, however we hope the written step-by-step instructions and the freebie pack included will help you follow along and achieve the same outcome!
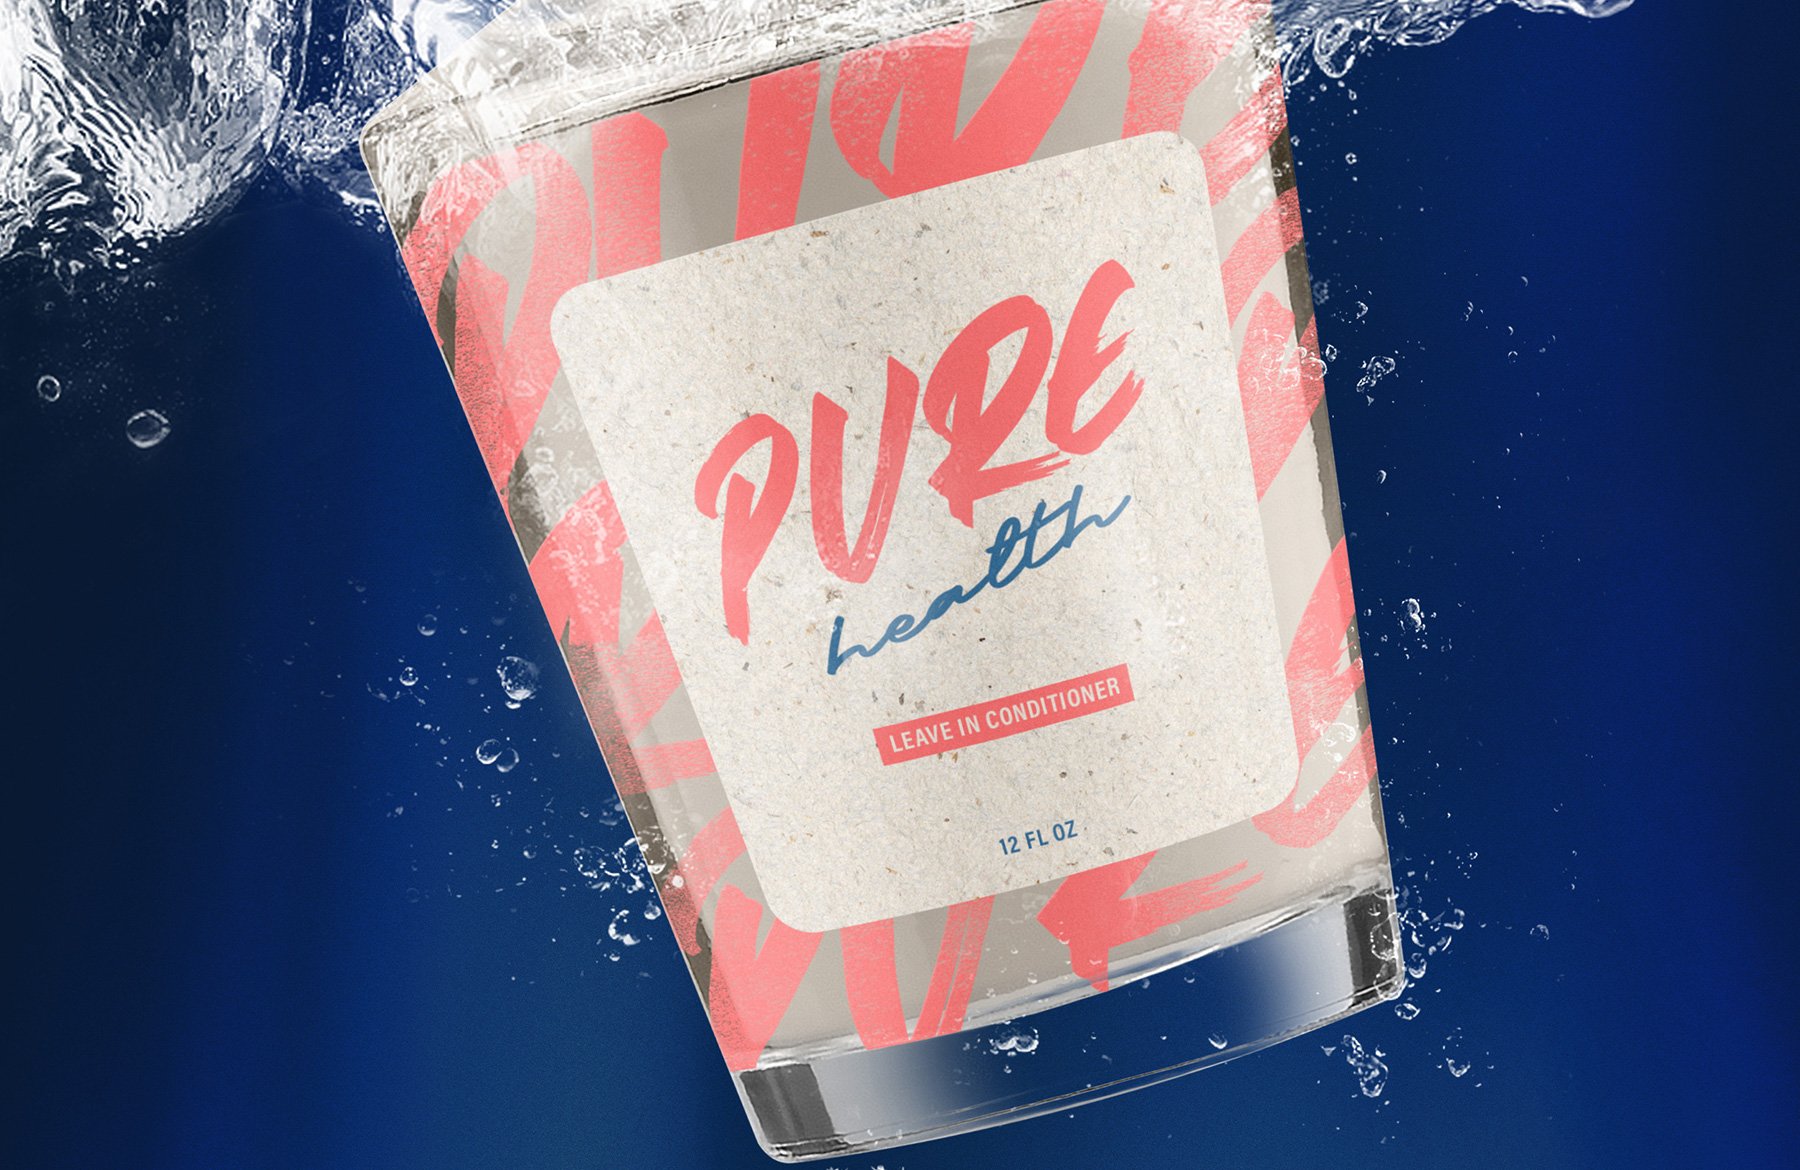
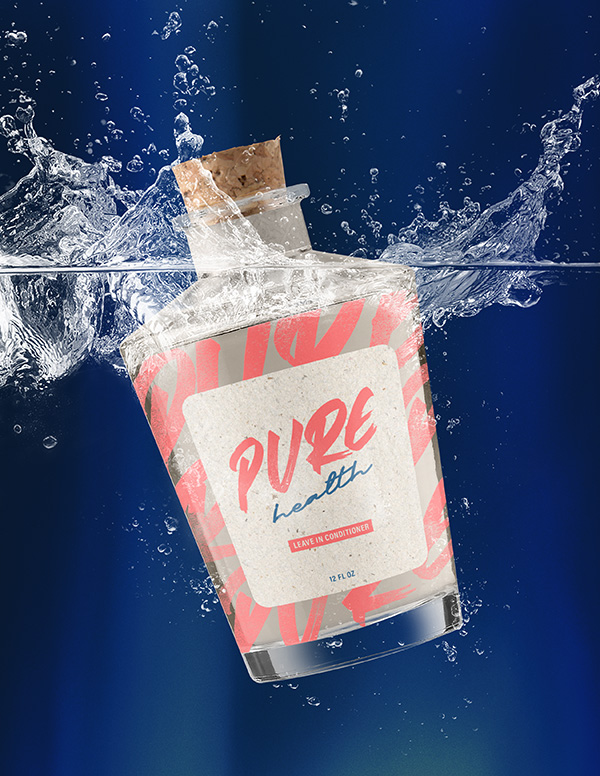
Here’s a look at what we’ll be creating:
Follow along with this tutorial: Download the freebie files
This freebie pack is just a small sample of what you can expect to find in The Designer’s Textures and Patterns Collection for just $29 (that’s 99% off). This bundle is sure to save you some serious time on your projects, allowing you to add the small touches that make the biggest impact on your design work!
Step 1: Pure Health Cosmetic Packaging Design
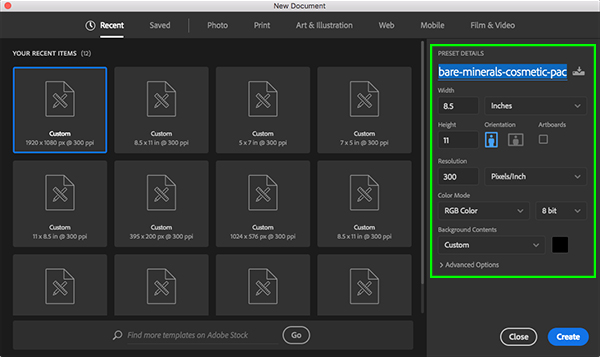
To begin, create a new document that is ‘8.5’ inches wide by ’11’ tall with a resolution of ‘300’. We can leave the ‘Color Mode’ set to ‘RGB’ and ‘Background Contents’ set to black. Before we continue let’s give our document a name – here I will use the name ‘pure-health-cosmetic-packaging-design’ and then click ‘Create’ from the lower right corner.
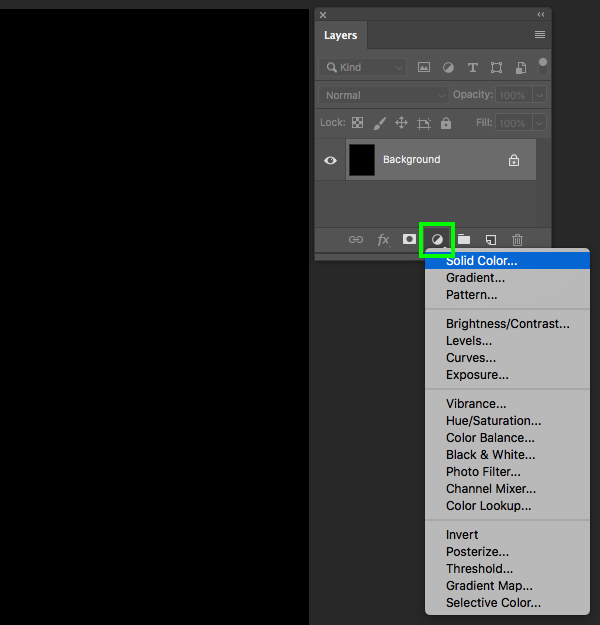
After creating the new document you will have a single ‘Background’ layer that is filled with black. Let’s now click the Adjustment Layer icon at the bottom of the Layers Palette and add a ‘Solid Color…’ Adjustment Layer as shown here:
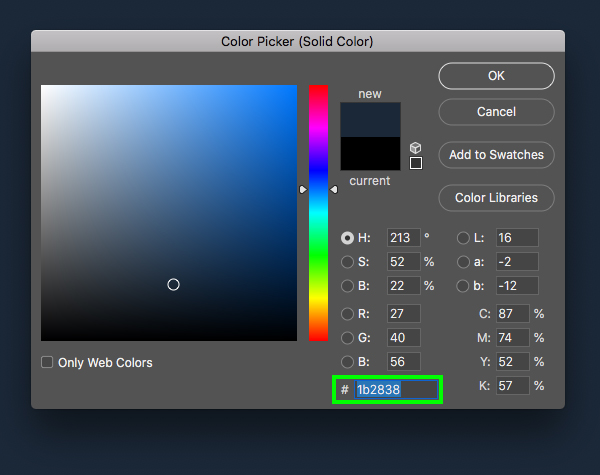
For the fill, enter the hex value ‘#1B2838’ and then click ‘OK’ to continue.
Step 2: Light Leak
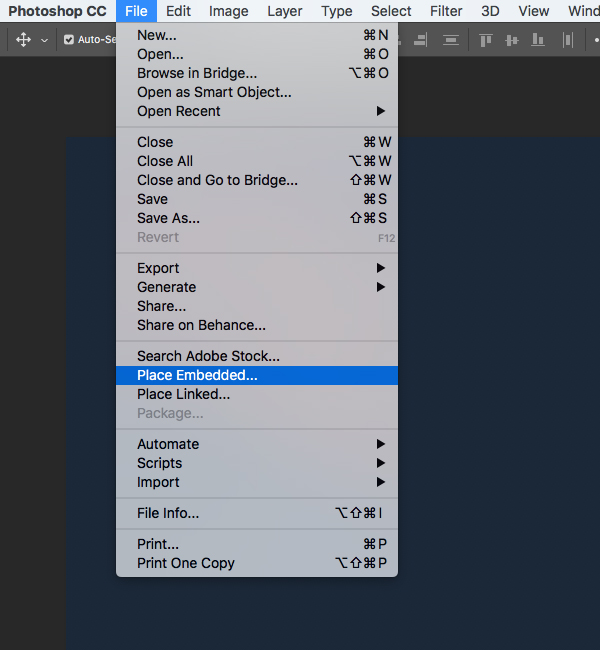
Go to the File menu and choose ‘Place Embedded…’ from the dropdown.
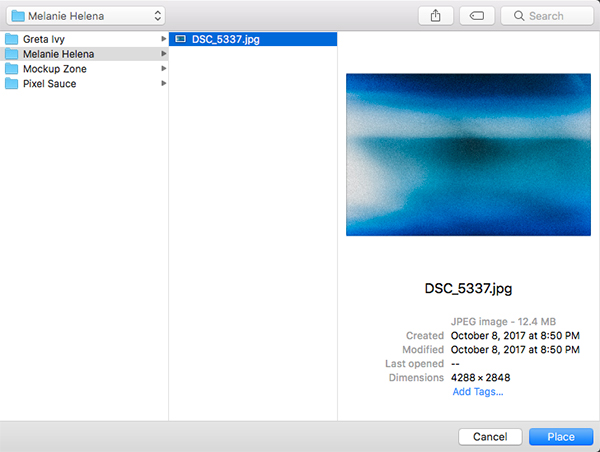
Navigate to the ‘Melanie Helena’ folder inside of the freebies for the tutorial and then choose the ‘DSC_5337.jpg’ image and click ‘Place’ to bring it into the document.
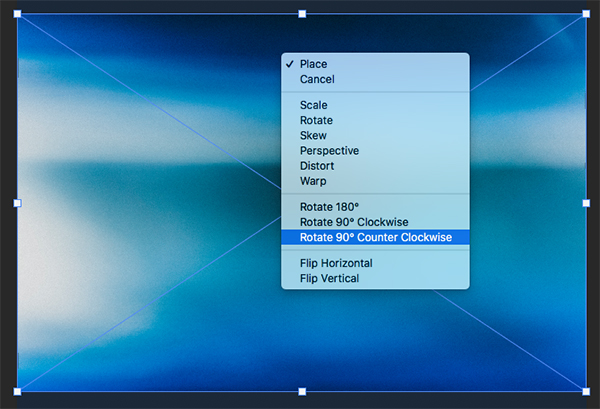
Once you’ve imported the light leak texture, hold the Control key and click on the image before choosing ‘Rotate 90º Counter Clockwise’.
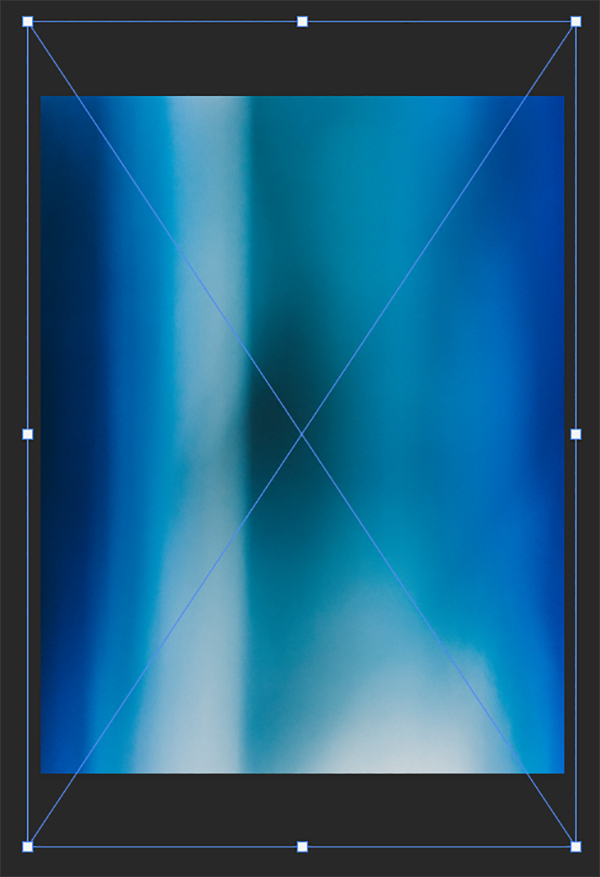
After rotating the image, hold the Alt/Option+Shift keys and drag outwards from any of the four corners of the bounding box to scale the image up until it’s about the same size as the image below:
Step 3: Contrast Boost
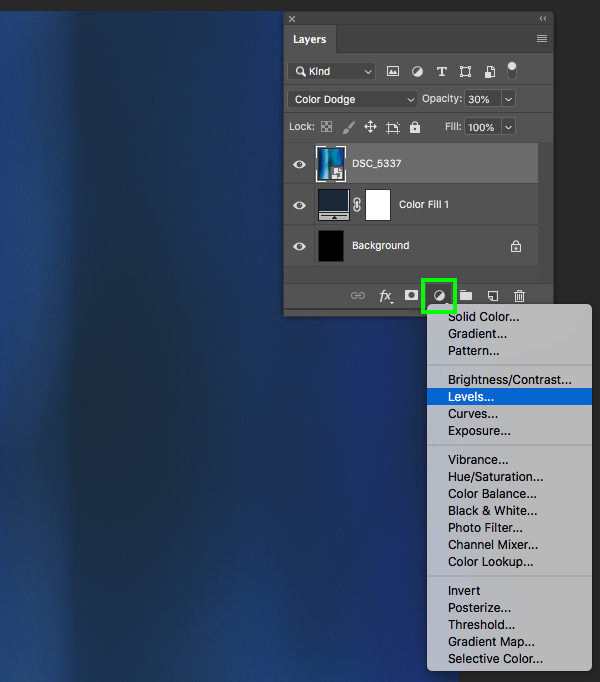
Select the light leak Smart Object and then click on the Adjustment Layer once again. This time let’s choose the ‘Levels…’ option from the menu as shown here:
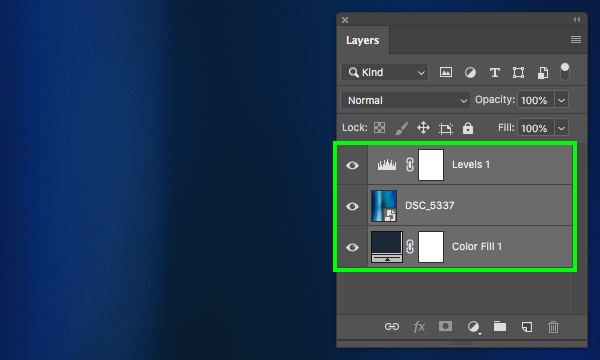
In the Properties let’s move the dark gray slider on the left in towards the center until it’s set to ’20’ and then move the light slider on the right side in towards the center until it’s set to ‘242’ to boost the contrast of the layers below this Adjustment Layer.
Step 4: Background Group
Next, select the solid black ‘Background’ layer and delete it by dragging it to the trash bin at the bottom of the Layers Palette. From here, select the Levels Adjustment Layer, hold the Shift key, and then select the ‘Color Fill 1’ layer so all three of the layers are selected together.
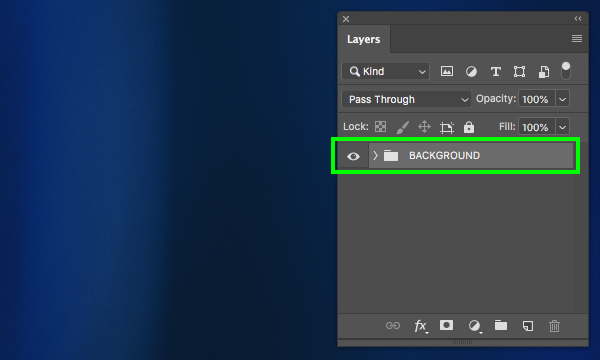
With your three layers still selected, press Command/Ctrl+G to place these layers into a new folder and double click the ‘Group 1’ text to rename this folder ‘BACKGROUND’.
Step 5: Cosmetic Packaging
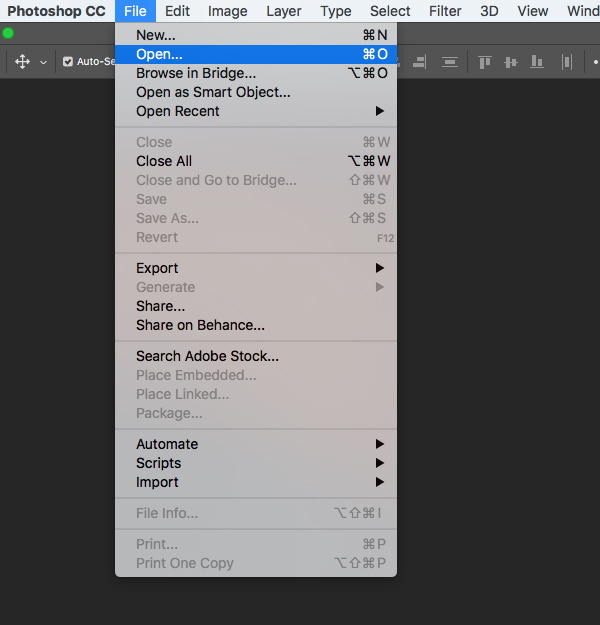
Let’s now go ahead and open our packaging mockup by first going to the file menu and choosing ‘Open…’ from the dropdown menu.
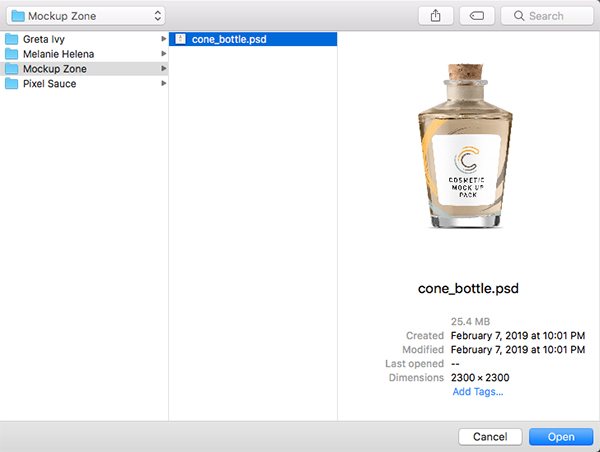
Navigate to the ‘Mockup Zone’ folder inside of the freebies and double click on the ‘cone_bottle.psd’ file to open it. This mockup is just one of many gorgeous cosmetic mockups from a larger bundle that you can pick up over at the Design Cuts Marketplace, but today we will just be working with one of these for the tutorial.
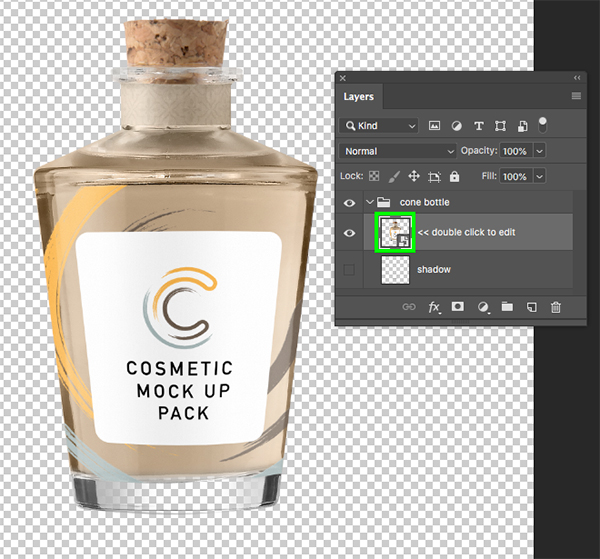
Once the file is open, go inside of the main ‘cone bottle’ folder and then turn off the visibility of the ‘shadow’ layer inside. After that, double click on the Smart Object layer above that says ‘double click to edit’ to go into the next window.
Step 6: Liquid Color
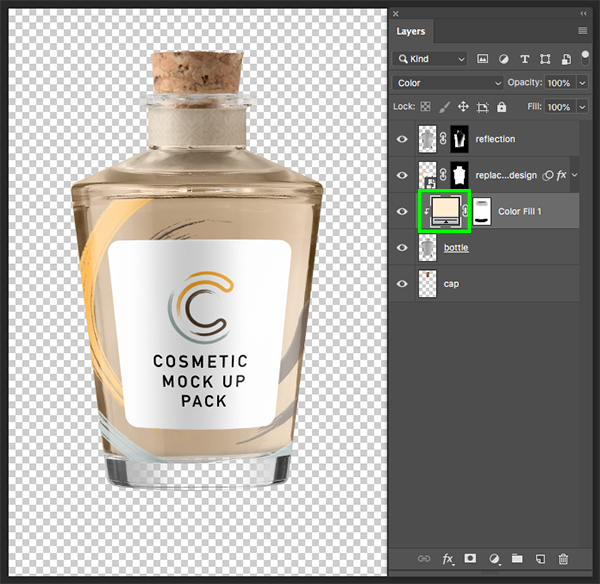
Now that we are inside of the first Smart Object we can change the color of the liquid. To do this simply double click on the ‘Color Fill 1’ thumbnail highlighted here:
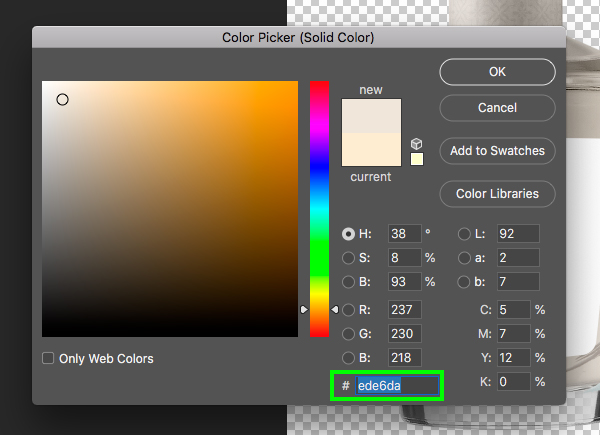
Enter the hex value ‘#EDE6DA’ and then click ‘OK’ or press ‘Return’ to proceed.
Step 7: Label Design
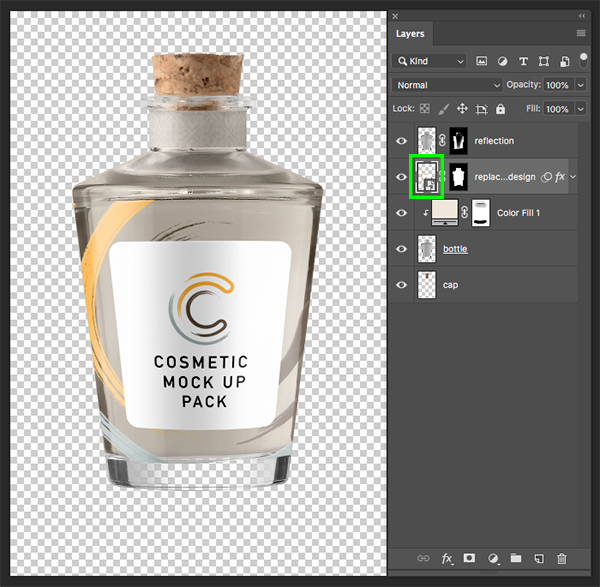
After changing the color of the liquid, double click the Smart Object layer just above the ‘Color Fill 1’ Adjustment Layer.
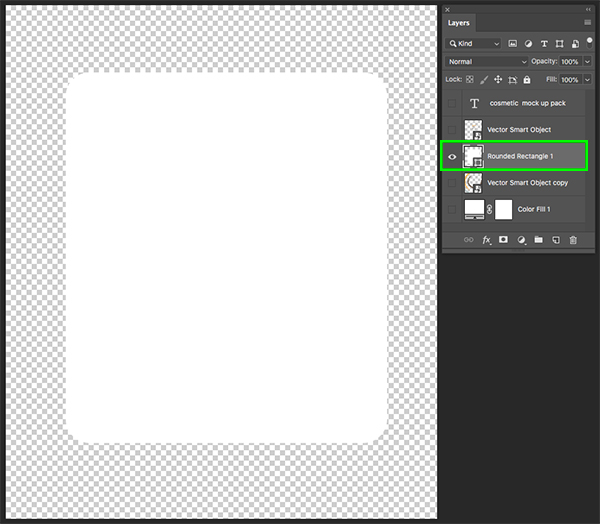
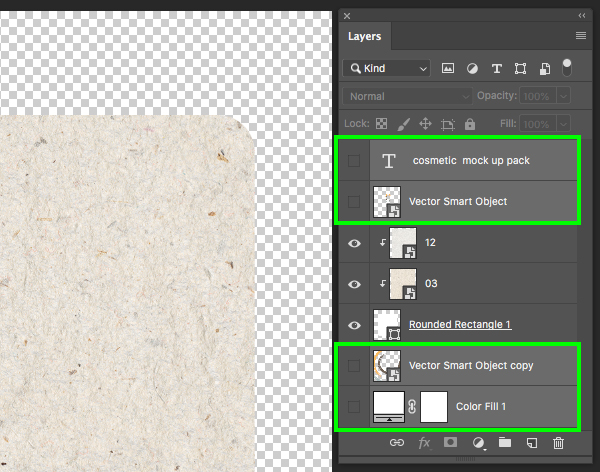
Now we have a new window open where we can change the main label artwork for the cosmetic packaging. The first thing we want to do here is turn off the visibility of all of the layers except for the ‘Rounded Rectangle 1’ layer like this:
Step 8: Paper Texture 1
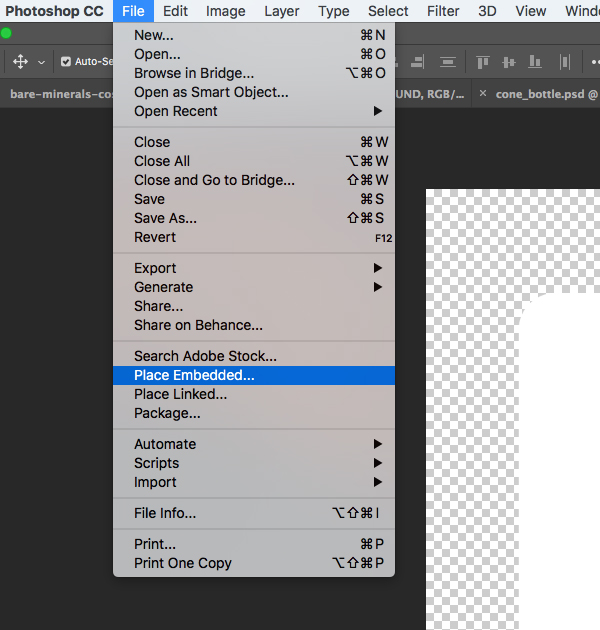
Go to the File menu and choose ‘Place Embedded…’ from the dropdown.
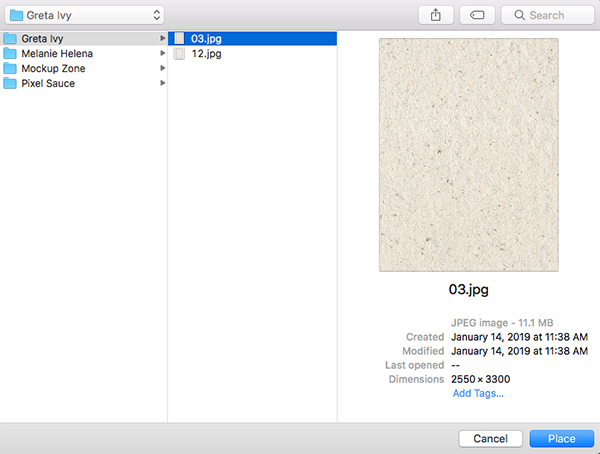
Navigate to the ‘Greta Ivy’ folder and then select the ’03.jpg’ image which is the first of two paper textures we’ll be working with in this tutorial. The full design bundle contains a beautiful variety of handmade paper textures just like these!
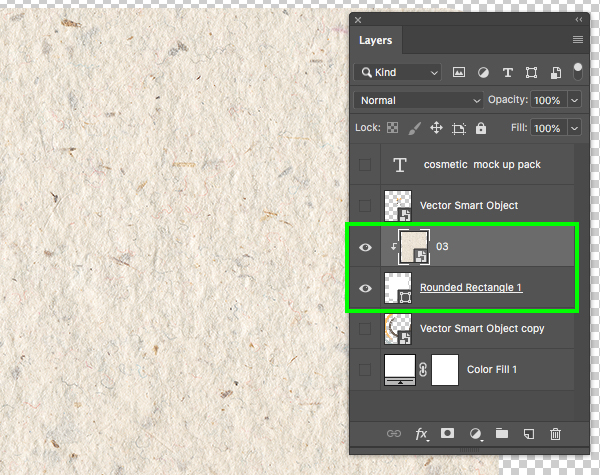
After bringing the paper texture into the document, make sure that it’s placed just above the rounded rectangle layer and then hold the Control key and click on the ’03’ Smart Object layer with our texture to reveal a dropdown menu. From the list that appears, select ‘Create Clipping Mask’ to clip the texture to the rectangle shape.
You should now see a small arrow icon appear next to the ’03’ layer and your paper texture will only be visible within the boundaries of the rounded rectangle which is exactly what we want.
Step 9: Paper Texture 2
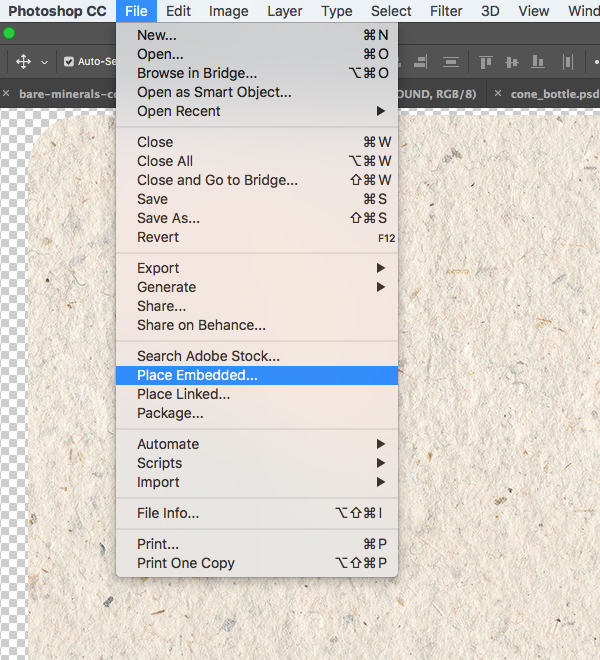
Return to the File menu and choose ‘Place Embedded…’ from the dropdown once again.
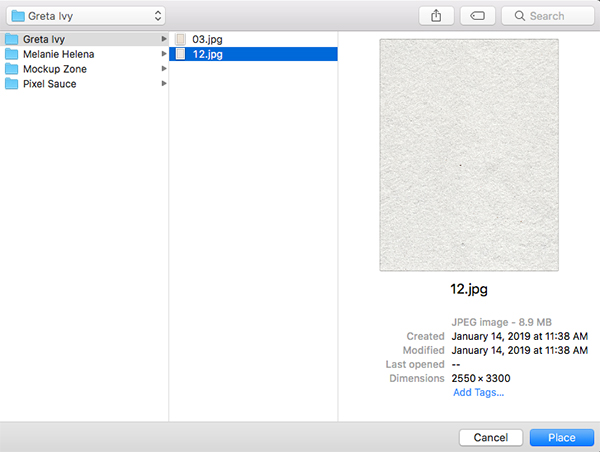
This time let’s go back to the ‘Greta Ivy’ folder and select the ’12.jpg’ texture before clicking ‘Place’ from the lower right corner to bring it into the document.
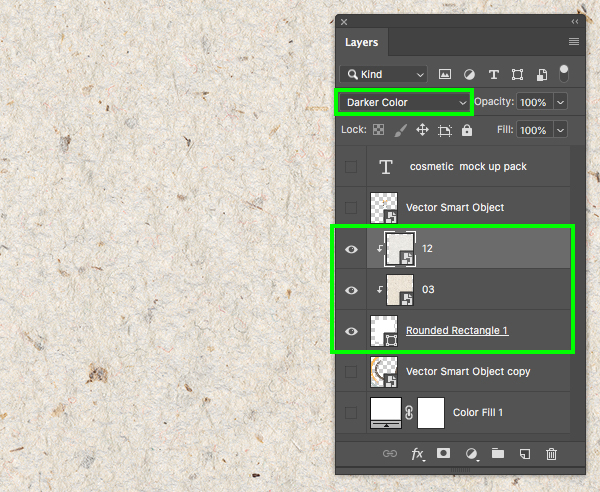
The texture should now appear just above the ’03’ Smart Object layer, but by default it won’t have a Clipping Mask applied. A quick shortcut that we will use to clip this to the same rounded rectangle is to press the Command/Ctrl key and the left bracket on the keyboard to move the layer down one position in the Layers Palette. After that, press Command/Ctrl and the right bracket to move it back up one spot so that it is now clipped, and above the ’03’ texture layer. Once you have placed the texture above the previous one and made sure that it is clipped to the rounded rectangle, change the Blend Mode of the layer from ‘Normal’ to ‘Darker Color’.
Step 10: Cleaning Up
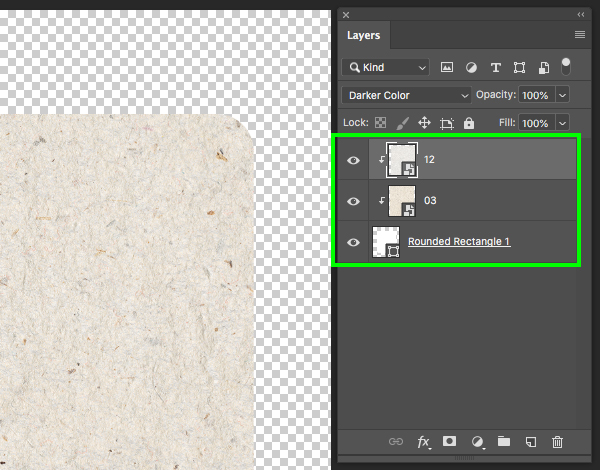
Hold the Command/Ctrl key and click on all of the layers that are currently turned off and then drag them to the trash bin to get rid of them.
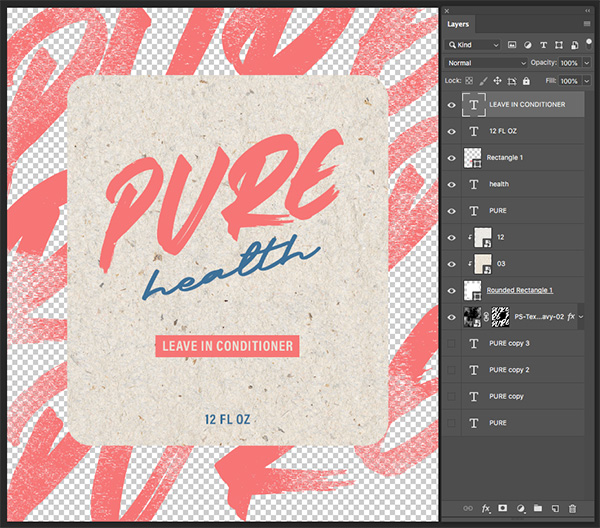
You should now just be left with three layers – the rounded rectangle shape and both of the two handmade paper textures from Greta Ivy as shown below:
Step 11: Main Copy
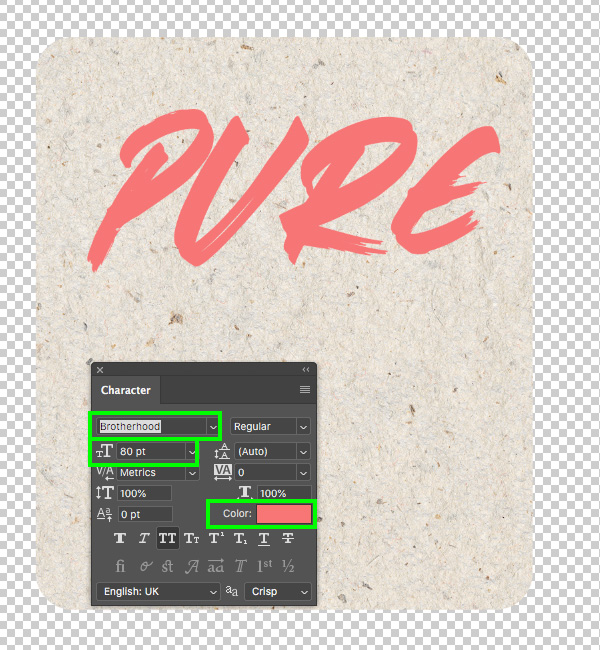
Create a new layer and then press ’T’ on the keyboard to switch to the Type Tool. From here, type out the word ‘PURE’ in all caps using the free ‘Brotherhood’ typeface. Let’s open the Character Panel and then change the size of the text to about ’80 pt’ and then click on the ‘Color’ swatch to change the fill color.
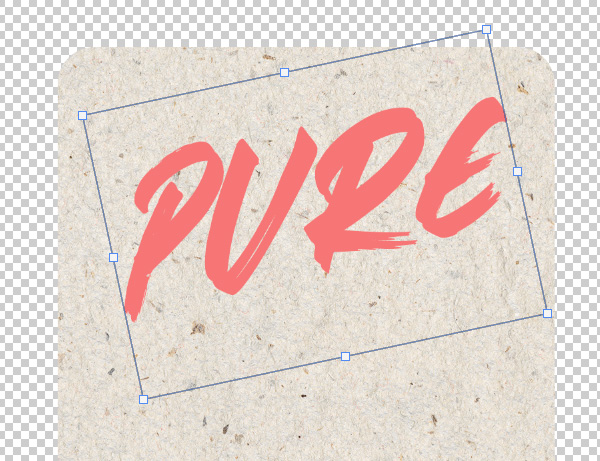
For the fill, enter the hex value ‘#DB7575’ and then press ‘Return’ or click ‘OK’ to apply the changes. Now that we’ve changed the color, let’s rotate the text by pressing Command/Ctrl+T to do a Free Transform and then moving your cursor over any of the four corners of the bounding box and then rotating the block of text counter clockwise so that it looks like this:
Step 12: Very Pure
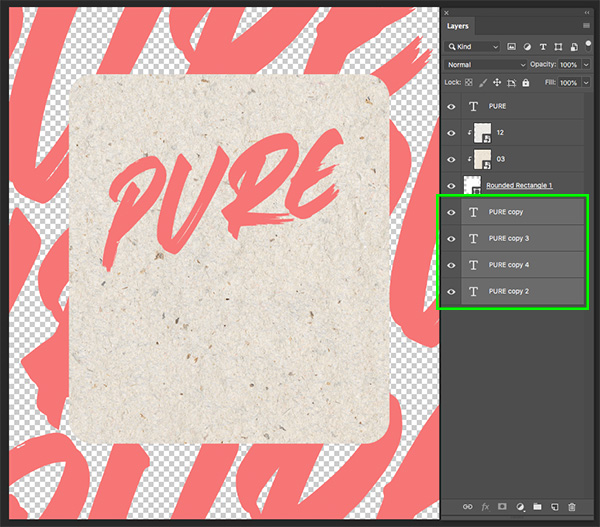
Select the ‘PURE’ text layer and then press Command/Ctrl+J to duplicate it. Move this copy down to the bottom of the Layers Palette so that it’s below all of the other layers. From here, press Command/Ctrl+T to do a Free Transform and drag outwards from any of the four corners of the bounding box while holding the Shift key to constrain the proportions as we make the text gets larger. Create three more copies and space them out so you can see some of the letters in the background behind the label as shown here:
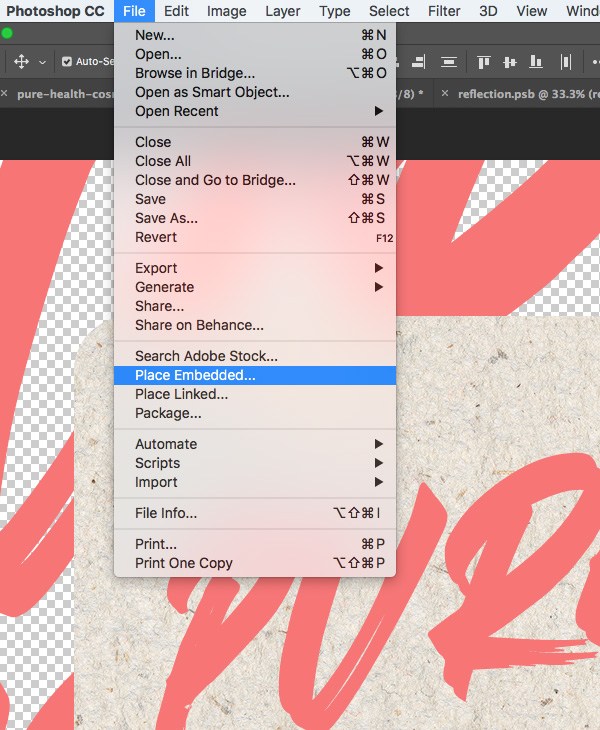
Next, go to the File menu and choose ‘Place Embedded…’ from the dropdown.
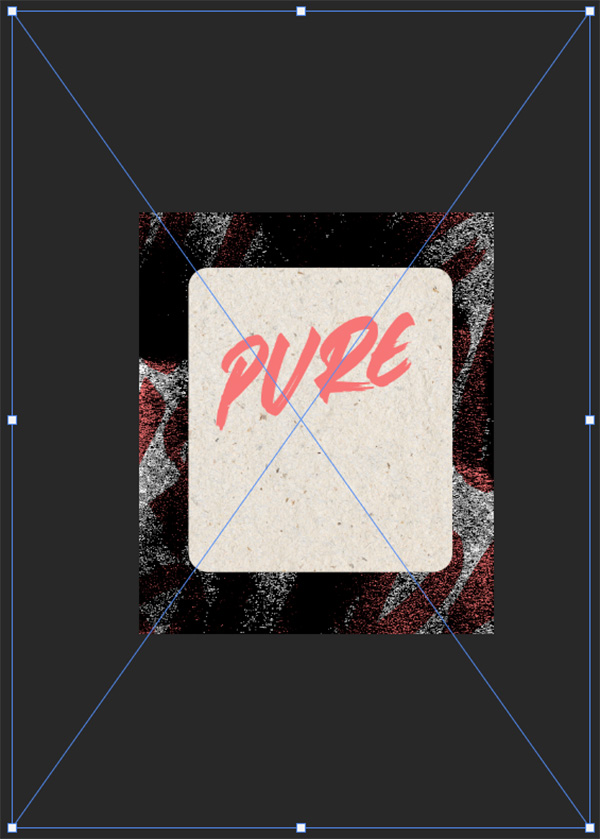
Return to the freebies folder for the tutorial and go to the ‘Pixel Sauce’ subfolder before choosing ‘Ps-Texture-Heavy-02.png’ and clicking on ‘Place’ from the lower right corner. The full design bundle contains light, medium, and heavy grunge textures like this and it really is a great way to add some cool looking grunge to your text or logos to give it a bit of a vintage or hand crafted feel. After bringing the texture into your document, hold the Alt/Option+Shift keys and drag outwards from any of the four corners of the bounding box to scale the texture up from the center until it spans out beyond the edges of your canvas like this:
Step 13: Texture Mask
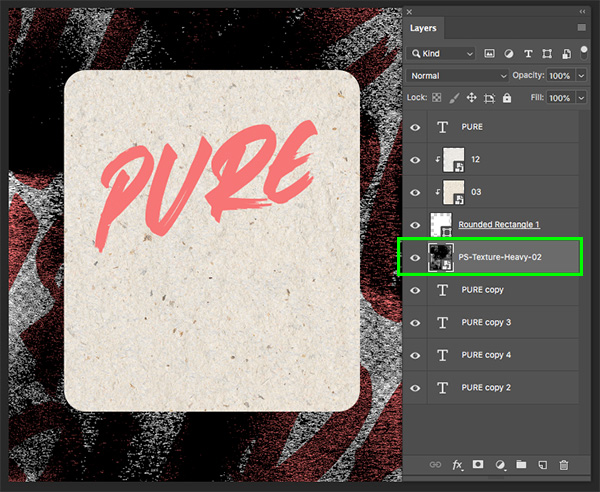
Place the texture Smart Object that we brought in below the ‘Rounded Rectangle 1’ layer, but above all four of the larger text copies.
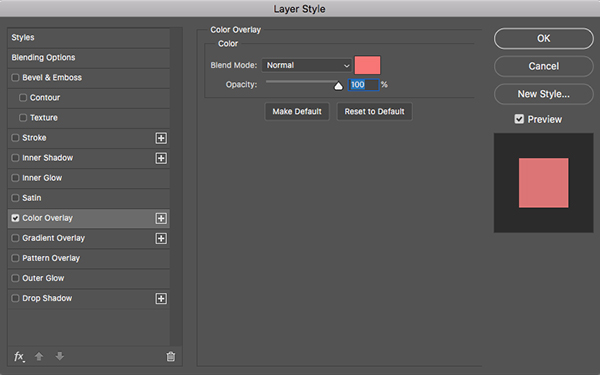
Double click on the heavy texture layer to open the Layer Styles and then check off the ‘Color Overlay’ option.
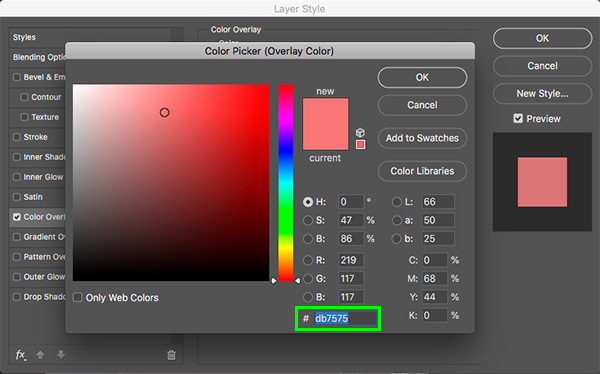
For the fill color, enter the hex value ‘#DB7575’ so that it matches the pink color of the text.
Step 14: Grunge Type
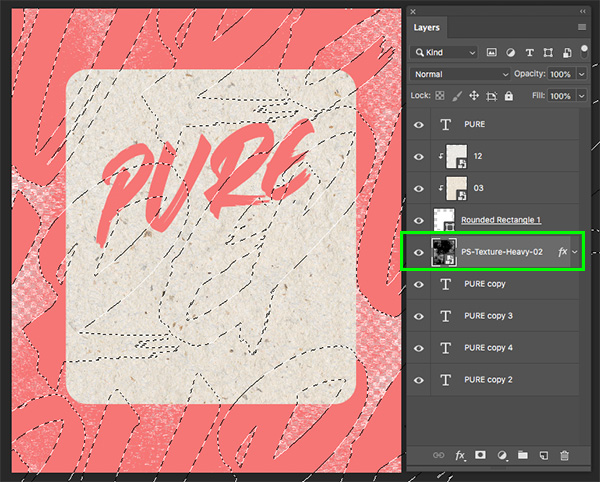
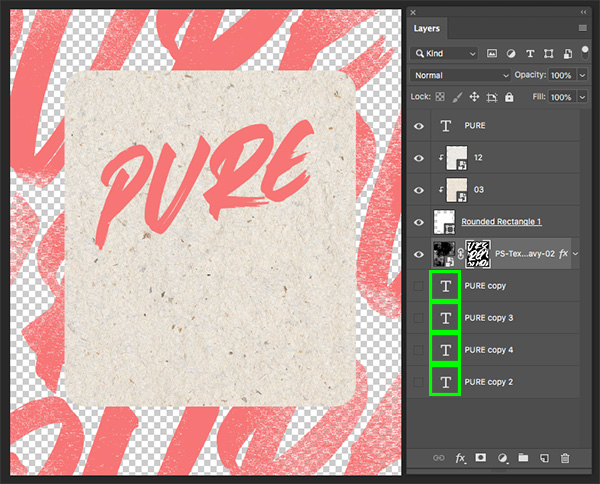
Hold the Command/Ctrl+Shift keys and click on each of the four layer thumbnails for the large copies of the text to activate a selection around them all together. Once you have a selection of all of the large text in the background, turn off the visibility of these layers.
Make sure the heavy texture Smart Object layer is selected while you still have an active selection of all of the large copies of the text, and then click on the ‘Add Layer Mask’ icon at the bottom of the Layers Palette. We have now created a mask on the texture layer using the large text.
Step 15: Minerals
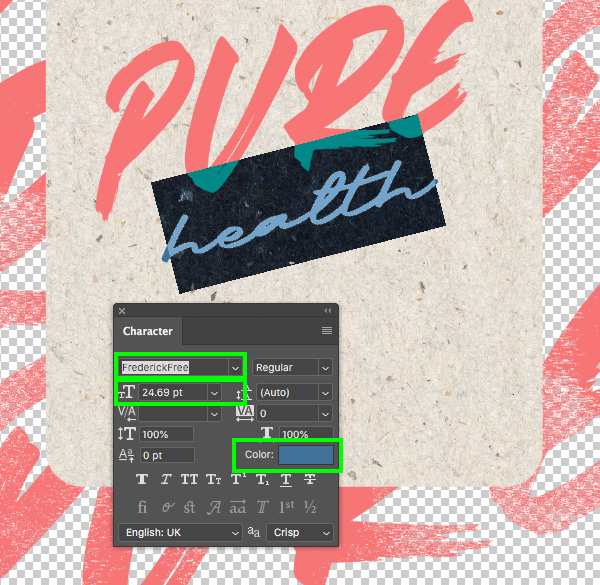
Create a new layer at the top of the Layers Palette and switch back to the Type Tool (T) once again. This time let’s type out the word ‘minerals’ in all lowercase letters using the ‘Frederick’ typeface. Let’s then go ahead and change the size of this text to about ’24.69 pt’ and then click on the ‘Color’ swatch to change the fill.
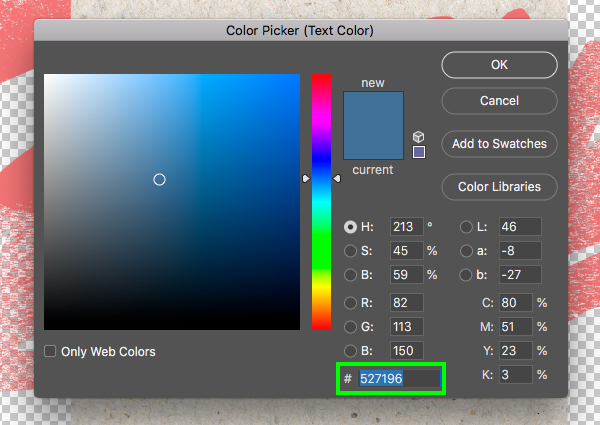
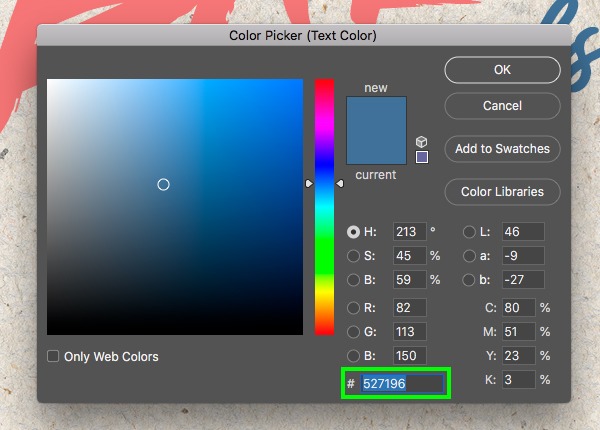
For the fill color, enter the hex value ‘#527196’ and then click ‘OK’ or press ‘Return’ on the keyboard to continue.
Step 16: Adding Details
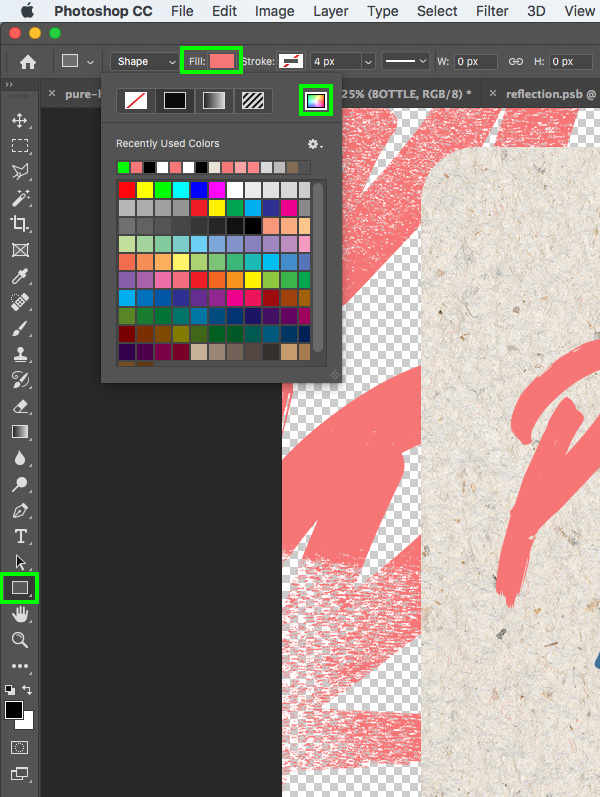
Next, press ‘U’ on the keyboard to switch to the Rectangle Tool and then click on the ‘Fill’ color swatch in the top toolbar. You should then see a dropdown menu appear and we want to click on the rainbow color icon in the upper right.
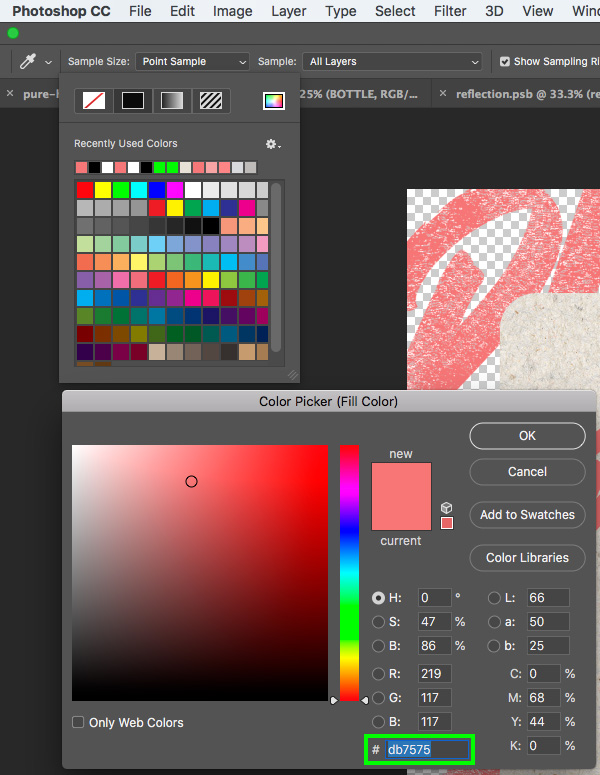
Let’s change the fill color to our pink – ‘#DB7575’ and then click ‘OK’ to continue.
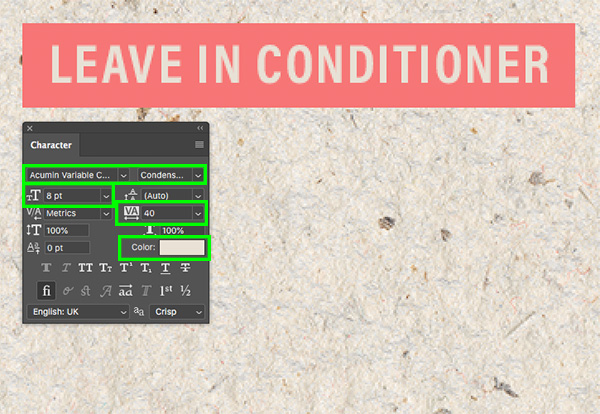
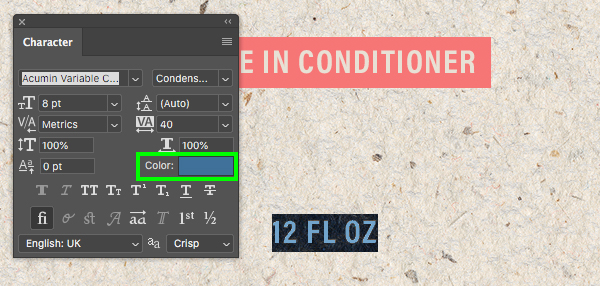
Click and drag to create a short, wide rectangle towards the bottom of the label. After that, add a new layer above and switch back to the Type Tool (T). Type out the words ‘LEAVE IN CONDITIONER’ in all caps using a bold, condensed, sans serif typeface such as Acumin Variable Concept or something similar. Here I am using ‘8 pt’ for the size and the tracking setting can be set to ’40’ or so. Once you have done that, click on the ‘Color’ swatch to change the fill.
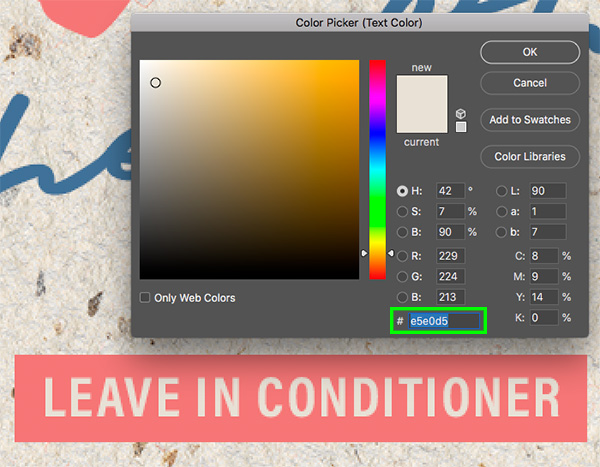
Let’s change the fill color to ‘#E5E0D5’ and then click ‘OK’ to continue.
Step 17: Tertiary Information
Select the text layer we created in the previous step and press Command/Ctrl+J to duplicate it. After that hold the Shift key and drag the layer down towards the bottom of the label before changing the text to ’12 FL OZ’. From here, click on the ‘Color’ swatch once again to change the fill for this layer.
Change the fill color for the text to ‘#527196’ so that it matches the blue color we used for the ‘minerals’ text earlier on.
Now let’s take a look at our label design and then save it by pressing Command/Ctrl+S. Once the label has finished saving, press Command/Ctrl+W to close the window and return to the previous window.
Step 18: Artwork Update
Now that we are in the second level of the mockup let’s save this and then close the window by pressing Command/Ctrl+S and then Command/Ctrl+W to return to the main bottle mockup window.
Step 19: Placing The Bottle
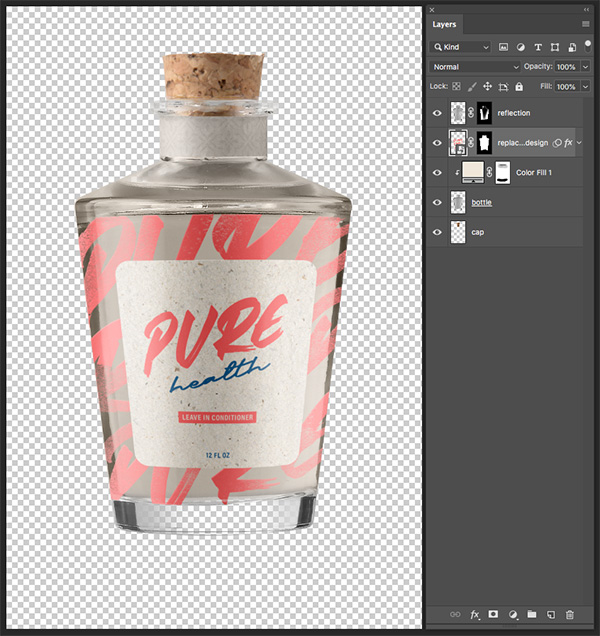
You should now be back inside of the main mockup file. From here we want to click and drag the ‘double click to edit’ Smart Object file into our working document as shown here:
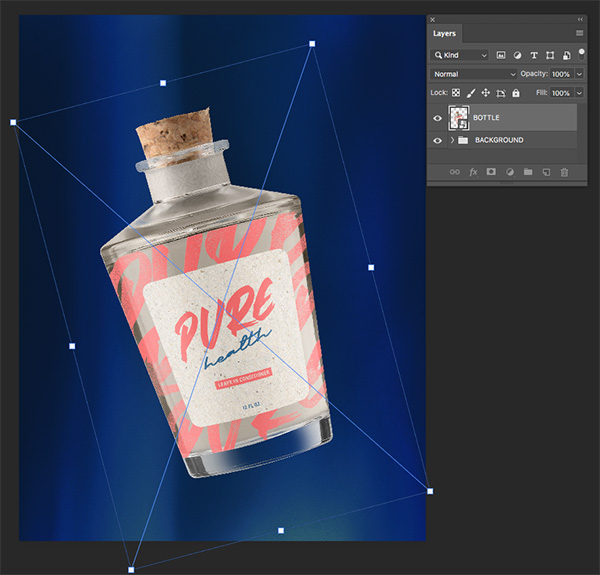
After bringing the mockup into your main file, double click on the ‘double click to edit’ text and rename the layer ‘BOTTLE’. From here, scale the bottle up by pressing Command/Ctrl+T and then holding the Shift key and dragging outwards from any of the four corners of the bounding box. Let’s also rotate the bottle about 15º counter clockwise so that it looks like the image below:
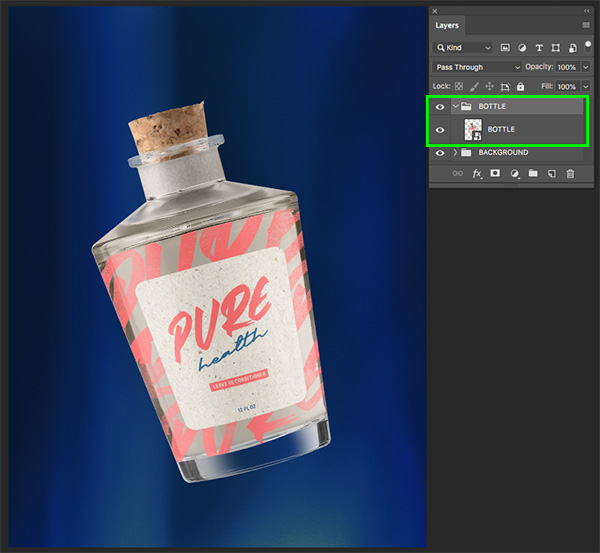
With the ‘BOTTLE’ Smart Object layer still selected, press Command/Ctrl+G to put it into a new folder and double click the ‘Group 1’ text to rename the folder ‘BOTTLE’ as well.
Step 20: Making A Splash
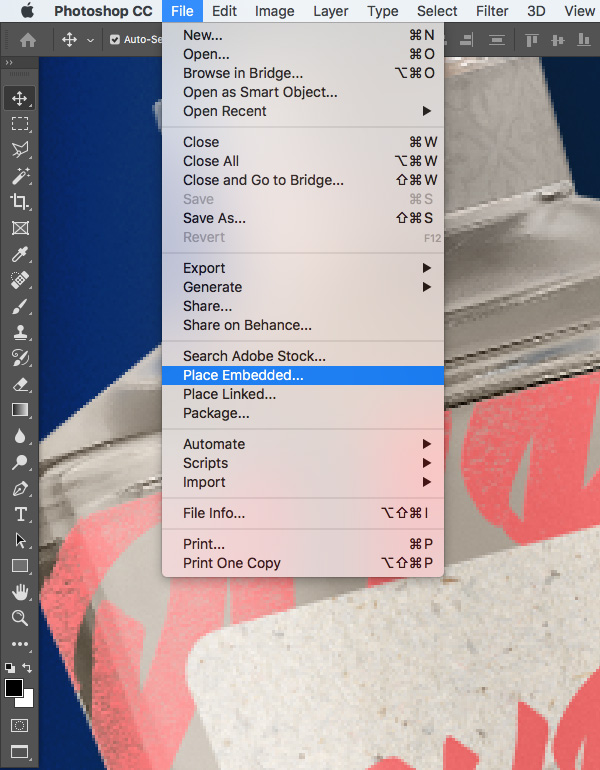
Go to the File menu and choose ‘Place Embedded…’ from the menu.
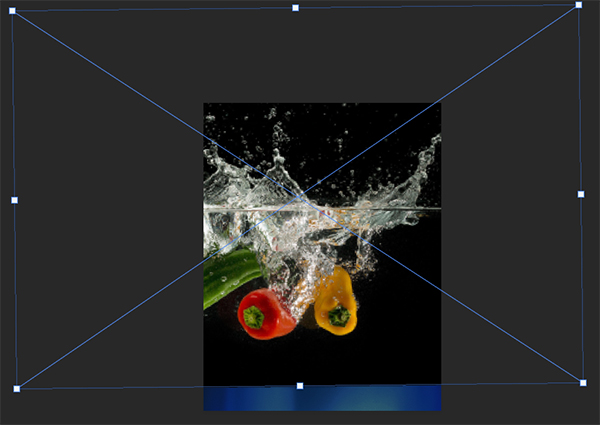
Next we want to download this ‘water splash’ stock photo from Pixabay and then navigate to it and open it in Photoshop.
Scale the image up using a Free Transform (Command/Ctrl+T) and placing the main part of the splash over the center of the image as shown here:
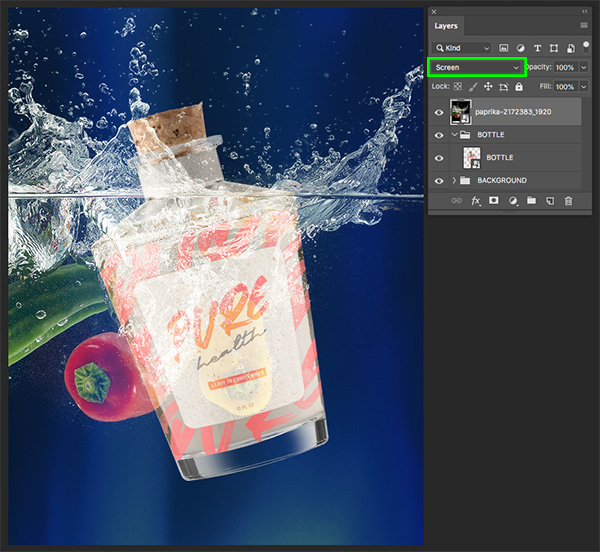
After placing the splash image, change the Blend Mode from ‘Normal’ to ‘Screen’ and you will now be able to see the bottle through the photo like this:
Step 21: Black & White
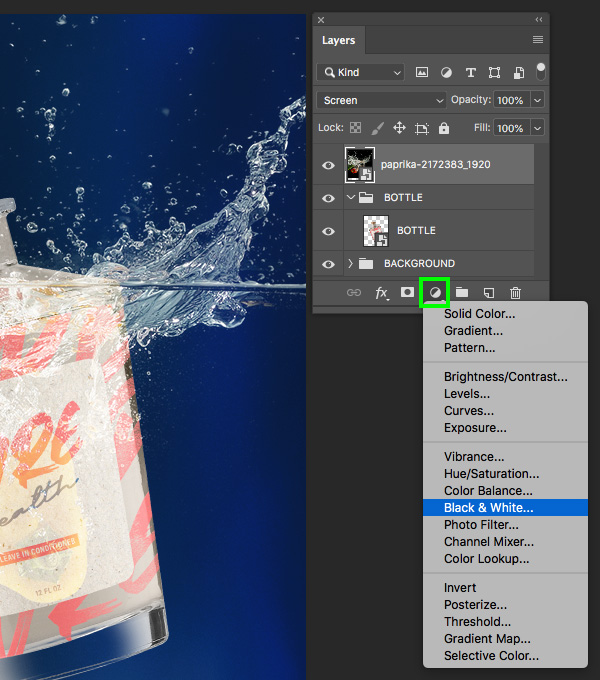
Select the splash Smart Object and then hold the Alt/Option key and click on the Adjustment Layer icon at the bottom of the Layers Palette before choosing ‘Black & White…’ from the menu.
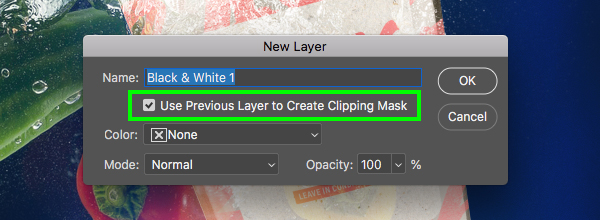
Check off the box that says ‘Use Previous Layer to Create Clipping Mask’ and then press ‘Return’ or click ‘OK’ to continue. The Adjustment Layer will now be clipped to the splash image.
Step 22: Levels
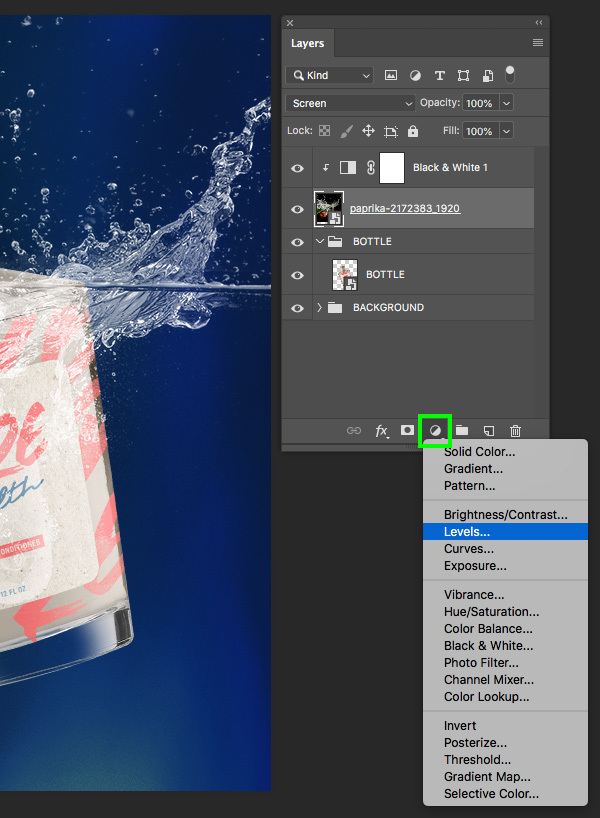
Select the splash Smart Object layer again and then click the Adjustment Layer icon and this time choose ‘Levels…’ from the menu.
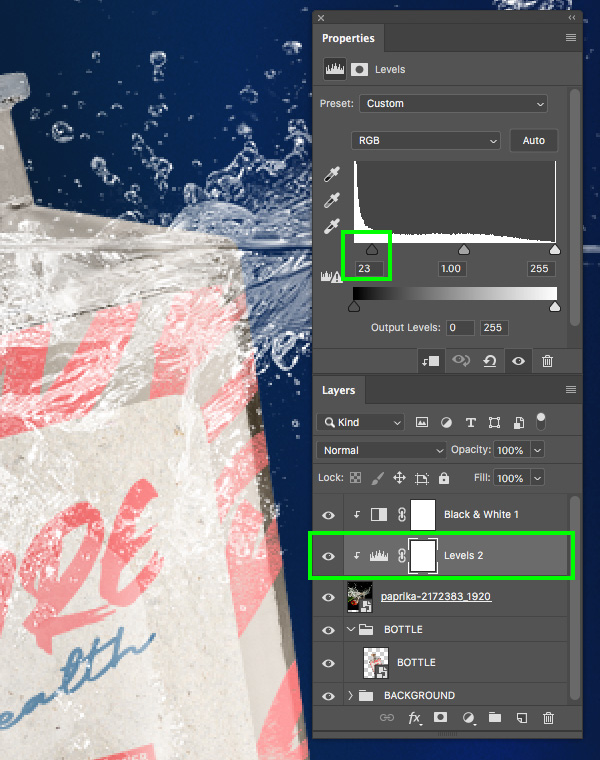
In the Properties let’s move the dark gray slider on the left in towards the center until it’s set to ’23’ to increase the contrast and boost the shadows to help the photo pop more.
Step 23: Splash Mask
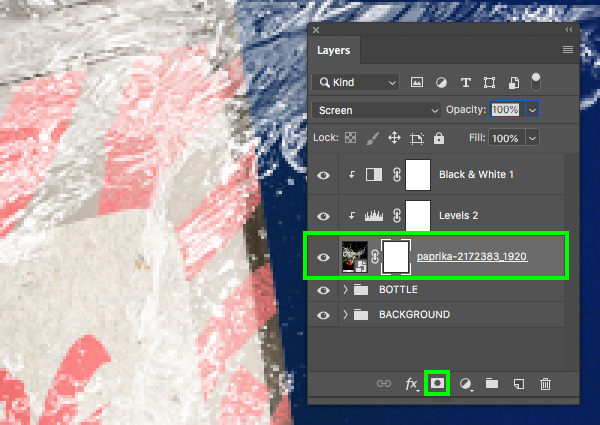
Select the splash Smart Object and then add a Layer Mask.
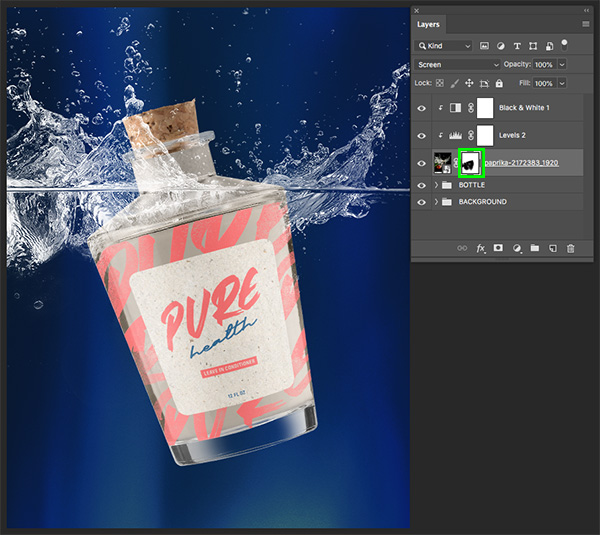
Press ‘B’ to switch to the Brush Tool and select a large, soft, round brush with a low opacity of somewhere between ’20%’ and ’40%’ as shown here:
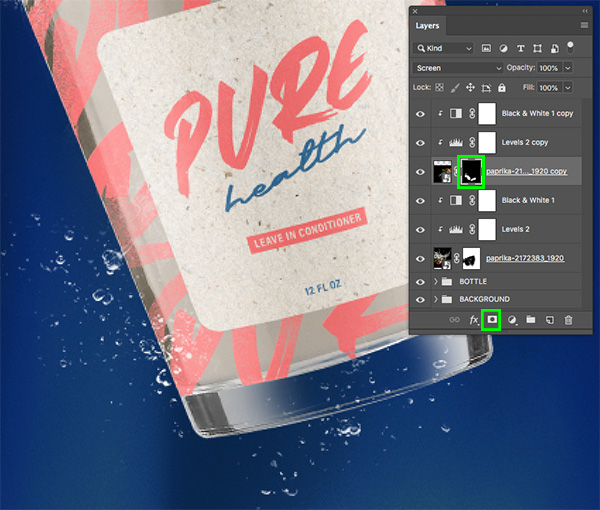
Press ‘D’ to reset to your default colors and make sure you have a solid black fill color selected. We can now begin brushing over parts of the photo that we want to hide – in this case the goal is to hide the peppers and the parts of the underwater splash that are covering the label. You can leave a few areas on top of the label to create some depth, but be mindful of the legibility of the text. The nice thing about using masks for this is that if you mess up, all you have to do is press ‘X’ to change your fill color to white, and then brush with that color to bring parts of the original photo back. You can also make your brush larger or smaller by using the bracket keys. Take your time here to try and achieve a nice looking result, and then once you’re happy with the way your image is looking select the top ‘Black & White 1’ Adjustment Layer, hold the Shift key, and then select the splash Smart Object. Once these three layers have been selected together, press Command/Ctrl+J to duplicate them.
Step 24: Second Splash
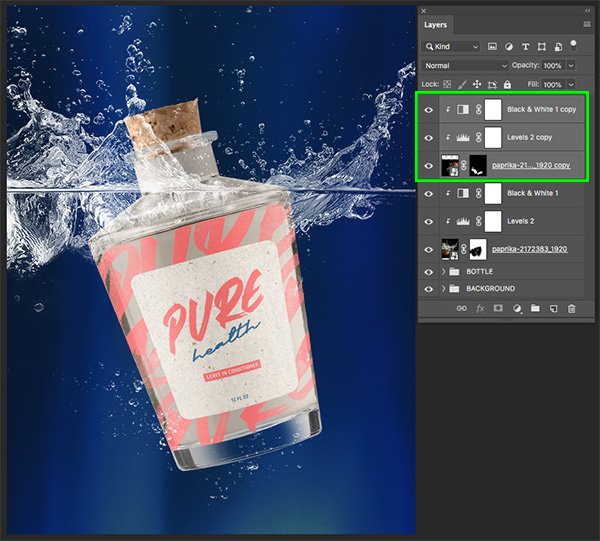
Now that you have copies of your three layers, hold the Control key and click on the Layer Mask of the duplicate splash image and then delete it. We now want to reposition the image, scale it, and maybe rotate it until we can see some of the smaller bubbles over the middle, bottom and sides of the bottle.
This time, instead of just adding a regular Layer Mask, let’s hold the Alt/Option key and then click on the ‘Add Layer Mask’ icon to add an inverted mask. Doing this will hide the entire photo so that instead of using a black brush to hide certain parts of the photo, we will use white to reveal the parts that we want to keep. Use the same soft brush as before with solid white to begin painting in some of the smaller bubbles around the left side and bottom of the bottle as shown here:
Step 25: Third Splash
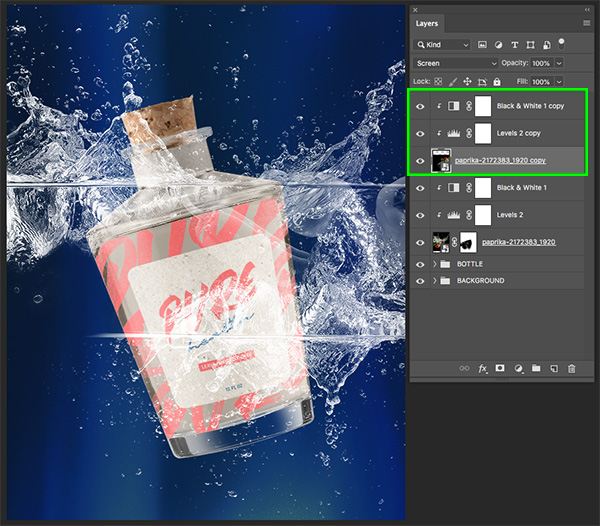
Select the second copy of the splash image with both Adjustment Layer by selecting the top layer, holding Shift, and then clicking on the second copy of the splash.
With your layers selected, press Command/Ctrl+J to duplicate them all together. Next, hold the Control key and click on the Layer Mask of the third copy of the splash photo and then choose ‘Delete Layer Mask’ to once again reveal the original image.
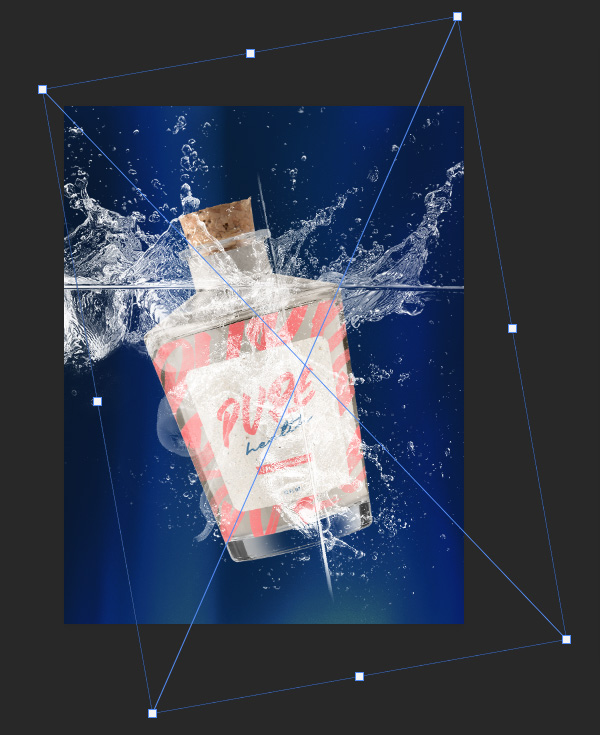
Let’s take this third copy of the splash and rotate it about 90º using a Free Transform.
Add an inverted Layer Mask by holding Alt/Option and clicking on the ‘Add Layer Mask’ icon once again. Now we will use our soft white brush to bring in some of the smaller bubbles over the right side of the bottle to help balance the composition. We still want to take our time and experiment to see which areas of the splash image look the best on top of the bottle.
Step 26: Splash Group
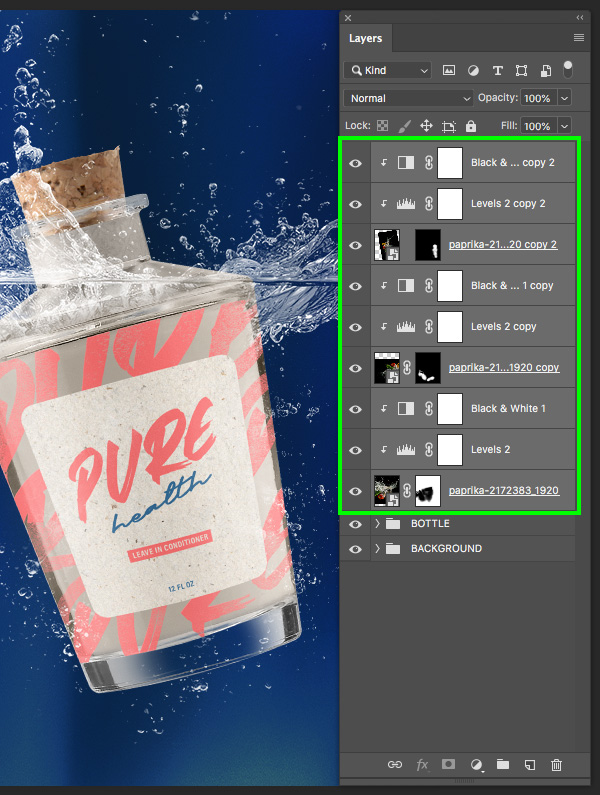
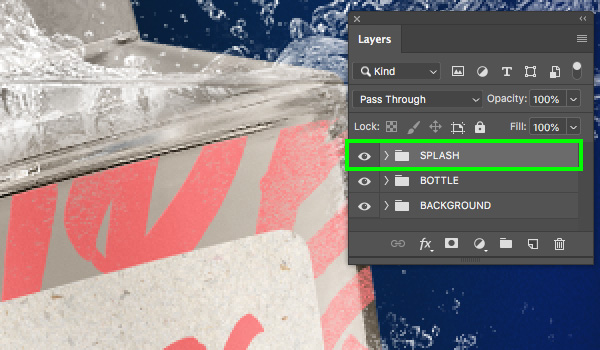
Once you are happy with the way that the splash and the bubbles are looking we want to select the very top layer, hold the Shift key, and then select the original splash image just above the ‘BOTTLE’ folder.
Press Command/Ctrl+G to put all of these selected layers into a new folder and double click the ‘Group 1’ text to rename the folder ‘SPLASH’ or something similar.
We have now completed our cosmetic packaging design and mockup! To create our design we have used a small variety of textures and resources from The Designer’s Textures and Patterns Collection including some beautiful paper textures from Greta Ivy, a light leak texture from Melanie Helena, a grunge texture from Pixel Sauce, two free typefaces, a free stock photo, and a gorgeous cosmetic packaging mockup from the Design Cuts Marketplace to tie it all together.
Remember that whether it’s your outcome for this tutorial or something new you’ve made, we’d love to see your designs on our Facebook page.
Please leave a comment if you have any questions or suggestions. We always look forward to hearing from you!
There’s still time to check out The Designer’s Textures and Patterns Collection at an incredible 99% off!






Great tutorial! It is very interesting and helpful to see something new from the colleague. Many Thanks!
Thanks so much for the lovely feedback Valentina- we are so pleased you are liking this one :)
Thank you for your Great Help! This tutorial was exactly what I need! :)
Hey Despina,
Thanks so much for your lovely comment. That is wonderful to hear and we are so pleased we have been able to help! We would love to see your finished tutorial if you were keen to share :)
Woohoo that’s so awesome to hear Despina and I hope that you find all of the new tips and tricks that you have picked up in this tutorial super useful for all of your own creative projects :).
Great tutorial. It’s fun to learn something new. Thank you!
We’re so happy to hear that you really enjoy learning new things in our tutorials Anita and we’re so excited to share all of our new tutorials to come!
Very cool. would love to give it a try myself when I find some time. Thanks a lot!
It’s great to hear that you find this tutorial really cool Robertino!
If you do find time to take this one for a spin, we would love to see the end result :)
I love these tutorials – they’re succinct and help to refine skills and techniques much better than a longer, structured course which often have to assume basic knowledge and can be a little repetitive for more experienced hands. Thanks for making them available.
Thanks so much for taking the time to write such an awesome comment Derek- you’ve really blown us away with your kind words!
We’re so happy to hear that you feel that our tutorials are really helpful for refining your skills, and are feeling so excited to share all of our tutorials to come with you :)